Redis 缓存 + Spring 的集成示例(转载)
1. 依赖包安装
pom.xml 加入:
<groupId>org.springframework.data</groupId>
<artifactId>spring-data-redis</artifactId>
<version>1.6.0.RELEASE</version>
</dependency>
<dependency>
<groupId>redis.clients</groupId>
<artifactId>jedis</artifactId>
<version>2.7.3</version>
</dependency>
xxxxxxxxxx
<dependency>
<groupId>org.springframework.data</groupId>
<artifactId>spring-data-redis</artifactId>
<version>1.6.0.RELEASE</version>
</dependency>
<dependency>
<groupId>redis.clients</groupId>
<artifactId>jedis</artifactId>
<version>2.7.3</version>
</dependency>
2. Spring 项目集成进缓存支持
要启用缓存支持,我们需要创建一个新的 CacheManager bean。CacheManager 接口有很多实现,本文演示的是和 Redis 的集成,自然就是用 RedisCacheManager 了。Redis 不是应用的共享内存,它只是一个内存服务器,就像 MySql 似的,我们需要将应用连接到它并使用某种“语言”进行交互,因此我们还需要一个连接工厂以及一个 Spring 和 Redis 对话要用的 RedisTemplate,这些都是 Redis 缓存所必需的配置,把它们都放在自定义的 CachingConfigurerSupport 中:
import org.springframework.cache.CacheManager;
import org.springframework.cache.annotation.CachingConfigurerSupport;
import org.springframework.cache.annotation.EnableCaching;
import org.springframework.context.annotation.Bean;
import org.springframework.context.annotation.Configuration;
import org.springframework.data.redis.cache.RedisCacheManager;
import org.springframework.data.redis.connection.RedisConnectionFactory;
import org.springframework.data.redis.connection.jedis.JedisConnectionFactory;
import org.springframework.data.redis.core.RedisTemplate;
@Configuration
@EnableCaching
public class RedisCacheConfig extends CachingConfigurerSupport {
@Bean
public JedisConnectionFactory redisConnectionFactory() {
JedisConnectionFactory redisConnectionFactory = new JedisConnectionFactory();
redisConnectionFactory.setHostName("192.168.1.166");
redisConnectionFactory.setPort(6379);
return redisConnectionFactory;
}
@Bean
public RedisTemplate<String, String> redisTemplate(RedisConnectionFactory cf) {
RedisTemplate<String, String> redisTemplate = new RedisTemplate<String, String>();
redisTemplate.setConnectionFactory(cf);
return redisTemplate;
}
@Bean
public CacheManager cacheManager(RedisTemplate redisTemplate) {
RedisCacheManager cacheManager = new RedisCacheManager(redisTemplate);
cacheManager.setDefaultExpiration(3000);
return cacheManager;
}
}
xxxxxxxxxx
package com.defonds.bdp.cache.redis;
import org.springframework.cache.CacheManager;
import org.springframework.cache.annotation.CachingConfigurerSupport;
import org.springframework.cache.annotation.EnableCaching;
import org.springframework.context.annotation.Bean;
import org.springframework.context.annotation.Configuration;
import org.springframework.data.redis.cache.RedisCacheManager;
import org.springframework.data.redis.connection.RedisConnectionFactory;
import org.springframework.data.redis.connection.jedis.JedisConnectionFactory;
import org.springframework.data.redis.core.RedisTemplate;
@Configuration
@EnableCaching
public class RedisCacheConfig extends CachingConfigurerSupport {
@Bean
public JedisConnectionFactory redisConnectionFactory() {
JedisConnectionFactory redisConnectionFactory = new JedisConnectionFactory();
redisConnectionFactory.setHostName("192.168.1.166");
redisConnectionFactory.setPort(6379);
return redisConnectionFactory;
}
@Bean
public RedisTemplate<String, String> redisTemplate(RedisConnectionFactory cf) {
RedisTemplate<String, String> redisTemplate = new RedisTemplate<String, String>();
redisTemplate.setConnectionFactory(cf);
return redisTemplate;
}
@Bean
public CacheManager cacheManager(RedisTemplate redisTemplate) {
RedisCacheManager cacheManager = new RedisCacheManager(redisTemplate);
cacheManager.setDefaultExpiration(3000);
return cacheManager;
}
}
当然也别忘了把这些 bean 注入 Spring,不然配置无效。在 applicationContext.xml 中加入以下
xxxxxxxxxx
<context:component-scan base-package="com.defonds.bdp.cache.redis" />
3. 缓存某些方法的执行结果并缓存数据一致性保证
设置好缓存配置之后我们就可以使用 @Cacheable 注解来缓存方法执行的结果了,比如根据省份名检索城市的 provinceCities 方法和根据 city_code 检索城市的 searchCity 方法:
@Cacheable("provinceCities")
public List<City> provinceCities(String province) {
logger.debug("province=" + province);
return this.cityMapper.provinceCities(province);
}
// R
@Cacheable("searchCity")
public City searchCity(String city_code){
logger.debug("city_code=" + city_code);
return this.cityMapper.searchCity(city_code);
}
@CacheEvict(value = { "provinceCities"}, allEntries = true)
public void insertCity(String city_code, String city_jb,
String province_code, String city_name,
String city, String province) {
City cityBean = new City();
cityBean.setCityCode(city_code);
cityBean.setCityJb(city_jb);
cityBean.setProvinceCode(province_code);
cityBean.setCityName(city_name);
cityBean.setCity(city);
cityBean.setProvince(province);
this.cityMapper.insertCity(cityBean);
}
// U
@CacheEvict(value = { "provinceCities", "searchCity" }, allEntries = true)
public int renameCity(String city_code, String city_name) {
City city = new City();
city.setCityCode(city_code);
city.setCityName(city_name);
this.cityMapper.renameCity(city);
return 1;
}
// D
@CacheEvict(value = { "provinceCities", "searchCity" }, allEntries = true)
public int deleteCity(String city_code) {
this.cityMapper.deleteCity(city_code);
return 1;
}
xxxxxxxxxx
// R
@Cacheable("provinceCities")
public List<City> provinceCities(String province) {
logger.debug("province=" + province);
return this.cityMapper.provinceCities(province);
}
// R
@Cacheable("searchCity")
public City searchCity(String city_code){
logger.debug("city_code=" + city_code);
return this.cityMapper.searchCity(city_code);
}
@CacheEvict(value = { "provinceCities"}, allEntries = true)
public void insertCity(String city_code, String city_jb,
String province_code, String city_name,
String city, String province) {
City cityBean = new City();
cityBean.setCityCode(city_code);
cityBean.setCityJb(city_jb);
cityBean.setProvinceCode(province_code);
cityBean.setCityName(city_name);
cityBean.setCity(city);
cityBean.setProvince(province);
this.cityMapper.insertCity(cityBean);
}
// U
@CacheEvict(value = { "provinceCities", "searchCity" }, allEntries = true)
public int renameCity(String city_code, String city_name) {
City city = new City();
city.setCityCode(city_code);
city.setCityName(city_name);
this.cityMapper.renameCity(city);
return 1;
}
// D
@CacheEvict(value = { "provinceCities", "searchCity" }, allEntries = true)
public int deleteCity(String city_code) {
this.cityMapper.deleteCity(city_code);
return 1;
}
5. 自定义缓存数据 key 生成策略
对于使用 @Cacheable 注解的方法,每个缓存的 key 生成策略默认使用的是参数名+参数值,比如以下方法:
public User findByUsername(String username)
xxxxxxxxxx
@Cacheable("users")
public User findByUsername(String username)
这个方法的缓存将保存于 key 为 users~keys 的缓存下,对于 username 取值为 "赵德芳" 的缓存,key 为 "username-赵德芳"。一般情况下没啥问题,二般情况如方法 key 取值相等然后参数名也一样的时候就出问题了,如:
public Integer getLoginCountByUsername(String username)
xxxxxxxxxx
@Cacheable("users")
public Integer getLoginCountByUsername(String username)
这个方法的缓存也将保存于 key 为 users~keys 的缓存下。对于 username 取值为 "赵德芳" 的缓存,key 也为 "username-赵德芳",将另外一个方法的缓存覆盖掉。
解决办法是使用自定义缓存策略,对于同一业务(同一业务逻辑处理的方法,哪怕是集群/分布式系统),生成的 key 始终一致,对于不同业务则不一致:
public KeyGenerator customKeyGenerator() {
return new KeyGenerator() {
@Override
public Object generate(Object o, Method method, Object... objects) {
StringBuilder sb = new StringBuilder();
sb.append(o.getClass().getName());
sb.append(method.getName());
for (Object obj : objects) {
sb.append(obj.toString());
}
return sb.toString();
}
};
}
xxxxxxxxxx
@Bean
public KeyGenerator customKeyGenerator() {
return new KeyGenerator() {
@Override
public Object generate(Object o, Method method, Object... objects) {
StringBuilder sb = new StringBuilder();
sb.append(o.getClass().getName());
sb.append(method.getName());
for (Object obj : objects) {
sb.append(obj.toString());
}
return sb.toString();
}
};
}
这对于集群系统、分布式系统之间共享缓存很重要,真正实现了分布式缓存。
笔者建议:缓存方法的 @Cacheable 最好使用方法名,避免不同的方法的 @Cacheable 值一致,然后再配以以上缓存策略。
6. 缓存的验证
6.1 缓存的验证
为了确定每个缓存方法到底有没有走缓存,我们打开了 MyBatis 的 SQL 日志输出,并且为了演示清楚,我们还清空了测试用 Redis 数据库。
先来验证 provinceCities 方法缓存,Eclipse 启动 tomcat 加载项目完毕,使用 JMeter 调用 /bdp/city/province/cities.json 接口: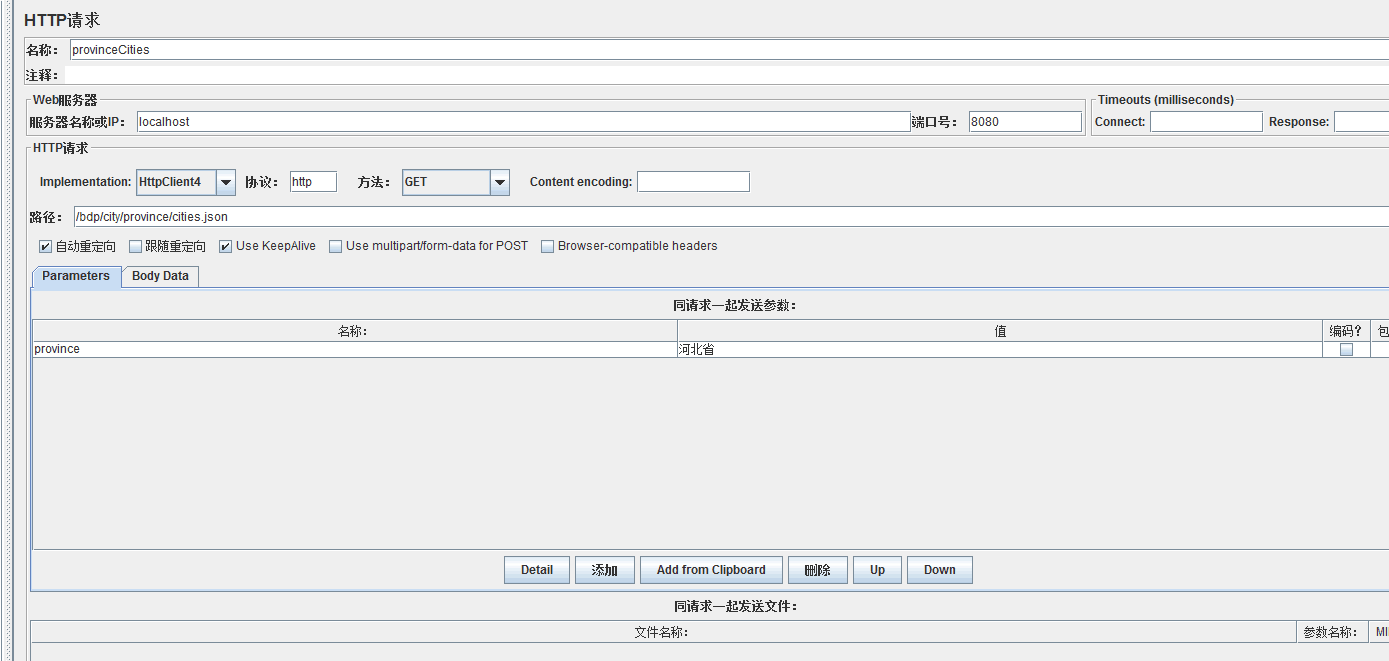
Eclipse 控制台输出如下:
说明这一次请求没有命中缓存,走的是 db 查询。JMeter 再次请求,Eclipse 控制台输出:
标红部分以下是这一次请求的 log,没有访问 db 的 log,缓存命中。查看本次请求的 Redis 存储情况:
同样可以验证 city_code 为 1492 的 searchCity 方法的缓存是否有效:
图中标红部分是 searchCity 的缓存存储情况。
6.2 缓存一致性的验证
先来验证 insertCity 方法的缓存配置,JMeter 调用 /bdp/city/create.json 接口: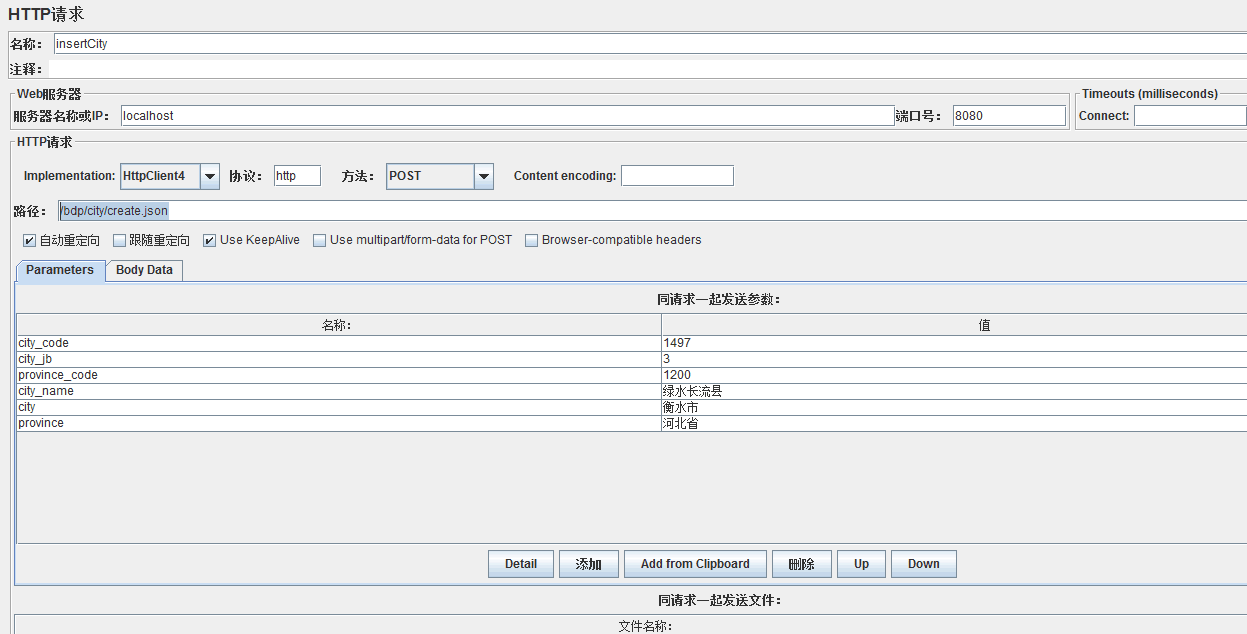
之后看 Redis 存储:
可以看出 provinceCities 方法的缓存已被清理掉,insertCity 方法的缓存奏效。
然后验证 renameCity 方法的缓存配置,JMeter 调用 /bdp/city/rename.json 接口: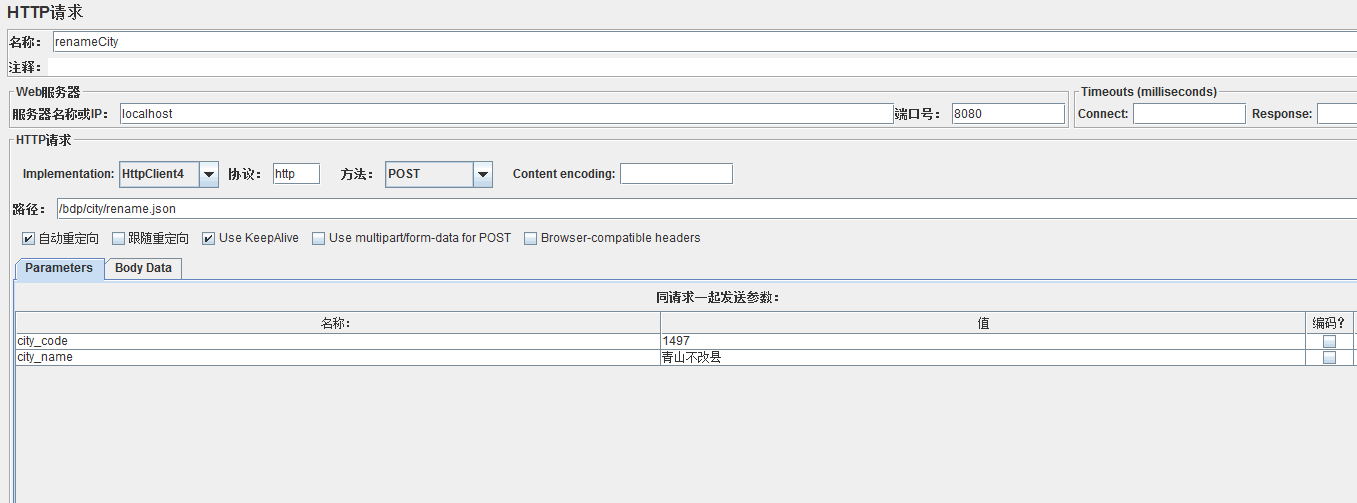
之后再看 Redis 存储:
searchCity 方法的缓存也已被清理,renameCity 方法的缓存也奏效。
7. 注意事项
- 要缓存的 Java 对象必须实现 Serializable 接口,因为 Spring 会将对象先序列化再存入 Redis,比如本文中的 com.defonds.bdp.city.bean.City 类,如果不实现 Serializable 的话将会遇到类似这种错误:nested exception is java.lang.IllegalArgumentException: DefaultSerializer requires a Serializable payload but received an object of type [com.defonds.bdp.city.bean.City]]。
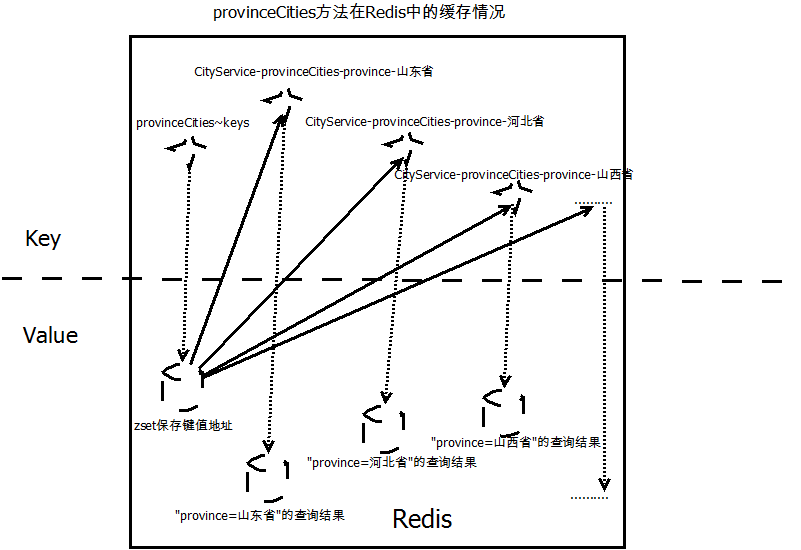
- 缓存的生命周期我们可以配置,然后托管 Spring CacheManager,不要试图通过 redis-cli 命令行去管理缓存。比如 provinceCities 方法的缓存,某个省份的查询结果会被以 key-value 的形式存放在 Redis,key 就是我们刚才自定义生成的 key,value 是序列化后的对象,这个 key 会被放在 key 名为 provinceCities~keys key-value 存储中,参考下图"provinceCities 方法在 Redis 中的缓存情况"。可以通过 redis-cli 使用 del 命令将 provinceCities~keys 删除,但每个省份的缓存却不会被清除。
- CacheManager 必须设置缓存过期时间,否则缓存对象将永不过期,这样做的原因如上,避免一些野数据“永久保存”。此外,设置缓存过期时间也有助于资源利用最大化,因为缓存里保留的永远是热点数据。
- 缓存适用于读多写少的场合,查询时缓存命中率很低、写操作很频繁等场景不适宜用缓存。
Redis 缓存 + Spring 的集成示例(转载)的更多相关文章
- Redis 缓存 + Spring 的集成示例(转)
<整合 spring 4(包括mvc.context.orm) + mybatis 3 示例>一文简要介绍了最新版本的 Spring MVC.IOC.MyBatis ORM 三者的整合以及 ...
- spring Cache /Redis 缓存 + Spring 的集成示例
spring Cache https://www.ibm.com/developerworks/cn/opensource/os-cn-spring-cache/ spring+redis 缓存 ht ...
- Redis 缓存 + Spring 的集成示例
参考网址:http://blog.csdn.net/defonds/article/details/48716161
- 【spring boot】【redis】spring boot 集成redis的发布订阅机制
一.简单介绍 1.redis的发布订阅功能,很简单. 消息发布者和消息订阅者互相不认得,也不关心对方有谁. 消息发布者,将消息发送给频道(channel). 然后是由 频道(channel)将消息发送 ...
- Redis缓存与springboot集成
注意点:
- redis 缓存
本篇博客只介绍 redis 作为缓存的的一些使用,以及在项目中如何把redis和spring如何集成. 1:redis的maven依赖,redis 依赖 spring-redis 依赖: < ...
- redis之spring应用
前言 读本文之前,需要大家对redis有所了解,大家可以去看一下我之前分享的redis安装及简单使用这一随笔,而本文我将跟大家分享学习一下redis与spring的集成.当然,首先需要打开我们的red ...
- redis缓存的安装和使用(转)
redis缓存的安装和使用 转载自:http://www.open-open.com/lib/view/open1384091914836.html Redis介绍 Redis本质上一个Key/ ...
- 如约而至,Java 10 正式发布! Spring+SpringMVC+MyBatis+easyUI整合进阶篇(十四)Redis缓存正确的使用姿势 努力的孩子运气不会太差,跌宕的人生定当更加精彩 优先队列详解(转载)
如约而至,Java 10 正式发布! 3 月 20 日,Oracle 宣布 Java 10 正式发布. 官方已提供下载:http://www.oracle.com/technetwork/java ...
随机推荐
- shell执行字符串中的命令
假如说你有以下代码: cmd='ls -l' 然后你想要执行将cmd的内容作为命令来执行该怎么操作呢? 答案: cmd='ls -l' ${cmd}
- 2. 感知机(Perceptron)基本形式和对偶形式实现
1. 感知机原理(Perceptron) 2. 感知机(Perceptron)基本形式和对偶形式实现 3. 支持向量机(SVM)拉格朗日对偶性(KKT) 4. 支持向量机(SVM)原理 5. 支持向量 ...
- [转]SpringMVC<from:form>表单标签和<input>表单标签简介
原文地址:https://blog.csdn.net/hp_yangpeng/article/details/51906654 在使用SpringMVC的时候我们可以使用Spring封装的一系列表单标 ...
- 【转】如何使用visual studio将你的程序打包成安装包
原文地址:https://www.cnblogs.com/SolarWings/p/6132310.html 很久很久以前,我一直有一个梦想,那就是做出一个自己的游戏,这个游戏很像模像样,除了拥有一个 ...
- STM32 ACM Linux 驱动添加
kernel 内驱动添加如下: x Symbol: USB_ACM [=y] x x Type : tristate x x Prompt: USB Modem (CDC ACM) support x ...
- Java多线程编程中Future模式的详解<转>
Java多线程编程中,常用的多线程设计模式包括:Future模式.Master-Worker模式.Guarded Suspeionsion模式.不变模式和生产者-消费者模式等.这篇文章主要讲述Futu ...
- filezilla server老提示connect server
地址设置成127.0.0.1即可 端口14147 密码为空(也可能是string未测试) 上次登录的默认路径:C:\Users\admin\AppData\Roaming\FileZilla Serv ...
- CDH版本java开发环境搭建
1. maven设置 除了阿里云库,还需要引入 cdh, spring库.需要修改maven下面的配置文件setting.xml, 参考下面设置. <mirror> <!--This ...
- 网页QQ弹出
<script language="javascript"> function cdyht(){ window.location.href='tencent://Mes ...
- 【oneday_onepage】—— 美国人的仪容整洁与个人卫生
There used to be an old joke in America that people should take a bath once a week, whether they nee ...