初始化centoS 相关
install aspnetcoremodule for iis
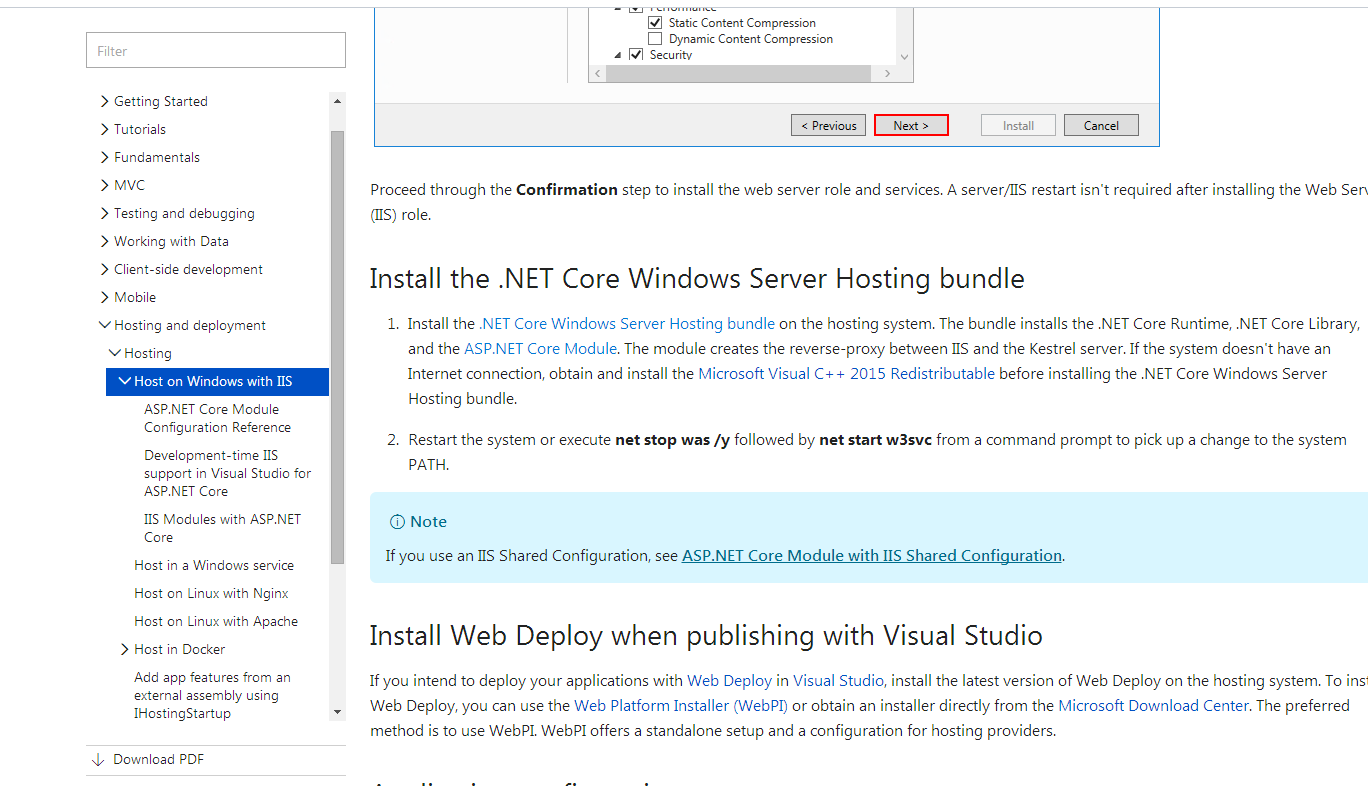
https://docs.microsoft.com/en-us/aspnet/core/publishing/iis?tabs=aspnetcore2x (the download url and the img explain )
1.用的是centerOs 最小版 网络配置需要改成桥接模式
2.ping baidu.com 是否能拼通过
3. 打开配置命令 cd /etc/sysconfig
4.Ls 列出所有配置列表 然后 找到其中的 network-scripts/
5.LS 列出 network-scripts/ 中的所有配置项
6. 用vi 命令 编辑 LS列表中的 ifcfg-ens33配置
7 然后更改 onboot 选项的no改为 yes ;按esc 退出编辑 按 :wq 保存配置
8.重启网卡 service network restart (clear 为清空屏幕命令)
9.获取该台虚拟机的ip 地址 ifconfig
10.如果没有则 安装 sudo yum install net-tools 后面将有一个选择 全部选择yes
11.安装 putty 方便连接centos 同时方便copy相关命令 ip 则为centos相关IP
centOS7下安装GUI图形界面
1、如何在centOS7下安装GUI图形界面
当你安装centOS7服务器版本的时候,系统默认是不会安装GUI的图形界面程序,这个需要手动安装CentOS7 Gnome GUI包。
2、在系统下使用命令安装gnome图形界面程序
在安装Gnome包之前,需要检查一下安装源(yum)是否正常,因为需要在yum命令来安装gnome包。
第一步:先检查yum 是否安装了,以及网络是否有网络。如果这两者都没有,先解决网络,在解决yum的安装。
(配置步骤可以查看我的博客文章-centOS-配置网络地址-的步骤来实现 )
第二步:在命令行下 输入下面的命令来安装Gnome包。
# yum groupinstall "GNOME Desktop" "Graphical Administration Tools"
第三步:更新系统的运行级别。
# ln -sf /lib/systemd/system/runlevel5.target /etc/systemd/system/default.target
第四步:重启机器。启动默认进入图形界面。
# reboot
2
1. 在centos上安装nginx
About Nginx
Nginx is a high performance web server software. It is a much more flexible and lightweight program than Apache HTTP Server.
This tutorial will teach you how to install and start Nginx on your CentOS 7 server.
Prerequisites
The steps in this tutorial require the user to have root privileges. You can see how to set that up by following steps 3 and 4 in the Initial Server Setup with CentOS 7 tutorial.
Step One—Add Nginx Repository
To add the CentOS 7 EPEL repository, open terminal and use the following command:
sudo yum install epel-release
Step Two—Install Nginx
Now that the Nginx repository is installed on your server, install Nginx using the following yum command:
sudo yum install nginx
After you answer yes to the prompt, Nginx will finish installing on your virtual private server (VPS).
Step Three—Start Nginx
Nginx does not start on its own. To get Nginx running, type:
sudo systemctl start nginx
If you are running a firewall, run the following commands to allow HTTP and HTTPS traffic:
sudo firewall-cmd --permanent --zone=public --add-service=http

sudo firewall-cmd --permanent --zone=public --add-service=https

sudo firewall-cmd --reload
You can do a spot check right away to verify that everything went as planned by visiting your server's public IP address in your web browser (see the note under the next heading to find out what your public IP address is if you do not have this information already):
http://server_domain_name_or_IP/
You will see the default CentOS 7 Nginx web page, which is there for informational and testing purposes. It should look something like this:
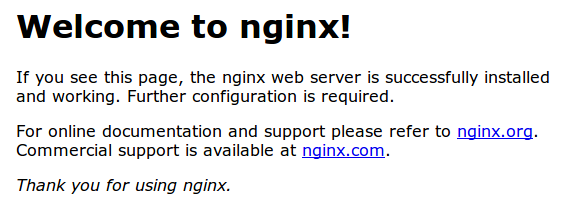
If you see this page, then your web server is now correctly installed.
Before continuing, you will probably want to enable Nginx to start when your system boots. To do so, enter the following command:
sudo systemctl enable nginx
Congratulations! Nginx is now installed and running!
How To Find Your Server's Public IP Address
To find your server's public IP address, find the network interfaces on your machine by typing:
ip addr
1. lo: <LOOPBACK,UP,LOWER_UP> mtu 65536 qdisc noqueue state UNKNOWN

. . .

2: eth0: <BROADCAST,MULTICAST,UP,LOWER_UP> mtu 1500 qdisc pfifo_fast state UP qlen 1000

. . .
You may see a number of interfaces here depending on the hardware available on your server. The lointerface is the local loopback interface, which is not the one we want. In our example above, the eth0interface is what we want.
Once you have the interface name, you can run the following command to reveal your server’s public IP address. Substitute the interface name you found above:
ip addr show eth0 | grep inet | awk '{ print $2; }' | sed 's/\/.*$//'
Server Root and Configuration
If you want to start serving your own pages or application through Nginx, you will want to know the locations of the Nginx configuration files and default server root directory.
Default Server Root
The default server root directory is /usr/share/nginx/html. Files that are placed in there will be served on your web server. This location is specified in the default server block configuration file that ships with Nginx, which is located at /etc/nginx/conf.d/default.conf.
Server Block Configuration
Any additional server blocks, known as Virtual Hosts in Apache, can be added by creating new configuration files in /etc/nginx/conf.d. Files that end with .conf in that directory will be loaded when Nginx is started.
Nginx Global Configuration
The main Nginx configuration file is located at /etc/nginx/nginx.conf. This is where you can change settings like the user that runs the Nginx daemon processes, and the number of worker processes that get spawned when Nginx is running, among other things.
--------------------------------------------------------------------------------------------------------------------------------------------------------
在centOs 上安装.net core 运行时
Linux Distribution
Add the dotnet product feed
To start installing .NET, you'll need to register the Microsoft signature key and add the Microsoft Product feed. This only needs to be done once per machine.
Open a command prompt and run the following commands:
sudo rpm --import https://packages.microsoft.com/keys/microsoft.asc

sudo sh -c 'echo -e "[packages-microsoft-com-prod]\nname=packages-microsoft-com-prod \nbaseurl= https://packages.microsoft.com/yumrepos/microsoft-rhel7.3-prod\nenabled=1\ngpgcheck=1\ngpgkey=https://packages.microsoft.com/keys/microsoft.asc" > /etc/yum.repos.d/dotnetdev.repo'
Install the .NET SDK
Update the products available for installation, install the components required by .NET, then install the .NET SDK.
In your command prompt, run the following commands:
sudo yum update

sudo yum install libunwind libicu

sudo yum install dotnet-sdk-2.0.2
----------------------------------------------- -----------------------------------------------------------------------
然后再centeros上就 就可以运行.net core的命令了 例如 (dotnet --help ,dotnet new webapi 然后run 最后单独开一条putty 然后用命令行 curl localhost:5000/webapi/values)
将 asp.net mvc 发不到centos 上
现在安装一个FPT工具 filezilla

备注 
初始化centoS 相关的更多相关文章
- bash-1 初始化CentOS系统的初始化脚本
初始化CentOS系统的初始化脚本 #!/bin/bash # #******************************************************************* ...
- CENTOS系统安装及初始化配置相关
一,配置网卡: 1,设置网卡ip地址:vi /etc/sysconfig/network-scripts/ifcfg-eth0 DEVICE=eth0TYPE=EthernetONBOOT=yes ...
- mysql数据库的初始化及相关配置
接着上篇文章我们继续探讨在安装完mysq数据库之后的一些相关配置: 一.mysql数据库的初始化 我们在安装完mysql数据库以后,会发现会多出一个mysqld的服务,这个就是咱们的数据库服务,我们通 ...
- centos 相关
运行locate httpd.conf,提示-bash: locate: command not found错误.则需要安装mlocate软件包: yum install mlocate 搜索,提示l ...
- Java中初始化的相关问题
目录 局部变量的初始化 成员变量的初始化 构造器初始化 静态数据的初始化 总结 已经快半个月没写博客了,这周在看 Thinking in Java 这本书,准备将书中的第五章和第七章的内容整合一下,写 ...
- CentOS相关引导文件杂摘
1,EFI文件
- CentOS 相关软件安装 与 Siege压测
1.登录linux机器 a.打开mac的钥匙串 b.ssl root@ip c.输入密码 常用命令: cat /proc/version 查看系统版本 cat /etc/issue control ...
- git初始化仓库相关
当我们需要新建一个git项目会遇到的问题 全局设置 git config --global user.name "名字" git config --global user.emai ...
- centos相关
查看虚拟机里的Centos7的IP:ip addr或者ifconfig ---https://blog.csdn.net/dancheren/article/details/73611878 Cen ...
随机推荐
- PHP安全相关的配置(2)
php用越来越多!安全问题更为重要!这里讲解如果安全配置php.ini 安全配置一 (1) 打开php的安全模式 php的安全模式是个非常重要的内嵌的安全机制,能够控制一些php中的函数,比如syst ...
- 设置新时间校正服务器NTP SERVER
时间校正服务器IP : 10.*.*.* 适用系统:windows server 2008/windows 7 net stop w32time net start w32time w32tm /qu ...
- Angular 4.0 安装组件
安装组件 ng g componet 组件名
- Microsoft Dynamics CRM 2011 Plugin中PluginExecutionContext.InputParameters["Target"]中的Target是从哪来的?
图 1 如图1,CRM编程是一个请求响应模型,任何操作都是通过一个Request发起,一个Response返回结果,这个模型简单实用.所有请求类都是继承OrganizationRequest,所有响应 ...
- python 正则表达式的使用
本文以例子的形势,介绍如何在python中使用正则表达式. Example1 #!/usr/bin/python import re import sys pattern = re.compile(r ...
- 【shell】awk命令
简介 awk是一个强大的文本分析工具,相对于grep的查找,sed的编辑,awk在其对数据分析并生成报告时,显得尤为强大.简单来说awk就是把文件逐行的读入,以空格为默认分隔符将每行切片,切开的部分再 ...
- 关于Jquery 插件开发,写的很清楚了。。。
转自:http://blog.jobbole.com/30550/ 本文由 伯乐在线 - 戴嘉华 翻译.未经许可,禁止转载!英文出处:Extraordinarythoughts.欢迎加入翻译小组. 如 ...
- ALGO-2_蓝桥杯_算法训练_最大最小公倍数
问题描述 已知一个正整数N,问从1~N中任选出三个数,他们的最小公倍数最大可以为多少. 输入格式 输入一个正整数N. 输出格式 输出一个整数,表示你找到的最小公倍数. 样例输入 样例输出 数据规模与约 ...
- 第4章 NumPy基础
NumPy是高性能科学计算和数据分析的基础包. 主要功能: 1.ndarray,一个具有矢量算术运算和复杂广播能力的快速且节省空间的多维数组. 2.用于对整组数据进行快速运算的标准数学函数(无需编写循 ...
- Bind2nd源码解析
例:transform(coll1.begin(), coll1.end(), back_inserter(coll2), bind2nd(multiplies<int>(), 10)); ...