
Android ListView的使用(二)
上一章使用ListView和ArrayAdapter 进行了最简单的操作。
本文来自文档来自:http://www.runoob.com/w3cnote/android-tutorial-adapter.html
这里继续来学习SimpleAdapter 的使用。
- BaseAdapter:抽象类,实际开发中我们会继承这个类并且重写相关方法,用得最多的一个Adapter!
- ArrayAdapter:支持泛型操作,最简单的一个Adapter,只能展现一行文字~
- SimpleAdapter:同样具有良好扩展性的一个Adapter,可以自定义多种效果!
- SimpleCursorAdapter:用于显示简单文本类型的listView,一般在数据库那里会用到,不过有点过时, 不推荐使用!
先上个效果图吧:有点类似QQ 里面 说说的 那种
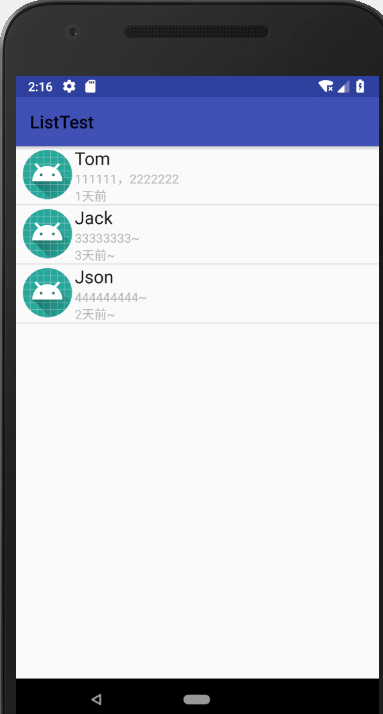
上代码
先创建一个页面activity_main.xml 里面需要有一个listview
<?xml version="1.0" encoding="utf-8"?>

<android.support.constraint.ConstraintLayout xmlns:android="http://schemas.android.com/apk/res/android"

    xmlns:app="http://schemas.android.com/apk/res-auto"

    xmlns:tools="http://schemas.android.com/tools"

    android:layout_width="match_parent"

    android:layout_height="match_parent"

    tools:context=".MainActivity">

    <ListView

        android:id="@+id/list_item"

        android:layout_width="match_parent"

        android:layout_height="match_parent" />

</android.support.constraint.ConstraintLayout>
第二步:创建一个用于listview显示的布局页面list_news.xml
<?xml version="1.0" encoding="utf-8"?>

<LinearLayout xmlns:android="http://schemas.android.com/apk/res/android"

    xmlns:tools="http://schemas.android.com/tools"

    android:layout_width="match_parent"

    android:layout_height="match_parent"

    xmlns:app="http://schemas.android.com/apk/res-auto">

    <!-- 定义一个用于显示头像的ImageView -->

    <ImageView

        android:id="@+id/imgtou"

        android:layout_width="64dp"

        android:layout_height="64dp"

        android:baselineAlignBottom="true"

        android:paddingLeft="8dp" />

    <!-- 定义一个竖直方向的LinearLayout,把QQ呢称与说说的文本框设置出来 -->

    <LinearLayout

        android:id="@+id/new_line"

        android:layout_width="match_parent"

        android:layout_height="wrap_content"

        android:orientation="vertical">

        <TextView

            android:id="@+id/name"

            android:layout_width="wrap_content"

            android:layout_height="wrap_content"

            android:paddingLeft="8px"

            android:textColor="#1D1D1C"

            android:textSize="20sp" />

        <TextView

            android:id="@+id/says"

            android:layout_width="wrap_content"

            android:layout_height="wrap_content"

            android:paddingLeft="8px"

            android:textColor="#B4B4B9"

            android:textSize="14sp" />

        <TextView

            android:id="@+id/time"

            android:layout_width="wrap_content"

            android:layout_height="wrap_content"

            android:paddingLeft="8px"

            android:textColor="#B4B4B9"

            android:textSize="14sp" />

    </LinearLayout>

</LinearLayout>
最后,上activity代码:
package action.sun.com.listtest;

import android.support.v7.app.AppCompatActivity;

import android.os.Bundle;

import android.widget.ListView;

import android.widget.SimpleAdapter;

import java.util.ArrayList;

import java.util.HashMap;

import java.util.List;

import java.util.Map;

public class MainActivity extends AppCompatActivity {

    private String[] names = new String[]{"Tom", "Jack", "Json"};

    private String[] says = new String[]{"111111,2222222", "33333333~", "444444444~"};

    private String[] times = new String[]{"1天前", "3天前~", "2天前~"};

    private int[] imgIds = new int[]{R.mipmap.ic_launcher, R.mipmap.ic_launcher, R.mipmap.ic_launcher};

    @Override

    protected void onCreate(Bundle savedInstanceState) {

        super.onCreate(savedInstanceState);

        setContentView(R.layout.activity_main);

        List<Map<String, Object>> listitem = new ArrayList<Map<String, Object>>();

        for (int i = 0; i < names.length; i++) {

            Map<String, Object> showitem = new HashMap<String, Object>();

            showitem.put("touxiang", imgIds[i]);

            showitem.put("name", names[i]);

            showitem.put("says", says[i]);

            showitem.put("time", times[i]);

            listitem.add(showitem);

        }

        //创建一个simpleAdapter

        SimpleAdapter myAdapter = new SimpleAdapter(getApplicationContext(), listitem,

                R.layout.list_news, new String[]{"touxiang", "name", "says","time"},

                new int[]{R.id.imgtou, R.id.name, R.id.says, R.id.time});

        ListView listView = (ListView) findViewById(R.id.list_item);

        listView.setAdapter(myAdapter);

    }

}
这样,运行,效果就能够实现了,这个很简单就能够实现了。
Android ListView的使用(二)的更多相关文章
- Android ListView 之 SimpleAdapter 二 (包含 item 中按钮监听)
1 MainActivity.java package com.myadapter; import java.util.ArrayList; import java.util.HashMap; ...
- 【腾讯Bugly干货分享】Android ListView与RecyclerView对比浅析--缓存机制
本文来自于腾讯bugly开发者社区,非经作者同意,请勿转载,原文地址:http://dev.qq.com/topic/5811d3e3ab10c62013697408 作者:黄宁源 一,背景 Recy ...
- Android listview addHeaderView 和 addFooterView 详解
addHeaderView()方法:主要是向listView的头部添加布局addFooterView()方法:主要是向listView的底部添加布局 需要注意的是添加布局的时候应该添加从父容器开始添加 ...
- Android Contextual Menus之二:contextual action mode
Android Contextual Menus之二:contextual action mode 接上文:Android Contextual Menus之一:floating context me ...
- GitHub上不错的Android开源项目(二)
收集相关系列资料,自己用作参考,练习和实践.小伙伴们,总有一天,你也能写出 Niubility 的 Android App :-) 系列文章如下: GitHub上不错的Android开源项目(一):h ...
- Android高手进阶教程(二十八)之---Android ViewPager控件的使用(基于ViewPager的横向相册)!!!
分类: Android高手进阶 Android基础教程 2012-09-14 18:10 29759人阅读 评论(35) 收藏 举报 android相册layoutobjectclassloade ...
- 【转】带checkbox的ListView实现(二)——自定义Checkable控件的实现方法
原文网址:http://blog.csdn.net/harvic880925/article/details/40475367 前言:前一篇文章给大家展示了传统的Listview的写法,但有的时候我们 ...
- Android学习路线(二十四)ActionBar Fragment运用最佳实践
转载请注明出处:http://blog.csdn.net/sweetvvck/article/details/38645297 通过前面的几篇博客.大家看到了Google是怎样解释action bar ...
- Android图表库MPAndroidChart(二)——线形图的方方面面,看完你会回来感谢我的
Android图表库MPAndroidChart(二)--线形图的方方面面,看完你会回来感谢我的 在学习本课程之前我建议先把我之前的博客看完,这样对整体的流程有一个大致的了解 Android图表库MP ...
- Android ListView中Item点击事件失效解决方案
欢迎关注公众号,每天推送Android技术文章,二维码如下:(可扫描) 在平常的开发过程中,我们的ListView可能不只是简单的显示下文本或者按钮,更多的是显示复杂的布局,这样的话,我们就得自己写布 ...
随机推荐
- android安卓系统上运行jar文件
原文链接: http://blog.sina.com.cn/s/blog_658c8cea0101mdhp.html 步骤如下: 1. 将文件打包成可执行jar文件(可在eclipse里export) ...
- ajaxupload.js调用始终进入error回调
现象:脚本调用成功,文件上传也成功,但是始终进入error的回调函数. 1. ajaxfileupload.js jQuery.extend({ handleError: function( s, x ...
- [转]Spring mvc interceptor配置拦截器,没有登录跳到登录页
<?xml version="1.0" encoding="UTF-8"?> <beans xmlns="http://www.s ...
- 6个P2P流媒体开源项目介绍
P2P流媒体开源项目介绍 1. PeerCast 2002年成立,最早的开源P2P流媒体项目.PeerCast把节点按树结构组织起来, 每个频道都是一个树, 直播源是根节点,父节点只给子节点提供数据 ...
- php分享二十四:数组
1:isset() 对于数组中为 NULL 的值不会返回 TRUE,而 array_key_exists() 会. 2:利用array_filter和strlen快速过滤数组中等于0的值 $path ...
- Spring Security教程(四):自定义登录页
在前面的例子中,登陆页面都是用的Spring Security自己提供的,这明显不符合实际开发场景,同时也没有退出和注销按钮,因此在每次测试的时候都要通过关闭浏览器来注销达到清除session的效果. ...
- struts2(六) 文件上传和下载
前面对文件下载提过一点点,这里正好要讲文件上传,就放在一起在说一遍. --WH 一.单文件上传 在没学struts2之前,我们要写文件上传,非常麻烦,需要手动一步步去获取表单中的各种属性,然后在进行相 ...
- ios开发中的一些小技巧
1.如果在程序中想对某张图片进行处理的话(得到某张图片的一部分)可一用以下代码: UIImage *image = [UIImage imageNamed:filename]; CGImageRe ...
- 【Unity】10.2 通用动画的导入和设置
分类:Unity.C#.VS2015 创建日期:2016-05-02 一.简介 使用类人动画时,Mecanim 的强大之处最明显.但是,尽管没有 Avatar 系统和其他功能,非类人动画也仍然受Mec ...
- MyEclipse中设置jsp页面为默认utf-8编码
转自:http://www.cnblogs.com/xdp-gacl/p/3496161.html 在MyEclispe中创建Jsp页面,Jsp页面的默认编码是“ISO-8859-1”,如下图所示: ...