Android 多语言动态更新方案探索
本文首发于 vivo互联网技术 微信公众号
链接: https://mp.weixin.qq.com/s/jG8rAjQ8QAOmViiQ33SuEg
作者:陈龙
最近做的项目需要支持几十种语言,很多小语种在不认识的人看来跟乱码一样,,翻译一般是由翻译gongsi翻译的,翻译完成后再导入到项目里面,这就容易存在一些问题。
一、问题一:翻译容易出错
翻译的流程是客户端开发编写中文文案---翻译成英文----外包翻译根据英文字符串翻译小语种,在这个流程中,有些多义词和一些涉及语境的词就很容易翻译错误。
二、问题二:错误无法及时发现
前面说了,翻译gongsi提供回来的字符串我们都看不懂,错了也不知道,几乎都是上线之后,用户反馈过来,我们才知道。
因此小语种的翻译bug一直是项目里面比较多的一类bug,于是就需要探索一种可以用于动态更新翻译字符串的方案。
三、设计思路
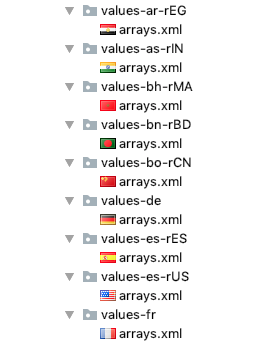
在Android中,多语言字符串都是以各种不同文件夹下的xml保存的,每种文件夹中的限定符表示一种语言,这个一般Android的开发人员都是了解的。
如下图所示
String文件作为Resource的一种,在使用时不管是layout中使用还是在java代码中使用其实都是调用Resource的各种方法。
那么其实翻译语言的动态更新实际上是Resource资源的替换更新。
在早些年的开发经验中,我们都知道有一种Android换主题的方案来给应用进行资源替换,简单来讲方案流程如下:
使用addAssertPath方法加载sd卡中的apk包,构建AsserManager实例。
AsserManager构建PlugResource实例。
使用装饰者模式编写ProxyResource,在各个获取资源的方法中优先获取PlugResource,获取不到再从备份的AppResource中获取。
替换Application和Activity中的Resource对象为ProxyResource。
继承LayoutInflater.Factory,拦截layout生成过程,并将资源获取指向ProxyResource,完成layout初始化。
既然有可参考的方案,那就可以直接开工了。
事实上在后续的开发过程中遇到很多细节问题,但万事开头难,我们可以先从第一步开始做起。
四、开发
流程一:从独立的plugapk包中取出PlugResources资源
AssetManager mLoadedAssetManager = AssetManager.class.newInstance();

Reflector.with(mLoadedAssetManager).method("addAssetPath", String.class).call(textResPath);

Resources textResPackResources = new Resources(mLoadedAssetManager, appResources.getDisplayMetrics(), appResources.getConfiguration());
流程二:构建自己的TextResResources 实现getText等方法 将getText方法代理到PlugResources的getText
public class TextRepairProxyResourcess extends Resources {

    private static final String TAG = "TextRepairProxyResourcess";

    private Resources mResPackResources;

    private Resources mAppResources;

    private String mResPackPkgName;

    public TextRepairProxyResourcess(AssetManager assets, DisplayMetrics metrics, Configuration config) {

        super(assets, metrics, config);

    }

    public void prepare(Resources plugResources, Resources appResources, String pkgName) {

        mResPackResources = plugResources;

        mAppResources = appResources;

        mResPackPkgName = pkgName;

    }

    private void printLog(String tag, CharSequence messgae) {

        if (BuildConfig.DEBUG) {

            VLog.d(tag, messgae + "");

        }

    }

    @NonNull

    @Override

    public CharSequence getText(int resId) throws NotFoundException {

        if (!checkNull()) {

            return super.getText(resId);

        } else if (!checkTextRepairOn()) {

            return mAppResources.getText(resId);

        } else {

            CharSequence charSequence;

            try {

                int plugId = getIdentifier(resId);

                if (plugId == 0) {

                    charSequence = mAppResources.getText(resId);

                    printLog(TAG, "getText res from app ---" + charSequence);

                } else {

                    charSequence = mResPackResources.getText(plugId);

                    printLog(TAG, "getText res from plug ---" + charSequence);

                }

            } catch (Throwable e) {

                charSequence = mAppResources.getText(resId);

                if (BuildConfig.DEBUG) {

                    e.printStackTrace();

                }

            }

            return charSequence;

        }

    }

    @NonNull

    @Override

    public CharSequence[] getTextArray(int resId) throws NotFoundException {

        .............

    }

    @NonNull

    @Override

    public String[] getStringArray(int resId) throws NotFoundException {

        .............

    }

    @NonNull

    @Override

    public String getString(int resId) throws NotFoundException {

        .............

    }

    @NonNull

    @Override

    public CharSequence getQuantityText(int resId, int quantity) throws NotFoundException {

        .............

    }

    @NonNull

    @Override

    public String getQuantityString(int resId, int quantity, Object... formatArgs) throws NotFoundException {

        .............

    }

    public int getIdentifier(int resId) {

        if (!checkNull()) {

            return 0;

        } else {

            // 有些情况就是很特殊 比如webView的34800147资源 使用mAppResources.getResourceEntryName会抛出

            // notfound 异常 但是使用getString 却又可以拿到这个资源的字符串

            try {

                String resName = mAppResources.getResourceEntryName(resId);

                String resType = mAppResources.getResourceTypeName(resId);

                int plugId = mResPackResources.getIdentifier(resName, resType, mResPackPkgName);

                return plugId;

            } catch (Throwable e) {

                return 0;

            }

        }

    }

    /**

     * 有些方法是在super的构造方法里面调用的 需要判空处理

     *

     * @return

     */

    private boolean checkNull() {

        if (mAppResources != null && mResPackResources != null) {

            return true;

        } else {

            return false;

        }

    }

    /**

     * 有些方法是在super的构造方法里面调用的 需要判空处理

     *

     * @return

     */

    private boolean checkTextRepairOn() {

        return TextRepairConfig.getInstance().isTextRepairOnThisSystem();

    }

}
流程三:Application启动的时候将Application的mResources对象Hook掉并设置TextResResources对象
Reflector.with(appContext).field("mResources").set(textRepairProxyResourcess);
流程四:Activity启动的时候将Activity的mResources对象Hook掉并设置TextResResources对象
Reflector.with(activityContext).field("mResources").set(textRepairProxyResourcess);
流程五:注册ActivtyLifecycleCallbacks 在onActivityCreated中对activity的LayoutInfater实现自己的Factory,在Factory中对text的Attribute的属性进行拦截并重新setText
public class TextRepairFactory implements LayoutInflater.Factory2 {

    private static final HashMap<String, Constructor<? extends View>> mConstructorMap = new HashMap<>();

    /**

     * 系统调用的是两个参数的构造方法,我们也调用这个构造方法

     */

    private static final Class<?>[] mConstructorSignature = new Class[] { Context.class, AttributeSet.class };

    /**

     * 一般 Android 系统的 View 都存储在这几个包下面

     */

    private final String[] a = new String[] { "android.widget.", "android.view.", "android.webkit." };

    // 属性处理类

    TextRepairAttribute mTextRepairAttribute;

    public TextRepairFactory() {

        mTextRepairAttribute = new TextRepairAttribute();

    }

    @Override

    public View onCreateView(View parent, String name, Context context, AttributeSet attrs) {

        /*

         * 我们模仿源码那样来创建 View

         */

        View view = createViewFormTag(name, context, attrs);

        /*

         * 这里如果 View 返回的是 null 的话,就是自定义控件,

         * 自定义控件不需要我们进行拼接,可以直接拿到全类名

         */

        if (view == null) {

            view = createView(name, context, attrs);

        }

        if (view != null) {

            mTextRepairAttribute.load(view, attrs);

        }

        return view;

    }

    @Override

    public View onCreateView(String name, Context context, AttributeSet attrs) {

        return null;

    }

    private View createView(String name, Context context, AttributeSet attrs) {

        Constructor<? extends View> constructor = findConstructor(context, name);

        try {

            return constructor.newInstance(context, attrs);

        } catch (Throwable e) {

        }

        return null;

    }

    private Constructor<? extends View> findConstructor(Context context, String name) {

        Constructor<? extends View> constructor = mConstructorMap.get(name);

        if (null == constructor) {

            try {

                // 通过反射来获取 View 实例对象

                Class<? extends View> clazz = context.getClassLoader().loadClass(name).asSubclass(View.class);

                constructor = clazz.getConstructor(mConstructorSignature);

                // 缓存View的class对象

                mConstructorMap.put(name, constructor);

            } catch (Throwable e) {

            }

        }

        return constructor;

    }

    private View createViewFormTag(String name, Context context, AttributeSet attrs) {

        // 包含自定义控件

        if (-1 != name.indexOf('.')) {

            return null;

        }

        View view = null;

        for (int i = 0; i < a.length; i++) {

            view = createView(a[i] + name, context, attrs);

            if (view != null) {

                break;

            }

        }

        return view;

    }

}
public class TextRepairActivityLifecycle implements Application.ActivityLifecycleCallbacks {

    @Override

    public void onActivityCreated(Activity activity, Bundle savedInstanceState) {

            LayoutInflater layoutInflater = LayoutInflater.from(activity);

            TextRepairFactory textRepairFactory = new TextRepairFactory();

            LayoutInflaterCompat.setFactory2(layoutInflater, textRepairFactory);

    }

}
但是真的就就这么简单吗?
上述几段代码就已经构成了资源替换的雏形,基本上完成了一个基础的资源替换流程。
再后续的调试点检过程种,我发现这才刚刚开始入坑。
五、探索
探索一:api 限制调用
demo一跑起来就发现log中打印诸多告警信息。
因为是使用反射的方法将Resource替换,因此也触发了Google的Api限制调用机制,于是研究了一下Api的限制调用。
结论:
系统签名应用暂时没有限制,因为demo使用的是调试签名,换用系统签名之后,告警消失。
探索二:性能测试
使用sd卡中的plugapk包生成PlugResources,主要是在生成assetManager过程,该过程耗时10-15ms,对于页面启动来说,这个时间还是太长了,于是尝试将AssetManager缓存起来,缩短了时间。
在反射替换resource完成后,调用PlugResources的getText方法,要先从本地Resources中根据Id获取原资源的name和type,然后在使用name和type调用getIndentifier获取PlugResources中的resId,这个过程耗时较长,虽然也是纳秒级别的,但其耗时比不hook场景下高一个数据级。
然而幸运的是,在页面流畅性性能测试中,并没有发现流畅性有所下降,页面启动速度也没有明显的下降。
探索三:系统版本兼容
真正的大坑来了。
解决完之前的问题之后,开始进入monkey测试,在测试中发现7.0以上的机器,只要在webView界面长按内容弹出复制粘贴对话框,就会崩溃从日志里面可以看出来是找不到webView的资源导致的,如果我try住这个崩溃,原资源位置显示的字符串就会变成类似@1232432这种id标签。
google搜索了半天,发现相关资料甚少,看来是需要从源码层面了解webView资源加载的相关逻辑才行。
看源码,总是需要带着问题去看,目标才够清晰。
问题:为什么6.0的系统可以使用这套方案而且不会有webView的问题而7.0以上的系统却会崩溃,6.0和7.0以上的资源管理有什么具体的区别。
想要得到答案 ,就得阅读6.0和7.0以上的Resource源码,先从6.0的源码看起。
1、6.0资源管理源码解析
Context初始化
private ContextImpl(ContextImpl container, ActivityThread mainThread,

           LoadedApk packageInfo, IBinder activityToken, UserHandle user, boolean restricted,

           Display display, Configuration overrideConfiguration, int createDisplayWithId) {

       mOuterContext = this;

       mMainThread = mainThread;

       mActivityToken = activityToken;

       mRestricted = restricted;

       。。。。。。。。。。

       Resources resources = packageInfo.getResources(mainThread);

       if (resources != null) {

           if (displayId != Display.DEFAULT_DISPLAY

                   || overrideConfiguration != null

                   || (compatInfo != null && compatInfo.applicationScale

                           != resources.getCompatibilityInfo().applicationScale)) {

               resources = mResourcesManager.getTopLevelResources(packageInfo.getResDir(),

                       packageInfo.getSplitResDirs(), packageInfo.getOverlayDirs(),

                       packageInfo.getApplicationInfo().sharedLibraryFiles, displayId,

                       overrideConfiguration, compatInfo);

           }

       }

       mResources = resources;

       。。。。。。。。。。。

   }
在Context创建之初,Resource就已经创建完成。
这里有两个地方涉及到了Resource创建
resources =packageInfo.getResources(mainThread);
resources =mResourcesManager.getTopLevelResources(packageInfo.getResDir(),
先从packageInfo.getResources(mainThread); 说起packageInfo 其实就是LoadedApk
packageInfo 的 getResources 方法
public Resources getResources(ActivityThread mainThread) {

if (mResources == null) {

mResources = mainThread.getTopLevelResources(mResDir, mSplitResDirs, mOverlayDirs,

mApplicationInfo.sharedLibraryFiles, Display.DEFAULT_DISPLAY, null, this);

}

return mResources;

}
再看ActivityThread
ActivityThread 的 getTopLevelResources 方法
Resources getTopLevelResources(String resDir, String[] splitResDirs, String[] overlayDirs,

String[] libDirs, int displayId, Configuration overrideConfiguration,

LoadedApk pkgInfo) {

return mResourcesManager.getTopLevelResources(resDir, splitResDirs, overlayDirs, libDirs,

displayId, overrideConfiguration, pkgInfo.getCompatibilityInfo());
其实调用的都是mResourcesManager.getTopLevelResources
Android M 的ResourcesManager写的比较简单
其内部有一个Resource缓存
getTopLevelResource 方法会使用传入的参数 组装一个key
ResourcesKey key = new ResourcesKey(resDir, displayId, overrideConfigCopy, scale);
使用这个key去缓存里面找,找到了就拿出来用。
WeakReference<Resources> wr = mActiveResources.get(key);
找不到就新创建一个assets 来生成一个Resource实例
AssetManager assets = new AssetManager();

if (resDir != null) {

if (assets.addAssetPath(resDir) == 0) {

return null;

}

}

if (splitResDirs != null) {

for (String splitResDir : splitResDirs) {

if (assets.addAssetPath(splitResDir) == 0) {

return null;

}

}

}

if (overlayDirs != null) {

for (String idmapPath : overlayDirs) {

assets.addOverlayPath(idmapPath);

}

}

if (libDirs != null) {

for (String libDir : libDirs) {

if (libDir.endsWith(".apk")) {

// Avoid opening files we know do not have resources,

// like code-only .jar files.

if (assets.addAssetPath(libDir) == 0) {

Log.w(TAG, "Asset path '" + libDir +

"' does not exist or contains no resources.");

}

}

}

}
缓存的另一个作用就是configuration变化的时候 可以从缓存里面找到所有当前正在激活状态的Resource。
并且调用这些Resource的public void updateConfiguration(Configuration config,DisplayMetrics metrics, CompatibilityInfo compat) {方法,最终生效的是对Resource中的mAssets的configuration
再来看一下Resource.java
其核心包含两个部分
1:封装Assets,讲所有资源调用最终都是调用到mAssets的方法
public CharSequence getText(@StringRes int id) throws NotFoundException {

CharSequence res = mAssets.getResourceText(id);

if (res != null) {

return res;

}

throw new NotFoundException("String resource ID #0x" + Integer.toHexString(id));

}
2:提供缓存
private static final LongSparseArray<ConstantState>[] sPreloadedDrawables;

private static final LongSparseArray<ConstantState> sPreloadedColorDrawables = new LongSparseArray<>();

private static final LongSparseArray<android.content.res.ConstantState<ColorStateList>> sPreloadedColorStateLists = new LongSparseArray<>();

private final DrawableCache mDrawableCache = new DrawableCache(this);

private final DrawableCache mColorDrawableCache = new DrawableCache(this);

private final ConfigurationBoundResourceCache<ColorStateList> mColorStateListCache = new ConfigurationBoundResourceCache<>(this);

private final ConfigurationBoundResourceCache<Animator> mAnimatorCache = new ConfigurationBoundResourceCache<>(this);

private final ConfigurationBoundResourceCache<StateListAnimator> mStateListAnimatorCache = new ConfigurationBoundResourceCache<>(this);

将从mAsserts中取出的大资源进行缓存,避免读取耗时和内存占用
看完6.0的源码我们再找一份9.0的代码来看下,9.0的资源管理基本上与7.0一脉相承,因此我们直接使用了9.0的源码来进行分析。
相比于Android6.0 ,9.0源码中Resources中不在维护AssertManager 而是将AssertManager与其他的一些缓存 封装成了一个ResourcesImpl。
public class Resources {

    static final String TAG = "Resources";

    static Resources mSystem = null;

    private ResourcesImpl mResourcesImpl;

    private TypedValue mTmpValue = new TypedValue();

    final ClassLoader mClassLoader;
public class ResourcesImpl {

    private static final LongSparseArray<Drawable.ConstantState>[] sPreloadedDrawables;

    private static final LongSparseArray<Drawable.ConstantState> sPreloadedColorDrawables = new LongSparseArray<>();

    private static final LongSparseArray<android.content.res.ConstantState<ComplexColor>> sPreloadedComplexColors = new LongSparseArray<>();

    // These are protected by mAccessLock.

    private final Configuration mTmpConfig = new Configuration();

    private final DrawableCache mDrawableCache = new DrawableCache();

    private final DrawableCache mColorDrawableCache = new DrawableCache();

    private final ConfigurationBoundResourceCache<ComplexColor> mComplexColorCache = new ConfigurationBoundResourceCache<>();

    private final ConfigurationBoundResourceCache<Animator> mAnimatorCache = new ConfigurationBoundResourceCache<>();

    private final ConfigurationBoundResourceCache<StateListAnimator> mStateListAnimatorCache = new ConfigurationBoundResourceCache<>();

    final AssetManager mAssets;

    private final DisplayMetrics mMetrics = new DisplayMetrics();

    private final DisplayAdjustments mDisplayAdjustments;

    private PluralRules mPluralRule;

    private final Configuration mConfiguration = new Configuration();

}
ResourcesImpl 承担着老版本里面Resources的职责, 包装AssertManager 和 维护数据缓存。
而Resources的代码也变的更加简单,其方法调用最终都是交给了ResourcesImpl来实现。
不变的是Resources的管理还是要交给ResourcesManager来管理的,跟Android6.0一样ResourcesManager是一个单例模式。
那么9.0的ResourcesManager与6.0的ResourcesManager有和不同?
还是从应用启动开始看起,还是熟悉的ContextImpl。
2、9.0资源管理源码解析
static ContextImpl createAppContext(ActivityThread mainThread, LoadedApk packageInfo) {

    if (packageInfo == null) throw new IllegalArgumentException("packageInfo");

    ContextImpl context = new ContextImpl(null, mainThread, packageInfo, null, null, null, 0, null);

    context.setResources(packageInfo.getResources());

    return context;

}
static ContextImpl createActivityContext(ActivityThread mainThread, LoadedApk packageInfo, ActivityInfo activityInfo, IBinder activityToken, int displayId, Configuration overrideConfiguration) {

     。。。。。。。。

     ContextImpl context = new ContextImpl(null, mainThread, packageInfo, activityInfo.splitName, activityToken, null, 0, classLoader);

     final ResourcesManager resourcesManager = ResourcesManager.getInstance();

     context.setResources(resourcesManager.createBaseActivityResources(activityToken, packageInfo.getResDir(), splitDirs, packageInfo.getOverlayDirs(), packageInfo.getApplicationInfo().sharedLibraryFiles, displayId, overrideConfiguration, compatInfo, classLoader));

     context.mDisplay = resourcesManager.getAdjustedDisplay(displayId, context.getResources());

     return context;

 }
无论是生成Application的Resource还是生成Activity的Resource最终调用的是ResourceManager中的方法区别。在于一个调用的是
ResourcesManager.getInstance().getResources ,另一个调用的是resourcesManager.createBaseActivityResources。
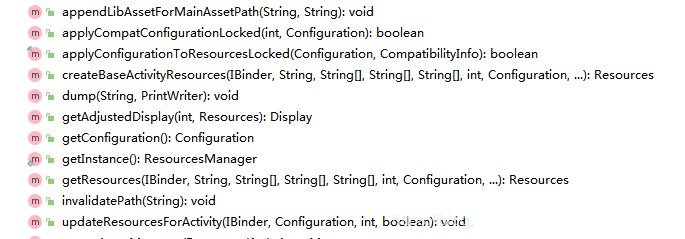
OK 我们看一下ResourcesManager的源码。
先看下它提供的各种属性,我们挑重要的放上来。
 /**

     * ResourceImpls及其配置的映射。这些都是占用较大内存的数据

     * 应该尽可能重用。所有的由ResourcesManager生成的ResourcesImpl都会被缓存在这个map中

     */

    private final ArrayMap<ResourcesKey, WeakReference<ResourcesImpl>> mResourceImpls = new ArrayMap<>();

    /**

     *可以重用的资源引用列表。注意一下 这个list里面存储的并不是Activity的Resources缓存,按照我的理解,所有非Activcity的Resource都会被缓存在此处,比如Application的Resource

     */

    private final ArrayList<WeakReference<Resources>> mResourceReferences = new ArrayList<>();

    /**

     * 每个Activity都有一个基本覆盖配置,该配置应用于每个Resources对象,而这些对象又可以指定自己的覆盖配置。

        这个缓存里面保存的都是Actrivity的Resource的缓存,ActivityResources是一个对象,里面包含了一个Activity所拥有的Configuration和所有可能拥有过的Resources,比如一个Activity,在某些情况下他的ResourcesImpl发生了变化,那么这个时候就ActivityResources就可能会持有多个Resource引用

     */

    private final WeakHashMap<IBinder, ActivityResources> mActivityResourceReferences = new WeakHashMap<>();

    /**

     * 缓存的ApkAssets,这个可以先不看

     */

    private final LruCache<ApkKey, ApkAssets> mLoadedApkAssets = new LruCache<>(3);

    /**

     * 这也是ApkAssets的一个缓存 这个也可以先不看

     */

    private final ArrayMap<ApkKey, WeakReference<ApkAssets>> mCachedApkAssets = new ArrayMap<>();

    private static class ApkKey {

        public final String path;

        public final boolean sharedLib;

        public final boolean overlay;

    }

    /**

     * 与Activity关联的资源和基本配置覆盖。

     */

    private static class ActivityResources {

        public final Configuration overrideConfig = new Configuration();

//按照常规的理解 一个Activity只有一个Resources 但是这里却使用了一个list来存储,这是考虑如果Activity发生变化,重新生成了Resource,这个列表就会将Activity历史使用过的Resources都存在里面,当然,如果没有人再持有这些Resources,就会被回收

        public final ArrayList<WeakReference<Resources>> activityResources = new ArrayList<>();

    }
了解了这些重要的属性之后,我们再来看一下ResourceManager提供的诸多方法。
ResourceManager提供了如下以写public方法供调用。
先看getResources和createBaseActivityResources 最终都是使用一个ResourcesKey去调用getOrCreateResources。
Resources getResources(@Nullable IBinder activityToken, @Nullable String resDir, @Nullable String[] splitResDirs, @Nullable String[] overlayDirs, @Nullable String[] libDirs, int displayId, @Nullable Configuration overrideConfig, @NonNull CompatibilityInfo compatInfo, @Nullable ClassLoader classLoader) {

     try {

         final ResourcesKey key = new ResourcesKey(resDir, splitResDirs, overlayDirs, libDirs, displayId, overrideConfig != null ? new Configuration(overrideConfig) : null,compatInfo);

         classLoader = classLoader != null ? classLoader : ClassLoader.getSystemClassLoader();

         return getOrCreateResources(activityToken, key, classLoader);

     } finally {

     }

 }
Resources createBaseActivityResources(@NonNull IBinder activityToken, @Nullable String resDir, @Nullable String[] splitResDirs, @Nullable String[] overlayDirs, @Nullable String[] libDirs, int displayId, @Nullable Configuration overrideConfig, @NonNull CompatibilityInfo compatInfo, @Nullable ClassLoader classLoader) {

    try {

        final ResourcesKey key = new ResourcesKey(resDir, splitResDirs, overlayDirs, libDirs, displayId, overrideConfig != null ? new Configuration(overrideConfig) : null, compatInfo);

        classLoader = classLoader != null ? classLoader : ClassLoader.getSystemClassLoader();

        synchronized (this) {

            // 强制创建ActivityResources对象并放到缓存里面

            getOrCreateActivityResourcesStructLocked(activityToken);

        }

        // 更新任何现有的Activity Resources引用。

        updateResourcesForActivity(activityToken, overrideConfig, displayId, false /* movedToDifferentDisplay */);

        // 现在请求一个实际的Resources对象。

        return getOrCreateResources(activityToken, key, classLoader);

    } finally {

    }

}
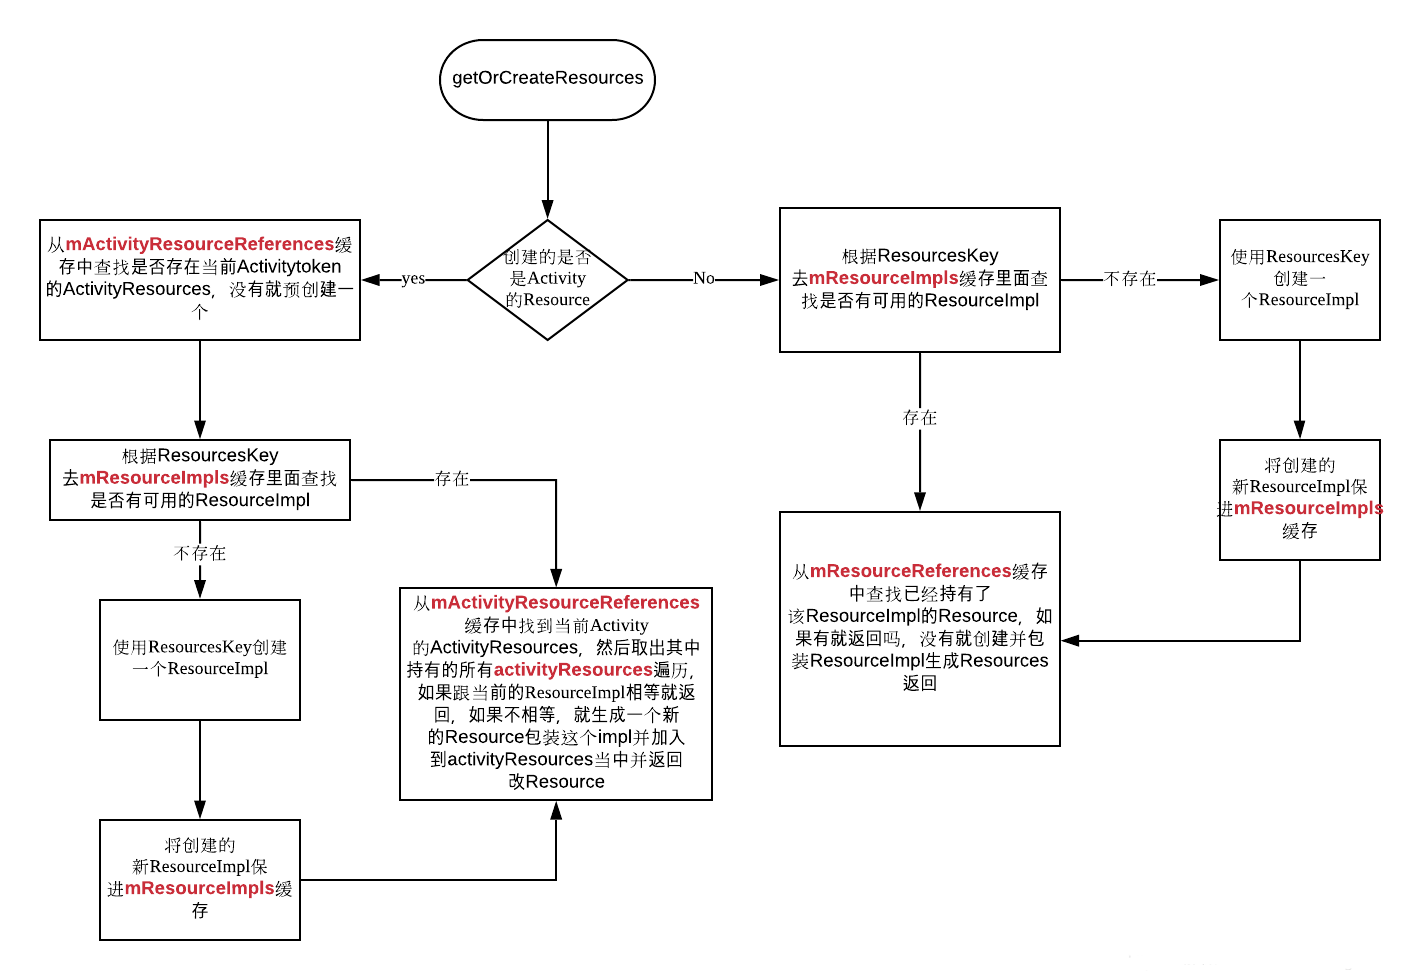
getOrCreateResources 我在各行代码处都写了注释,大家注意看代码中的注释,部分注释是对代码中引文注释的翻译。
private @Nullable

Resources getOrCreateResources(@Nullable IBinder activityToken, @NonNull ResourcesKey key, @NonNull ClassLoader classLoader) {

    synchronized (this) {

        if (activityToken != null) {

            final ActivityResources activityResources = getOrCreateActivityResourcesStructLocked(activityToken);

            // 清理已经被回收的缓存

            ArrayUtils.unstableRemoveIf(activityResources.activityResources, sEmptyReferencePredicate);

            // Rebase the key's override config on top of the Activity's base override.

            if (key.hasOverrideConfiguration() && !activityResources.overrideConfig.equals(Configuration.EMPTY)) {

                final Configuration temp = new Configuration(activityResources.overrideConfig);

                temp.updateFrom(key.mOverrideConfiguration);

                key.mOverrideConfiguration.setTo(temp);

            }

            //根据对应的key 去获取一个ResourcesImpl 有可能是新的也有可能是缓存里面的

            ResourcesImpl resourcesImpl = findResourcesImplForKeyLocked(key);

            if (resourcesImpl != null) {

                //使用ResourcesImpl 去生成一个Resources

                return getOrCreateResourcesForActivityLocked(activityToken, classLoader, resourcesImpl, key.mCompatInfo);

            }

            // We will create the ResourcesImpl object outside of holding this lock.

        } else {

            // 清理 因为mResourceReferences里面放的都是弱引用,要判断这些弱引用是否都已经被释放,如果释放的话就要从Array里面移除掉

            ArrayUtils.unstableRemoveIf(mResourceReferences, sEmptyReferencePredicate);

            // 不依赖于Activity,找到具有正确ResourcesImpl的共享资源 这里就是根据key去mResourceImpls的缓存里面找

            ResourcesImpl resourcesImpl = findResourcesImplForKeyLocked(key);

            if (resourcesImpl != null) {

                //如果找到resourcesImpl的话就去从mResourceReferences看有没有可用的resources 如果类加载器和ResourcesImpl相同,则获取现有的Resources对象,否则会创建一个新的Resources对象。

                return getOrCreateResourcesLocked(classLoader, resourcesImpl, key.mCompatInfo);

            }

            // 我们将在持有此锁之外创建ResourcesImpl对象。

        }

        // 如果我们走到了这里,我们找不到合适的ResourcesImpl来使用,所以现在创建一个。

        ResourcesImpl resourcesImpl = createResourcesImpl(key);

        if (resourcesImpl == null) {

            return null;

        }

        // 将此ResourcesImpl添加到缓存中。

        mResourceImpls.put(key, new WeakReference<>(resourcesImpl));

        final Resources resources;

        if (activityToken != null) {

            //从mActivityResourceReferences 里面去找 看有没有合适的Resources可用 如果没有就构建一个Resources兵添加到mActivityResourceReferences里面

            resources = getOrCreateResourcesForActivityLocked(activityToken, classLoader, resourcesImpl, key.mCompatInfo);

        } else {

            //使用创建出来的ResourcesImpl去匹配一个Resource,具体是从缓存mResourceReferences里面取(如果有的话)还是创建新的由下面的方法决定

            resources = getOrCreateResourcesLocked(classLoader, resourcesImpl, key.mCompatInfo);

        }

        return resources;

    }

}
画个流程图看下

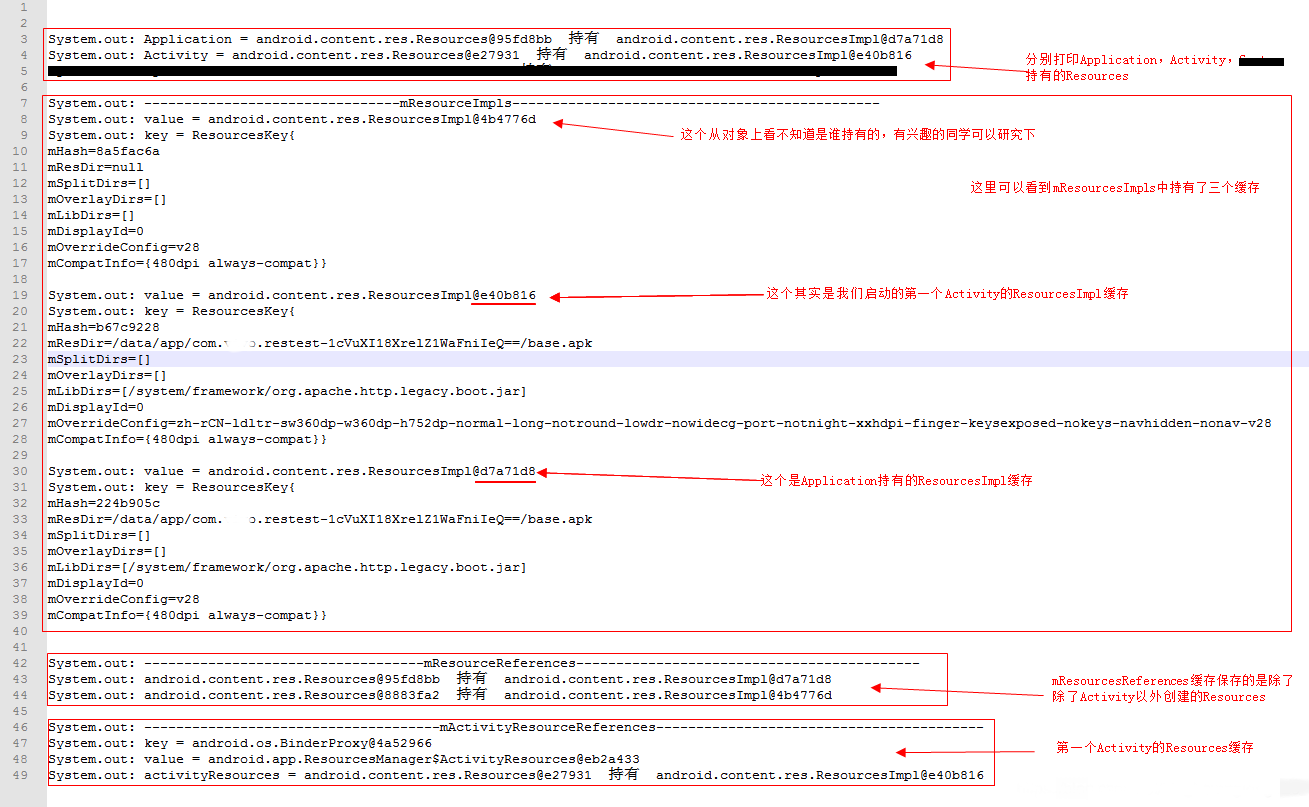
看完这个图基本上大体的逻辑就通我们使用如下的代码 hook 系统ResourcesManger的几个缓存 看一下当一个App启动并且打开一个Activity时,这些缓存里面都包含了哪些对象。
try {

    System.out.println("Application = " + getApplicationContext().getResources() + "  持有  " + Reflector.with(getApplicationContext().getResources()).method("getImpl").call());

    System.out.println("Activity = " + getResources() + "  持有  " + Reflector.with(getResources()).method("getImpl").call());

    System.out.println("System = " + Resources.getSystem() + "  持有  " + Reflector.with(Resources.getSystem()).method("getImpl").call());

    ResourcesManager resourcesManager = ResourcesManager.getInstance();

    System.out.println("--------------------------------mResourceImpls----------------------------------------------");

    ArrayMap<ResourcesKey, WeakReference<ResourcesImpl>> mResourceImpls = Reflector.with(resourcesManager).field("mResourceImpls").get();

    Iterator<ResourcesKey> resourcesKeyIterator = mResourceImpls.keySet().iterator();

    while (resourcesKeyIterator.hasNext()) {

        ResourcesKey key = resourcesKeyIterator.next();

        WeakReference<ResourcesImpl> value = mResourceImpls.get(key);

        System.out.println("key = " + key);

        System.out.println("value = " + value.get());

    }

    System.out.println("-----------------------------------mResourceReferences-------------------------------------------");

    ArrayList<WeakReference<Resources>> mResourceReferences = Reflector.with(resourcesManager).field("mResourceReferences").get();

    for (WeakReference<Resources> weakReference : mResourceReferences) {

        Resources resources = weakReference.get();

        if (resources != null) {

            System.out.println(resources + "  持有  " + Reflector.with(resources).method("getImpl").call());

        }

    }

    System.out.println("-------------------------------------mActivityResourceReferences-----------------------------------------");

    WeakHashMap<IBinder, Object> mActivityResourceReferences = Reflector.with(resourcesManager).field("mActivityResourceReferences").get();

    Iterator<IBinder> iBinderIterator = mActivityResourceReferences.keySet().iterator();

    while (iBinderIterator.hasNext()) {

        IBinder key = iBinderIterator.next();

        Object value = mActivityResourceReferences.get(key);

        System.out.println("key = " + key);

        System.out.println("value = " + value);

        Object overrideConfig = Reflector.with(value).field("overrideConfig").get();

        System.out.println("overrideConfig = " + overrideConfig);

        Object activityResources = Reflector.with(value).field("activityResources").get();

        try {

            ArrayList<WeakReference<Resources>> list = (ArrayList<WeakReference<Resources>>) activityResources;

            for (WeakReference<Resources> weakReference : list) {

                Resources resources = weakReference.get();

                System.out.println("activityResources = " + resources + "  持有  " + Reflector.with(resources).method("getImpl").call());

            }

        } catch (Reflector.ReflectedException e) {

            e.printStackTrace();

        }

    }

} catch (Exception e) {

    e.printStackTrace();

}
打印出来的结果如下图:

分析完两个不同api level的资源管理源码,我们再来分析一下两个不同apiLevel在加载完成一个webView组件之后Resource的区别。
先说以下6.0的 。
根据6.0 ResourceManager的代码 我们先做一个测试:
编写如下代码 我们将mActiveResources中保存的内容打印出来。
3、6.0 web资源注入分析
ResourcesManager resourcesManager = ResourcesManager.getInstance();

//6.0打印

try {

    ArrayMap<Object, WeakReference<Object>> map = Reflector.with(resourcesManager).field("mActiveResources").get();

    for (int i = 0; i < map.size(); i++) {

        Object a = map.keyAt(i);

        Object b = map.valueAt(i).get();

        System.out.println(Reflector.with(a).field("mResDir").get());

        System.out.println(b.toString());

    }

} catch (Exception e) {

    e.printStackTrace();

}
打印输出
10-12 15:47:02.816 10785-10785/com.xxxx.res_manager_study I/System.out: /data/app/com.xxxx.res_manager_study-1/base.apk

10-12 15:47:02.816 10785-10785/com.xxxx.res_manager_study I/System.out: android.content.res.Resources@f911117
可以看到当前包的Resources已经被加入到mActiveResources中了。
再修改代码:
在打印之前添加webView初始化 WebView webView = new WebView(context);
打印输出:
10-12 15:48:48.586 10985-10985/com.xxxx.res_manager_study I/System.out: /data/app/com.google.android.webview-1/base.apk

10-12 15:48:48.586 10985-10985/com.xxxx.res_manager_study I/System.out: android.content.res.Resources@9bc9c4

10-12 15:48:48.586 10985-10985/com.xxxx.res_manager_study I/System.out: /data/app/com.xxxx.res_manager_study-2/base.apk

10-12 15:48:48.586 10985-10985/com.xxxx.res_manager_study I/System.out: android.content.res.Resources@b66d0ad
可以看到添加了webView初始化代码之后 mActiveResources中增加了一个Resources实例,该实例指向webView组件安装路径。
WebView就是从这个Resources取到了自己所需要的资源。这也是7.0以下版本中替换Activity和Application的Resources不会出现Web组件崩溃的原因,因为在这个level的系统中,web组件资源与主apk资源是分离的。
OK 分析完6.0的再看9.0的。
9.0的ResourceManager相对复杂,我们也是使用反射的方法将两种情况下的ResourceManager数据打印出来。
编写打印代码。
4、9.0 web资源注入分析
System.out.println(" 打印 mResourceImpls 中缓存的 ResourceImpl");

ResourcesManager resourcesManager = ResourcesManager.getInstance();

// 9.0源码

try {

    ArrayMap map = Reflector.with(resourcesManager).field("mResourceImpls").get();

    for (int i = 0; i < map.size(); i++) {

        Object key = map.keyAt(i);

        WeakReference value = (WeakReference) map.get(key);

        System.out.println(value.get() + "  " + key);

    }

} catch (Reflector.ReflectedException e) {

    e.printStackTrace();

}

System.out.println(" 打印 mActivityResourceReferences 中缓存的 Activity Resources");

try {

    WeakHashMap<Object, Object> map = Reflector.with(resourcesManager).field("mActivityResourceReferences").get();

    for (Map.Entry<Object, Object> entry : map.entrySet()) {

        Object activityResources = entry.getValue();

        ArrayList<WeakReference<Resources>> list = Reflector.with(activityResources).field("activityResources").get();

        for (WeakReference<Resources> weakReference : list) {

            Resources resources = weakReference.get();

            Object resourcesImpl = Reflector.with(resources).field("mResourcesImpl").get();

            System.out.println(resourcesImpl);

        }

    }

} catch (Exception e) {

    e.printStackTrace();

}
打印输出在这份打印代码中 我们输出了mResourceImpls和mActivityResourceReferences中的数据 不理解这两个缓存作用的可以去看之前的文章。
I/System.out:  打印 mResourceImpls 中缓存的 ResourceImpl

I/System.out: android.content.res.ResourcesImpl@c0c1962  ResourcesKey{ mHash=8a5fac6a mResDir=null mSplitDirs=[] mOverlayDirs=[] mLibDirs=[] mDisplayId=0 mOverrideConfig=v28 mCompatInfo={480dpi always-compat}}

I/System.out: android.content.res.ResourcesImpl@4aedaf3  ResourcesKey{ mHash=bafccb1 mResDir=/data/app/com.xxxx.res_manager_study-_k1QRBE8jUyrPTVnJDIbsA==/base.apk mSplitDirs=[] mOverlayDirs=[] mLibDirs=[/system/framework/org.apache.http.legacy.boot.jar] mDisplayId=0 mOverrideConfig=v28 mCompatInfo={480dpi always-compat}}

I/System.out: android.content.res.ResourcesImpl@1b73b0  ResourcesKey{ mHash=30333beb mResDir=/data/app/com.xxxx.res_manager_study-_k1QRBE8jUyrPTVnJDIbsA==/base.apk mSplitDirs=[] mOverlayDirs=[] mLibDirs=[/system/framework/org.apache.http.legacy.boot.jar] mDisplayId=0 mOverrideConfig=en-rUS-ldltr-sw360dp-w360dp-h752dp-normal-long-notround-lowdr-nowidecg-port-notnight-xxhdpi-finger-keysexposed-nokeys-navhidden-nonav-v28 mCompatInfo={480dpi always-compat}}

I/System.out:  打印 mActivityResourceReferences 中缓存的 Activity Resources

I/System.out: android.content.res.ResourcesImpl@1b73b0
根据 mActivityResourceReferences中AcitvityResource 我们找到对应的ResourcesImpl并且根据ResourceKey得知了ResourcesImpl中的内容。
mResDir=/data/app/com.xxxx.res_manager_study-_k1QRBE8jUyrPTVnJDIbsA==/base.apk

mSplitDirs=[]

mOverlayDirs=[]

mLibDirs=[/system/framework/org.apache.http.legacy.boot.jar]

mDisplayId=0

mOverrideConfig=en-rUS-ldltr-sw360dp-w360dp-h752dp-normal-long-notround-lowdr-nowidecg-port-notnight-xxhdpi-finger-keysexposed-nokeys-navhidden-nonav-v28 mCompatInfo={480dpi always-compat}}
打印输出下面我们在打印代码之前添加初始化webView的源码 WebView webView = new WebView(context);
I/System.out:  打印 mResourceImpls 中缓存的 ResourceImpl

I/System.out: android.content.res.ResourcesImpl@cbc1adc  ResourcesKey{ mHash=8a5fac6a mResDir=null mSplitDirs=[] mOverlayDirs=[] mLibDirs=[] mDisplayId=0 mOverrideConfig=v28 mCompatInfo={480dpi always-compat}}

I/System.out: android.content.res.ResourcesImpl@aa8a10  ResourcesKey{ mHash=25ddf2aa mResDir=/data/app/com.xxxx.res_manager_study-sVY46cDW2JT2hEkohn2GJw==/base.apk mSplitDirs=[] mOverlayDirs=[] mLibDirs=[/system/framework/org.apache.http.legacy.boot.jar,/data/app/com.android.chrome-dO2jAeCdfgkLjVHzK2yx0Q==/base.apk] mDisplayId=0 mOverrideConfig=v28 mCompatInfo={480dpi always-compat}}

I/System.out: android.content.res.ResourcesImpl@e6ea7e5  ResourcesKey{ mHash=4114b0be mResDir=/data/app/com.android.chrome-dO2jAeCdfgkLjVHzK2yx0Q==/base.apk mSplitDirs=[/data/app/com.android.chrome-dO2jAeCdfgkLjVHzK2yx0Q==/split_autofill_assistant.apk,/data/app/com.android.chrome-dO2jAeCdfgkLjVHzK2yx0Q==/split_autofill_assistant.config.en.apk,/data/app/com.android.chrome-dO2jAeCdfgkLjVHzK2yx0Q==/split_autofill_assistant.config.in.apk,/data/app/com.android.chrome-dO2jAeCdfgkLjVHzK2yx0Q==/split_autofill_assistant.config.ms.apk,/data/app/com.android.chrome-dO2jAeCdfgkLjVHzK2yx0Q==/split_autofill_assistant.config.zh.apk,/data/app/com.android.chrome-dO2jAeCdfgkLjVHzK2yx0Q==/split_config.en.apk,/data/app/com.android.chrome-dO2jAeCdfgkLjVHzK2yx0Q==/split_config.in.apk,/data/app/com.android.chrome-dO2jAeCdfgkLjVHzK2yx0Q==/split_config.ms.apk,/data/app/com.android.chrome-dO2jAeCdfgkLjVHzK2yx0Q==/split_config.zh.apk] mOverlayDirs=[] mLibDirs=[] mDisplayId=0 mOverrideConfig=v28 mCompatInfo={480dpi always-compat}}

I/System.out: android.content.res.ResourcesImpl@70dd909  ResourcesKey{ mHash=4a6161e4 mResDir=/data/app/com.xxxx.res_manager_study-sVY46cDW2JT2hEkohn2GJw==/base.apk mSplitDirs=[] mOverlayDirs=[] mLibDirs=[/system/framework/org.apache.http.legacy.boot.jar,/data/app/com.android.chrome-dO2jAeCdfgkLjVHzK2yx0Q==/base.apk] mDisplayId=0 mOverrideConfig=en-rUS-ldltr-sw360dp-w360dp-h752dp-normal-long-notround-lowdr-nowidecg-port-notnight-xxhdpi-finger-keysexposed-nokeys-navhidden-nonav-v28 mCompatInfo={480dpi always-compat}}

I/System.out: android.content.res.ResourcesImpl@81669ae  ResourcesKey{ mHash=578cb784 mResDir=/data/app/com.xxxx.res_manager_study-sVY46cDW2JT2hEkohn2GJw==/base.apk mSplitDirs=[] mOverlayDirs=[] mLibDirs=[/system/framework/org.apache.http.legacy.boot.jar] mDisplayId=0 mOverrideConfig=v28 mCompatInfo={480dpi always-compat}}

I/System.out: android.content.res.ResourcesImpl@52334f  ResourcesKey{ mHash=7c1026be mResDir=/data/app/com.xxxx.res_manager_study-sVY46cDW2JT2hEkohn2GJw==/base.apk mSplitDirs=[] mOverlayDirs=[] mLibDirs=[/system/framework/org.apache.http.legacy.boot.jar] mDisplayId=0 mOverrideConfig=en-rUS-ldltr-sw360dp-w360dp-h752dp-normal-long-notround-lowdr-nowidecg-port-notnight-xxhdpi-finger-keysexposed-nokeys-navhidden-nonav-v28 mCompatInfo={480dpi always-compat}}

I/System.out:  打印 mActivityResourceReferences 中缓存的 Activity Resources

I/System.out: android.content.res.ResourcesImpl@70dd909
同样 根据 mActivityResourceReferences中AcitvityResource 我们找到对应的ResourcesImpl并且根据ResourceKey得知了ResourcesImpl中的内容。
对比没有添加webview 实例化之前的代码 我们发现mLibDirs中新增了/data/app/com.android.chrome-dO2jAeCdfgkLjVHzK2yx0Q==/base.apk
结论:9.0源码中 android将Web组件资源作为libDir添加至Assert中,用于资源查找,没有使用Resource分离的方式。
了解了这个原因之后 我们进一步寻找libDir添加web组件资源的地方。
webView在初始化阶段 会调用WebViewDelegate的addWebViewAssetPath方法。
public void addWebViewAssetPath(Context context) {

    final String newAssetPath = WebViewFactory.getLoadedPackageInfo().applicationInfo.sourceDir;

    final ApplicationInfo appInfo = context.getApplicationInfo();

    final String[] libs = appInfo.sharedLibraryFiles;

    if (!ArrayUtils.contains(libs, newAssetPath)) {

        // Build the new library asset path list.

        final int newLibAssetsCount = 1 + (libs != null ? libs.length : 0);

        final String[] newLibAssets = new String[newLibAssetsCount];

        if (libs != null) {

            System.arraycopy(libs, 0, newLibAssets, 0, libs.length);

        }

        newLibAssets[newLibAssetsCount - 1] = newAssetPath;

        // Update the ApplicationInfo object with the new list.

        // We know this will persist and future Resources created via ResourcesManager

        // will include the shared library because this ApplicationInfo comes from the

        // underlying LoadedApk in ContextImpl, which does not change during the life of the

        // application.

        appInfo.sharedLibraryFiles = newLibAssets;

        // Update existing Resources with the WebView library.

        ResourcesManager.getInstance().appendLibAssetForMainAssetPath(

                appInfo.getBaseResourcePath(), newAssetPath);

    }

}
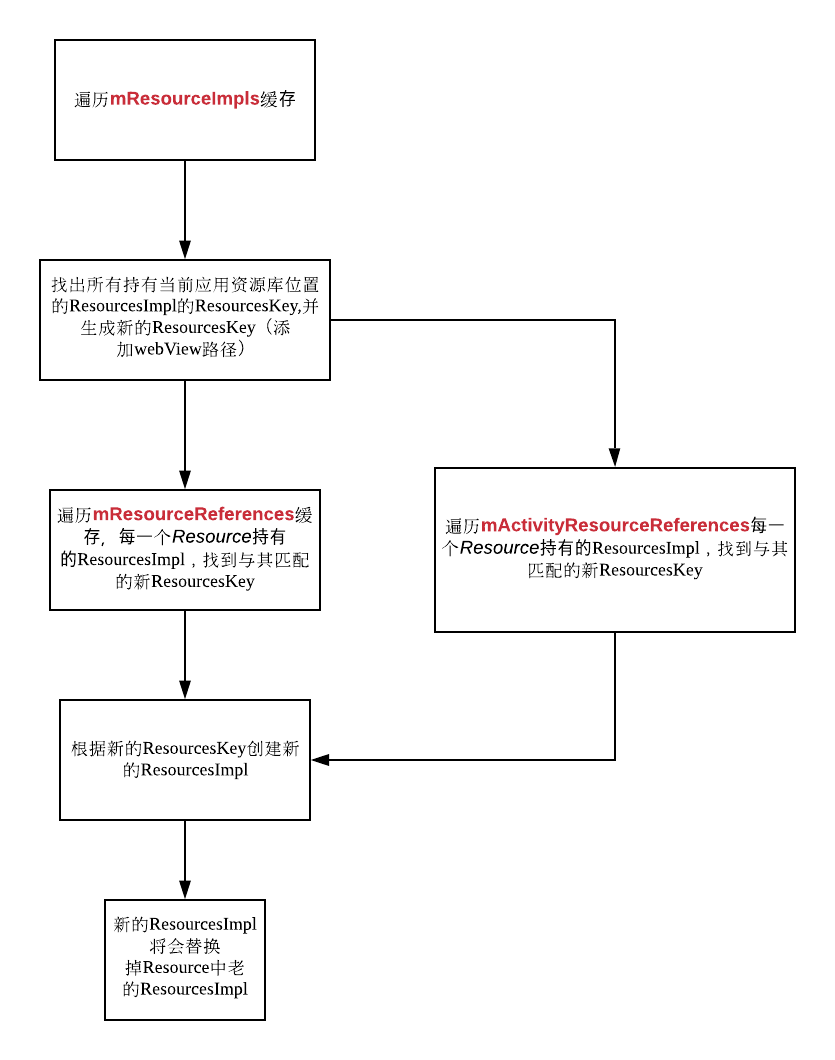
最终调用的方法是 ResourcesManager.getInstance().appendLibAssetForMainAssetPath(appInfo.getBaseResourcePath(), newAssetPath);
传入两个参数 第一个是当前应用的respath 第二个是webView的resPath 具体看如下源码注释。
public void appendLibAssetForMainAssetPath(String assetPath, String libAsset) {

    synchronized (this) {

        // Record which ResourcesImpl need updating

        // (and what ResourcesKey they should update to).

        final ArrayMap<ResourcesImpl, ResourcesKey> updatedResourceKeys = new ArrayMap<>();

        final int implCount = mResourceImpls.size();

        //遍历所有的ResourcesImpl ResourcesImpl是组成Rescource的核心 他们之间的关系是Resource包含ResourcesImpl包含AssertManager

        for (int i = 0; i < implCount; i++) {

            final ResourcesKey key = mResourceImpls.keyAt(i);

            final WeakReference<ResourcesImpl> weakImplRef = mResourceImpls.valueAt(i);

            final ResourcesImpl impl = weakImplRef != null ? weakImplRef.get() : null;

            //这里首先进行判断的ResourcesImpl是否包含assetPath 也就是说如果一个ResourcesImpl的mResDir不是当前应用的 则不会进行处理

            if (impl != null && Objects.equals(key.mResDir, assetPath)) {

                //还要判断新的资源路径是不是已经存在了 如果存在了就不做处理

                if (!ArrayUtils.contains(key.mLibDirs, libAsset)) {

                    final int newLibAssetCount = 1 + (key.mLibDirs != null ? key.mLibDirs.length : 0);

                    final String[] newLibAssets = new String[newLibAssetCount];

                    if (key.mLibDirs != null) {

                        //这里就将新的路径添加到需要添加的ResourcesImpl所对应的ResourcesKey的libDir上面了

                        System.arraycopy(key.mLibDirs, 0, newLibAssets, 0, key.mLibDirs.length);

                    }

                    newLibAssets[newLibAssetCount - 1] = libAsset;

                    updatedResourceKeys.put(impl, new ResourcesKey(key.mResDir, key.mSplitResDirs, key.mOverlayDirs, newLibAssets, key.mDisplayId, key.mOverrideConfiguration, key.mCompatInfo));

                }

            }

        }

        redirectResourcesToNewImplLocked(updatedResourceKeys);

    }

}
//这个方法是更新当前持有ResourcesImpl的Resource

 private void redirectResourcesToNewImplLocked(@NonNull final ArrayMap<ResourcesImpl, ResourcesKey> updatedResourceKeys) {

     // Bail early if there is no work to do.

     if (updatedResourceKeys.isEmpty()) {

         return;

     }

     // Update any references to ResourcesImpl that require reloading.

     final int resourcesCount = mResourceReferences.size();

     for (int i = 0; i < resourcesCount; i++) {

         final WeakReference<Resources> ref = mResourceReferences.get(i);

         final Resources r = ref != null ? ref.get() : null;

         if (r != null) {

             //首先是根据老的ResourcesImpl找到新的ResourcesKey

             final ResourcesKey key = updatedResourceKeys.get(r.getImpl());

             if (key != null) {

                 //然后根据新的ResourcesKey生成新的ResourcesImpl

                 final ResourcesImpl impl = findOrCreateResourcesImplForKeyLocked(key);

                 if (impl == null) {

                     throw new Resources.NotFoundException("failed to redirect ResourcesImpl");

                 }

                 //最后在替换掉Resources中的ResourcesImpl

                 r.setImpl(impl);

             }

         }

     }

     // Update any references to ResourcesImpl that require reloading for each Activity.

     //这边跟上面是一样的道理 只不过这里处理的是所有记录的Activity的Resource

     for (ActivityResources activityResources : mActivityResourceReferences.values()) {

         final int resCount = activityResources.activityResources.size();

         for (int i = 0; i < resCount; i++) {

             final WeakReference<Resources> ref = activityResources.activityResources.get(i);

             final Resources r = ref != null ? ref.get() : null;

             if (r != null) {

                 final ResourcesKey key = updatedResourceKeys.get(r.getImpl());

                 if (key != null) {

                     final ResourcesImpl impl = findOrCreateResourcesImplForKeyLocked(key);

                     if (impl == null) {

                         throw new Resources.NotFoundException("failed to redirect ResourcesImpl");

                     }

                     r.setImpl(impl);

                 }

             }

         }

     }

 }
当appendLibAssetForMainAssetPath方法被调用时,逻辑顺序如下好吧,不喜欢看源码,还是来个画个流程图吧。

WebView就是通过这种方式,在Activity的Resource中加入了WebView的资源。
最终解决方案
这样其实我们就已经分析出在7.0以上的机器中长按WebView 因为资源缺失导致崩溃的原因了。
我们在资源替换方案中将Context的Resource替换成了我们的ProxyResources,而ProxyResources其实并没有被ResourcesManager管理,也就是说webView资源注入的时候 我们的ProxyResources并没有被更新。
了解了全部原理之后 解决方法一目了然。
见如下代码:
// step 4 将代理的Resources合并到ResourcesManager中统一管控 因为我们的ProxyResourcess的ResPath是应用的path,所以webView资源注入的时候就会同步到这个Res里面

if (Build.VERSION.SDK_INT >= Build.VERSION_CODES.N) {

    synchronized (ResourcesManager.getInstance()) {

        //不用担心在list中不断的添加会造成数量暴增,因为添加的是弱引用,如果页面被关闭,会自动回收

        ArrayList<WeakReference<Resources>> list = Reflector.with(ResourcesManager.getInstance()).field("mResourceReferences").get();

        list.add(new WeakReference<Resources>(textRepairProxyResourcess));

    }

}
至此,webView崩溃问题解决。
六、问题回顾
问题一:
为什么要在attachBaseContext中进行反射替换Resource?
回答:
不管替换的是Application还是Activity的mResources 一定是在attachBaseContext里面对baseContext进行Hook,直接将Activity或者Application本身进行hook是不成功的 因为Activity或者Application本身并不是Context,他只是一个ContextWapper。而ContextWapper中真正的Context其实就是在attachBaseContext时赋值的。
问题二:
既然已经替换了Activity和Application的Resource,为什么还要使用factory处理layout初始化,难道layout初始化不是使用Activity中的Resource吗?
回答:
我们对Activity或者Application的mResources进行了替换,但是如果不实现流程5中的ActivtyLifecycleCallbacks,那么XML中编写的text无法实现替换,原因在于View使用TypedArray在进行赋值的时候,并不是直接使用mResources,而是直接使用mResourcesImpl,所以直接hooke了mResources还是没用,其实mResources的getText方法也是调用mResources中的mResourcesImpl的方法。
问题三:
对于已经使用了换肤模式的app(比如说浏览器)如何做String在线更新?
回答:
只需要修改原有换肤模式使用的SkinProxyResource,并getText,getString等方法代理到在线更新的TextProxyResources上即可。
更多内容敬请关注 vivo 互联网技术 微信公众号

注:转载文章请先与微信号:Labs2020 联系。
Android 多语言动态更新方案探索的更多相关文章
- [原创]一种简单的cocos2d-x动态更新方案
介绍一个曾经在cocos2d-x项目中使用过的动态更新方案,这个方案简单易行,针对小的项目非常有用. 这个方案有两个核心的关键词:JSON,MD5. 原理可以简单地概括为:服务端持有所有动态更新资源文 ...
- fir.im Weekly - iOS / Android 动态化更新方案盘点
动态化更新是 App 开发必然面对的问题.在 iOS 环境下,Apple 开发者们像是" 带着手铐脚镣跳舞" ,相比之下 Android 开发者会轻松一点,有很多相关的开源框架帮助 ...
- iOS 利用 Framework 进行动态更新
http://nixwang.com/2015/11/09/ios-dynamic-update/ 前言 目前 iOS 上的动态更新方案主要有以下 4 种: HTML 5 lua(wax)hotpat ...
- Android UI:机智的远程动态更新策略
问题描述 做过Android开发的人都遇到过这样的问题:随着需求的变化,某些入口界面通常会出现 UI的增加.减少.内容变化.以及跳转界面发生变化等问题.每次发生变化都要手动修改代码,而入口界面通常具有 ...
- 移动端热更新方案(iOS+Android)
PPT资源包含iOS+Android 各种方案分析:https://github.com/qiyer/Share/blob/master/%E7%83%AD%E6%9B%B4%E6%96%B0%E5% ...
- Android C语言_init函数和constructor属性及.init/.init_array节探索
本篇文章主要介绍了"Android C语言_init函数和constructor属性及.init/.init_array节探索",主要涉及到Android C语言_init函数和c ...
- 在Android中实现service动态更新UI界面
之前曾介绍过Android的UI设计与后台线程交互,据Android API的介绍,service一般是在后台运行的,没有界面的.那么如何实现service动态更新UI界面呢?案例:通过service ...
- Android中动态更新ListView(转)
在使用ListView时,会遇到当ListView列表滑动到最底端时,添加新的列表项的问题,本文通过代码演示如何动态的添加新的列表项到ListView中.实现步骤:调用ListView的setOnSc ...
- 一步步教你为网站开发Android客户端---HttpWatch抓包,HttpClient模拟POST请求,Jsoup解析HTML代码,动态更新ListView
本文面向Android初级开发者,有一定的Java和Android知识即可. 文章覆盖知识点:HttpWatch抓包,HttpClient模拟POST请求,Jsoup解析HTML代码,动态更新List ...
- Android Handler传递参数动态更新UI界面demo
package com.example.demo_test; import android.app.Activity; import android.os.Bundle; import android ...
随机推荐
- Taro:高性能小程序的最佳实践
前言 作为一个开放式的跨端跨框架解决方案,Taro 在大量的小程序和 H5 应用中得到了广泛应用.我们经常收到开发者的反馈,例如"渲染速度较慢"."滑动不够流畅" ...
- 分享一个LCD驱动框架
首先需要说明的是本篇文章不是关于如何点亮一块LCD屏的教程,而是介绍一个LCD开发框架,更准确的说是介绍一个LCD的中间件(Middlwware),用来连接UI和不同类型的LCD屏.笔者本人的工作内容 ...
- Python 潮流周刊第 30 期(摘要)
本周刊由 Python猫 出品,精心筛选国内外的 250+ 信息源,为你挑选最值得分享的文章.教程.开源项目.软件工具.播客和视频.热门话题等内容.愿景:帮助所有读者精进 Python 技术,并增长职 ...
- bash shell笔记整理——tail命令
作用 Print the last 10 lines of each FILE to standard output. With more than one FILE, precede each wi ...
- 内网& 公网
内.外网是相对于防火墙而言的,在防火墙内部叫做内网,反之就是外网.在一定程度上外网等同于公网,内网等同于私网. 内网IP是什么? 内网IP简单理解就是局域网IP地址.内网地址即局域网(LAN),内网的 ...
- zabbix_agent配置文件
agent常用参数 : [root@jqebsdb zabbix]# cat zabbix_agentd.conf | grep -v ^$ | grep -v ^# PidFile=/var/ru ...
- hwclock详解
linux下hwclock命令详解 hwclock(hardware clock) 功能说明:显示与设定硬件时钟. 语 法:hwclock [--adjust][--debug][--directis ...
- java框架Mybatis的第一个程序
1:什么是MyBatis MyBatis 是一款优秀的持久层框架 MyBatis 避免了几乎所有的 JDBC 代码和手动设置参数以及获取结果集的过程 MyBatis 可以使用简单的 XML 或注解来配 ...
- 【scikit-learn基础】--『监督学习』之 均值聚类
聚类算法属于无监督学习,其中最常见的是均值聚类,scikit-learn中,有两种常用的均值聚类算法:一种是有名的K-means(也就是K-均值)聚类算法,这个算法几乎是学习聚类必会提到的算法:另一个 ...
- 2023-05-14:你的赛车可以从位置 0 开始,并且速度为 +1 ,在一条无限长的数轴上行驶, 赛车也可以向负方向行驶, 赛车可以按照由加速指令 ‘A‘ 和倒车指令 ‘R‘ 组成的指令序列自动行驶
2023-05-14:你的赛车可以从位置 0 开始,并且速度为 +1 ,在一条无限长的数轴上行驶, 赛车也可以向负方向行驶, 赛车可以按照由加速指令 'A' 和倒车指令 'R' 组成的指令序列自动行驶 ...