
ohmyposh 安装 - 基于 powershell7.2.1 - 最后改成 profile自定义
今天偶然下载了 powershell7.2.1
- https://mydown.yesky.com/pcsoft/468254.html
- 这想着 vscode也支持了,得装一个 ohmyposh的主题啊
安装准备先装scoop
看默认可以装个winget,win10环境,可是装半天没装上
// powershell7.2.1

set-executionpolicy remotesigned -s cu

iex (new-object net.webclient).downloadstring('https://get.scoop.sh')
安装ohmyposh
scoop install https://github.com/JanDeDobbeleer/oh-my-posh/releases/latest/download/oh-my-posh.json
下载字体
- https://github.com/microsoft/cascadia-code/releases/download/v2111.01/CascadiaCode-2111.01.zip
- https://github.com/ryanoasis/nerd-fonts/releases/download/v2.1.0/Meslo.zip
https://blog.csdn.net/dietime1943/article/details/122925134
Windows Terminal美化(oh-my-posh3)
https://blog.csdn.net/dietime1943/article/details/122968934
最后失败了
好吧,最后vscode也没搞上,直接点开始菜单的出来了,但是要3秒多,太慢了。我还是默认的吧。88
- Import-Module posh-git
- 最后就留下了 Powershell7 和这个 posh-git
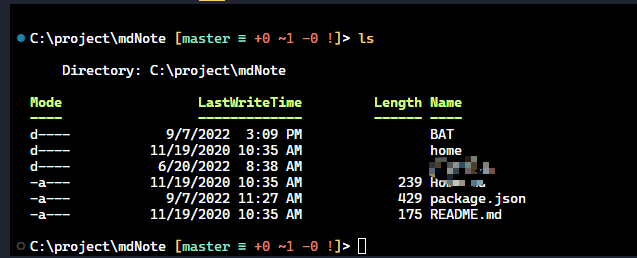
最后方案改成了 直接改 Powershell7 风格
code $profile
- 修改最后的样式 带git分支信息
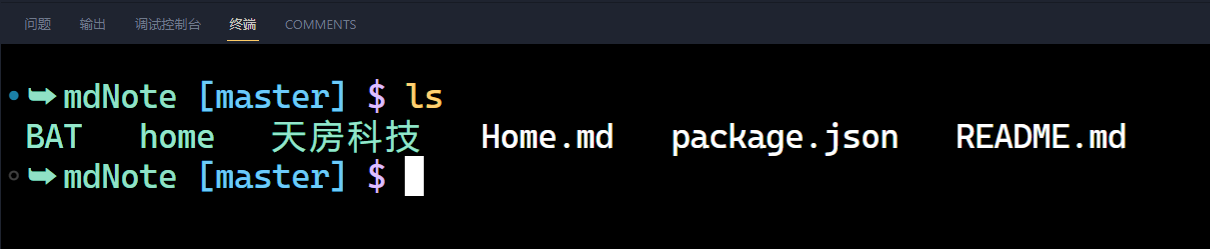
- 代码备份
# 20220922

# powershell7

# Import-Module posh-git

# # 提示插件: PSReadLine 如果是使用 PowerShell 7.1 或以上版本则自带了 PSReadLine 2.1,不需要手动安装。

# # 如果你是7.1以下的powershell7 就需要安装

# # Install-Module PSReadLine

# # 设置预测文本来源为历史记录

Set-PSReadLineOption -PredictionSource History

# # 设置向上键为后向搜索历史记录

Set-PSReadLineKeyHandler -Key UpArrow -Function HistorySearchBackward

# # 设置向下键为前向搜索历史纪录

Set-PSReadLineKeyHandler -Key DownArrow -Function HistorySearchForward

set-alias ls         Get-ChildItemColor

function prompt

{

    $my_path = $(get-location).toString()

    $my_pos = ($my_path).LastIndexOf("\") + 1

    if( $my_pos -eq ($my_path).Length ) { $my_path_tail = $my_path }

    else { $my_path_tail = ($my_path).SubString( $my_pos, ($my_path).Length - $my_pos ) }

    Write-Host ("➥ ") -nonewline -foregroundcolor 'DarkCyan'

    # Write-Host ($my_path) -nonewline -foregroundcolor 'DarkCyan'

    Write-Host ($my_path_tail) -nonewline -foregroundcolor 'DarkCyan'

    $GitStatus = Get-GitStatus

    $status = $GitStatus.Branch

    if ($status) {

      Write-Host (" [$status]") -nonewline -foregroundcolor 'DarkBlue'

    }

    # Write-GitStatus $GitStatus

    Write-Host (" $ ") -nonewline -foregroundcolor 'Magenta'

    return ""

}

function Get-ChildItemColor {

<#

.Synopsis

  Returns childitems with colors by type.

.Description

  This function wraps Get-ChildItem and tries to output the results

  color-coded by type:

  Directories - Cyan

  Compressed - Red

  Executables - Green

  Text Files - Gray

  Image Files - Magenta

  Others - Gray

.ReturnValue

  All objects returned by Get-ChildItem are passed down the pipeline

  unmodified.

.Notes

  NAME:      Get-ChildItemColor

  AUTHOR:    blueky

#>

  # 这个函数用来做正则匹配,并为不同的文件配置不同的颜色。

  $regex_opts = ([System.Text.RegularExpressions.RegexOptions]::IgnoreCase -bor [System.Text.RegularExpressions.RegexOptions]::Compiled)

  $fore = $Host.UI.RawUI.ForegroundColor

  $compressed = New-Object System.Text.RegularExpressions.Regex(

      '\.(zip|tar|gz|rar|7z|tgz|bz2)', $regex_opts)

  $executable = New-Object System.Text.RegularExpressions.Regex(

      '\.(exe|bat|cmd|py|pl|ps1|psm1|vbs|rb|reg|sh)', $regex_opts)

  $text_files = New-Object System.Text.RegularExpressions.Regex(

      '\.(txt|cfg|conf|ini|csv|log)', $regex_opts)

  $image_files = New-Object System.Text.RegularExpressions.Regex(

      '\.(bmp|jpg|png|gif|jpeg)', $regex_opts)

  Invoke-Expression ("Get-ChildItem $args") |

    %{

      if ($_.GetType().Name -eq 'DirectoryInfo') { $Host.UI.RawUI.ForegroundColor = 'Cyan' }

      elseif ($compressed.IsMatch($_.Name)) { $Host.UI.RawUI.ForegroundColor = 'Red' }

      elseif ($executable.IsMatch($_.Name)) { $Host.UI.RawUI.ForegroundColor = 'Green' }

      elseif ($text_files.IsMatch($_.Name)) { $Host.UI.RawUI.ForegroundColor = 'Gray' }

      elseif ($image_files.IsMatch($_.Name)) { $Host.UI.RawUI.ForegroundColor = 'Magenta' }

      else { $Host.UI.RawUI.ForegroundColor = 'Gray' }

      # echo $_.Name

      Write-Host -NoNewline $_.Name "  "

      # echo $_

      $Host.UI.RawUI.ForegroundColor = $fore

    }

}

function Show-Color( [System.ConsoleColor] $color )

{

    $fore = $Host.UI.RawUI.ForegroundColor

    $Host.UI.RawUI.ForegroundColor = $color

    echo ($color).toString()

    $Host.UI.RawUI.ForegroundColor = $fore

}

function Show-AllColor

{

    Show-Color('Black')

    Show-Color('DarkBlue')

    Show-Color('DarkGreen')

    Show-Color('DarkCyan')

    Show-Color('DarkRed')

    Show-Color('DarkMagenta')

    Show-Color('DarkYellow')

    Show-Color('Gray')

    Show-Color('DarkGray')

    Show-Color('Blue')

    Show-Color('Green')

    Show-Color('Cyan')

    Show-Color('Red')

    Show-Color('Magenta')

    Show-Color('Yellow')

    Show-Color('White')

}

# code $PROFILE

set code "C:\Users\Reciter\AppData\Local\Programs\Microsoft VS Code\Code.exe"

# set-alias d 'npm run dev'

set-alias n 'nest'

function gitpush ($m) {

  # git push 的简称 gp

  git add .

  git commit -m "$m"

  git push

}

function d { npm run dev }

# defineConfig 定义配置

function dc { &$code C:\Users\Reciter\Documents\PowerShell\Microsoft.PowerShell_profile.ps1 }

# 打包发布到远程

function pp { npm run buildAndPublic }

# 任免表

function rmb { &$code C:\project\renmianbiaobianjiqiz\appointeditweb }

# 任免表运行

function rmbRun { C:\GreenSoft\aardio\aardio.exe C:\GreenSoft\aardio\project\rmbRun-aardio\default.aproj }

# 任免表后台

# function rmbServer { &$code E:\root\Personal\giteez\koa2\koa2-backend }

function rmbServer {

  cd E:\root\Personal\giteez\koa2\koa2-backend

  npm run dev }

# vuejsdev

function vuejs { &$code E:\root\Personal\giteez\vuejsdev-com }

# 周报

function note { &$code C:\project\mdNote }

# 导航

function navi { &$code C:\project\navigator }

# 平台

function pt { &$code C:\project\aizzb_project_web }

# 单点登录

function dd { &$code C:\project\aizzb_single_login }

# nestjs-api

function nestjs { &$code C:\Users\Reciter\Desktop\nestjs-study\nestjs-api }
ohmyposh 安装 - 基于 powershell7.2.1 - 最后改成 profile自定义的更多相关文章
- 如何将基于对话框的MFC工程改成基于BCG的
1.stdafx.h 加入如下内容.BCGCBProInc.h间接导入了lib. 2.应用程序类的父类由CWinApp改成CBCGPWinApp.构造函数增加如下代码: 3.对话框的父类有CDialo ...
- dede:field name=’position’标签调用 主页改成英文Home和改变符号
在用dede:field name=’position’ 这个标签的时候我们调用的这个就是中文的,出现的是主页>+相应的栏目 ,那么这个问题怎么改成英文的呢?有好多大虾都说找到dede安装目录 ...
- 安装基于XenServer的DevStack
Openstack默认的hypervisior是基于KVM的,可以修改nova-compute.conf的libvirt_type改成使用其他,网上可以搜到个别文章 但是Openstack官方文档却说 ...
- 编译安装基于 fastcgi 模式的多虚拟主机的wordpress和discuz的LAMP架构
目录 实现CentOS 7 编译安装基于 fastcgi 模式的多虚拟主机的wordpress和discuz的LAMP架构 准备环境: 准备软件版本: 主机名修改用以区分 数据库服务器 实现数据库二进 ...
- asp.net(c#) 将dbf转换为xls或wps,并将数据的列名改成中文;并判断本机是否安装office2003,2007和wps2007,2010
using Microsoft.Office.Interop.Excel;//转换为excel时,需要引用此命名空间 using ET;//转换为wps时,需要引用此命名空间using KSO;//转 ...
- 安装基于 Linux 发行版的重要事项(流程指引)
安装基于 Linux 发行版的重要事项(Install important issues based on the Linux distribution. (Process guidance)) 1. ...
- win2003系统网络安装——基于linux+pxe+dhcp+tftp+samba+ris
原文发表于:2010-09-16 转载至cu于:2012-07-21 一.原理简介 PXE(preboot execute environment)工作于Client/Server的网络模式,支持工作 ...
- 给Clouderamanager集群里安装基于Hive的大数据实时分析查询引擎工具Impala步骤(图文详解)
这个很简单,在集群机器里,选择就是了,本来自带就有Impala的. 扩展博客 给Ambari集群里安装基于Hive的大数据实时分析查询引擎工具Impala步骤(图文详解)
- 给Ambari集群里安装基于Hive的大数据实时分析查询引擎工具Impala步骤(图文详解)
不多说,直接上干货! Impala和Hive的关系(详解) 扩展博客 给Clouderamanager集群里安装基于Hive的大数据实时分析查询引擎工具Impala步骤(图文详解) 参考 horton ...
- 给ambari集群里的kafka安装基于web的kafka管理工具Kafka-manager(图文详解)
不多说,直接上干货! 参考博客 基于Web的Kafka管理器工具之Kafka-manager的编译部署详细安装 (支持kafka0.8.0.9和0.10以后版本)(图文详解)(默认端口或任意自定义端口 ...
随机推荐
- HarmonyOS实战[一]——原理概念介绍安装:基础篇
[本文正在参与"有奖征文|HarmoneyOS征文大赛"活动] 相关文章: HarmonyOS实战[一]--原理概念介绍安装:基础篇 HarmonyOS实战[二]-超级详细的原子化 ...
- 『深度学习项目四』基于ResNet101人脸特征点检测
相关文章: [深度学习项目一]全连接神经网络实现mnist数字识别 [深度学习项目二]卷积神经网络LeNet实现minst数字识别 [深度学习项目三]ResNet50多分类任务[十二生肖分类] 『深度 ...
- Java并发(六)----线程start、run、state方法
1.start 与 run 调用 run public static void main(String[] args) { Thread t1 = new Thread("t1&quo ...
- 零基础入门学习Java课堂笔记 ——day06
面向对象(中) 1.封装 "高内聚,低耦合" 高内聚:类内部的细节自己完成,不允许外部干涉 低耦合:仅暴露少量方法给外部使用 属性私有 在Java中可以通过private关键字给方 ...
- SVC服务的发布
目录 服务的发布 发布的方式 1.NodePort 方法一:创建的时候直接指定类型 方法二:在线修改(将其他类型改为NodePort) 2.LoadBalance 3.Ingress(推荐/重点) 服 ...
- 思维分析逻辑 6 DAY
数据仓库研究 大数据体系 日志采集和传输 数据建模 数据管理 数据应用 数据建模 日志传输(原始数据) ODS(原始数据) 用户基础属性表:imei,prov,city,machine 用户文章下发表 ...
- windows_exporter 安装
windows_exporter 安装 背景 如果想使用Prometheus监控Windows主机相关参数,那么就需要在Windows系统的主机上进行安装指标收集器. windows_exporter ...
- JS 页面离开事件 页面关闭事件,实现登录成功返回上个页面
壹 ❀ 引 登录成功后跳转到上一个页面是很常见的需求,比如在天猫添加购物车时网站会效验用户登录情况,若未登录则跳转登录,登录成功返回到先前的商品页. 这个功能实现并不困难,但因为我的奇思妙想让我先后了 ...
- Ubuntu/Centos下OpenJ9 POI输出Excel的Bug
项目更换 JDK为 OpenJ9 后, 使用 POI 导出 Excel 遇到的问题 OpenJ9 版本信息 /opt/jdk/jdk-11.0.17+8/bin/java -version openj ...
- 【framework】应用进程启动流程
1 前言 Activity启动流程 中介绍了从点击桌面上应用快捷方式到 Activity 的 onCreate() 方法调用流程,本将介绍应用进程的启动流程.由于应用进程启动流程复杂,本文按进程将其拆 ...