
Spring框架学习
没有状态变化的对象(无状态对象):应当做成单例。
Spring-framework的下载:http://repo.spring.io/release/org/springframework/spring/。
配置Spring环境(Spring Context)所需要的jar包,以及它们之间的相互依赖关系:
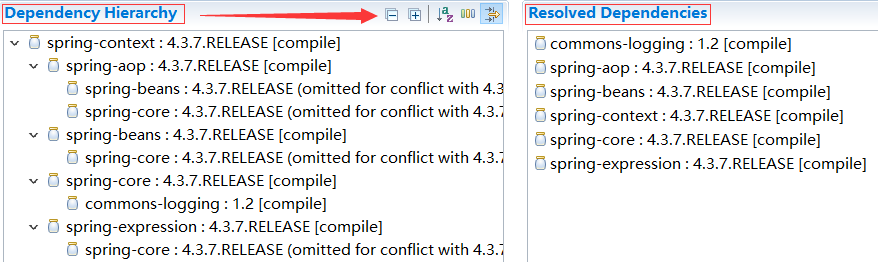
Maven会自动管理依赖,这就比较简单了:
<dependency>

    <groupId>org.springframework</groupId>

    <artifactId>spring-context</artifactId>

    <version>4.3.9.RELEASE</version>

</dependency>
Spring基础配置:
- IoC容器 —— ApplicationContext、WebApplicationContext:控制反转(原理是依赖注入DI),即容器IoC管理bean的创建和注入。Spring有xml、注解、Java、groovy,四种方式配置IoC —— 对应有2种解析容器:xml —— ClassPathXmlApplication、注解+Java —— AnnotationConfigApplicationContext(如果是 Spring MVC 项目:AnnotationConfigWebApplicationContext)。
- AOP面向切面编程:分离横切逻辑。
IoC容器 —— 控制反转(容器接管对象的管理以及对象间的依赖关系):
(1) 容器的配置,属于元数据配置,Spring的容器解析这些元数据配置,以进行对bean的管理。(2) 注入:将已经存在的bean注入到某个bean —— xml 方式必须通过ref,指定需要注入的bean;annotation 方式只需要@Autowired就可以注入已有的bean。
1、Xml配置(<beans>的名称空间必须添加,不然会报错,如下):
<?xml version="1.0" encoding="UTF-8"?>

<beans xmlns="http://www.springframework.org/schema/beans"

    xmlns:xsi="http://www.w3.org/2001/XMLSchema-instance"

    xsi:schemaLocation="http://www.springframework.org/schema/beans

        http://www.springframework.org/schema/beans/spring-beans.xsd">

    <bean id="ctest" class="test.CTest">

        <property name="value" value="10000" />

    </bean>

    <bean id="mytest" class="test.MyTest">

        <property name="it" ref="ctest" />

    </bean>

</beans>
IoC依赖注入 —— 通过容器,根据配置注入依赖属性:
测试代码:
beans(接口与实现):
//接口

package test;

public interface ITest {

    public void print();

}

//接口实现

package test;

public class CTest implements ITest {

    private int value;

    @Override

    public void print() {

        System.out.println(value);

    }

    public int getValue() {

        return value;

    }

    public void setValue(int value) {

        this.value = value;

    }

}
依赖注入 —— 获取bean(有两种方法):
package test;

import org.junit.AfterClass;

import org.junit.BeforeClass;

import org.junit.Test;

import org.springframework.context.ApplicationContext;

import org.springframework.context.support.ClassPathXmlApplicationContext;

public class MyTest {

    private static ApplicationContext context = null;

    //方法一:通过配置依赖关系,然后用getter、setter操作bean(这种方式只适用于static bean)

    //这里就体现了IoC的解耦和,即依赖关系由IoC管理。

    //分离了关注点:分开了,接口的实现和具体使用哪个接口的选择,以及其使用无需在此关心接口采用的哪一个实现

    private static ITest it = null;

    public ITest getIt() {

        return it;

    }

    public void setIt(ITest it) {

        this.it = it;

    }

    @BeforeClass

    public static void setUpBeforeClass() {

        System.out.println("hello");

        context = new ClassPathXmlApplicationContext("app.xml");

    }

    @AfterClass

    public static void tearDownAfterClass() {

        System.out.println("goodbye");

        if(context instanceof ClassPathXmlApplicationContext) {

            ((ClassPathXmlApplicationContext) context).destroy();

        }

    }

    /**

     * 测试获取bean的第一种方法:

     */

    @Test

    public void testOne() {

        it.print();

    }

    /**

     * 测试第二种方法:getBean

     */

    @Test

    public void testTwo() {

        //方法二:直接通过getBean方法,获得某个bean

//        ITest itest = context.getBean(CTest.class);

        ITest itest = (ITest) context.getBean("ctest");

        itest.print();

    }

}
2、注解配置:
- 声明式bean注解(声明某个类是Spring管理的Bean):@Component、@Service、@Repository、@Controller。四者效果相同,都是声明bean。区别在于,会在不同的层次中使用:普通组件(普通bean)、业务逻辑层(service层)、数据持久层(dao层)、。声明式bean:需要配置类使用@ComponentScan("包名")注解,才能把声明的bean,真正的注册为bean。
- 注入式bean注解(用于将某个bean注入到某个类中,可注解在set方法,或者直接注解在属性上):@Autowired、@Inject、@Resource。也具有相同效果,都是注入bean。区别在于提供者不同:Spring提供、JSR-330提供、JSR-250提供。
测试代码:
两个bean:
package com.test.service;

import org.springframework.stereotype.Service;

@Service

public class FunctionService {

    public String sayHello(String word) {

        return "Hello " + word + "!";

    }

}

//注入上面的bean

package com.test.service;

import org.springframework.beans.factory.annotation.Autowired;

import org.springframework.stereotype.Service;

@Service

public class UseFunctionService {

    @Autowired

    FunctionService functionService;//注入

    public String sayHello(String word) {

        return functionService.sayHello(word);

    }

}
配置类:之后会,使用配置类完成IoC容器的创建:
package com.test.config;

import org.springframework.context.annotation.ComponentScan;

import org.springframework.context.annotation.Configuration;

@Configuration

@ComponentScan("com.test")

public class DiConfig {

}
开始测试:
package com.test.AnnotationSpring;

import org.junit.AfterClass;

import org.junit.BeforeClass;

import org.junit.Test;

import org.springframework.context.ApplicationContext;

import org.springframework.context.annotation.AnnotationConfigApplicationContext;

import com.test.config.DiConfig;

import com.test.service.UseFunctionService;

public class AppTest {

    private static ApplicationContext context = null;

    @BeforeClass

    public static void setUpBeforeClass() {

        context = new AnnotationConfigApplicationContext(DiConfig.class);

    }

    @AfterClass

    public static void teatDownAfterClass() {

        if(context instanceof AnnotationConfigApplicationContext) {

            ((AnnotationConfigApplicationContext) context).destroy();

        }

    }

    @Test

    public void test() {

        UseFunctionService useFunctionService = context.getBean(UseFunctionService.class);

        System.out.println(useFunctionService.sayHello("DI"));

    }

}
3、Java配置(Spring 4.x 和 Srping Boot 推荐使用的配置方式):
- @Configuration(查看源码,可知配置类也是Bean):声明当前类,是一个配置类。其作用相当于 一个配置Spring的xml文件。
- @Bean:注解在方法上,声明当前方法返回一个bean(即将返回值注册为一个bean:bean的名称不是返回值的名称,而是方法名) —— 之前的做法是将某个类声明为一个bean,然后指定包扫描,找到所有的bean。
测试 Java 配置 IoC:
不再需要声明bean:
package com.test.service;

public class FunctionService {

    public String sayHello(String word) {

        return "Hello " + word + "!";

    }

}

package com.test.service;

public class UseFunctionService {

    FunctionService functionService;

    public void setFunctionService(FunctionService functionService) {

        this.functionService = functionService;

    }

    public String sayHello(String word) {

        return functionService.sayHello(word);

    }

}
统一在配置类中注册:
package com.test.config;

import org.springframework.context.annotation.Bean;

import org.springframework.context.annotation.Configuration;

import com.test.service.FunctionService;

import com.test.service.UseFunctionService;

/*

 * 此处没有使用包扫描,是因为所有的bean,都在此类中定义了

 * 是因为:容器注入bean时,调用方法返回并注册。例如注入FunctionService的bean时,直接调用functionService方法

 */

@Configuration

public class JavaConfig {

    @Bean

    public FunctionService functionService() {

        return new FunctionService();

    }

    @Bean

    public UseFunctionService useFunctionService() {

        UseFunctionService useFunctionService = new UseFunctionService();

        useFunctionService.setFunctionService(functionService());

        return useFunctionService;

    }

    //写法二(两种方法,任选一种):

    //原理是:若Spring容器中,已存在某个bean,则可以直接作为参数在另一个bean方法中写入,然后通过setter注入

//    @Bean

//    public UseFunctionService useFunctionService(FunctionService functionService) {

//        UseFunctionService useFunctionService = new UseFunctionService();

//        useFunctionService.setFunctionService(functionService);

//        return useFunctionService;

//    }

}
开始测试(测试代码和注解配置的测试,完全一样):
package com.test.AnnotationSpring;

import org.junit.AfterClass;

import org.junit.BeforeClass;

import org.junit.Test;

import org.springframework.context.ApplicationContext;

import org.springframework.context.annotation.AnnotationConfigApplicationContext;

import com.test.config.JavaConfig;

import com.test.service.UseFunctionService;

public class AppTest {

    private static ApplicationContext context = null;

    @BeforeClass

    public static void setUpBeforeClass() {

        context = new AnnotationConfigApplicationContext(JavaConfig.class);

    }

    @AfterClass

    public static void teatDownAfterClass() {

        if(context instanceof AnnotationConfigApplicationContext) {

            ((AnnotationConfigApplicationContext) context).destroy();

        }

    }

    @Test

    public void test() {

        UseFunctionService useFunctionService = context.getBean(UseFunctionService.class);

        System.out.println(useFunctionService.sayHello("java config"));

    }

}
通常混合使用Java配置、注解配置:面向全局的配置,使用Java配置(如数据库的数据源配置、MVC配置)。而业务bean采用注解配置,即@Component、@Service、@Repository、@Controller。
Spring AOP面向切面编程(Spring 支持 AspectJ 的注解式切面编程):
- 使用@Aspect声明某个类是一个切面。
- 使用@After、@Before、@Around定义建言(advice),可直接将拦截规则(切点),作为参数。
- 建言的参数,拦截规则(切点):使用@PointCut专门定义拦截规则,使得切点可以复用。
直接用Maven添加Spring Aop支持,以及AspectJ 依赖:
<!-- spring aop 支持 -->

<dependency>

    <groupId>org.springframework</groupId>

    <artifactId>spring-aop</artifactId>

    <version>4.3.7.RELEASE</version>

</dependency>

<!-- aspectj 依赖 -->

<dependency>

    <groupId>org.aspectj</groupId>

    <artifactId>aspectjrt</artifactId>

    <version>1.8.9</version>

</dependency>

<dependency>

    <groupId>org.aspectj</groupId>

    <artifactId>aspectjweaver</artifactId>

    <version>1.8.10</version>

</dependency>
Spring 常用配置:
bean的Scope,即 Spring 容器创建 bean 的方式(Scope范围:创建方式不同,决定使用范围也不同):
- Singleton:单例模式,即一个 Spring 容器中只有一个 bean 的实例,全容器共享同一个实例。此为Spring的默认配置。
- Prototype:原型,每次使用bean,Spring都会提供一个新建bean的实例,相当于每次都new。
- Request:在Web项目中,给每个http request新建一个bean实例。
- Session:给每个http session新建一个bean实例。
- GlobalSession:只在portal应用中有用,给每一个global http session新建一个bean实例。
此外,在Spring Batch中,还有一个注解是@StepScope。
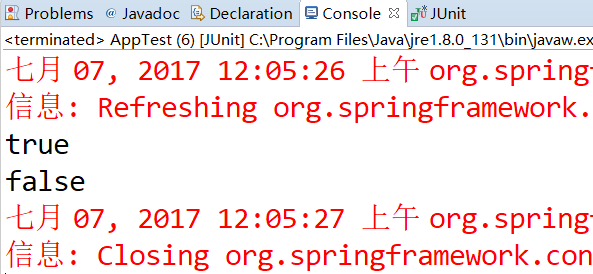
测试Singleton和Prototype —— 判断创建的bean到底是不是单例;是不是原型:
声明两个bean:
//单例bean

package com.test.service;

import org.springframework.stereotype.Service;

@Service

public class DemoSingletonService {

}

//原型bean

package com.test.service;

import org.springframework.context.annotation.Scope;

import org.springframework.stereotype.Service;

@Scope("prototype")

@Service

public class DemoPrototypeService {

}
配置bean的位置:
//配置类

package com.test.config;

import org.springframework.context.annotation.ComponentScan;

import org.springframework.context.annotation.Configuration;

@Configuration

@ComponentScan("com.test")

public class ScopeConfig {

}
开始测试:
package com.test.CommonSpring;

import org.junit.AfterClass;

import org.junit.BeforeClass;

import org.junit.Test;

import org.springframework.context.ApplicationContext;

import org.springframework.context.annotation.AnnotationConfigApplicationContext;

import com.test.config.ScopeConfig;

import com.test.service.DemoPrototypeService;

import com.test.service.DemoSingletonService;

public class AppTest {

    private static ApplicationContext context = null;

    @BeforeClass

    public static void setUpBeforeClass() {

        context = new AnnotationConfigApplicationContext(ScopeConfig.class);

    }

    @AfterClass

    public static void tearDownAfterClass() {

        if(context instanceof AnnotationConfigApplicationContext) {

            ((AnnotationConfigApplicationContext) context).destroy();

        }

    }

    @Test

    public void test() {

        DemoSingletonService singletonOne = context.getBean(DemoSingletonService.class);

        DemoSingletonService singletonTwo = context.getBean(DemoSingletonService.class);

        DemoPrototypeService prototypeOne = context.getBean(DemoPrototypeService.class);

        DemoPrototypeService prototypeTwo = context.getBean(DemoPrototypeService.class);

        System.out.println(singletonOne == singletonTwo);

        System.out.println(prototypeOne == prototypeTwo);

    }

}
输出结果:
Spring EL 和资源调用:
Sping EL支持在 xml 和在注解,以及在 html 中使用表达式,类似于 JSP 的 EL 表达式。
Spring EL主要在注解 @Value 的参数中使用表达式,通过表达式可注入各种资源到属性:普通字符、操作系统属性、表达式运算结果、bean的属性、文件内容、URI的内容、配置文件属性。
测试示例:
为简化文件操作,使用 apache 的 commons-io 将文件转换成字符串。如果用 maven 构建依赖,可能需要注意:commons-io在中央仓库,已经由 "Commons IO" move 到了 "Apache Commons IO",而阿里云现目前还没有更改,因此需要根据自己本机的环境决定使用哪个依赖。
Commons IO 的依赖:

<dependency>

    <groupId>org.apache.commons</groupId>

    <artifactId>commons-io</artifactId>

    <version>1.3.2</version>

</dependency>
Apache Commons IO的依赖(现目前阿里云的镜像还没有):
<dependency>

    <groupId>commons-io</groupId>

    <artifactId>commons-io</artifactId>

    <version>2.4</version>

</dependency>
在项目的类路径classpath下,新建 test.txt 和 test.properties 文件,txt内容随意,配置文件如下(呃,尊重原作):
book.author=wangyunfei

book.name=spring boot
两个Bean:
package com.qfedu.CommonSpring.service;

import org.springframework.beans.factory.annotation.Value;

import org.springframework.stereotype.Service;

@Service

public class DemoService {

    @Value("bean-demoService 的属性")

    private String another;

    public String getAnother() {

        return another;

    }

    public void setAnother(String another) {

        this.another = another;

    }

}
package com.qfedu.CommonSpring.service;

import java.io.IOException;

import org.apache.commons.io.IOUtils;

import org.springframework.beans.factory.annotation.Autowired;

import org.springframework.beans.factory.annotation.Value;

import org.springframework.context.annotation.PropertySource;

import org.springframework.core.env.Environment;

import org.springframework.core.io.Resource;

import org.springframework.stereotype.Service;

@Service

@PropertySource("classpath:test.properties")

public class ELService {

    @Value("Normal String")

    private String normal;

    @Value("#{ systemProperties['os.name'] }")

    private String osName;

    @Value(" #{ T(Math).random() * 100.0 }")

    private double randomNumber;

    @Value("#{ demoService.another }")    //直接从单例bean中拿

    private String fromAnother;

    @Value("classpath:test.txt")

    private Resource testFile;

    @Value("https://www.baidu.com")        //需要网络,且获取其内容会阻塞

    private Resource testUrl;

    //不能空格,会报错,如@Value("${ book.name }")

    @Value("${book.name}")

    private String bookName;

    @Autowired

    private Environment environment;

    public void outputResource() {

        try {

            System.out.println(normal);

            System.out.println(osName);

            System.out.println(randomNumber);

            System.out.println(fromAnother);

            System.out.println(IOUtils.toString(testFile.getInputStream()));

            System.out.println("\n" + IOUtils.toString(testUrl.getInputStream()) + "\n");

            System.out.println(bookName);

            System.out.println(environment.getProperty("book.author"));

        } catch (IOException e) {

            e.printStackTrace();

        }

    }

}
获取配置文件的属性:首先要给任意的Bean注解@PropertySource,指定文件位置。1、从Environment中获取;2、注册一个PropertySourcesPlaceholderConfigurer的bean,然后通过@Value("${属性名}")注入
配置类:
package com.qfedu.CommonSpring.config;

import org.springframework.context.annotation.Bean;

import org.springframework.context.annotation.ComponentScan;

import org.springframework.context.annotation.Configuration;

import org.springframework.context.support.PropertySourcesPlaceholderConfigurer;

@Configuration

@ComponentScan("com.qfedu.CommonSpring")

public class ELConfig {

    @Bean

    public static PropertySourcesPlaceholderConfigurer propertyConfigure() {

        return new PropertySourcesPlaceholderConfigurer();

    }

}
单元测试:
package com.qfedu.CommonSpring;

import org.junit.AfterClass;

import org.junit.BeforeClass;

import org.junit.Test;

import org.springframework.context.ApplicationContext;

import org.springframework.context.annotation.AnnotationConfigApplicationContext;

import com.qfedu.CommonSpring.config.ELConfig;

import com.qfedu.CommonSpring.service.ELService;

public class AppTest {

    private static ApplicationContext context = null;

    @BeforeClass

    public static void setUpBeforeClass() {

        context = new AnnotationConfigApplicationContext(ELConfig.class);

    }

    @AfterClass

    public static void tearDownAfterClass() {

        if(context instanceof AnnotationConfigApplicationContext) {

            ((AnnotationConfigApplicationContext) context).destroy();

        }

    }

    @Test

    public void test() {

        ELService elService = context.getBean(ELService.class);

        elService.outputResource();

    }

}
Bean的初始化和销毁:
在实际开发中,经常会在bean使用之前或之后,做一些必要的操作,而Spring对Bean生命周期的操作提供了支持。可以使用两种方式操作:
- 使用Java配置(返回注册Bean):使用@Bean的 initMethod 和 destroyMethod (相当于 xml 配置的 inti-method 和 destroy-method)。
- 使用JSR250提供的注解方式:JSR-250的 @PostConstruct 和 @PreDestroy。
测试示例:
添加JSR250支持:
<dependency>

    <groupId>javax.annotation</groupId>

    <artifactId>jsr250-api</artifactId>

    <version>1.0</version>

</dependency>
使用JSR250注解的bean:
package com.test.service;

import javax.annotation.PostConstruct;

import javax.annotation.PreDestroy;

public class JSR250WayService {

    @PostConstruct    //构造函数执行完之后执行

    public void init() {

        System.out.println("JSR250-init-method");

    }

    public JSR250WayService() {

        System.out.println("constructor-JSR250WayService");

    }

    @PreDestroy        //bean销毁之前执行

    public void destroy() {

        System.out.println("JSR250-destroy-method");

    }

}
使用Java配置的bean:
package com.test.service;

public class BeanWayService {

    public void init() {

        System.out.println("@Bean-init-method");

    }

    public BeanWayService() {

        System.out.println("constructor-BeanWayService");

    }

    public void destroy() {

        System.out.println("@Bean-destroy-method");

    }

}
配置类:
package com.test.config;

import org.springframework.context.annotation.Bean;

import org.springframework.context.annotation.ComponentScan;

import org.springframework.context.annotation.Configuration;

import com.test.service.BeanWayService;

import com.test.service.JSR250WayService;

@Configuration

@ComponentScan("com.test")

public class PrePostConfig {

    // post and pre

    @Bean(initMethod = "init", destroyMethod = "destroy")

    BeanWayService beanWayService() {

        return new BeanWayService();

    }

    @Bean

    JSR250WayService jsr250WayService() {

        return new JSR250WayService();

    }

}
单元测试:
package com.test.CommonSpring;

import org.junit.AfterClass;

import org.junit.BeforeClass;

import org.junit.Test;

import org.springframework.context.ApplicationContext;

import org.springframework.context.annotation.AnnotationConfigApplicationContext;

import com.test.config.PrePostConfig;

import com.test.service.BeanWayService;

import com.test.service.JSR250WayService;

public class AppTest {

    private static ApplicationContext context = null;

    @BeforeClass

    public static void setUpBeforeClass() {

        context = new AnnotationConfigApplicationContext(PrePostConfig.class);

    }

    @AfterClass

    public static void tearDownAfterClass() {

        if(context instanceof AnnotationConfigApplicationContext) {

            ((AnnotationConfigApplicationContext) context).destroy();

        }

    }

    @Test

    public void test() {

        //这两个bean,容器始终是会根据配置类创建的,此处至于要不要getBean都没影响

//        JSR250WayService jsr250WayService = context.getBean(JSR250WayService.class);

//        BeanWayService beanWayService = context.getBean(BeanWayService.class);

    }

}
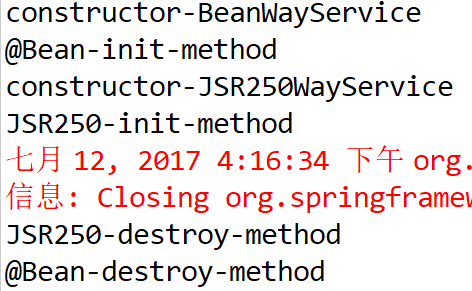
测试结果:
依次创建、销毁bean,post 和 pre 也如期所至。
Profile:
Profile为在不同环境下,使用不同的配置提供了支持(一般开发环境和生产环境的配置肯定是不相同的,例如数据库的配置)。
由于Profile的配置类中,有用于不同环境的不同配置,使用时需要选择某一种配置,故不能像之前那样,直接用配置类初始化容器,而是要设定容器使用哪一种Profile,然后容器根据配置类来选择使用不同的配置 —— 有以下几种设定方式:
- 通过设置容器的Enviroment的ActiveProfiles,来设定当前容器需要的配置环境。使用@Profile对类或方法进行注解,以实现不同的情况,实例化不同的bean。
- 通过设置JVM的环境参数(spring.profiles.active),来设定配置环境。
- 在Web项目中,设置在前端控制器DispatcherServlet(在Spring web mvc的jar包下)的context parameter中。
在Servlet 2.5及以下,通过xml配置:
<servlet>

    <servlet-name>dispatcher</servlet-name>

    <servlet-class>org.springframework.web.servlet.DispatcherServlet</servlet-class>

    <init-param>

        <param-name>spring.profiles.active</param-name>

        <param-value>production</param-value>

    </init-param>

</servlet>
在Servlet 3.0及以上,通过WebApplicationInitializer的实现类配置:
public class WebInitializer implements WebApplicationInitializer {

    @Override

    public void onStartup(ServletContext servletContext) throws ServletException {

        servletContext.setInitParameter("spring.profiles.default", "dev");

    }

}
测试上述第一种设定方式:
待配置的bean:
package com.qfedu.CommonSpring.service;

public class DemoBean {

    private String content;

    public DemoBean(String content) {

        this.content = content;

    }

    public String getContent() {

        return content;

    }

    public void setContent(String content) {

        this.content = content;

    }

}
Profile的配置类:
package com.qfedu.CommonSpring.config;

import org.springframework.context.annotation.Bean;

import org.springframework.context.annotation.Configuration;

import org.springframework.context.annotation.Profile;

import com.qfedu.CommonSpring.service.DemoBean;

@Configuration

public class ProfileConfig {

    @Bean

    @Profile("dev")

    public DemoBean devDemoBean() {

        return new DemoBean("when development profile enviroment");

    }

    @Bean

    @Profile("prod")

    public DemoBean prodDemoBean() {

        return new DemoBean("when production profile enviroment");

    }

}
单元测试:
package com.qfedu.CommonSpring;

import org.junit.AfterClass;

import org.junit.BeforeClass;

import org.junit.Test;

import org.springframework.context.annotation.AnnotationConfigApplicationContext;

import com.qfedu.CommonSpring.config.ProfileConfig;

import com.qfedu.CommonSpring.service.DemoBean;

public class AppTest {

    private static AnnotationConfigApplicationContext context = null;

    @BeforeClass

    public static void setUpBeforeClass() {

        context = new AnnotationConfigApplicationContext();

        //先将活动的Profile设置为dev,然后注册bean配置类,不然getBean会报Bean未定义的错误。注册后是必须refresh的,不然也会报错

        //Application的实现类的构造也是:register + refresh

        //不过只要不getBean,就不会报任何错

        context.getEnvironment().setActiveProfiles("dev");

        context.register(ProfileConfig.class);

        context.refresh();

    }

    @AfterClass

    public static void tearDownAfterClass() {

        context.destroy();

    }

    @Test

    public void test() {

        DemoBean demoBean = context.getBean(DemoBean.class);

        System.out.println(demoBean.getContent());

    }

}
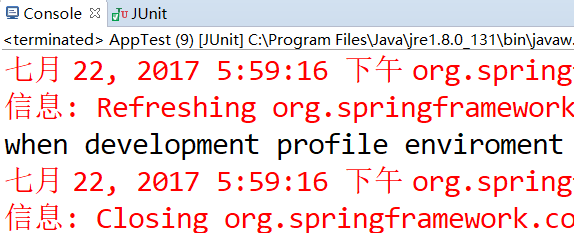
上面为dev,测试结果(设置为prod,结果也会有相应改变):
事件(Application Event):
Spring 的事件为 bean 与 bean 之间的消息通信提供了支持:当一个 bean 处理完一个任务之后,希望另一个 bean 能发现(监听事件的发送)并做出相应的处理。
测试示例:
自定义事件(需要 extends ApplicationEvent):
package com.qfedu.CommonSpring.event;

import org.springframework.context.ApplicationEvent;

public class DemoEvent extends ApplicationEvent {

    private static final long serialVersionUID = 1L;

    private String msg;

    public DemoEvent(Object source, String msg) {

        super(source);

        this.setMsg(msg);

    }

    public String getMsg() {

        return msg;

    }

    public void setMsg(String msg) {

        this.msg = msg;

    }

}
对应有事件监听器(需要 implements ApplicationListener<E extends ApplicationEvent(即自定义事件)>),指定监听事件的类型:
package com.qfedu.CommonSpring.component;

import org.springframework.context.ApplicationListener;

import org.springframework.stereotype.Component;

import com.qfedu.CommonSpring.event.DemoEvent;

@Component

public class DemoListener implements ApplicationListener<DemoEvent> {

    @Override

    public void onApplicationEvent(DemoEvent event) {

        String msg = event.getMsg();

        System.out.println("bean-demoListener收到bean-demoPublisher发布的消息:" + msg);

    }

}
使用容器发布事件:
package com.qfedu.CommonSpring.component;

import org.springframework.beans.factory.annotation.Autowired;

import org.springframework.context.ApplicationContext;

import org.springframework.stereotype.Component;

import com.qfedu.CommonSpring.event.DemoEvent;

@Component

public class DemoPublisher {

    @Autowired

    ApplicationContext context;

    public void publish(String msg) {

        context.publishEvent(new DemoEvent(this, msg));

    }

}
配置类:
package com.qfedu.CommonSpring.config;

import org.springframework.context.annotation.ComponentScan;

import org.springframework.context.annotation.Configuration;

@Configuration

@ComponentScan("com.qfedu.CommonSpring")

public class EventConfig {

}
单元测试:
package com.qfedu.CommonSpring;

import org.junit.AfterClass;

import org.junit.BeforeClass;

import org.junit.Test;

import org.springframework.context.ApplicationContext;

import org.springframework.context.annotation.AnnotationConfigApplicationContext;

import com.qfedu.CommonSpring.component.DemoPublisher;

import com.qfedu.CommonSpring.config.EventConfig;

public class AppTest {

    private static ApplicationContext context = null;

    @BeforeClass

    public static void setUpBeforeClass() {

        context = new AnnotationConfigApplicationContext(EventConfig.class);

    }

    @AfterClass

    public static void tearDownAfterClass() {

        if(context instanceof AnnotationConfigApplicationContext) {

            ((AnnotationConfigApplicationContext) context).destroy();

        }

    }

    @Test

    public void test() {

        DemoPublisher demoPublisher = context.getBean(DemoPublisher.class);

        demoPublisher.publish("hello");

    }

}
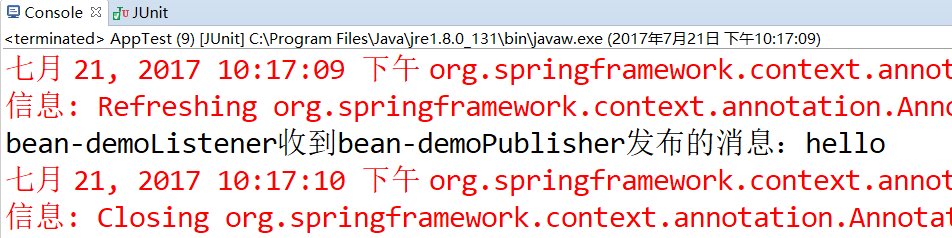
测试结果:
Spring高级话题:
Spring Aware:
Spring 的 DI 最大的亮点,就是所有的bean对容器的存在是没有意识的,即容器是可以替换的,如Google Guice。
但在实际项目中,往往不可避免的要用到 Spring 容器本身的功能 —— 要调用Spring提供的资源,就需要意识到Spring容器的存在,即需要使用Spring Aware(意识到),此时所有的bean就会与Spring框架相耦合。
Spring 提供的 Aware 接口:
- BeanNameAware:获得容器中bean的名称。
- BeanFactoryAware:获得当前的 bean factory,调用容器的服务。
- ApplicationContextAware*:获得当前的 application context,调用容器的服务。
- MessageSourceAware:获得 message source,获得文本信息。
- ApplicationEventPublisherAware:应用事件发布器,通过实现该接口发布事件。
- ResourceLoaderAware:资源加载器,获得外部资源文件。
通过实现Spring Aware的接口,让bean获得Spring容器的服务 —— ApplicationContext接口已经继承了MessageSource、ApplicationEventPublisher、ResourceLoader接口,通过ApplicationContext定义的IoC容器,可以直接获得Spring容器的所有服务。但是通常使用Spring的服务的原则是:需要什么服务,就实现相应的接口。
测试BeanNameAware和ResourceLoaderAware接口:
测试bean和配置类:
//bean

package com.test.service;

import java.io.IOException;

import org.apache.commons.io.IOUtils;

import org.springframework.beans.factory.BeanNameAware;

import org.springframework.context.ResourceLoaderAware;

import org.springframework.core.io.Resource;

import org.springframework.core.io.ResourceLoader;

import org.springframework.stereotype.Service;

@Service

public class AwareService implements BeanNameAware, ResourceLoaderAware {

    private String beanName;

    private ResourceLoader loader;

    @Override

    public void setResourceLoader(ResourceLoader resourceLoader) {

        this.loader = resourceLoader;

    }

    @Override

    public void setBeanName(String name) {

        this.beanName = name;

    }

    public void outputResult() {

        System.out.println("Bean的名称:" + beanName);

        Resource resource = loader.getResource("classpath:test.txt");

        try {

            System.out.println("ResourceLoader加载的文件内容:\n" + IOUtils.toString(resource.getInputStream()));

        } catch (IOException e) {

            e.printStackTrace();

        }

    }

}

//config class

package com.test.config;

import org.springframework.context.annotation.ComponentScan;

import org.springframework.context.annotation.Configuration;

@Configuration

@ComponentScan("com.test")

public class AwareConfig {

}
单元测试:
package com.test.CommonSpring;

import org.junit.AfterClass;

import org.junit.BeforeClass;

import org.junit.Test;

import org.springframework.context.ApplicationContext;

import org.springframework.context.annotation.AnnotationConfigApplicationContext;

import com.test.config.AwareConfig;

import com.test.service.AwareService;

public class AppTest {

    private static ApplicationContext context = null;

    @BeforeClass

    public static void setUpBeforeClass() {

        context = new AnnotationConfigApplicationContext(AwareConfig.class);

    }

    @AfterClass

    public static void tearDownAfterClass() {

        if(context instanceof AnnotationConfigApplicationContext) {

            ((AnnotationConfigApplicationContext) context).destroy();

        }

    }

    @Test

    public void test() {

        AwareService awareService = context.getBean(AwareService.class);

        awareService.outputResult();

    }

}
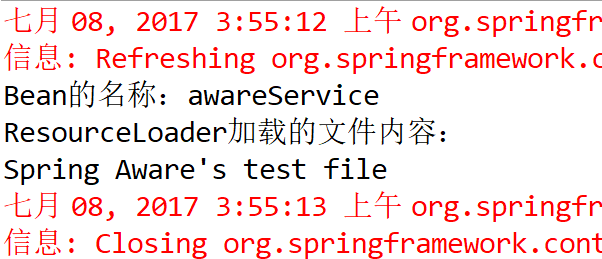
测试结果(如下,声明式bean,如@Service注册的bean的名称为:将类名的首字母小写的字符串):
多线程:
Spring 通过任务执行器(TaskExecutor),实现多线程以及并发编程。而使用ThreadPoolTaskExexcutor,则可实现一个基于线程池的TaskExecutor。实际开发中的任务,一般是非阻碍的,即异步的 —— 通过在配置类注解@EnableAsync,开启对异步任务的支持;并对实际执行异步任务的Bean的方法,声明@Async注解。
测试示例:
配置类:
package com.qfedu.CommonSpring.config;

import java.util.concurrent.Executor;

import org.springframework.aop.interceptor.AsyncUncaughtExceptionHandler;

import org.springframework.context.annotation.ComponentScan;

import org.springframework.context.annotation.Configuration;

import org.springframework.scheduling.annotation.AsyncConfigurer;

import org.springframework.scheduling.annotation.EnableAsync;

import org.springframework.scheduling.concurrent.ThreadPoolTaskExecutor;

@Configuration

@ComponentScan("com.qfedu.CommonSpring")

@EnableAsync

public class TaskExecutorConfig implements AsyncConfigurer {

    @Override

    public Executor getAsyncExecutor() {

        //配置并返回基于线程池的TaskExecutor,而Spring则通过此方法获得它

        ThreadPoolTaskExecutor taskExecutor = new ThreadPoolTaskExecutor();

        taskExecutor.setCorePoolSize(5);

        taskExecutor.setMaxPoolSize(10);

        taskExecutor.setQueueCapacity(25);

        taskExecutor.initialize();

        return taskExecutor;

    }

    @Override

    public AsyncUncaughtExceptionHandler getAsyncUncaughtExceptionHandler() {

        return null;

    }

}
任务执行类:
package com.qfedu.CommonSpring.service;

import org.springframework.scheduling.annotation.Async;

import org.springframework.stereotype.Service;

@Service

public class AsyncTaskService {

    //声明这是一个异步方法(如果注解在类级别,则表明该类的所有方法都是异步方法)

    //这些异步方法,会自动被注入,并使用ThreadPoolTaskExecutor作为TaskExecutor

    @Async

    public void executeAsyncTask(Integer i) {

        System.out.println("执行异步任务:" + i);

    }

    @Async

    public void executeAsyncTaskPlus(Integer i) {

        System.out.println("执行异步任务+1:" + (i + 1));

    }

}
单元测试:
package com.qfedu.CommonSpring;

import org.junit.AfterClass;

import org.junit.BeforeClass;

import org.junit.Test;

import org.springframework.context.ApplicationContext;

import org.springframework.context.annotation.AnnotationConfigApplicationContext;

import com.qfedu.CommonSpring.config.TaskExecutorConfig;

import com.qfedu.CommonSpring.service.AsyncTaskService;

public class AppTest {

    private static ApplicationContext context = null;

    @BeforeClass

    public static void setUpBeforeClass() {

        context = new AnnotationConfigApplicationContext(TaskExecutorConfig.class);

    }

    @AfterClass

    public static void tearDownAfterClass() {

        if(context instanceof AnnotationConfigApplicationContext) {

            ((AnnotationConfigApplicationContext) context).destroy();

        }

    }

    @Test

    public void test() {

        AsyncTaskService asyncTaskService = context.getBean(AsyncTaskService.class);

        for (int i = 0; i < 10; i++) {

            asyncTaskService.executeAsyncTask(i);

            asyncTaskService.executeAsyncTaskPlus(i);

        }

    }

}
测试结果:
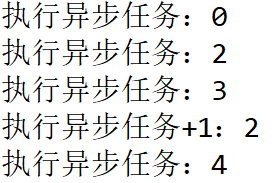
结果表明,for循环中的每次调用的方法,都不是顺序执行,而是这些方法都异步执行(因此看到的结果是"随机的")。
计划任务:
从Spring 3.1开始,计划任务在Spring中的实现变得异常简单 —— 先在配置类注解@EnableScheduling,开启对计划任务的支持;然后在要执行计划任务的方法上注解@Scheduled,声明这是一个计划任务,而且还可以通过@Scheduled注解设置为各种类型的计划任务,如cron、fixDelay、fixRate等。
测试示例:
配置类:
package com.test.config;

import org.springframework.context.annotation.ComponentScan;

import org.springframework.context.annotation.Configuration;

import org.springframework.scheduling.annotation.EnableScheduling;

@Configuration

@ComponentScan("com.test")

@EnableScheduling

public class TaskSchedulerConfig {

}
计划任务类:
package com.test.service;

import java.text.SimpleDateFormat;

import java.util.Date;

import org.springframework.scheduling.annotation.Scheduled;

import org.springframework.stereotype.Component;

@Component

public class ScheduledTaskService {

    private static final SimpleDateFormat dateFormat = new SimpleDateFormat("HH:mm:ss");

    @Scheduled(fixedRate = 5000)

    public void reportCurrentTime() {

        System.out.println("五秒执行一次:" + dateFormat.format(new Date()));

    }

    //cron在win环境也可以执行

    @Scheduled(cron = "0 14 11 ? * *")

    public void fixTimeExecution() {

        //每天的,11点14分0秒执行

        System.out.println("指定时间:" + dateFormat.format(new Date()));

    }

}
任意创建一个类,编写main方法(标准的 Java 入口方法) —— 这里不能用单元测试,因为AfterClass可能会自动关闭ApplicationContext资源,计划任务就失效了:
ApplicationContext context = new AnnotationConfigApplicationContext(TaskSchedulerConfig.class);
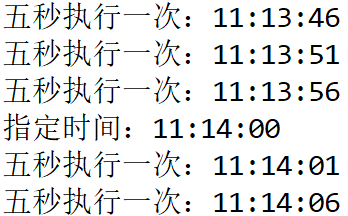
执行情况如下:
条件注解@Conditional:
通过活动(手动选择,而不是按条件选择)的Profile,可以获得不同的Bean。现在Spring 4提供了一个更有用的基于条件,来选择性实例化Bean的方式,即使用 @Conditional 注解,而Spring Boot会大量使用到条件注解。
@Conditional注解会根据,在满足的特定条件的情况下,创建对应的Bean(或者说根据特定条件,来控制Bean的创建行为) —— 利用这个特性,可以进行一些自动的配置。
下面的示例,以不同的操作系统为条件基础,通过实现Condition接口的matches方法来编写条件,然后在注册Bean时,使用条件类作为条件:
编写条件:
//操作系统为windows

package com.qfedu.CommonSpring.condition;

import org.springframework.context.annotation.Condition;

import org.springframework.context.annotation.ConditionContext;

import org.springframework.core.type.AnnotatedTypeMetadata;

public class WindowsCondition implements Condition {

    @Override

    public boolean matches(ConditionContext context, AnnotatedTypeMetadata metadata) {

        return context.getEnvironment().getProperty("os.name").contains("Windows");

    }

}

//操作系统为linux

package com.qfedu.CommonSpring.condition;

import org.springframework.context.annotation.Condition;

import org.springframework.context.annotation.ConditionContext;

import org.springframework.core.type.AnnotatedTypeMetadata;

public class LinuxCondition implements Condition {

    @Override

    public boolean matches(ConditionContext context, AnnotatedTypeMetadata metadata) {

        return context.getEnvironment().getProperty("os.name").contains("Linux");

    }

}
条件抽象化 —— Bean接口:
package com.qfedu.CommonSpring.service;

public interface OSNameService {

    public String showOSName();

}
对应条件的两个Bean:
//Windows下

package com.qfedu.CommonSpring.service.impl;

import com.qfedu.CommonSpring.service.OSNameService;

public class WindowsNameService implements OSNameService {

    @Override

    public String showOSName() {

        return "Windows";

    }

}

//Linux下

package com.qfedu.CommonSpring.service.impl;

import com.qfedu.CommonSpring.service.OSNameService;

public class LinuxNameService implements OSNameService {

    @Override

    public String showOSName() {

        return "Linux";

    }

}
Bean配置类:
package com.qfedu.CommonSpring.config;

import org.springframework.context.annotation.Bean;

import org.springframework.context.annotation.Conditional;

import org.springframework.context.annotation.Configuration;

import com.qfedu.CommonSpring.condition.LinuxCondition;

import com.qfedu.CommonSpring.condition.WindowsCondition;

import com.qfedu.CommonSpring.service.impl.LinuxNameService;

import com.qfedu.CommonSpring.service.impl.WindowsNameService;

@Configuration

public class ConditionConfig {

    @Bean

    @Conditional(WindowsCondition.class)

    public WindowsNameService windowsListService() {

        return new WindowsNameService();

    }

    @Bean

    @Conditional(LinuxCondition.class)

    public LinuxNameService linuxListService() {

        return new LinuxNameService();

    }

}
单元测试:
package com.qfedu.CommonSpring;

import org.junit.AfterClass;

import org.junit.BeforeClass;

import org.junit.Test;

import org.springframework.context.ApplicationContext;

import org.springframework.context.annotation.AnnotationConfigApplicationContext;

import com.qfedu.CommonSpring.config.ConditionConfig;

import com.qfedu.CommonSpring.service.OSNameService;

public class AppTest {

    private static ApplicationContext context = null;

    @BeforeClass

    public static void setUpBeforeClass() {

        context = new AnnotationConfigApplicationContext(ConditionConfig.class);

    }

    @AfterClass

    public static void tearDownAfterClass() {

        if(context instanceof AnnotationConfigApplicationContext) {

            ((AnnotationConfigApplicationContext) context).destroy();

        }

    }

    @Test

    public void test() {

        OSNameService osNameService = context.getBean(OSNameService.class);

        System.out.println("Current OS is " + osNameService.showOSName());

    }

}
组合注解:
从Spring 2开始,为了响应JDK 1.5推出的注解功能,Spring 开始大量加入注解来替代 xml 配置。Spring的注解主要用来,配置和注入Bean、以及AOP相关配置(@Transactional)。而伴随着注解的大量使用,自然会出现:相同的多个注解,用到了类或方法之上的情况。这被称为样板代码(boilerplate code),非常的繁琐,这也是Spring设计原则中要消除的代码。
使用一个或多个元注解的注解,被称为组合注解(组合注解会具备使用的元注解的功能,即组合了使用了的元注解)。Spring的很多注解都可以用作元注解,Spring也有很多组合注解,如@Configuration,通过查看@Configuration的源码,可以看到该注解组合了@Component 和 JDK 的几个注解。
将前面多线程的示例代码进行修改,作为组合注解的演示:
增加组合注解,修改配置类:
//组合注解

package com.qfedu.CommonSpring.config;

import org.springframework.context.annotation.Configuration;

import org.springframework.scheduling.annotation.EnableAsync;

@Configuration

@EnableAsync

public @interface ComboMetaAnnotation {

}

//修改后的配置类,并改用Java配置方式注入bean

package com.qfedu.CommonSpring.config;

import java.util.concurrent.Executor;

import org.springframework.aop.interceptor.AsyncUncaughtExceptionHandler;

import org.springframework.context.annotation.Bean;

import org.springframework.scheduling.annotation.AsyncConfigurer;

import org.springframework.scheduling.concurrent.ThreadPoolTaskExecutor;

import com.qfedu.CommonSpring.service.AsyncTaskService;

@ComboMetaAnnotation

public class ComboAnnotationTaskConfig implements AsyncConfigurer {

    @Override

    public Executor getAsyncExecutor() {

        ThreadPoolTaskExecutor taskExecutor = new ThreadPoolTaskExecutor();

        taskExecutor.setCorePoolSize(5);

        taskExecutor.setMaxPoolSize(10);

        taskExecutor.setQueueCapacity(25);

        taskExecutor.initialize();

        return taskExecutor;

    }

    @Override

    public AsyncUncaughtExceptionHandler getAsyncUncaughtExceptionHandler() {

        return null;

    }

    @Bean

    public AsyncTaskService asyncTaskService() {

        return new AsyncTaskService();

    }

}
修改单元测试,将旧配置类改为修改后的,其他代码不变 —— 结果表明,组合注解依然能达到原本的效果。这里将两个配置类比较,虽然不能感受到去掉了样板代码,但至少有组合的操作。实际使用时,按照封装的思想,组合去调用重复使用的样板代码即可。
Spring 对测试的支持:
Spring Test 有一个 SpringJUnit4ClassRunner 类,它提供了 Spring TestContext Framework 的功能。Spring TestContext Framework 对集成测试提供了顶级支持,即无须部署或运行程序测试整个系统能否协调工作,而且不依赖特定的测试框架(JUnit、TestNG 都可以使用),简化了一些测试的代码,包括:通过 @ConfiguartionContext 选择配置类,配置容器 ApplicationContext;通过 @ActiveProfiles 声明活动的 profile;通过 @WebAppConfiguration 设置 web 程序资源的根目录。
集成测试一般涉及程序中的各个分层,因此用单元测试简单演示:
Maven 依赖(scope 为 test,说明该依赖的 jar 包仅在 test 周期存活,即在发布的时候不会包含这些 jar 包):
<dependency>

    <groupId>junit</groupId>

    <artifactId>junit</artifactId>

    <version>4.12</version>

    <scope>test</scope>

</dependency>

<dependency>

    <groupId>org.springframework</groupId>

    <artifactId>spring-test</artifactId>

    <version>${spring-framework.version}</version>

    <scope>test</scope>

</dependency>
bean:
package com.qfedu.CommonSpring.component;

public class TestBean {

    private String content;

    public TestBean(String content) {

        super();

        this.content = content;

    }

    public String getContent() {

        return content;

    }

    public void setContent(String content) {

        this.content = content;

    }

}
配置类:
package com.qfedu.CommonSpring.config;

import org.springframework.context.annotation.Bean;

import org.springframework.context.annotation.Configuration;

import org.springframework.context.annotation.Profile;

import com.qfedu.CommonSpring.service.DemoBean;

@Configuration

public class ProfileConfig {

    @Bean

    @Profile("dev")

    public DemoBean devDemoBean() {

        return new DemoBean("when development profile enviroment");

    }

    @Bean

    @Profile("prod")

    public DemoBean prodDemoBean() {

        return new DemoBean("when production profile enviroment");

    }

}
使用Spring TestContext Framework 简化单元测试:
package com.qfedu.CommonSpring;

import static org.junit.Assert.assertEquals;

import org.junit.Test;

import org.junit.runner.RunWith;

import org.springframework.beans.factory.annotation.Autowired;

import org.springframework.test.context.ActiveProfiles;

import org.springframework.test.context.ContextConfiguration;

import org.springframework.test.context.junit4.SpringJUnit4ClassRunner;

import com.qfedu.CommonSpring.component.TestBean;

import com.qfedu.CommonSpring.config.TestConfig;

@RunWith(SpringJUnit4ClassRunner.class)

@ContextConfiguration(classes = {TestConfig.class})

@ActiveProfiles("prod")

public class AppTest {

    @Autowired

    private TestBean testBean;

    @Test

    public void test() {

        String expected = "when production profile enviroment";

        String actual = testBean.getContent();

        assertEquals(expected, actual);     // org.junit.Assert

    }

}
声明式事务:
Spring框架学习的更多相关文章
- Spring框架学习一
Spring框架学习,转自http://blog.csdn.net/lishuangzhe7047/article/details/20740209 Spring框架学习(一) 1.什么是Spring ...
- spring框架学习(三)junit单元测试
spring框架学习(三)junit单元测试 单元测试不是头一次听说了,但只是听说从来没有用过.一个模块怎么测试呢,是不是得专门为一单元写一个测试程序,然后将测试单元代码拿过来测试? 我是这么想的.学 ...
- Spring框架学习1
AnonymouL 兴之所至,心之所安;尽其在我,顺其自然 新随笔 管理 Spring框架学习(一) 阅读目录 一. spring概述 核心容器: Spring 上下文: Spring AOP ...
- spring 框架学习网站
spring 框架学习网站 NO1 http://www.mkyong.com NO2 https://spring.io/docs/reference
- Spring框架学习之IOC(二)
Spring框架学习之IOC(二) 接着上一篇的内容,下面开始IOC基于注解装配相关的内容 在 classpath 中扫描组件 <context:component-scan> 特定组件包 ...
- Spring框架学习之IOC(一)
Spring框架学习之IOC(一) 先前粗浅地学过Spring框架,但当时忙于考试及后期实习未将其记录,于是趁着最近还有几天的空闲时间,将其稍微整理一下,以备后期查看. Spring相关知识 spri ...
- Spring框架学习笔记(5)——Spring Boot创建与使用
Spring Boot可以更为方便地搭建一个Web系统,之后服务器上部署也较为方便 创建Spring boot项目 1. 使用IDEA创建项目 2. 修改groupid和artifact 3. 一路n ...
- Spring框架学习总结(上)
目录 1.Spring的概述 2.Spring的入门(IOC) 3.Spring的工厂类 4.Spring的配置 5.Spring的属性注入 6.Spring的分模块开发的配置 @ 1.Spring的 ...
- Spring框架学习笔记(8)——spring boot+mybatis plus+mysql项目环境搭建
之前写的那篇Spring框架学习笔记(5)--Spring Boot创建与使用,发现有多小细节没有提及,,正好现在又学习了mybatis plus这款框架,打算重新整理一遍,并将细节说清楚 1.通过I ...
- Spring框架学习笔记(1)
Spring 框架学习笔记(1) 一.简介 Rod Johnson(spring之父) Spring是分层的Java SE/EE应用 full-stack(服务端的全栈)轻量级(跟EJB比)开源框架, ...
随机推荐
- USB接口案例——多态和转型
其中,为传递和使用的匿名对象,即创建了对象,但是没有引用类和对象名来接收: 电脑类中的操作usb的成员方法中,要向下转型,毛主席讲的具体问题具体分析,不同的设备有不同的操作:
- linux下安装mysql(rpm文件安装)
数据库包下载: https://www.mysql.com/downloads/ 在GPL开原协议的社区开源版里边下载 我们用mysql community server里边的 其中workbench ...
- centos 安装MySQL全过程
1.到chinaunix下载mysql 下载地址: http://download.chinaunix.net/download/0008000/7159.shtml 2.上传到CentOS服务器 本 ...
- System.map文件的作用解析
有关System.map文件的信息好象很缺乏.其实它一点也不神秘,并且在整个事情当中它并不象看上去那么得重要.但是由于缺乏必要的文档说明,使其显得比较神秘.它就象耳垂,我们每个人都有,但却不知道是干什 ...
- 实用的 图片上传 html+css
html <form id="mainForm"> <div class="content"> <div class=" ...
- node.js的on、emit、off封装
//绑定事件.触发事件和移除事件 //绑定事件 //on(eventName,cb){} //第一步判断当前事件是否存在,如果不存在则初始化:key:[],然后在将回调函数添加到数据中去 let ev ...
- GoldenGate实时投递数据到大数据平台(3)- Apache Flume
Apache Flume Flume NG是一个分布式.可靠.可用的系统,它能够将不同数据源的海量日志数据进行高效收集.聚合,最后存储到一个中心化数据存储系统中,方便进行数据分析.事实上flume也可 ...
- Eloquent JavaScript #08# Bugs and Errors
索引 Notes strict mode js类型 js测试 Debugging Exceptions finally 异常分支 Exercise Retry The locked box Notes ...
- SVN的标准目录结构
SVN目录规范 在visualSVN中创建仓库时,可以选择svn目录结构 Trunk主干目录,此目录下的文件为基准文件. Brancher 用于开发的分支目录 Tags用于发布的版本目录 假设有一个项 ...
- c++ STL中的next_permutation
default (1) template <class BidirectionalIterator> bool next_permutation (BidirectionalIterato ...