详解thinkphp+redis+队列的实现代码
1,安装Redis,根据自己的PHP版本安装对应的redis扩展(此步骤简单的描述一下)
1.1,安装 php_igbinary.dll,php_redis.dll扩展此处需要注意你的php版本如图:

1.2,php.ini文件新增 extension=php_igbinary.dll;extension=php_redis.dll两处扩展
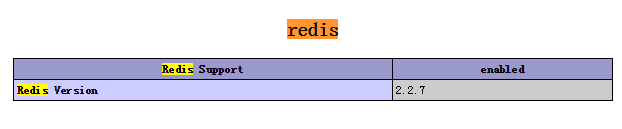
ok此处已经完成第一步redis环境搭建完成看看phpinfo
项目中实际使用redis
2.1,第一步配置redis参数如下,redis安装的默认端口为6379:
|
1
2
3
4
5
6
7
8
9
10
11
12
13
14
|
<?php/* 数据库配置 */return array( 'DATA_CACHE_PREFIX' => 'Redis_',//缓存前缀 'DATA_CACHE_TYPE'=>'Redis',//默认动态缓存为Redis 'DATA_CACHE_TIMEOUT' => false, 'REDIS_RW_SEPARATE' => true, //Redis读写分离 true 开启 'REDIS_HOST'=>'127.0.0.1', //redis服务器ip,多台用逗号隔开;读写分离开启时,第一台负责写,其它[随机]负责读; 'REDIS_PORT'=>'6379',//端口号 'REDIS_TIMEOUT'=>'300',//超时时间 'REDIS_PERSISTENT'=>false,//是否长连接 false=短连接 'REDIS_AUTH'=>'',//AUTH认证密码 );?> |
2.2,实际函数中使用redis:
|
1
2
3
4
5
6
7
8
9
10
11
|
/** * redis连接 * @access private * @return resource * @author bieanju */ private function connectRedis(){ $redis=new \Redis(); $redis->connect(C("REDIS_HOST"),C("REDIS_PORT")); return $redis; } |
2.3,秒杀的核心问题是在大并发的情况下不会超出库存的购买,这个就是处理的关键所以思路是第一步在秒杀类的先做一些基础的数据生成:
|
1
2
3
4
5
6
7
8
9
10
11
|
//现在初始化里面定义后边要使用的redis参数public function _initialize(){ parent::_initialize(); $goods_id = I("goods_id",'0','intval'); if($goods_id){ $this->goods_id = $goods_id; $this->user_queue_key = "goods_".$goods_id."_user";//当前商品队列的用户情况 $this->goods_number_key = "goods".$goods_id;//当前商品的库存队列 } $this->user_id = $this->user_id ? $this->user_id : $_SESSION['uid']; } |
2.4,第二步就是关键所在,用户在进入商品详情页前先将当前商品的库存进行队列存入redis如下:
|
1
2
3
4
5
6
7
8
9
10
11
12
13
14
15
16
17
18
19
20
21
22
23
24
25
26
27
28
29
30
|
/*** 访问产品前先将当前产品库存队列* @access public* @author bieanju*/public function _before_detail(){ $where['goods_id'] = $this->goods_id; $where['start_time'] = array("lt",time()); $where['end_time'] = array("gt",time()); $goods = M("goods")->where($where)->field('goods_num,start_time,end_time')->find(); !$goods && $this->error("当前秒杀已结束!"); if($goods['goods_num'] > $goods['order_num']){ $redis = $this->connectRedis(); $getUserRedis = $redis->hGetAll("{$this->user_queue_key}"); $gnRedis = $redis->llen("{$this->goods_number_key}"); /* 如果没有会员进来队列库存 */ if(!count($getUserRedis) && !$gnRedis){ for ($i = 0; $i < $goods['goods_num']; $i ++) { $redis->lpush("{$this->goods_number_key}", 1); } } $resetRedis = $redis->llen("{$this->goods_number_key}"); if(!$resetRedis){ $this->error("系统繁忙,请稍后抢购!"); } }else{ $this->error("当前产品已经秒杀完!"); } } |
接下来要做的就是用ajax来异步的处理用户点击购买按钮进行符合条件的数据进入购买的排队队列(如果当前用户没在当前产品用户的队列就进入排队并且pop一个库存队列,如果在就抛出,):
|
1
2
3
4
5
6
7
8
9
10
11
12
13
14
15
16
17
18
19
20
21
22
23
24
25
26
27
28
29
30
31
32
33
34
35
36
37
38
39
40
41
42
43
44
45
46
47
48
49
|
/** * 抢购商品前处理当前会员是否进入队列 * @access public * @author bieanju */ public function goods_number_queue(){ !$this->user_id && $this->ajaxReturn(array("status" => "-1","msg" => "请先登录")); $model = M("flash_sale"); $where['goods_id'] = $this->goods_id; $goods_info = $model->where($where)->find(); !$goods_info && $this->error("对不起当前商品不存在或已下架!"); /* redis 队列 */ $redis = $this->connectRedis(); /* 进入队列 */ $goods_number_key = $redis->llen("{$this->goods_number_key}"); if (!$redis->hGet("{$this->user_queue_key}", $this->user_id)) { $goods_number_key = $redis->lpop("{$this->goods_number_key}"); } if($goods_number_key){ // 判断用户是否已在队列 if (!$redis->hGet("{$this->user_queue_key}", $this->user_id)) { // 插入抢购用户信息 $userinfo = array( "user_id" => $this->user_id, "create_time" => time() ); $redis->hSet("{$this->user_queue_key}", $this->user_id, serialize($userinfo)); $this->ajaxReturn(array("status" => "1")); }else{ $modelCart = M("cart"); $condition['user_id'] = $this->user_id; $condition['goods_id'] = $this->goods_id; $condition['prom_type'] = 1; $cartlist = $modelCart->where($condition)->count(); if($cartlist > 0){ $this->ajaxReturn(array("status" => "2")); }else{ $this->ajaxReturn(array("status" => "1")); } } }else{ $this->ajaxReturn(array("status" => "-1","msg" => "系统繁忙,请重试!")); } } |
附加一个调试的函数,删除指定队列值:
|
1
2
3
4
5
6
7
8
9
10
11
12
13
14
|
public function clearRedis(){ set_time_limit(0); $redis = $this->connectRedis(); //$Rd = $redis->del("{$this->user_queue_key}"); $Rd = $redis->hDel("goods49",'用户id''); $a = $redis->hGet("goods_49_user", '用户id'); if(!$a){ dump($a); } if($Rd == 0){ exit("Redis队列已释放!"); } } |
详解thinkphp+redis+队列的实现代码的更多相关文章
- php_DWZ-JUI中碰到的问题解决方法详解(thinkphp+dwz)
原文:php_DWZ-JUI中碰到的问题解决方法详解(thinkphp+dwz) 折腾了两天,dwz删除后,数据不能自动刷新,解决方案,直接看图 . 1. 删除.修改状态后无法刷新记录: 在dwz. ...
- 详解OJ(Online Judge)中PHP代码的提交方法及要点【举例:ZOJ 1001 (A + B Problem)】
详解OJ(Online Judge)中PHP代码的提交方法及要点 Introduction of How to submit PHP code to Online Judge Systems Int ...
- Java并发包源码学习系列:详解Condition条件队列、signal和await
目录 Condition接口 AQS条件变量的支持之ConditionObject内部类 回顾AQS中的Node void await() 添加到条件队列 Node addConditionWaite ...
- HBase 协处理器编程详解,第二部分:客户端代码编写
实现 Client 端代码 HBase 提供了客户端 Java 包 org.apache.hadoop.hbase.client.coprocessor.它提供以下三种方法来调用协处理器提供的服务: ...
- 【Redis】Redis事务详解,Redis事务支持回滚(不支持悲观锁)
1.redis事物参考:https://baijiahao.baidu.com/s?id=1613631210471699441&wfr=spider&for=pc (php操作red ...
- Transformer各层网络结构详解!面试必备!(附代码实现)
1. 什么是Transformer <Attention Is All You Need>是一篇Google提出的将Attention思想发挥到极致的论文.这篇论文中提出一个全新的模型,叫 ...
- Redis 详解 (二) redis的配置文件介绍
目录 1.开头说明 2.INCLUDES 3.MODULES 4.NETWORK 5.GENERAL 6.SNAPSHOTTING 7.REPLICATION 8.SECURITY 9.CLIENTS ...
- 详解.Net消息队列(MSMQ)应用
[IT168 技术文档]MSMQ是Windows 2000.Windows XP.Windows Server 2003的一个组件,并将继续包含在Windows Vista和以后的Windows服务器 ...
- thinkphp+redis+队列
1,安装redis,根据自己的php版本安装对应的redis扩展(此步骤简单的描述一下) 1.1,安装 php_igbinary.dll,php_redis.dll扩展此处需要注意你的php版本如图: ...
随机推荐
- java:easyui(重点示例)
1.accordion(可折叠的): <!doctype html> <html lang="zh"> <head> <title> ...
- JavaScript(3)——文档工具
文档工具 LEARN HTML = 教程 HTML REFERENCE = 字典 HTML + CSS + JAVASCRIPT = DYNAMIC HTML 推荐浏览器: Chrome浏览器(有丰 ...
- Cocos2d-x入门之旅
Cocos通过动作(Action)让精灵动起来,把数个动作组成序列(Sequence)就能让精灵做出连续的动作,在动作中我们可以改变精灵的位置,旋转角度,缩放比例,等等 动作(Action)# 首先我 ...
- caoz的梦呓:找工作么?会坐牢的那种。
猫宁!!! 参考链接:https://mp.weixin.qq.com/s/kj9crZIIrS_8IzuYzukydw 很多年轻人,初入职场,确实背景资历不够强,眼界阅历也不够,有时候稀里糊涂就误入 ...
- CentOS7中yum配置
1.打开centos的yum文件夹 输入命令cd /etc/yum.repos.d/ 2.用wget下载repo文件 输入命令wget http://mirrors.aliyun.com/repo ...
- 关于torchvision.datasets.CIFAR10
在Pytorch0.4版本的DARTS代码里,有一行代码是 trn_data = datasets.CIFAR10(root=data_path, train=True, download=False ...
- ipcs查看消息队列命令
修改消息队列大小: root:用户: /etc/sysctl.conf kernel.msgmnb =4203520 #kernel.msgmnb =3520 kernel.msgmni = 2878 ...
- jump用户管理命令
ssh-keygen -t rsa -P '' -f ~/.ssh/id_rsa手动拷贝id_rsa.pub的内容到其他机器 或者用 ssh-copy,但你得知道对方root密码 ssh-copy-i ...
- PTA(Basic Level)1047.编程团体赛
编程团体赛的规则为:每个参赛队由若干队员组成:所有队员独立比赛:参赛队的成绩为所有队员的成绩和:成绩最高的队获胜. 现给定所有队员的比赛成绩,请你编写程序找出冠军队. 输入格式: 输入第一行给出一个正 ...
- hive与hbase的交互简要示意
建表 create external table if not exists hive2hbase( id int, ---> 对应hbase的rowkey (即下面的:key) age int ...