ASP.NET Core快速入门(第4章:ASP.NET Core HTTP介绍)--学习笔记
课程链接:http://video.jessetalk.cn/course/explore
良心课程,大家一起来学习哈!
任务22:课程介绍
- 1.HTTP 处理过程
- 2.WebHost 的配置与启动
- 3.Middleware 与管道
- 4.Routing MiddleWare 介绍
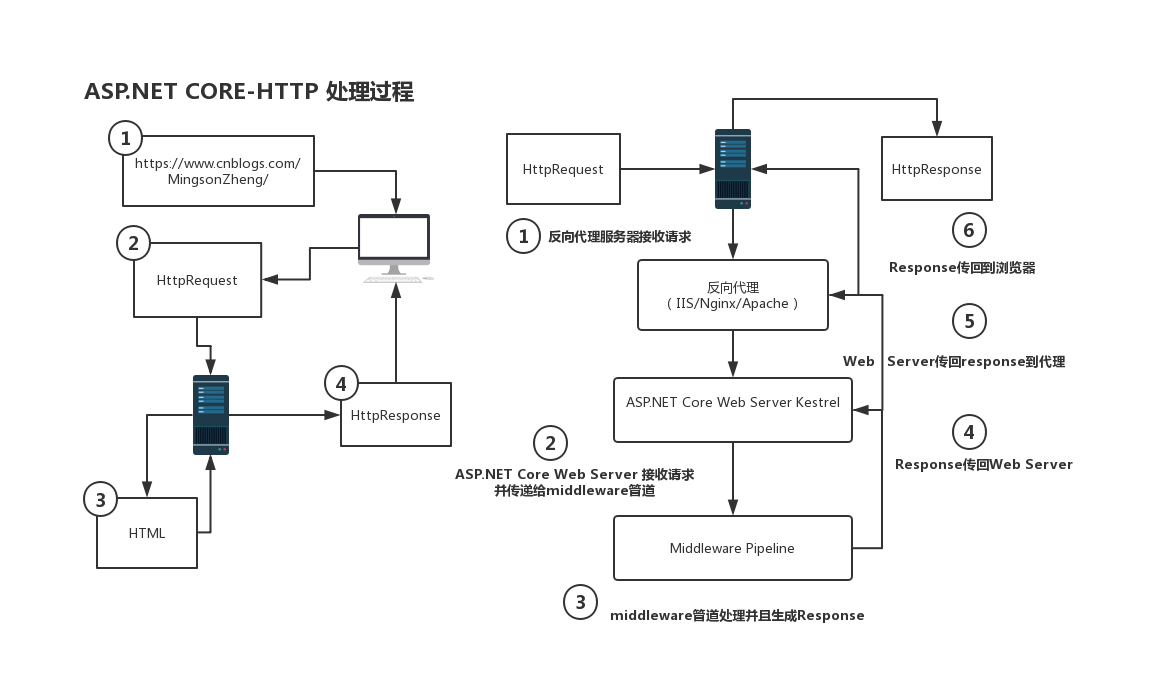
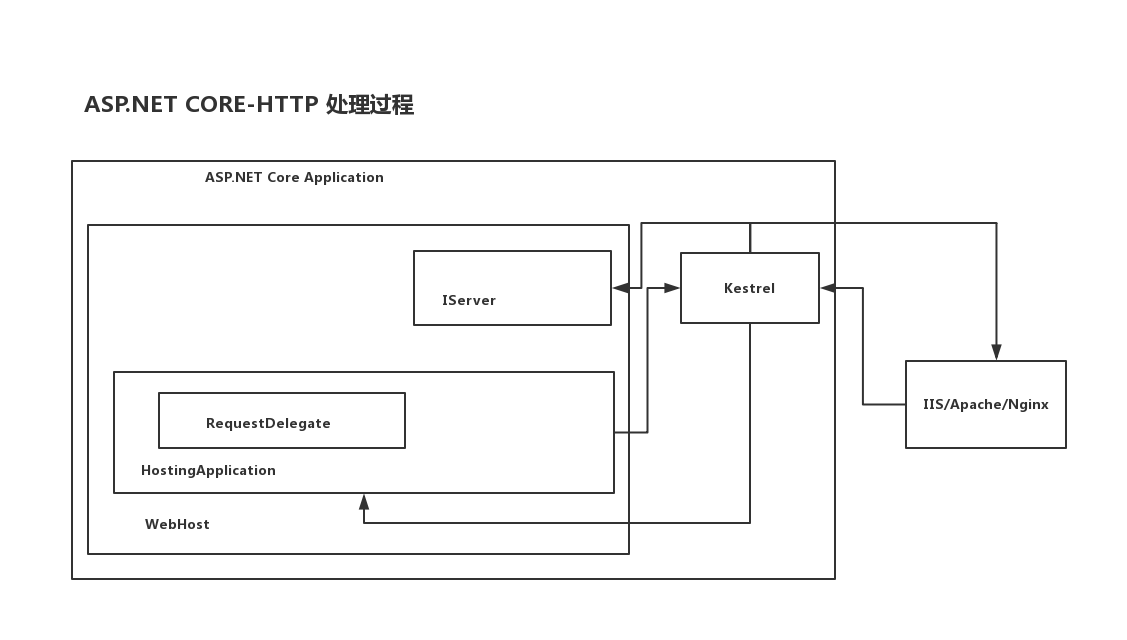
任务23:Http请求的处理过程
任务24:WebHost的配置
- 1.覆盖配置文件
- 2.更改启动URL
- 3.IHostingEnvironment
- 4.IApplicationLifetime
- 5.dotnet watch run
dotnet new web
settings.json
{

    "ConnectionStrings":{

        "DefaultConnection":"Server=...;Database=...;"

    }

}
Program.cs
public static IWebHostBuilder CreateWebHostBuilder(string[] args) =>

            WebHost.CreateDefaultBuilder(args)

            .ConfigureAppConfiguration(configureDelegate=>{

                configureDelegate.AddJsonFile("settings.json");

            })

            .UseStartup<Startup>();
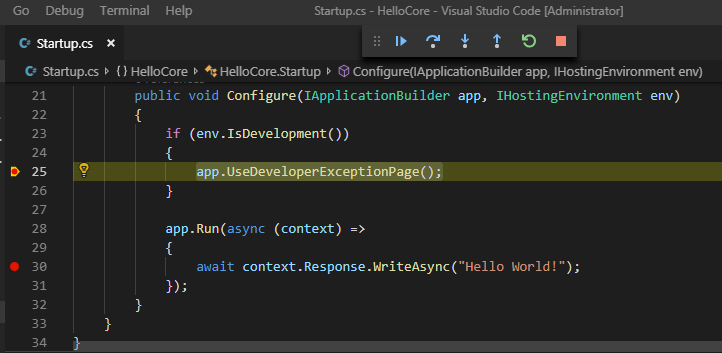
Startup.cs
using Microsoft.Extensions.Configuration;

public void Configure(IApplicationBuilder app, IHostingEnvironment env, IConfiguration configuration)

        {

            if (env.IsDevelopment())

            {

                app.UseDeveloperExceptionPage();

            }

            app.Run(async (context) =>

            {

                // await context.Response.WriteAsync("Hello World!");

                // JsonFile

                await context.Response.WriteAsync(configuration["ConnectionStrings:DefaultConnection"]);

            });

        }
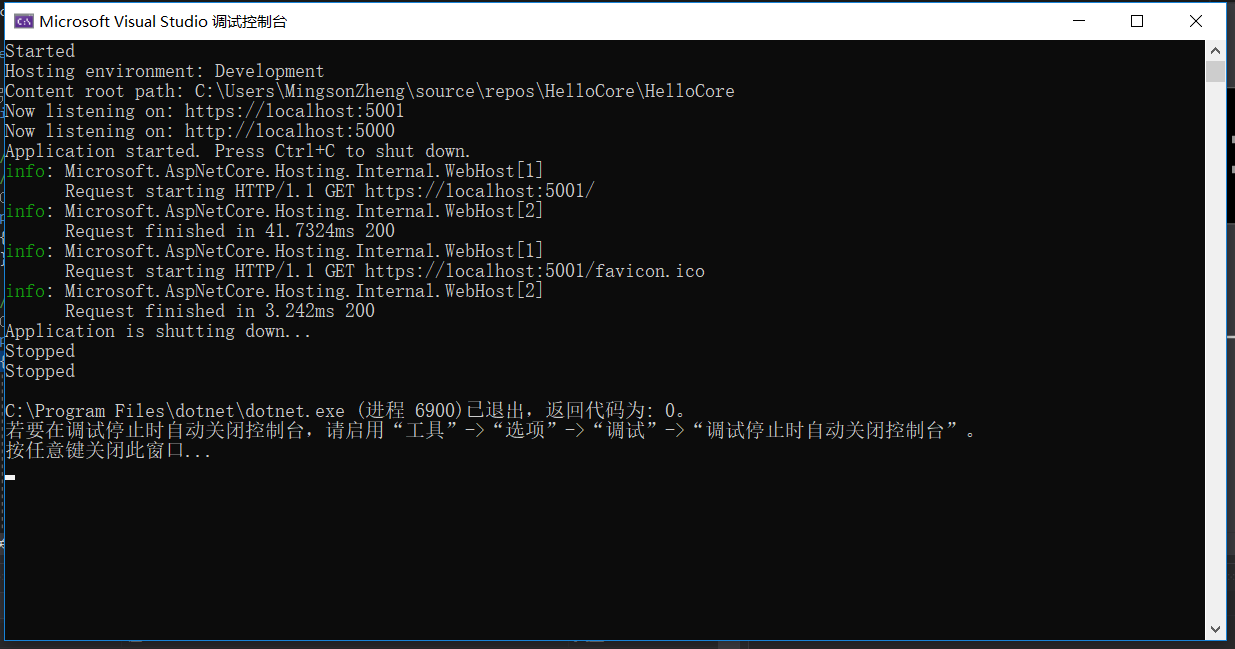
启动HelloCore,输出结果

Program.cs
        public static IWebHostBuilder CreateWebHostBuilder(string[] args) =>

            WebHost.CreateDefaultBuilder(args)

                .ConfigureAppConfiguration(configureDelegate => {

                    //configureDelegate.AddJsonFile("settings.json");

                    configureDelegate.AddCommandLine(args);

                })

                //.UseUrls("http://localhost:5001")

                .UseStartup<Startup>();
Startup.cs
            app.Run(async (context) =>

            {

                // await context.Response.WriteAsync("Hello World!");

                // JsonFile

                //await context.Response.WriteAsync(configuration["ConnectionStrings:DefaultConnection"]);

                // CommandLine

                await context.Response.WriteAsync($"name={configuration["name"]}");

            });
设置应用程序参数

启动HelloCore,输出结果

任务25:IHostEnvironment和 IApplicationLifetime介绍
Startup.cs
app.Run(async (context) =>

            {

                await context.Response.WriteAsync($"ContentRootPath = {env.ContentRootPath}");

                await context.Response.WriteAsync($"EnvironmentName = {env.EnvironmentName}");

                await context.Response.WriteAsync($"WebRootPath = {env.WebRootPath}");

            });
启动HelloCore,输出结果

Startup.cs
        public void Configure(IApplicationBuilder app, IHostingEnvironment env, IConfiguration configuration, IApplicationLifetime applicationLifetime)

        {

            if (env.IsDevelopment())

            {

                app.UseDeveloperExceptionPage();

            }

            applicationLifetime.ApplicationStarted.Register(() =>

            {

                Console.WriteLine("Started");

            });

            applicationLifetime.ApplicationStopped.Register(() =>

            {

                Console.WriteLine("Stopped");

            });

            applicationLifetime.ApplicationStopped.Register(() =>

            {

                Console.WriteLine("Stopped");

            });

            app.Run(async (context) =>

            {

                await context.Response.WriteAsync($"ContentRootPath = {env.ContentRootPath}");

                await context.Response.WriteAsync($"EnvironmentName = {env.EnvironmentName}");

                await context.Response.WriteAsync($"WebRootPath = {env.WebRootPath}");

            });

        }
启动HelloCore,输出结果
我心中的ASP.NET Core 新核心对象WebHost(一):
http://www.jessetalk.cn/2017/11/11/aspnet-core-object-webhost/#comment-194
我心中的ASP.NET Core 新核心对象WebHost(二):
http://www.jessetalk.cn/2017/11/14/aspnet-core-object-webhost-build/
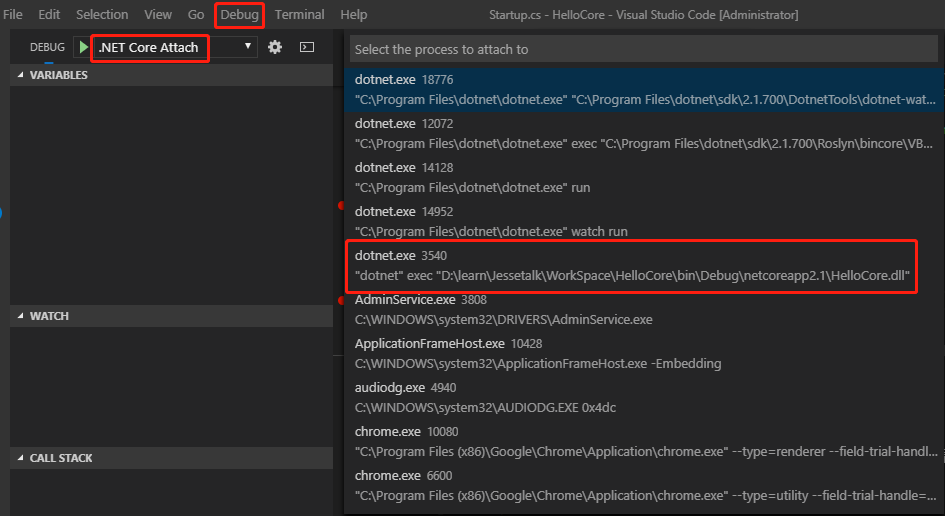
任务26:dotnet watch run 和attach到进程调试
New Terminal
dotnet new web --name HelloCore
F5 Start Debug
在csproj 的 ItemGroup 添加引用
<DotNetCliToolReference Include="Microsoft.DotNet.Watcher.Tools" Version="2.0.0" />
New Terminal
dotnet restore

dotnet watch run
修改代码保存后会自动重启
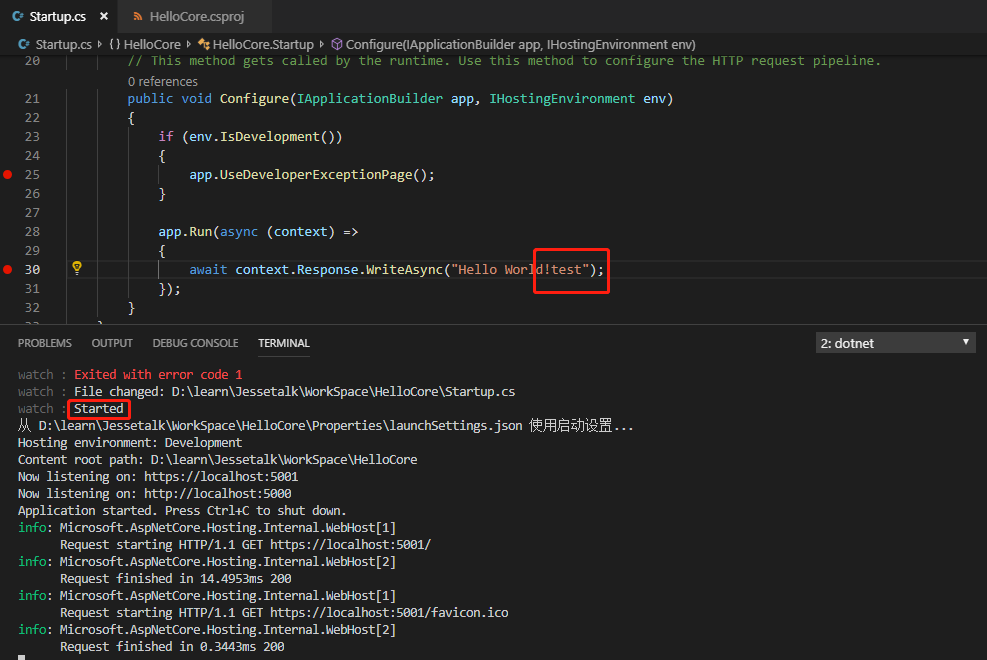
浏览器刷新即可看到更新结果
attach到进程调试
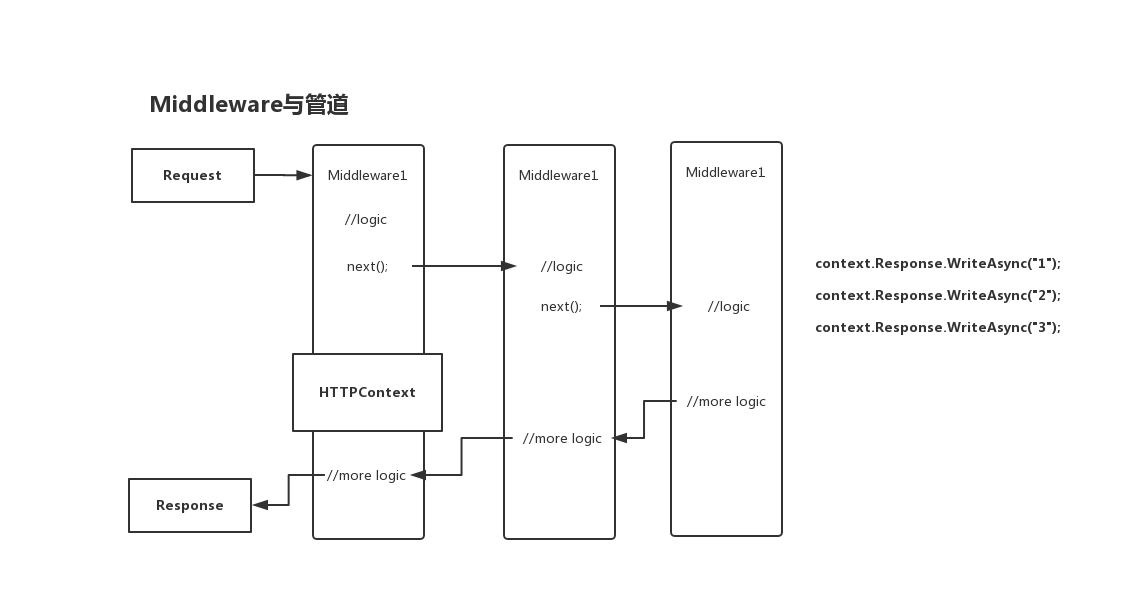
任务27:Middleware管道介绍
- 1.Middleware 与管道的概念
- 2.用 Middleware 来组成管道实践
- 3.管道的实现机制(RequestDelegate 与 ApplicationBuilder)
startup.cs
        public void Configure(IApplicationBuilder app, IHostingEnvironment env)

        {

            if (env.IsDevelopment())

            {

                app.UseDeveloperExceptionPage();

            }

            // 添加一个中间件,传一个名字为next的request delegate

            app.Use(async (context,next)=>{

                await context.Response.WriteAsync("1: before start...");

                await next.Invoke();

            });

            // 接收一个RequestDelegate,返回一个RequestDelegate

            app.Use(next=>{

                return (context)=>{

                    context.Response.WriteAsync("2: in the middle of start..");

                    return next(context);

                };

            });

            app.Run(async (context) =>

            {

                await context.Response.WriteAsync("3: start...");

            });

        }
启动项目,输出结果

// 如果不调用next,则管道终止,不会输出"3: start..."

            app.Use(next=>{

                return (context)=>{

                    return context.Response.WriteAsync("2: in the middle of start..");

                    //return next(context);

                };

            });

        // 使用Map构建路由,通过localhost:5000/task访问

        app.Map("/task", taskApp=>{

            taskApp.Run(async context=>{

                await context.Response.WriteAsync("this is a task");

            });

        });

        // 添加一个中间件,传一个名字为next的request delegate

        app.Use(async (context,next)=>{

            await context.Response.WriteAsync("1: before start...");

            await next.Invoke();

        });

        // 接收一个RequestDelegate,返回一个RequestDelegate

        // 如果不调用next,则管道终止,不会输出"3: start..."

        app.Use(next=>{

            return (context)=>{

                context.Response.WriteAsync("2: in the middle of start..");

                return next(context);

            };

        });

        app.Run(async (context) =>

        {

            await context.Response.WriteAsync("3: start...");

        });
访问 https://localhost:5001/task

任务28:RequestDelegate管道实现思路
- 1.RequestDelegate
- 2.ApplicationBuilder:多个RequestDelegate拼接
// 添加一个中间件,传一个名字为next的RequestDelegate

app.Use(async (context,next)=>{

    await context.Response.WriteAsync("1: before start...");// 完成自己处理

    await next.Invoke();// 调用下一步

});

// 封装一个function交给ApplicationBuilder处理

app.Use(next=>{

    return (context)=>{

        context.Response.WriteAsync("2: in the middle of start..");

        return next(context);

    };

});
任务29:自己动手构建RequestDelegate管道
新建一个控制台程序
dotnet new console --name MyPipeline
新建一个类RequestDelegate.cs
using System;

using System.Threading.Tasks;

namespace MyPipeline

{

    public delegate Task RequestDelegate(Context context);

}
新建一个类Context.cs
using System;

using System.Threading.Tasks;

namespace MyPipeline

{

    public class Context

    {

    }

}
using System;
using System.Collections.Generic;
using System.Threading.Tasks;
namespace MyPipeline
{
class Program
{
public static List<Func<RequestDelegate,RequestDelegate>>
_list = new List<Func<RequestDelegate, RequestDelegate>>();
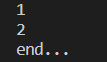
static void Main(string[] args)
{
Use(next=>{
return context=>{
Console.WriteLine("1");
return next.Invoke(context);
};
});
Use(next=>{
return context=>{
Console.WriteLine("2");
return next.Invoke(context);
};
});
RequestDelegate end = (Context)=>{
Console.WriteLine("end...");
return Task.CompletedTask;
};
_list.Reverse();
foreach(var middleware in _list)
{
end = middleware.Invoke(end);
}
end.Invoke(new Context());
Console.ReadLine();
}
public static void Use(Func<RequestDelegate,RequestDelegate> middleware)
{
_list.Add(middleware);
}
}
}
在任何一个Middleware可以结束管道
            Use(next=>{

                return context=>{

                    Console.WriteLine("1");

                    //return next.Invoke(context);

                    return Task.CompletedTask;// 结束管道调用,只输出1

                };

            });

任务30:RoutingMiddleware介绍以及MVC引入
using Microsoft.AspNetCore.Builder;

using Microsoft.AspNetCore.Hosting;

using Microsoft.AspNetCore.Http;

using Microsoft.AspNetCore.Routing;

using Microsoft.Extensions.DependencyInjection;

namespace HelloCore

{

    public class Startup

    {

        // This method gets called by the runtime. Use this method to add services to the container.

        // For more information on how to configure your application, visit https://go.microsoft.com/fwlink/?LinkID=398940

        public void ConfigureServices(IServiceCollection services)

        {

            services.AddRouting();// 添加依赖注入配置

        }

        // This method gets called by the runtime. Use this method to configure the HTTP request pipeline.

        public void Configure(IApplicationBuilder app, IHostingEnvironment env)

        {

            if (env.IsDevelopment())

            {

                app.UseDeveloperExceptionPage();

            }

            if (env.IsDevelopment())

            {

                app.UseDeveloperExceptionPage();

            }

            // 通过localhost:5000/action访问

            app.UseRouter(builder=>builder.MapGet("action", async context=>{

                await context.Response.WriteAsync("this is a action");

            }));

            // 使用Map构建路由,通过localhost:5000/task访问

            app.Map("/task", taskApp=>{

                taskApp.Run(async context=>{

                    await context.Response.WriteAsync("this is a task");

                });

            });

            // 添加一个中间件,传一个名字为next的request delegate

            app.Use(async (context,next)=>{

                await context.Response.WriteAsync("1: before start...");

                await next.Invoke();

            });

            // 如果不调用next,则管道终止,不会输出"3: start..."

            app.Use(next=>{

                return (context)=>{

                    return context.Response.WriteAsync("2: in the middle of start..");

                    //return next(context);

                };

            });

            app.Run(async (context) =>

            {

                await context.Response.WriteAsync("3: start...");

            });

        }

    }

}
访问 https://localhost:5001/action
使用UseRouter方法2
using Microsoft.AspNetCore.Builder;

using Microsoft.AspNetCore.Hosting;

using Microsoft.AspNetCore.Http;

using Microsoft.AspNetCore.Routing;

using Microsoft.Extensions.DependencyInjection;

namespace HelloCore

{

    public class Startup

    {

        // This method gets called by the runtime. Use this method to add services to the container.

        // For more information on how to configure your application, visit https://go.microsoft.com/fwlink/?LinkID=398940

        public void ConfigureServices(IServiceCollection services)

        {

            services.AddRouting();// 添加依赖注入配置

        }

        // This method gets called by the runtime. Use this method to configure the HTTP request pipeline.

        public void Configure(IApplicationBuilder app, IHostingEnvironment env)

        {

            if (env.IsDevelopment())

            {

                app.UseDeveloperExceptionPage();

            }

            if (env.IsDevelopment())

            {

                app.UseDeveloperExceptionPage();

            }

            // 使用UseRouter方法2

            // 通过localhost:5000/action访问

            RequestDelegate handler = context=>context.Response.WriteAsync("this is a action");

            var route = new Route(

                new RouteHandler(handler),

                "action",

                app.ApplicationServices.GetRequiredService<IInlineConstraintResolver>()

            );

            app.UseRouter(route);

            // 使用UseRouter方法1

            // 通过localhost:5000/action访问

            app.UseRouter(builder=>builder.MapGet("action", async context=>{

                await context.Response.WriteAsync("this is a action");

            }));

            // 使用Map构建路由,通过localhost:5000/task访问

            app.Map("/task", taskApp=>{

                taskApp.Run(async context=>{

                    await context.Response.WriteAsync("this is a task");

                });

            });

            // 添加一个中间件,传一个名字为next的request delegate

            app.Use(async (context,next)=>{

                await context.Response.WriteAsync("1: before start...");

                await next.Invoke();

            });

            // 如果不调用next,则管道终止,不会输出"3: start..."

            app.Use(next=>{

                return (context)=>{

                    return context.Response.WriteAsync("2: in the middle of start..");

                    //return next(context);

                };

            });

            app.Run(async (context) =>

            {

                await context.Response.WriteAsync("3: start...");

            });

        }

    }

}
访问 https://localhost:5001/action

RountingMiddleware介绍
var routeHandler = new RouteHandler(context=>context.Response.WriteAsync("test"));

var route = new Route(routeHandler);

new RouteMiddleware(route)

RouteMiddleware.Invoke(httpContext)

_route.RouteAsync(context)

routeMatch(RouteContext)

OnRouteMatched(RouteContext)


本作品采用知识共享署名-非商业性使用-相同方式共享 4.0 国际许可协议进行许可。
欢迎转载、使用、重新发布,但务必保留文章署名 郑子铭 (包含链接: http://www.cnblogs.com/MingsonZheng/ ),不得用于商业目的,基于本文修改后的作品务必以相同的许可发布。
如有任何疑问,请与我联系 (MingsonZheng@outlook.com) 。
ASP.NET Core快速入门(第4章:ASP.NET Core HTTP介绍)--学习笔记的更多相关文章
- ASP.NET Core 快速入门(Razor Pages + Entity Framework Core)
引子 自从 2009 年开始在博客园写文章,这是目前我写的最长的一篇文章了. 前前后后,我总共花了 5 天的时间,每天超过 3 小时不间断写作和代码调试.总共有 8 篇文章,每篇 5~6 个小结,总截 ...
- ASP.NET Core快速入门--学习笔记系列文章索引目录
课程链接:http://video.jessetalk.cn/course/explore 良心课程,大家一起来学习哈! 抓住国庆假期的尾巴完成了此系列课程的学习笔记输出! ASP.NET Core快 ...
- 【笔记目录2】【jessetalk 】ASP.NET Core快速入门_学习笔记汇总
当前标签: ASP.NET Core快速入门 共2页: 上一页 1 2 任务27:Middleware管道介绍 GASA 2019-02-12 20:07 阅读:15 评论:0 任务26:dotne ...
- 【笔记目录1】【jessetalk 】ASP.NET Core快速入门_学习笔记汇总
当前标签: ASP.NET Core快速入门 共2页: 1 2 下一页 任务50:Identity MVC:DbContextSeed初始化 GASA 2019-03-02 14:09 阅读:16 ...
- 【第三篇】ASP.NET MVC快速入门之安全策略(MVC5+EF6)
目录 [第一篇]ASP.NET MVC快速入门之数据库操作(MVC5+EF6) [第二篇]ASP.NET MVC快速入门之数据注解(MVC5+EF6) [第三篇]ASP.NET MVC快速入门之安全策 ...
- 【第一篇】ASP.NET MVC快速入门之数据库操作(MVC5+EF6)
目录 [第一篇]ASP.NET MVC快速入门之数据库操作(MVC5+EF6) [第二篇]ASP.NET MVC快速入门之数据注解(MVC5+EF6) [第三篇]ASP.NET MVC快速入门之安全策 ...
- .NET Core 快速入门教程
.NET Core 快速学习.入门系列教程.这个入门系列教程主要跟大家聊聊.NET Core的前世今生,以及Windows.Linux(CentOS.Ubuntu)基础开发环境的搭建.第一个.NET ...
- .NET Core快速入门教程 2、我的第一个.NET Core App(Windows篇)
一.前言 本篇开发环境?1.操作系统: Windows 10 X642.SDK: .NET Core 2.0 Preview 二.安装 .NET Core SDK 1.下载 .NET Core下载地址 ...
- .NET Core快速入门教程 3、我的第一个.NET Core App (CentOS篇)
一.前言 本篇开发环境?1.操作系统:CentOS7(因为ken比较偏爱CentOS7)2.SDK版本:.NET Core 2.0 Preview 你可能需要的前置知识1.了解如何通过Hyper-V安 ...
- 【第二篇】ASP.NET MVC快速入门之数据注解(MVC5+EF6)
目录 [第一篇]ASP.NET MVC快速入门之数据库操作(MVC5+EF6) [第二篇]ASP.NET MVC快速入门之数据注解(MVC5+EF6) [第三篇]ASP.NET MVC快速入门之安全策 ...
随机推荐
- 服务端性能测试技能tree
ALL: Left: Right: 摘抄一下(觉得不错) 以下来自百度百科 ---- 软件性能测试 软件性能测试是在交替进行负荷和强迫测试时常用的术语.理想的“软件性能测试”(和其他类型的测试)应在需 ...
- SAP MM MB5L 报表里的差异金额如何调整?
SAP MM MB5L 报表里的差异金额如何调整? 5月3号,收到财务顾问提出的一个问题,说是MB5L报表里有差异. 如下查询条件, 报表结果里显示有差异, 经查,导致这个差异的原因之一是,一些物料批 ...
- ABP进阶教程11 - 小结
点这里进入ABP进阶教程目录 效果预览 至此,ABP进阶教程的查询/分页/排序/导出/打印示例已完成,效果如下 登录 首页 办公室信息 院系信息 课程信息 教职员信息 学生信息 新增 修改 删除 查询 ...
- Redis主从复制机制详解
Redis主从复制机制详解 Redis有两种不同的持久化方式,Redis服务器通过持久化,把Redis内存中持久化到硬盘当中,当Redis宕机时,我们重启Redis服务器时,可以由RDB文件或AOF文 ...
- React教程:4 个 useState Hook 示例
摘要: React示例教程. 原文:快速了解 React Hooks 原理 译者:前端小智 到 React 16.8 目前为止,如果编写函数组件,然后遇到需要添加状态的情况,咱们就必须将组件转换为类组 ...
- MySQL日常使用遵循的规范建议
一 . 基础规范 1.必须使用InnoDB存储引擎 解读:支持事务:支持行级锁:支持MVCC多版本控制:支持外键:死锁自动检测:并发性能更好.CPU及内存缓存页优化使得资源利用率更高. 2. 表字符 ...
- bayaim_hadoop1_2.2.0伪分布式搭建
------------------bayaim_hadoop1_2.2.0伪分布式搭建_2018年11月06日09:21:46--------------------------------- 1. ...
- FileSizeLimitExceededException
org.apache.tomcat.util.http.fileupload.FileUploadBase$FileSizeLimitExceededException 很明显,这异常的意思是文件大小 ...
- Linux—服务器之间传输文件
https://www.jb51.net/article/82608.htm https://blog.csdn.net/taian1665/article/details/86492400 http ...
- 『007』MySQL
『005』索引-Database MySQL [001]- 点我快速打开文章[第一章 MySQL 大纲介绍] [002]- 点我快速打开文章[第二章 MySQL 介绍和安装] 更新中