pytorch实现yolov3(3) 实现forward
之前的文章里https://www.cnblogs.com/sdu20112013/p/11099244.html实现了网络的各个layer.
本篇来实现网络的forward的过程.
定义网络
class Darknet(nn.Module):

    def __init__(self, cfgfile):

        super(Darknet, self).__init__()

        self.blocks = parse_cfg(cfgfile)

        self.net_info, self.module_list = create_modules(self.blocks)
实现网络的forward过程
forward函数继承自nn.Module
Convolutional and Upsample Layers
if module_type == "convolutional" or module_type == "upsample":

            x = self.module_list[i](x)
Route Layer / Shortcut Layer
在上一篇里讲过了,route layer的输出是之前某一层或某两层在depth方向的连接.即
output[current_layer] = output[previous_layer]

或者

map1 = outputs[i + layers[0]]

map2 = outputs[i + layers[1]]

output[current layer]=torch.cat((map1, map2), 1)
所以route layer代码如下:
        elif module_type == "route":

            layers = module["layers"]

            layers = [int(a) for a in layers]

            if (layers[0]) > 0:

                layers[0] = layers[0] - i

            if len(layers) == 1:

                x = outputs[i + (layers[0])]

            else:

                if (layers[1]) > 0:

                    layers[1] = layers[1] - i

                map1 = outputs[i + layers[0]]

                map2 = outputs[i + layers[1]]

                x = torch.cat((map1, map2), 1)
shortcut layer的输出为前一层及前xx层(配置文件中配置)的输出之和
        elif  module_type == "shortcut":

            from_ = int(module["from"])

            x = outputs[i-1] + outputs[i+from_]
YOLO layer
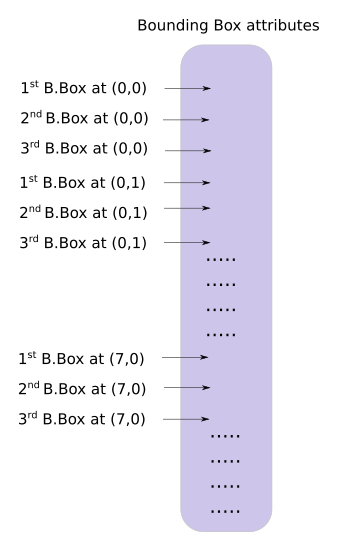
yolo层的输出是一个n*n*depth的feature map矩阵.假设你想访问第(5,6)个cell的第2个boundingbox的话你需要map[5,6,(5+C):2*(5+C)]这样访问,这种形式操作起来有点麻烦,所以我们引入一个predict_transform函数来改变一下输出的形式.
简而言之我们希望把一个batch_size*grid_size*grid_size*(B*(5+C))的4-D矩阵转换为batch_size*(grid_size*grid_size*B)*(5+C)的矩阵.
2-D矩阵的每一行的排列如下:
    batch_size = prediction.size(0)

    stride =  inp_dim // prediction.size(2)

    grid_size = inp_dim // stride

    bbox_attrs = 5 + num_classes

    num_anchors = len(anchors)

    prediction = prediction.view(batch_size, bbox_attrs*num_anchors, grid_size*grid_size)

    prediction = prediction.transpose(1,2).contiguous()

    prediction = prediction.view(batch_size, grid_size*grid_size*num_anchors, bbox_attrs)
上述代码涉及到pytorch中view的用法,和numpy中resize类似.contiguous一般与transpose,permute,view搭配使用,维度变换后tensor在内存中不再是连续存储的,而view操作要求连续存储,所以需要contiguous.最终我们得到一个batch_size*(grid_size*grid_size*num_anchors)*bbox_attrs的矩阵.
接下来要对预测boundingbox的坐标.
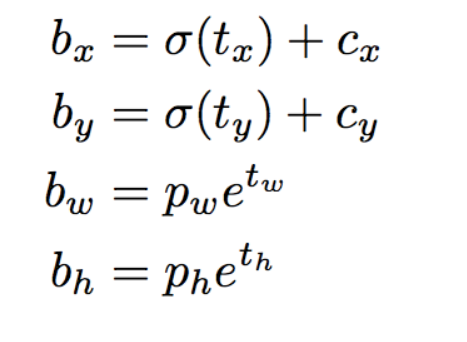
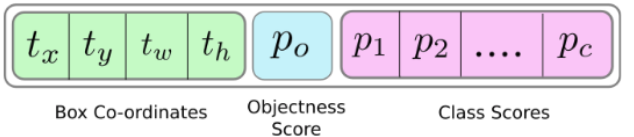
注意此时prediction[:,:,0],prediction[:,:,1],prediction[:,:,2],prediction[:,:,3]prediction[:,:,4]即相应的tx,ty,tw,th,obj score.
接下来是预测相对当前cell左上角的offset
    #sigmoid转换为0-1范围内

    #Sigmoid the  centre_X, centre_Y. and object confidencce

    prediction[:,:,0] = torch.sigmoid(prediction[:,:,0])

    prediction[:,:,1] = torch.sigmoid(prediction[:,:,1])

    prediction[:,:,4] = torch.sigmoid(prediction[:,:,4])

    #Add the center offsets

    grid = np.arange(grid_size)

    a,b = np.meshgrid(grid, grid)

    x_offset = torch.FloatTensor(a).view(-1,1)

    y_offset = torch.FloatTensor(b).view(-1,1)

    if CUDA:

        x_offset = x_offset.cuda()

        y_offset = y_offset.cuda()

    x_y_offset = torch.cat((x_offset, y_offset), 1).repeat(1,num_anchors).view(-1,2).unsqueeze(0)

    #prediction[:,:,:0],prediction[:,:,:1]修改为相对于当前cell偏移

    prediction[:,:,:2] += x_y_offset
有关meshgrid用法效果如下:
import numpy as np

import torch

grid_size = 13

grid = np.arange(grid_size)

a,b = np.meshgrid(grid, grid)

print(a)

print(b)

x_offset = torch.FloatTensor(a).view(-1,1)

#print(x_offset)

y_offset = torch.FloatTensor(b).view(-1,1)
这段代码输出如下:

预测boundingbox的width,height.注意anchors的大小要转换为适配当前feature map的大小.配置文件中配置的是相对于模型输入的大小.
    anchors = [(a[0]/stride, a[1]/stride) for a in anchors]  #适配到feature map上的尺寸

    #log space transform height and the width

    anchors = torch.FloatTensor(anchors)

    if CUDA:

        anchors = anchors.cuda()

    anchors = anchors.repeat(grid_size*grid_size, 1).unsqueeze(0)

    prediction[:,:,2:4] = torch.exp(prediction[:,:,2:4])*anchors

    ##还原为原始图片上对应的坐标

    prediction[:,:,:4] *= stride
预测class probability
prediction[:,:,5: 5 + num_classes] = torch.sigmoid((prediction[:,:, 5 : 5 + num_classes]))
predict_transform完整代码如下
#yolo经过不断地卷积得到的feature map size= batch_size*(B*(5+C))*grid_size*grid_size

def predict_transform(prediction, inp_dim, anchors, num_classes, CUDA = True):

    if CUDA:

        prediction = prediction.to(torch.device("cuda")) #使用gpu torch0.4不需要 torch1.0需要

    batch_size = prediction.size(0)

    stride =  inp_dim // prediction.size(2)

    grid_size = inp_dim // stride

    bbox_attrs = 5 + num_classes

    num_anchors = len(anchors)

    print("prediction.shape=",prediction.shape)

    print("batch_size=",batch_size)

    print("inp_dim=",inp_dim)

    #print("anchors=",anchors)

    #print("num_classes=",num_classes)

    print("grid_size=",grid_size)

    print("bbox_attrs=",bbox_attrs)

    prediction = prediction.view(batch_size, bbox_attrs*num_anchors, grid_size*grid_size)

    prediction = prediction.transpose(1,2).contiguous()

    prediction = prediction.view(batch_size, grid_size*grid_size*num_anchors, bbox_attrs)

    #Sigmoid the  centre_X, centre_Y. and object confidencce

    prediction[:,:,0] = torch.sigmoid(prediction[:,:,0])

    prediction[:,:,1] = torch.sigmoid(prediction[:,:,1])

    prediction[:,:,4] = torch.sigmoid(prediction[:,:,4])

    #Add the center offsets

    grid = np.arange(grid_size).astype(np.float32)

    a,b = np.meshgrid(grid, grid)

    x_offset = torch.FloatTensor(a).view(-1,1)

    y_offset = torch.FloatTensor(b).view(-1,1)

    if CUDA:

        x_offset = x_offset.cuda()

        y_offset = y_offset.cuda()

    x_y_offset = torch.cat((x_offset, y_offset), 1).repeat(1,num_anchors).view(-1,2).unsqueeze(0)

    print(type(x_y_offset),type(prediction[:,:,:2]))

    prediction[:,:,:2] += x_y_offset

    anchors = [(a[0]/stride, a[1]/stride) for a in anchors]  #适配到和feature map大小匹配

    #log space transform height and the width

    anchors = torch.FloatTensor(anchors)

    if CUDA:

        anchors = anchors.cuda()

    anchors = anchors.repeat(grid_size*grid_size, 1).unsqueeze(0)

    prediction[:,:,2:4] = torch.exp(prediction[:,:,2:4])*anchors

    prediction[:,:,5: 5 + num_classes] = torch.sigmoid((prediction[:,:, 5 : 5 + num_classes]))

    prediction[:,:,:4] *= stride #恢复到原始图片上的相应坐标,width,height等

    return prediction
助手函数写好了,现在来继续实现Darknet类的forward方法
            elif module_type == "yolo":

                anchors = self.module_list[i][0].anchors

                inp_dim = int(self.net_info["height"])

                num_classes = int (module["classes"])

                x = x.data

                x = predict_transform(x, inp_dim, anchors, num_classes, CUDA)

                if not write:              #if no collector has been intialised.

                    detections = x

                    write = 1

                else:

                    detections = torch.cat((detections, x), 1)
在没有写predict_transform之前,不同的feature map矩阵,比如13*13*N1,26*26*N2,52*52*N3是没法直接连接成一个tensor的,现在都变成了xx*(5+C)则可以了.
上面代码里的write flag主要是为了区别detections是否为空,为空则说明是第一个yolo layer做的预测,将yolo层的输出赋值给predictions,不为空则连接当前yolo layer的输出至detections.
测试
下载测试图片wget https://github.com/ayooshkathuria/pytorch-yolo-v3/raw/master/dog-cycle-car.png
def get_test_input():

    img = cv2.imread("dog-cycle-car.png")

    img = cv2.resize(img, (608,608))          #Resize to the input dimension

    img_ =  img[:,:,::-1].transpose((2,0,1))  # BGR -> RGB | H X W C -> C X H X W

    img_ = img_[np.newaxis,:,:,:]/255.0       #Add a channel at 0 (for batch) | Normalise

    img_ = torch.from_numpy(img_).float()     #Convert to float

    img_ = Variable(img_)                     # Convert to Variable

    return img_

model = Darknet("cfg/yolov3.cfg")

inp = get_test_input()

pred = model(inp, torch.cuda.is_available())

print (pred)
cv2.imread()导入图片时是BGR通道顺序,并且是h*w*c,比如416*416*3这种格式,我们要转换为3*416*416这种格式.如果有
- RuntimeError: expected type torch.FloatTensor but got torch.cuda.FloatTensor
在predict_transform开头添加prediction = prediction.to(torch.device("cuda")) #使用gpu - RuntimeError: shape '[1, 255, 3025]' is invalid for input of size 689520
注意检查你的input的img的大小和你模型的输入大小是否匹配. 比如模型是608*608的
最终测试结果如下:
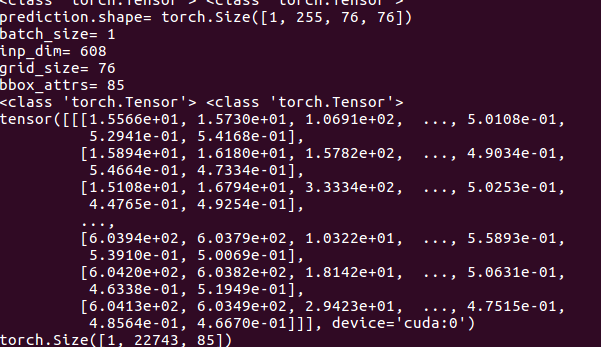
预测出22743个boundingbox,一共3种feature map,分别为19*19,38*38,76*76 每种尺度下预测出3个box,一共3*(19*19 + 38*38 + 76*76) = 22743个box.
pytorch实现yolov3(3) 实现forward的更多相关文章
- Pytorch版本yolov3源码阅读
目录 Pytorch版本yolov3源码阅读 1. 阅读test.py 1.1 参数解读 1.2 data文件解析 1.3 cfg文件解析 1.4 根据cfg文件创建模块 1.5 YOLOLayer ...
- 目标检测-基于Pytorch实现Yolov3(1)- 搭建模型
原文地址:https://www.cnblogs.com/jacklu/p/9853599.html 本人前段时间在T厂做了目标检测的项目,对一些目标检测框架也有了一定理解.其中Yolov3速度非常快 ...
- yolov3 进化之路,pytorch运行yolov3,conda安装cv2,或者conda安装找不到包问题
yolov3 进化之路,pytorch运行yolov3,conda安装cv2,或者conda安装找不到包问题 conda找不到包的解决方案. 目前是最快最好的实时检测架构 yolov3进化之路和各种性 ...
- pytorch实现yolov3(2) 配置文件解析及各layer生成
配置文件 配置文件yolov3.cfg定义了网络的结构 .... [convolutional] batch_normalize=1 filters=64 size=3 stride=2 pad=1 ...
- pytorch实现yolov3(4) 非极大值抑制nms
在上一篇里我们实现了forward函数.得到了prediction.此时预测出了特别多的box以及各种class probability,现在我们要从中过滤出我们最终的预测box. 理解了yolov3 ...
- pytorch实现yolov3(1) yolov3基本原理
理解一个算法最好的就是实现它,对深度学习也一样,准备跟着https://blog.paperspace.com/how-to-implement-a-yolo-object-detector-in-p ...
- pytorch实现yolov3(5) 实现端到端的目标检测
torch实现yolov3(1) torch实现yolov3(2) torch实现yolov3(3) torch实现yolov3(4) 前面4篇已经实现了network的forward,并且将netw ...
- pytorch版yolov3训练自己数据集
目录 1. 环境搭建 2. 数据集构建 3. 训练模型 4. 测试模型 5. 评估模型 6. 可视化 7. 高级进阶-网络结构更改 1. 环境搭建 将github库download下来. git cl ...
- 如何使用 pytorch 实现 yolov3
前言 看了 Yolov3 的论文之后,发现这论文写的真的是很简短,神经网络的具体结构和损失函数的公式都没有给出.所以这里参考了许多前人的博客和代码,下面进入正题. 网络结构 Yolov3 将主干网络换 ...
随机推荐
- 使用JScript编译指定目录下所有工程
作者:朱金灿 来源:http://blog.csdn.net/clever101 我遇到这样一个问题:在一个插件工程目录下的插件工程越来越多,因此通过建一个解决方案然后把新增加的工程逐个添加进解决方案 ...
- 嵌入式OS入门注意事项-同RTX案件:九.关于优先-翻转,继承和天花板
嵌入式OS入门注意事项-同RTX案件:九.关于优先-翻转,继承和天花板 涉及当调度优先级,会有很多问题,本文中,优先调度和一些战略的主要问题,以应付. 有几个概念如下:(priority invers ...
- 在运行Hfile的MR如果任务client结束OOM
在运行MR将HDFS转换成HFile什么时候.例如,会发生以下的异常: 14/07/09 18:02:59 INFO mapred.JobClient: map 83% reduce 0% 14/0 ...
- Windows下程序打包发布时的小技巧(使用Dependency Walker侦测不理想,改用VS自带的dumpbin则万无一失,还可查看dll导出的函数)
Windows下开发的应用程序在发布时,需要将其依赖的一些动态链接库一起打进安装包里面去.这个时候,快速确定这个程序到底依赖哪些动态链接库变得非常重要.很久以前写过一篇关于Qt程序安装包制作的博客,里 ...
- pandas 学习(二)—— pandas 下的常用函数
import pandas as pd; 1. 数据处理函数 pd.isnull()/pd.notnull():用于检测缺失数据: 2. 辅助函数 pd.to_datetime() 3. Series ...
- PD生成兼容Oracle、Mysql脚本
mysql date 改为 datetime ->运行sql脚本 Oracle " clustered " 替换为空,即key(XX) ->运行sql脚本
- Single Application
如果限制一个程序同时只能启动一个实例,有几个可以使用的库 QtSingleApplication 以前可以免费使用,后来只有商业版能里能用,在 Github 上也有一个 LGPL 协议的实现,地址为h ...
- 2015微软创新杯Imaginecup正在进行参赛(报名截止日期2014年12月31日本23:59)
CSDN高校俱乐部与微软官方合作,2015微软创新杯大赛中国区官网落户CSDN高校俱乐部:http://student.csdn.net/mcs/imaginecup2015 在微软官方设置创新杯中国 ...
- VS中发布并调试IIS程序(非附加进程!!!)
筒子们,你们不觉得发布到IIS再附加进程太烦了么???看了看网上全是这种方法,这不科学!VS已经提供了更好的方式了,少年们! 流程 1.打开你的IIS,创建一个站点示例中,我创建了一个端口号为5002 ...
- IOS开发之把 JSON 数据转化成 Arrays 或者 Dictionaries
1 前言通过 NSJSONSerialization 这个类的 JSONObjectWithData:options:error:方法来实现,把JSON 数据解析出来放在数据或者字典里面保存. 2 代 ...