基础分类网络VGG
vgg16是牛津大学视觉几何组(Oxford Visual Geometry Group)2014年提出的一个模型. vgg模型也得名于此.
2014年,vgg16拿了Imagenet Large Scale Visual Recognition Challenge 2014 (ILSVRC2014)
比赛的冠军.
论文连接:https://arxiv.org/abs/1409.1556
http://www.robots.ox.ac.uk/~vgg/research/very_deep/牛津大学视觉研究小组在这里放出了他们在ImageNet比赛训练得到的模型文件.
网上有很多vgg16的实现,下面
https://github.com/machrisaa/tensorflow-vgg/blob/master/vgg16.py
这个是推理的实现,即加载权重文件,实现图像预测https://github.com/ppplinday/tensorflow-vgg16-train-and-test/blob/master/train_vgg.py
这个是训练的实现,即如何得到权重文件
vgg的模型结构如下:
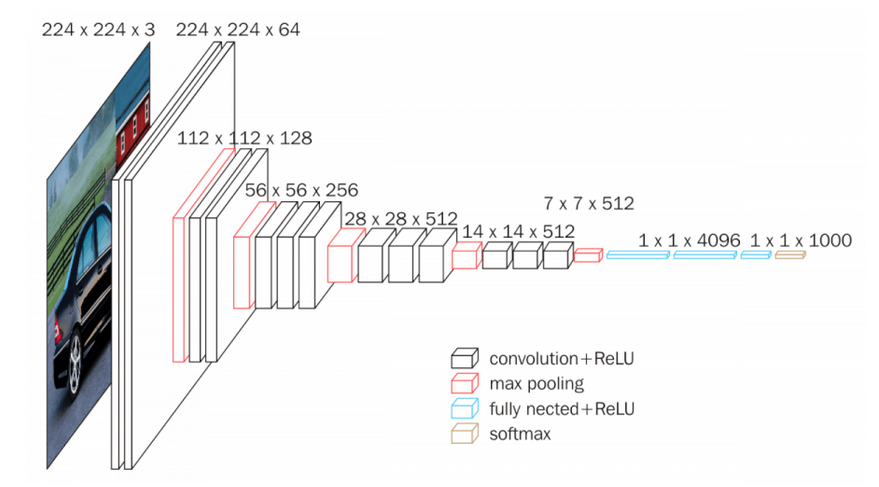
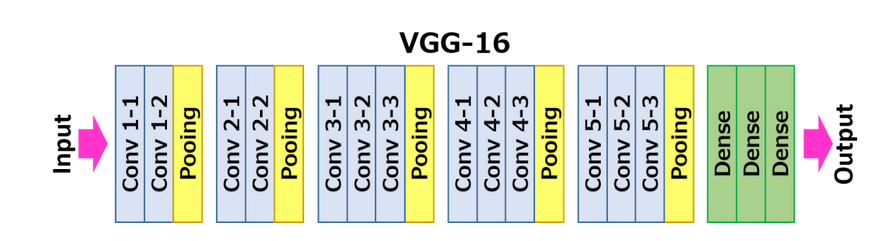
每一层的卷积核的大小都是3*3.
现在的keras里已经集成了很多模型,具体可以参考keras的文档.
https://keras.io/applications/#models-for-image-classification-with-weights-trained-on-imagenet
下面是keras_applications/vgg16.py的实现.比tensorflow的代码更易于理解.
"""VGG16 model for Keras.

# Reference

- [Very Deep Convolutional Networks for Large-Scale Image Recognition](

    https://arxiv.org/abs/1409.1556) (ICLR 2015)

"""

from __future__ import absolute_import

from __future__ import division

from __future__ import print_function

import os

from . import get_submodules_from_kwargs

from . import imagenet_utils

from .imagenet_utils import decode_predictions

from .imagenet_utils import _obtain_input_shape

preprocess_input = imagenet_utils.preprocess_input

WEIGHTS_PATH = ('https://github.com/fchollet/deep-learning-models/'

                'releases/download/v0.1/'

                'vgg16_weights_tf_dim_ordering_tf_kernels.h5')

WEIGHTS_PATH_NO_TOP = ('https://github.com/fchollet/deep-learning-models/'

                       'releases/download/v0.1/'

                       'vgg16_weights_tf_dim_ordering_tf_kernels_notop.h5')

def VGG16(include_top=True,

          weights='imagenet',

          input_tensor=None,

          input_shape=None,

          pooling=None,

          classes=1000,

          **kwargs):

    """Instantiates the VGG16 architecture.

    Optionally loads weights pre-trained on ImageNet.

    Note that the data format convention used by the model is

    the one specified in your Keras config at `~/.keras/keras.json`.

    # Arguments

        include_top: whether to include the 3 fully-connected

            layers at the top of the network.

        weights: one of `None` (random initialization),

              'imagenet' (pre-training on ImageNet),

              or the path to the weights file to be loaded.

        input_tensor: optional Keras tensor

            (i.e. output of `layers.Input()`)

            to use as image input for the model.

        input_shape: optional shape tuple, only to be specified

            if `include_top` is False (otherwise the input shape

            has to be `(224, 224, 3)`

            (with `channels_last` data format)

            or `(3, 224, 224)` (with `channels_first` data format).

            It should have exactly 3 input channels,

            and width and height should be no smaller than 32.

            E.g. `(200, 200, 3)` would be one valid value.

        pooling: Optional pooling mode for feature extraction

            when `include_top` is `False`.

            - `None` means that the output of the model will be

                the 4D tensor output of the

                last convolutional block.

            - `avg` means that global average pooling

                will be applied to the output of the

                last convolutional block, and thus

                the output of the model will be a 2D tensor.

            - `max` means that global max pooling will

                be applied.

        classes: optional number of classes to classify images

            into, only to be specified if `include_top` is True, and

            if no `weights` argument is specified.

    # Returns

        A Keras model instance.

    # Raises

        ValueError: in case of invalid argument for `weights`,

            or invalid input shape.

    """

    backend, layers, models, keras_utils = get_submodules_from_kwargs(kwargs)

    if not (weights in {'imagenet', None} or os.path.exists(weights)):

        raise ValueError('The `weights` argument should be either '

                         '`None` (random initialization), `imagenet` '

                         '(pre-training on ImageNet), '

                         'or the path to the weights file to be loaded.')

    if weights == 'imagenet' and include_top and classes != 1000:

        raise ValueError('If using `weights` as `"imagenet"` with `include_top`'

                         ' as true, `classes` should be 1000')

    # Determine proper input shape

    input_shape = _obtain_input_shape(input_shape,

                                      default_size=224,

                                      min_size=32,

                                      data_format=backend.image_data_format(),

                                      require_flatten=include_top,

                                      weights=weights)

    if input_tensor is None:

        img_input = layers.Input(shape=input_shape)

    else:

        if not backend.is_keras_tensor(input_tensor):

            img_input = layers.Input(tensor=input_tensor, shape=input_shape)

        else:

            img_input = input_tensor

    # Block 1

    x = layers.Conv2D(64, (3, 3),

                      activation='relu',

                      padding='same',

                      name='block1_conv1')(img_input)

    x = layers.Conv2D(64, (3, 3),

                      activation='relu',

                      padding='same',

                      name='block1_conv2')(x)

    x = layers.MaxPooling2D((2, 2), strides=(2, 2), name='block1_pool')(x)

    # Block 2

    x = layers.Conv2D(128, (3, 3),

                      activation='relu',

                      padding='same',

                      name='block2_conv1')(x)

    x = layers.Conv2D(128, (3, 3),

                      activation='relu',

                      padding='same',

                      name='block2_conv2')(x)

    x = layers.MaxPooling2D((2, 2), strides=(2, 2), name='block2_pool')(x)

    # Block 3

    x = layers.Conv2D(256, (3, 3),

                      activation='relu',

                      padding='same',

                      name='block3_conv1')(x)

    x = layers.Conv2D(256, (3, 3),

                      activation='relu',

                      padding='same',

                      name='block3_conv2')(x)

    x = layers.Conv2D(256, (3, 3),

                      activation='relu',

                      padding='same',

                      name='block3_conv3')(x)

    x = layers.MaxPooling2D((2, 2), strides=(2, 2), name='block3_pool')(x)

    # Block 4

    x = layers.Conv2D(512, (3, 3),

                      activation='relu',

                      padding='same',

                      name='block4_conv1')(x)

    x = layers.Conv2D(512, (3, 3),

                      activation='relu',

                      padding='same',

                      name='block4_conv2')(x)

    x = layers.Conv2D(512, (3, 3),

                      activation='relu',

                      padding='same',

                      name='block4_conv3')(x)

    x = layers.MaxPooling2D((2, 2), strides=(2, 2), name='block4_pool')(x)

    # Block 5

    x = layers.Conv2D(512, (3, 3),

                      activation='relu',

                      padding='same',

                      name='block5_conv1')(x)

    x = layers.Conv2D(512, (3, 3),

                      activation='relu',

                      padding='same',

                      name='block5_conv2')(x)

    x = layers.Conv2D(512, (3, 3),

                      activation='relu',

                      padding='same',

                      name='block5_conv3')(x)

    x = layers.MaxPooling2D((2, 2), strides=(2, 2), name='block5_pool')(x)

    if include_top:

        # Classification block

        x = layers.Flatten(name='flatten')(x)

        x = layers.Dense(4096, activation='relu', name='fc1')(x)

        x = layers.Dense(4096, activation='relu', name='fc2')(x)

        x = layers.Dense(classes, activation='softmax', name='predictions')(x)

    else:

        if pooling == 'avg':

            x = layers.GlobalAveragePooling2D()(x)

        elif pooling == 'max':

            x = layers.GlobalMaxPooling2D()(x)

    # Ensure that the model takes into account

    # any potential predecessors of `input_tensor`.

    if input_tensor is not None:

        inputs = keras_utils.get_source_inputs(input_tensor)

    else:

        inputs = img_input

    # Create model.

    model = models.Model(inputs, x, name='vgg16')

    # Load weights.

    if weights == 'imagenet':

        if include_top:

            weights_path = keras_utils.get_file(

                'vgg16_weights_tf_dim_ordering_tf_kernels.h5',

                WEIGHTS_PATH,

                cache_subdir='models',

                file_hash='64373286793e3c8b2b4e3219cbf3544b')

        else:

            weights_path = keras_utils.get_file(

                'vgg16_weights_tf_dim_ordering_tf_kernels_notop.h5',

                WEIGHTS_PATH_NO_TOP,

                cache_subdir='models',

                file_hash='6d6bbae143d832006294945121d1f1fc')

        model.load_weights(weights_path)

        if backend.backend() == 'theano':

            keras_utils.convert_all_kernels_in_model(model)

    elif weights is not None:

        model.load_weights(weights)

    return model
可以清楚地看出来,所用的卷积核全部是3*3的.
用keras做预测也很简单,
from keras.applications.vgg16 import VGG16

model = VGG16()

print(model.summary())
上面代码会把权重文件下载到
这里贴一段网上找的代码
from keras.applications.vgg16 import VGG16, preprocess_input, decode_predictions

from keras.preprocessing.image import load_img, img_to_array

import numpy as np

# VGG-16 instance

model = VGG16(weights='imagenet', include_top=True)

image = load_img('C:/Pictures/Pictures/test_imgs/golden.jpg', target_size=(224, 224))

image_data = img_to_array(image)

# reshape it into the specific format

image_data = image_data.reshape((1,) + image_data.shape)

print(image_data.shape)

# prepare the image data for VGG

image_data = preprocess_input(image_data)

# using the pre-trained model to predict

prediction = model.predict(image_data)

# decode the prediction results

results = decode_predictions(prediction, top=3)

print(results)
很简单
- 加载模型
- 加载图片,预处理
- 前向传播
- 解释输出tensor
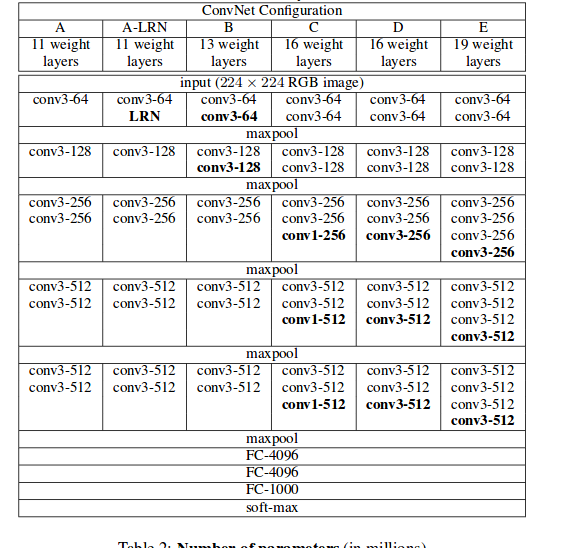
vgg19和vgg16结构基本一致的,就是多了几个卷积层.
基础分类网络VGG的更多相关文章
- TCP/IP协议(一)网络基础知识 网络七层协议
参考书籍为<图解tcp/ip>-第五版.这篇随笔,主要内容还是TCP/IP所必备的基础知识,包括计算机与网络发展的历史及标准化过程(简述).OSI参考模型.网络概念的本质.网络构建的设备等 ...
- Python黑客编程基础3网络数据监听和过滤
网络数据监听和过滤 课程的实验环境如下: • 操作系统:kali Linux 2.0 • 编程工具:Wing IDE • Python版本:2.7.9 • 涉及 ...
- 黑马程序员:Java基础总结----网络编程
黑马程序员:Java基础总结 网络编程 ASP.Net+Android+IO开发 . .Net培训 .期待与您交流! 网络编程 网络通讯要素 . IP地址 . 网络中设备的标识 . 不易记忆,可用 ...
- 网络编程基础:网络基础之网络协议、socket模块
操作系统(简称OS)基础: 应用软件不能直接操作硬件,能直接操作硬件的只有操作系统:所以,应用软件可以通过操作系统来间接操作硬件 网络基础之网络协议: 网络通讯原理: 连接两台计算机之间的Intern ...
- GO学习-(19) Go语言基础之网络编程
Go语言基础之网络编程 现在我们几乎每天都在使用互联网,我们前面已经学习了如何编写Go语言程序,但是如何才能让我们的程序通过网络互相通信呢?本章我们就一起来学习下Go语言中的网络编程. 关于网络编程其 ...
- python渗透测试入门——基础的网络编程工具
<Python黑帽子--黑客与渗透测试编程之道学习>这本书是我在学习安全的过程中发现的在我看来十分优秀的一本书,业内也拥有很高的评价,所以在这里将自己的学习内容分享出来. 1.基础的网络编 ...
- 转 经典分类网络Googlenet
转自https://my.oschina.net/u/876354/blog/1637819 2014年,GoogLeNet和VGG是当年ImageNet挑战赛(ILSVRC14)的双雄,GoogLe ...
- 【深度学习系列】用PaddlePaddle和Tensorflow实现经典CNN网络Vgg
上周我们讲了经典CNN网络AlexNet对图像分类的效果,2014年,在AlexNet出来的两年后,牛津大学提出了Vgg网络,并在ILSVRC 2014中的classification项目的比赛中取得 ...
- 周末班:Python基础之网络编程
一.楔子 你现在已经学会了写python代码,假如你写了两个python文件a.py和b.py,分别去运行,你就会发现,这两个python的文件分别运行的很好.但是如果这两个程序之间想要传递一个数据, ...
随机推荐
- 微服务SpringCloud之Spring Cloud Config配置中心SVN
在回来的路上看到一个个的都抱着花,吃了一路的狗粮,原本想着去旁边的工业园里跑跑步呢,想想还是算了,人家过七夕,俺们过巴西.上一博客学习了Spring Cloud Config使用git作为配置中心,本 ...
- 编码规范 | Java函数优雅之道(上)
导读 随着软件项目代码的日积月累,系统维护成本变得越来越高,是所有软件团队面临的共同问题.持续地优化代码,提高代码的质量,是提升系统生命力的有效手段之一.软件系统思维有句话“Less coding, ...
- 佳木斯集训Day2
D2好点了,最起码不像之前那么水 T1按照常规操作是个找规律,类似于括号匹配的题,但是又不是,推进栈里,然后看最长的左括号有多少个,然后直接cout就可以了 #include <bits/std ...
- PHP 的一些底层知识
本篇内容比较干涩,请自备矿泉水 文章分6个主题进行讲解 PHP运行机制和原理 PHP底层变量数据结构 PHP传值赋值中的COW特性 PHP垃圾回收机制 PHP中数组底层分析 PHP数组函数分类 PHP ...
- resolv.conf文件配置相关的案例
引言 操作系统中/etc/resolv.conf配置文件中的内容一般为空,如果该文件配置不正确,将导致ssh.route.netstat命令响应慢的问题. 在/etc/resolv.conf添加错误地 ...
- Java——字符串
1.不可变的String String对象是不可变的.String类中的每一个看起来会修改String值的方法,实际上都是创建了一个全新的String对象,以包含修改修改后的字符串内容. public ...
- JSP前端数据本地排序
在前端中我们经常需要数据的排序,首先写引入我写好的js $(function($) { $('#sclazzId').val($('#voId').val()); document.getElemen ...
- 使用idea在linux上启动springboot项目
springboot项目启动方式 1.改成war包放到tomcat上,网上方法很多不再介绍. 2.直接用jar包启动,比较方便,不需要修改项目文件,推荐使用jar包起 将项目和package打成jar ...
- 100天搞定机器学习|day40-42 Tensorflow Keras识别猫狗
100天搞定机器学习|1-38天 100天搞定机器学习|day39 Tensorflow Keras手写数字识别 前文我们用keras的Sequential 模型实现mnist手写数字识别,准确率0. ...
- 基于Springboot的BaseService和BaseController
基于Springboot的BaseService,BaseController 前言: 在做项目时需要对大量的表做增删查改,而其中的逻辑大同小异,所以抽象了一个 BaseService,BaseCon ...