
ios – 使用UINib加载xib文件实现UITableViewCell
xib文件的实质是xml,描述界面对象,每个对象都有一个很重要的属性,identity inspector面板中class属性,加载xib文件的时候实际上是实例化界面对象相对应的这些class。
xib文件的加载过程:
1.将xib文件从磁盘载入内存,有两种技术可以加载xib文件:NSBundle和UINib。
2.执行unarchive和initialize操作,该过程主要由NSCoding Protocol中的initWithCoder:(NSCoder *)decoder完成。
3.建立connections:Outlets和Actions。Outlets使用IBOutlet关键字标示,使用setValue:forKey:方法建立每个Outlet,所以每个Outlet的建立都会发送KVO通知。Actions使用IBAction关键字标示,替换void返回值,通过调用addTarget:action:forControlEvents:方法建立每个Action连接。注意,这里构建Outlets和Actions是有先后顺序的,先建立Outlets连接,随后建立Actions连接。因为,Actions的建立依赖之前建立的Outlets。
4.调用awakeFromNib方法,首先要调用super的awakeFromNib方法,之后可以设置一些个性化的操作,以及一些无法在设计时设定的操作。注意,awakeFromNib消息只发往在Interface Builder中指定的Custom Class,不会发送给Files's Owner,First Responder等占位对象。
之后,该对象的加载完成,可以进行各式各样的操作了。
使用NSBundle加载xib文件:
[[NSBundle mainBundle]loadNibNamed:<(NSString *)> owner:<(id)> options:<(NSDictionary *)>];
这是最常见的一种,loadNibNamed:owner:options:方法返回的是一个NSArray*,里面包含了所加载xib文件包含的界面对象(class)。
NSBundle每次都从磁盘上载入xib文件,而UINib则只是第一次从磁盘上载入xib文件,之后将xib文件缓存在内存中,每次新生成一个对象时,直接访问内存中的xib文件执行上面描述的2-4步,所以性能上会有很大的提升,并且开发者文档也建议对于那些重复使用的xib文件使用UINib 加载技术,当收到低内存警告时,会从内从中卸载xib文件,当再次访问的时候会从磁盘中载入。下面看一下UINib的定义:

NS_CLASS_AVAILABLE_IOS(4_0) @interface UINib : NSObject {

  @private

    id storage;

}

// If the bundle parameter is nil, the main bundle is used.

// Releases resources in response to memory pressure (e.g. memory warning), reloading from the bundle when necessary.

+ (UINib *)nibWithNibName:(NSString *)name bundle:(NSBundle *)bundleOrNil;

// If the bundle parameter is nil, the main bundle is used.

+ (UINib *)nibWithData:(NSData *)data bundle:(NSBundle *)bundleOrNil;

// Returns an array containing the top-level objects from the NIB.

// The owner and options parameters may both be nil.

// If the owner parameter is nil, connections to File's Owner are not permitted.

// Options are identical to the options specified with -[NSBundle loadNibNamed:owner:options:]

- (NSArray *)instantiateWithOwner:(id)ownerOrNil options:(NSDictionary *)optionsOrNil;

@end
前面两个方法很清楚,分别以不同的方式载入,第三个方法则是实例化(将对象创建出来)
表视图实例:
具体的细节就不说了
创建一个名为Empty的xib文件

注意看Table View Cell的class属性是TableViewCell,不是默认的UITableViewCell,TableViewCell.h如下:
@interface TableViewCell : UITableViewCell

@property (weak, nonatomic) IBOutlet UILabel *lb1;

@property (weak, nonatomic) IBOutlet UILabel *lb2;

- (IBAction)bt:(id)sender;

@end
三个属性都和xib文件进行了链接,应该能看出来。
然后在UITableViewDataSource代理中分别进行如下操作:
//头文件内声明

UINib *nib;

//实例化

self->nib = [UINib nibWithNibName:@"Empty" bundle:nil];
然后在来看tableView:cellForRowAtIndexPath:方法,这个方法标准的实现方法如下:
- (UITableViewCell *)tableView:(UITableView *)tableView cellForRowAtIndexPath:(NSIndexPath *)indexPath {

  static NSString *CellIdentifier = [NSString stringWithFormat:@"Cell"];

  UITableViewCell *cell = [tableView dequeueReusableCellWithIdentifier:CellIdentifier];

  if (cell == nil) {

    cell = [[[UITableViewCell alloc] initWithStyle:UITableViewCellStyleDefault reuseIdentifier:CellIdentifier] autorelease];

  }

  //config the cell

  return cell;

}
这是使用代码的方式创建cell ,下面看使用UINib:
- (UITableViewCell *)tableView:(UITableView *)tableView cellForRowAtIndexPath:(NSIndexPath *)indexPath{

    static NSString *identifier = @"Cell";

    TableViewCell *cell = [tableView dequeueReusableCellWithIdentifier:identifier];

    if (cell == nil) {

        cell = [[nib instantiateWithOwner:nil options:nil] objectAtIndex:0];

    }

    switch (indexPath.section) {

        case redSection:

            cell.lb1.text = @"lb1";

            cell.lb2.text = @"lb2";

            break;

        case blueSection:

            break;

        default:

            [[cell textLabel] setText:@"Unknow"];

    }

    return cell;

}
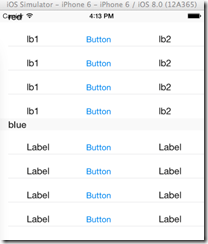
效果图如下:
以上只是个人理解,有错误之处欢迎指正。
ios – 使用UINib加载xib文件实现UITableViewCell的更多相关文章
- 加载xib文件
// Test.xib --编译--> Test.nib // 方式1 NSArray *objs = [[NSBundle mainBundle] loadNibNamed:@"Te ...
- 加载xib文件的两种方式
一.加载xib文件的两种方式 1.方法一(NewsCell是xib文件的名称) NSArray *objects = [[NSBundle mainBundle] loadNibNamed:@&quo ...
- 加载 xib 文件 UIView
记在 UIView 的 xib 文件方式有一下几种: 一 .直接加载 xib 文件, 没有.h.m 文件 1. NSBundle 方式 NSArray *objs = [[NSBundle mainB ...
- 通过加载Xib文件来创建UITableViewCell造成复用数据混乱问题方案
- (UITableViewCell *)tableView:(UITableView *)tableView cellForRowAtIndexPath:(NSIndexPath *)indexPa ...
- IOS第11天(4:UIDatePicker时间选择,和键盘处理,加载xib文件,代理模式)
***控制层 #import "ViewController.h" #import "CZKeyboardToolbar.h" @interface ViewC ...
- 加载xib文件,如果想在初始化的时候就添加点东西就重载-(id)initWithCoder:(NSCoder *)aDecoder
- (id)initWithCoder:(NSCoder *)aDecoder { self = [super initWithCoder:aDecoder]; if (self) { self.cl ...
- cordova程序加载pdf文件的2种方法(ios/android)
前言 公司目前的前端架构是微信端由vue全家桶负责h5网站的单页应用,android端和ios端则选择cordova打包成apk和app.其中,有一个业务逻辑是点击某个链接进入pdf的展示,h5的方案 ...
- iOS之webview加载网页、文件、html的方法
UIWebView 是用来加载加载网页数据的一个框.UIWebView可以用来加载pdf.word.doc 等等文件 生成webview 有两种方法,1.通过storyboard 拖拽 2.通过a ...
- iOS --- UIWebView的加载本地数据的三种方式
UIWebView是IOS内置的浏览器,可以浏览网页,打开文档 html/htm pdf docx txt等格式的文件. safari浏览器就是通过UIWebView做的. 服务器将MIM ...
随机推荐
- JavaWeb学习总结(三)——Tomcat服务器学习和使用(二) 包含https 非对称秘钥 NB
JavaWeb学习总结(三)--Tomcat服务器学习和使用(二) 一.打包JavaWeb应用 在Java中,使用"jar"命令来对将JavaWeb应用打包成一个War包,jar命 ...
- Pycharm 使用
Pycharm基本使用http://edu.51cto.com/index.php?do=lession&id=118722 Pycharm的基本使用 在Pycharm下为你的Python ...
- 二叉排序树(Binary Sort Tree)
参考文章:http://blog.csdn.net/ns_code/article/details/19823463 不过博主的使用第一种方法操作后的树已经不是二叉排序树了,值得深思!! #inclu ...
- QT读写ini配置文件
/********下面是写ini文件*************************/ //Qt中使用QSettings类读写ini文件 //QSettings构造函数的第一 ...
- C# 表达式树demo
class Program { static void Main(string[] args) { //创建Expression参数 var left = System.Linq.Expression ...
- javascript函数命名的三种方式及区别
1, function fn(val1,val2) { alert(val1+val2); } fn(1,2); 2, var fn=function() { alert(val1+val2); } ...
- ubuntu系统下更新jdk版本
1. 添加软件源 sudo add-apt-repository ppa:webupd8team/java 2. 更新软件源 sudo apt-get update 3. 安装 jdk1.8 sudo ...
- linux下如何查看chm文件
转自:http://www.cnblogs.com/jesseZh/p/4036811.html (64位) sudo dpkg -i chmsee_1.3.0-2ubuntu2_amd64.d ...
- 论Linux运维的一些基础安全知识和简单办法
不知不觉本人来北京也已经第三个年头了,从一个Linux小小鸟,开始,2012年我参加了第一份工作,其实现在想想其实我是幸运的,本来求学的时候,就没好好的学Linux,我认为有Cisco知识从上wind ...
- STL删除元素
1.从vector中删除多个元素: #include <iostream> #include <vector> int main() { std::vector<int& ...