一键式Spring集成工具 Spring Boot
最近公司使用Spring boot进行开发,稍微了解一下,不过自我感觉把集中式配置applicate.properties搞明白,注解用过Spring MVC的boot绝对没问题的
比如拦截器:@Aspect
public class ControllerAspect {
//对 com.store59.creditmall.controller包下面的所有类的所有带request对象的方法 进行拦截
@Before("execution(* com.store59.creditmall.controller.*.*(javax.servlet.http.HttpServletRequest, ..))")
public void proController(JoinPoint point) {
Object[] args = point.getArgs();
if (args.length > 0 && args[0] instanceof HttpServletRequest) {
HttpServletRequest request = (HttpServletRequest) args[0];//获取request对象
...
}
}
再比如@Controller,方法前加 @RequestMapping注释,可以设置web页面访问该方法的路径...
下面这篇文章写的不错,转载过来
转自http://my.oschina.net/u/1027043/blog/406558
Spring Boot提供了一个强大的一键式Spring的集成开发环境,能够单独进行一个Spring应用的开发,其中:
(1)集中式配置(application.properties)+注解,大大简化了开发流程
(2)内嵌的Tomcat和Jetty容器,可直接打成jar包启动,无需提供Java war包以及繁琐的Web配置
(3)提供了Spring各个插件的基于Maven的pom模板配置,开箱即用,便利无比。
(4)可以在任何你想自动化配置的地方,实现可能
(5)提供更多的企业级开发特性,如何系统监控,健康诊断,权限控制
(6) 无冗余代码生成和XML强制配置
(7)提供支持强大的Restfult风格的编码,非常简洁
当然Spring Boot提供的功能,远远比上面的强大,散仙会在后续文章中,逐渐以实际工作中的项目为背景,穿插记录使用Spring Boot的心得体会。
下面看一个入门级的例子:
pom依赖:
- <?xml version="1.0" encoding="UTF-8"?>
- <project xmlns="http://maven.apache.org/POM/4.0.0"
- xmlns:xsi="http://www.w3.org/2001/XMLSchema-instance"
- xsi:schemaLocation="http://maven.apache.org/POM/4.0.0 http://maven.apache.org/xsd/maven-4.0.0.xsd">
- <modelVersion>4.0.0</modelVersion>
- <groupId>com.spring.boot</groupId>
- <artifactId>springboot</artifactId>
- <version>1.0-SNAPSHOT</version>
- <parent>
- <groupId>org.springframework.boot</groupId>
- <artifactId>spring-boot-starter-parent</artifactId>
- <version>1.2.3.RELEASE</version>
- </parent>
- <dependencies>
- <dependency>
- <groupId>org.springframework.boot</groupId>
- <artifactId>spring-boot-starter-web</artifactId>
- </dependency>
- </dependencies>
- </project>
核心代码:
- package controller;
- import org.springframework.boot.SpringApplication;
- import org.springframework.boot.autoconfigure.EnableAutoConfiguration;
- import org.springframework.stereotype.Controller;
- import org.springframework.web.bind.annotation.RequestBody;
- import org.springframework.web.bind.annotation.RequestMapping;
- import org.springframework.web.bind.annotation.ResponseBody;
- /**
- * Created by 三劫散仙 on 2015/4/24.
- */
- @Controller
- @EnableAutoConfiguration
- public class HellowController {
- @RequestMapping("/hellow")
- @ResponseBody
- public String hellow(){
- return "哈喽,Spring Boot !";
- }
- public static void main(String[] args) {
- //第一个简单的应用,
- SpringApplication.run(HellowController.class,args);
- }
- }
好了,多说了点废话,下面看下本篇记录Spring Boot的几个知识点:
(一)一个Maven+Spring Boot项目基本的包结构形式
(二)一个简单的在Spring Boot项目集成安全控制
(二)如何在Spring Boot中记录log日志
(四)Spring Boot中几个常用注解介绍
ok下面开始正题:
(一)先看下,官网给出的一个简单的包结构组成:

- com
- +- example
- +- myproject
- +- Application.java
- |
- +- domain
- | +- Customer.java
- | +- CustomerRepository.java
- |
- +- service
- | +- CustomerService.java
- |
- +- web
- +- CustomerController.java
然后,看下散仙实际工作中的项目结构:
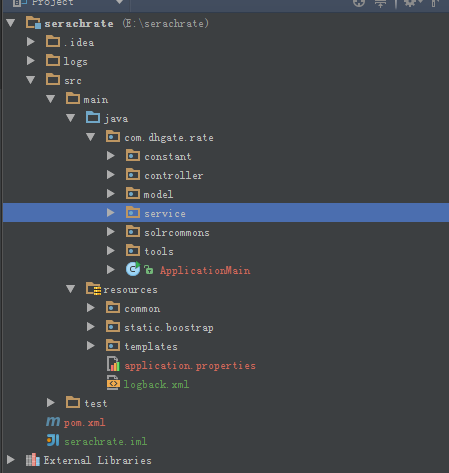
需要注意的地方如下:
1,在src/main/java包下的第一层结构中,是必须放一个含有main方法的主启动的类,而且只能有一个main方法,如果再出现其他的main方法,在使用maven编译打包时,会报编译错误,当然在src/test/java包下,可以出现多个,但建议最好使用Junit进行单元测试.
这个main方法启动,就会启动内嵌的tomcat或jetty容器,然后加载所有需要加载的或扫描的类或资源文件。上篇博客中,散仙为了测试方便,是直接在当前的Conroller中,启动了一个测试服务,这样做适合单独调试,如果是生产环境下的启动方法,则是散仙前面所讲的,在java包的根目录下建立一个main方法类,负责启动所有的资源。
在本例中,散仙的main代码如下:
- package com.dhgate.rate;
- import org.springframework.boot.SpringApplication;
- import org.springframework.boot.autoconfigure.EnableAutoConfiguration;
- import org.springframework.context.annotation.ComponentScan;
- import org.springframework.context.annotation.Configuration;
- @Configuration//配置控制
- @EnableAutoConfiguration//启用自动配置
- @ComponentScan//组件扫描
- public class ApplicationMain {
- public static void main(String[] args) throws Exception {
- //启动Spring Boot项目的唯一入口
- SpringApplication.run(ApplicationMain.class, args);
- }
- }
2,在src/main/resource目录下面,是放置一些配置文件,或模板支持的文件,如JSP,Velocity,Freemaker等,这里面比较常用或重要的一个文件,就是Spring Boot的集中式配置文件application.properties这个文件了,这里面给其他大部分的组件,提供了一个可集中管理和配置的中心,包括安全控制,redis,solr,mangodb的连接信息,以及数据库连接池,容器端口号,jmx,java mail,动态模板等。此外这个目录下默认是可以访问静态资源的,比如我们的css,js,或者第三方的一些引用文件等。
(二)关于在Spring Boot的配置简单的安全访问控制,这一点非常容器,我们只需要做如下二步,即可。
1,在pom文件中,引入spring-boot-starter-security的maven依赖。
- <dependency>
- <groupId>org.springframework.boot</groupId>
- <artifactId>spring-boot-starter-security</artifactId>
- </dependency>
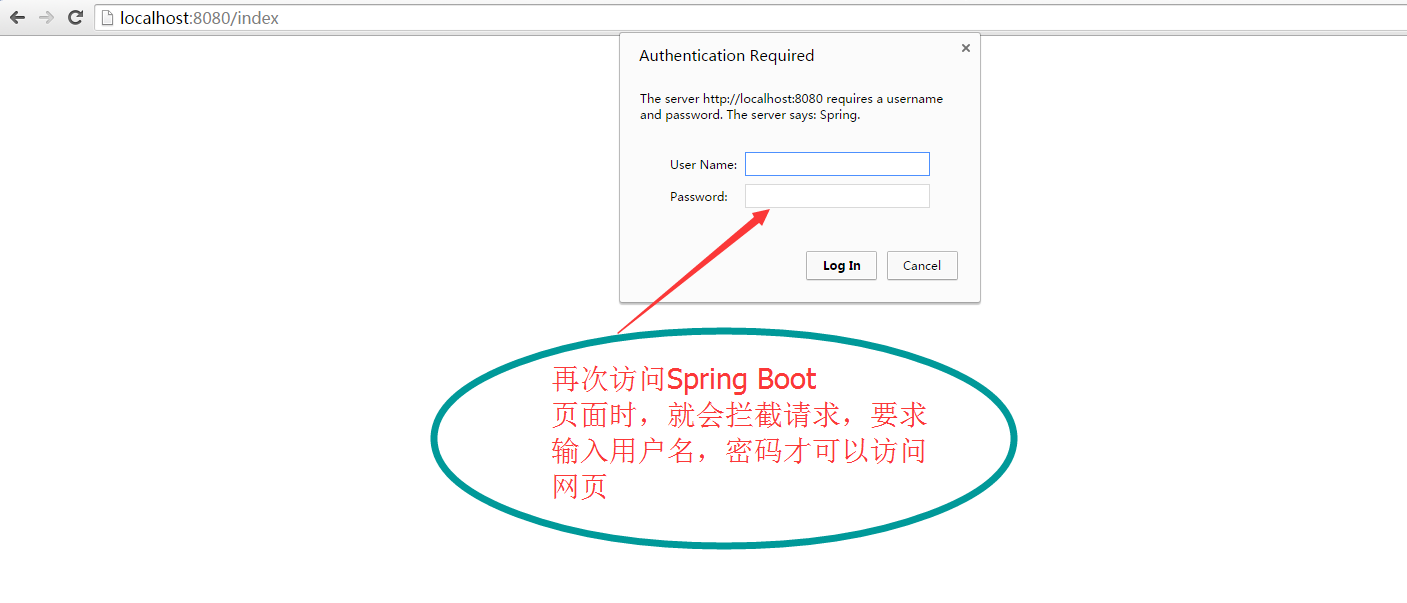
2,在application.properties中,配置访问的用户名和密码
- #用户名 密码配置
- security.user.name=admin
- security.user.password=test
再次,访问链接时,会出现以下,拦截页面,就代表配置成功:
当然这只是,一个初级的配置,更复杂的配置,可以分不用角色,在控制范围上,能够拦截到方法级别的权限控制。
(三)日志的重要性,不言而喻,Spring Boot支持大部分的log配置,其中包括:
(1)java util logging
(2)log4j
(3)log4j2
(4)logbak
默认的情况下spring boot会选择logback作为日志记录的载体,当然要想它正常的工作,需要依赖 Commons Logging, Java Util Logging, Log4J 或 SLF4J,相信大部分同学都是选择使用log4j.properties作为我们的日志配置和管理,但是散仙在Spring Boot中一直没有测试集成成功,所以就放弃使用log4j.properties作为日志载体,而是选择了Spring Boot推荐的logbak作为日志的配置文件,用过之后感觉也不错。
使用步骤:
1,将logbak.xml拷贝至resource目录下的根目录,然后在logbak.xml中,配置相关的log生成规则,log级别,以及日志路径,log的字符编码集,这个非常重要,因为刚开始用这个log记录程序运行的信息时,发现它不支持中文log,后来经查名,需要配置相关的log编码才可以正确记录对应的信息。一个通用的配置如下:
- <!-- Logback configuration. See http://logback.qos.ch/manual/index.html -->
- <configuration scan="true" scanPeriod="10 seconds">
- <!-- Simple file output -->
- <appender name="FILE" class="ch.qos.logback.core.rolling.RollingFileAppender">
- <!-- encoder defaults to ch.qos.logback.classic.encoder.PatternLayoutEncoder -->
- <encoder>
- <pattern>
- [ %-5level] [%date{yyyy-MM-dd HH:mm:ss}] %logger{96} [%line] - %msg%n
- </pattern>
- <charset>UTF-8</charset> <!-- 此处设置字符集 -->
- </encoder>
- <rollingPolicy class="ch.qos.logback.core.rolling.TimeBasedRollingPolicy">
- <!-- rollover daily 配置日志所生成的目录以及生成文件名的规则 -->
- <fileNamePattern>logs/mylog-%d{yyyy-MM-dd}.%i.log</fileNamePattern>
- <timeBasedFileNamingAndTriggeringPolicy
- class="ch.qos.logback.core.rolling.SizeAndTimeBasedFNATP">
- <!-- or whenever the file size reaches 64 MB -->
- <maxFileSize>64 MB</maxFileSize>
- </timeBasedFileNamingAndTriggeringPolicy>
- </rollingPolicy>
- <filter class="ch.qos.logback.classic.filter.ThresholdFilter">
- <level>DEBUG</level>
- </filter>
- <!-- Safely log to the same file from multiple JVMs. Degrades performance! -->
- <prudent>true</prudent>
- </appender>
- <!-- Console output -->
- <appender name="STDOUT" class="ch.qos.logback.core.ConsoleAppender">
- <!-- encoder defaults to ch.qos.logback.classic.encoder.PatternLayoutEncoder -->
- <encoder>
- <pattern>
- [ %-5level] [%date{yyyy-MM-dd HH:mm:ss}] %logger{96} [%line] - %msg%n
- </pattern>
- <charset>GBK</charset> <!-- 此处设置字符集 -->
- </encoder>
- <!-- Only log level WARN and above -->
- <filter class="ch.qos.logback.classic.filter.ThresholdFilter">
- <level>WARN</level>
- </filter>
- </appender>
- <!-- Enable FILE and STDOUT appenders for all log messages.
- By default, only log at level INFO and above. -->
- <root level="INFO">
- <appender-ref ref="FILE" />
- <appender-ref ref="STDOUT" />
- </root>
- <!-- For loggers in the these namespaces, log at all levels. -->
- <logger name="pedestal" level="ALL" />
- <logger name="hammock-cafe" level="ALL" />
- <logger name="user" level="ALL" />
- </configuration>
2,在application.properties中,指定log文件的加载路径,已经配置通用的log日志级别:
- #指定log的配置文件,以及记录Spring Boot的log级别
- logging.config=logback.xml
- logging.level.org.springframework.web: INFO
(四)介绍下Spring Boot中几个常用的注解,其中大部分都是来自Spring MVC的注解,这些注解使用的频率一般都在90%之上。
(1)@RestController和@Controller指定一个类,作为控制器的注解
(2)@RequestMapping方法级别的映射注解,这一个用过Spring MVC的小伙伴相信都很熟悉
(3)@EnableAutoConfiguration和@SpringBootApplication是类级别的注解,根据maven依赖的jar来自动猜测完成正确的spring的对应配置,只要引入了spring-boot-starter-web的依赖,默认会自动配置Spring MVC和tomcat容器
(4)@Configuration类级别的注解,一般这个注解,我们用来标识main方法所在的类
(5)@ComponentScan类级别的注解,自动扫描加载所有的Spring组件包括Bean注入,一般用在main方法所在的类上
(6)@ImportResource类级别注解,当我们必须使用一个xml的配置时,使用@ImportResource和@Configuration来标识这个文件资源的类。
(7)@Autowired注解,一般结合@ComponentScan注解,来自动注入一个Service或Dao级别的Bean
(8)@Component类级别注解,用来标识一个组件,比如我自定了一个filter,则需要此注解标识之后,Spring Boot才会正确识别。
ok,本篇的讲解,就到此结束,这些都是项目工程的基础知识,了解这些,有助于我们快速的上手一个Spring Boot应用。
下篇博客的内容会写:
(1)如何在Spring Boot项目中集成Spring Loaded框架,来完成模块热加载和代码动态编译,有了这个东西,我们开发的效率会更加高效,大部分情况下我们改了一个类或方法的代码之后,都不需要重启应用,因为Spring Loaded会定时重新编译并加载代码。
(2)如何在Spring Boot项目中集成Velocity,Spring Boot支持多种模板引擎,包括
1,FreeMarker
2,Groovy
3,Thymeleaf
4,Velocity
5,JSP (Spring Boot官方不推荐)
我们可以根据熟悉程度来选择自己喜欢的引擎。
一键式Spring集成工具 Spring Boot的更多相关文章
- Redis篇之操作、lettuce客户端、Spring集成以及Spring Boot配置
Redis篇之操作.lettuce客户端.Spring集成以及Spring Boot配置 目录 一.Redis简介 1.1 数据结构的操作 1.2 重要概念分析 二.Redis客户端 2.1 简介 2 ...
- Spring开发工具Spring Tools Suite(STS)
The Spring Tool Suite is an Eclipse-based development environment that is customized for developing ...
- Activiti学习——Activiti与Spring集成
转: Activiti学习——Activiti与Spring集成 与Spring集成 基础准备 目录结构 相关jar包 Activiti的相关jar包 Activiti依赖的相关jar包 Spring ...
- Spring 集成开发工具(STS)安装及配置
安装 spring 集成开发工具,下载地址:https://spring.io/tools 下载后,解压,双击 STS ,运行. 如果提示: 去oracle的网站上下载了1.8版本的jdk,下载地址如 ...
- Spring集成web环境(使用封装好的工具)
接上文spring集成web环境(手动实现) ##########代码接上文############# spring提供了一个监听器ContextLoaderListener对上述功能的封装,该监听器 ...
- Spring Cloud和Spring Boot的区别
Spring MVC: Spring MVC属于SpringFrameWork的后续产品,已经融合在Spring Web Flow里面.Spring 框架提供了构建 Web 应用程序的全功能 MVC ...
- Spring MVC和Spring Boot的理解以及比较
Spring MVC是什么?(1)Spring MVC是Spring提供的一个强大而灵活的模块式web框架.通过Dispatcher Servlet, ModelAndView 和 View Reso ...
- spring、spring mvc与spring boot的区别是什么?
Spring 的功能 Spring 框架就像一个家族,有众多衍生产品例如 boot.security.jpa等等.但他们的基础都是Spring 的 ioc和 aop ioc 提供了依赖注入的容器 ao ...
- Spring集成RabbitMQ-使用RabbitMQ更方便
如果提到Spring,你脑海中对他的印象还停留在SSH三大框架之一,那或许你该好好重新认识这个家伙. 在IT技术日新月异的今天,他还能让你忘不了并与他朝夕相处,他,肯定有自己的绝活.如今他早已经不是孤 ...
随机推荐
- 【iCore3 双核心板_ uC/OS-III】例程十:消息队列
实验指导书及代码包下载: http://pan.baidu.com/s/1sleklm1 iCore3 购买链接: https://item.taobao.com/item.htm?id=524229 ...
- IE6低版本jQuery里的show和hide方法BUG
公司内部一直在用的jQ的版本有些低,具体是哪个版本不太清楚,相关的东西都给删掉了,今天在做一个固定在页面右侧的导航的时候,IE6里出现了一个比较奇葩的问题.具体样子如下图: 收起是用定位left等于负 ...
- win7安装virtualbox遇到的问题
今天用台式机的时候想装个virtualbox跑centos做测试用,结果centos始终装不上,vbox一直提示无法开启任务.重装vbox,以及手动点击安装xxx.inf文件,都不行. 以前用的win ...
- iOS开发UI篇—Quartz2D使用(绘制基本图形)
iOS开发UI篇—Quartz2D使用(绘制基本图形) 一.简单说明 图形上下文(Graphics Context):是一个CGContextRef类型的数据 图形上下文的作用:保存绘图信息.绘图状态 ...
- 使用windows资源管理器的排序规则
对于windows资源管理器 abc_1_def是要排到abc_10_def前面的 而一般的排序规则, 都会吧_10_排到前面 所以为了使用习惯, 最好用资源管理器的排序规则, windows有个AP ...
- gets(),fgets()的作用机制探究
gets(),fgets() scanf("%d",&a)若接受形如 2 这样的输入后,缓冲区内会留一个\n,此后若调用gets等函数时会读出这个换行出现错误,需注意 fg ...
- Win8.1密钥
Win8.1 在线永久激活密钥一枚! 78BHN-M3KRH-PCP9W-HQJYR-Q9KHD [剩余次数:7K多+] 继续增加 [Key]:HPCJW-VGYW4-CR7W2-JG6Q7-K4Q ...
- Android应用程序窗口(Activity)的视图对象(View)的创建过程分析
从前文可知道,每一个Activity组件都有一个关联的Window对象,用来描述一个应用程序窗口.每一个应用程序窗口内部又包含有一个View对象,用来描述应用程序窗口的视图.应用程序窗口视图是真正用来 ...
- Android onMeasure方法介绍
onMeasure方法在控件的父元素正要放置它的子控件时调用.它会问一个问题,“你想要用多大地方啊?”,然后传入两个参数——widthMeasureSpec和heightMeasureSpec. 它们 ...
- Solr6.2.0 + zookeeper 集群配置
zookeeper1 : 192.168.1.103zookeeper2 : 192.168.1.104zookeeper3 : 192.168.1.105solr1 : 192.168.1.106s ...