将AE开发的专题图制作功能发布为WPS
AE开发可以定制化实现ArcGIS的地理处理功能,并实际运用于其他方面的工作,有时候我们还希望将AE开发的功能发布为网络地理信息处理服务(WPS),从而能在Web端更自由便利地调用所需要的地学处理算法。本文记录的就是这一过程,大体思路为:用C#类库封装专题图制作的方法并生成为Dll,再用C++调用这一Dll并生成C++的Dll,然后在Java中用jna来调用C++的Dll,实现Java调用AE开发的专题图制作的算法,最后用Tomcat将这一地学算法发布为服务。该服务只需要传递Shp文件的路径和专题图输出路径两个参数,便可以自动化执行,输入Shp矢量文件,输出Jpg专题图文件。
具体实现过程分为以下三方面来进行介绍:
一、将AE开发的功能封装为C#的Dll
在实验阶段,我其实先写了一个C#的Windows窗体应用程序,用以实现专题图制作功能,其界面如下所示:
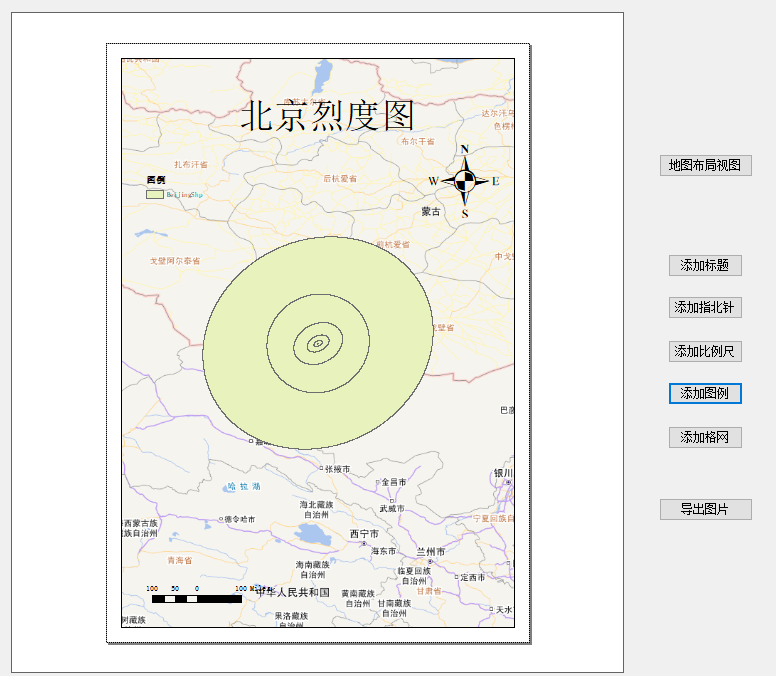
这个程序可以实现简单的专题图制作功能,以天地图图层为背景,加载Shp文件到PageLayoutControl控件,通过点击按钮来添加标题、指北针、比例尺、图例等专题图要素,这些要素依据Shp文件并调用AE的相关接口来生成,生成后加载到PageLayoutControl窗口的固定位置,最后通过点击按钮来将其导出为Jpg图片,并保存在本地目录。
但是由于Windows窗体应用程序无法生成可以被C++调用的Dll,并且最后的服务不允许有窗口的出现,于是就需要将这一方法封装为C#的类库,过程及代码如下:
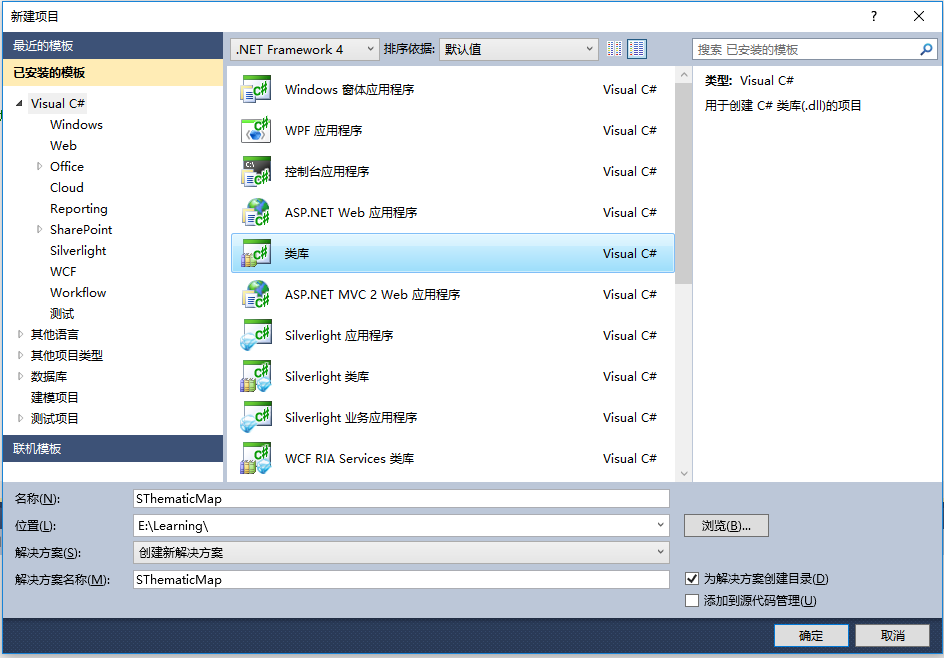
1.1以管理员方式启动VS(涉及到注册COM组件,必须以管理员方式启动),新建C#项目,选择类库。
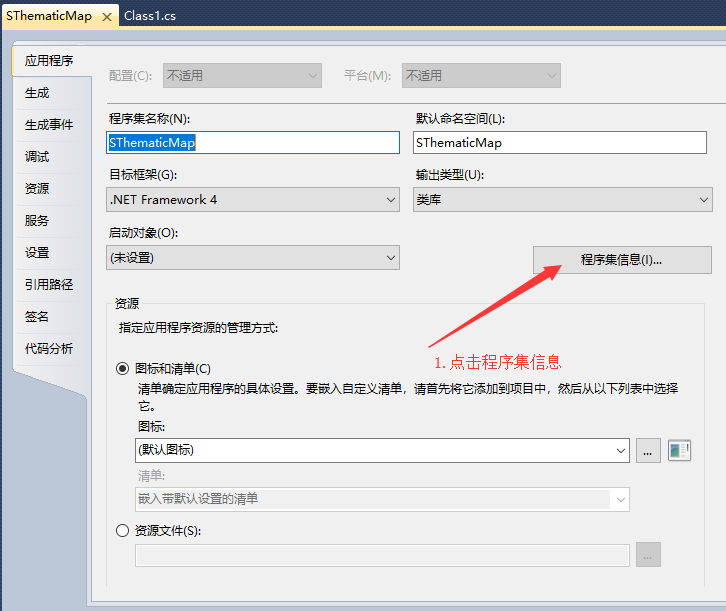
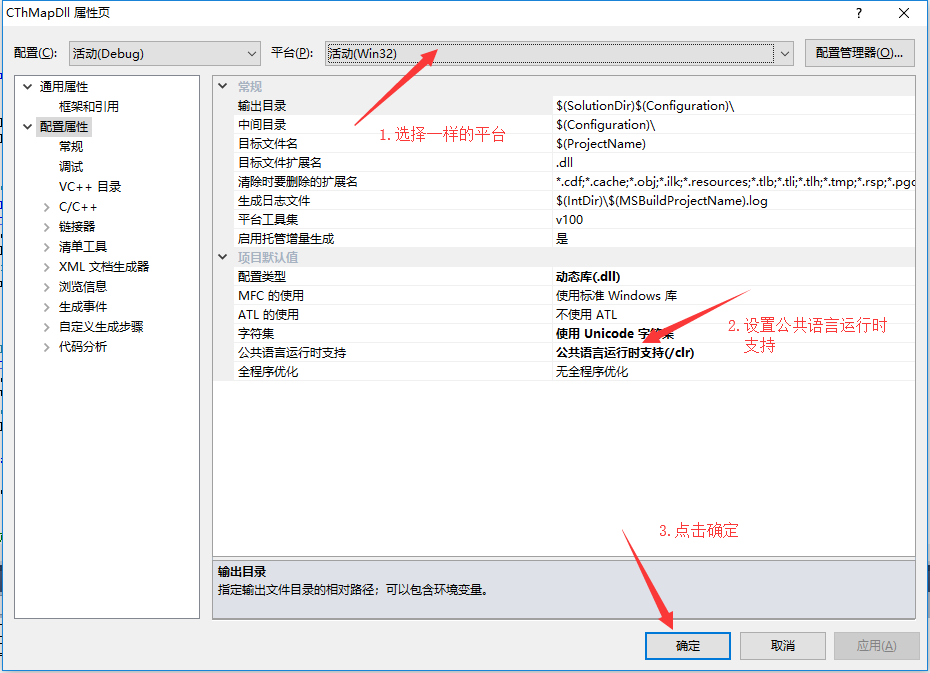
1.2设置SThematicMap的属性,右键新建的项目,点击属性。
继续设置项目属性,由于引用的ESRI.ArcGIS.Version为32位,本项目必须生成为32位(与后面过程相对应,后续过程中C++、JDK和Tomcat都必须保持相同位数)。
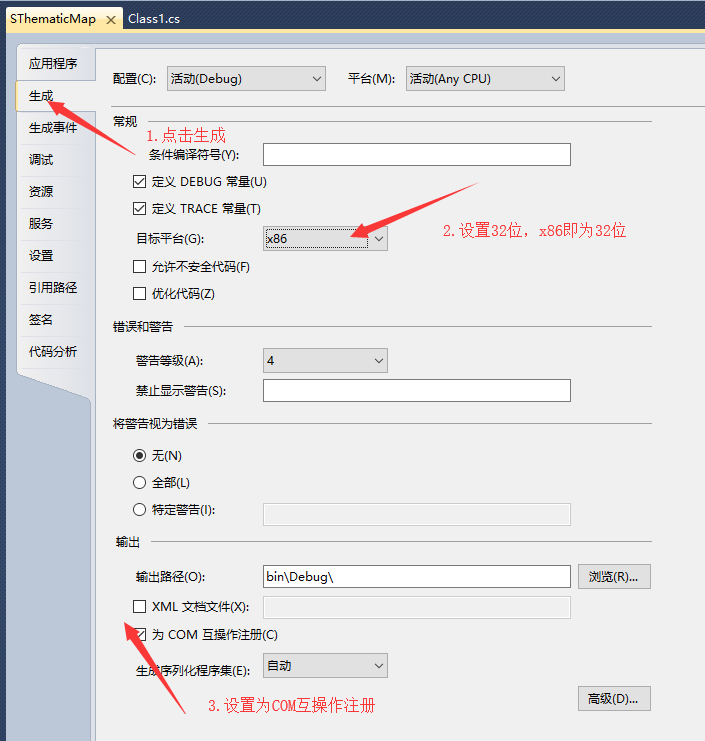
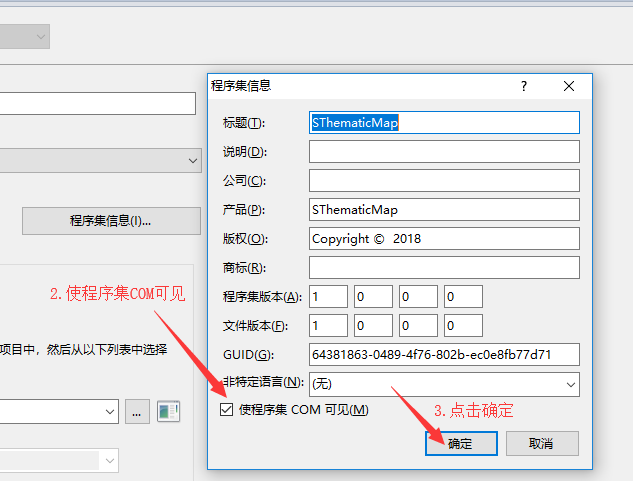
记得保存属性设置。
1.3添加代码。
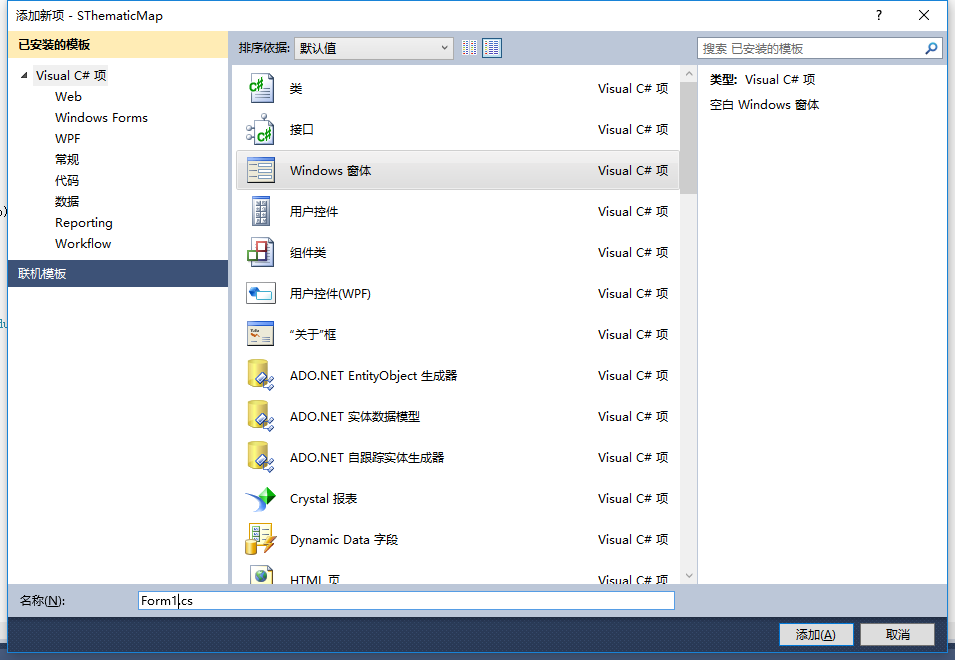
这一块需要说明一下,本项目最终不允许有窗体界面的出现,但是专题图制作中图例、比例尺等要素的添加都需要PageLayoutControl控件窗体的存在,就像是要在没有水的公路上开一艘船,很矛盾的一件事,想要开这艘船,就必须引水进来。换言之,就是在类库中引入Windows窗体文件,在窗体中加入需要的控件,并且设置窗体为不显示,仅仅让窗体控件作为一个搭载数据的载体。右键项目,添加新建项,添加C#的Windows窗体。
由于在类库中调用窗体会实例化Active X控件,而该控件需要应用程序的线程为单线程单元,因此在类库文件中需要添加一个额外的函数来设置线程,这一点很重要,否则后面会报错!因此,Class1下面的代码就如下所示:
using System;

using System.Linq;

using System.Text;

using System.Threading;

using System.Collections.Generic;

namespace SThematicMap

{

    public class Class1

    {

        private string InputPath, OutputPath;

        public Thread newThread;

        //设置程序为单线程单元

        public void ThMap(string inputPath, string outPath)

        {

            InputPath = inputPath;

            OutputPath = outPath;

            newThread = new Thread(new ThreadStart(threadMap));

            newThread.SetApartmentState(ApartmentState.STA);

            newThread.Start();

        }

        //实际执行模块

        public void threadMap()

        {

            ESRI.ArcGIS.RuntimeManager.Bind(ESRI.ArcGIS.ProductCode.Desktop);

            Form1 form = new Form1();

            form.thMap(InputPath, OutputPath);

        }

    }

}
其中form.thMap(InputPath, OutputPath)这句函数将两个参数传入Form1,核心的专题图生成算法在Form1.cs中实现,其代码如下:
using System;
using System.Collections.Generic;
using System.ComponentModel;
using System.Data;
using System.Drawing;
using System.Linq;
using System.Text;
using System.Windows.Forms; using ESRI.ArcGIS.Carto;
using ESRI.ArcGIS.Output;
using ESRI.ArcGIS.SystemUI;
using ESRI.ArcGIS.Controls;
using ESRI.ArcGIS.Display;
using ESRI.ArcGIS.Geometry;
using ESRI.ArcGIS.GISClient;
using ESRI.ArcGIS.esriSystem;
using ESRI.ArcGIS.Geodatabase;
using ESRI.ArcGIS.DataSourcesFile; namespace SThematicMap
{
public partial class Form1 : Form
{
public Form1()
{
InitializeComponent();
}
public void thMap(string InputPath, string OutputPath)
{
//在MapControl中导入shp文件
string filePath = System.IO.Path.GetDirectoryName(InputPath);
string fileName = System.IO.Path.GetFileNameWithoutExtension(InputPath);
axMapControl1.AddShapeFile(filePath, fileName);
//加载天地图
IPropertySet pPropertyset = new PropertySetClass();
pPropertyset.SetProperty("url", "http://t0.tianditu.com/vec_c/wmts");//全球矢量地图服务
//pPropertyset.SetProperty("url", "http://t0.tianditu.com/ter_c/wmts");//全球地形晕渲地图服务
IWMTSConnectionFactory pWMTSConnectionfactory = new WMTSConnectionFactory();
IWMTSConnection pWMTSConnection = pWMTSConnectionfactory.Open(pPropertyset, 0, null);
IWMTSLayer pWMTSLayer = new WMTSLayer();
IName pName = pWMTSConnection.FullName;
pWMTSLayer.Connect(pName);
axMapControl1.AddLayer(pWMTSLayer as ILayer);
//加载中文注记
IPropertySet pPropertyset1 = new PropertySetClass();
pPropertyset1.SetProperty("url", "http://t0.tianditu.com/cva_c/wmts");//全球矢量中文注记服务
IWMTSConnectionFactory pWMTSConnectionfactory1 = new WMTSConnectionFactory();
IWMTSConnection pWMTSConnection1 = pWMTSConnectionfactory1.Open(pPropertyset1, 0, null);
IWMTSLayer pWMTSLayer1 = new WMTSLayer();
IName pName1 = pWMTSConnection1.FullName;
pWMTSLayer1.Connect(pName1);
axMapControl1.AddLayer(pWMTSLayer1 as ILayer);
//将矢量文件显示在最上面
axMapControl1.MoveLayerTo(axMapControl1.LayerCount - 1, 0);
axMapControl1.Refresh(); //将MapControl中shp文件转为地图布局视图
IObjectCopy objectCopy = new ObjectCopyClass();
object toCopyMap = axMapControl1.Map;
object copiedMap = objectCopy.Copy(toCopyMap);
object toOverwriteMap = axPageLayoutControl1.ActiveView.FocusMap;
objectCopy.Overwrite(copiedMap, ref toOverwriteMap); //获取Layout视图内容
IGraphicsContainer container = axPageLayoutControl1.GraphicsContainer;
IActiveView activeView = axPageLayoutControl1.ActiveView;
// 获得MapFrame
IFrameElement frameElement = container.FindFrame(activeView.FocusMap);
IMapFrame mapFrame = frameElement as IMapFrame;
//根据MapSurround的uid,创建相应的MapSurroundFrame和MapSurround
UID uid = new UIDClass(); //*****************************添加指北针***************************
uid.Value = "esriCarto.MarkerNorthArrow";
IMapSurroundFrame mapSurroundFrame = mapFrame.CreateSurroundFrame(uid, null);
//设置MapSurroundFrame中指北针的点符号
IMapSurround mapSurround = mapSurroundFrame.MapSurround;
IMarkerNorthArrow markerNorthArrow = mapSurround as IMarkerNorthArrow;
IMarkerSymbol markerSymbol = markerNorthArrow.MarkerSymbol;
markerSymbol.Size = 130;
markerNorthArrow.MarkerSymbol = markerSymbol;
//QI,确定mapSurroundFrame的位置
IElement element = mapSurroundFrame as IElement;
IEnvelope envelope = new EnvelopeClass();
envelope.PutCoords(16, 21, 19, 23);
element.Geometry = envelope;
//使用IGraphicsContainer接口添加显示
container.AddElement(element, 0);
activeView.Refresh(); //*****************************添加比例尺***************************
ITrackCancel trackCancel = new CancelTracker();
//根据MapSurround的uid,创建相应的MapSurroundFrame和MapSurround
uid = new UIDClass();
uid.Value = "esriCarto.AlternatingScaleBar";
mapSurroundFrame = mapFrame.CreateSurroundFrame(uid, null);
//设置MapSurroundFrame中比例尺的样式
mapSurround = mapSurroundFrame.MapSurround;
//QI,确定mapSurroundFrame的位置
element = mapSurroundFrame as IElement;
envelope = new EnvelopeClass();
envelope.PutCoords(2, 2, 4, 4);
envelope.Width = 6;
element.Geometry = envelope;
element.Activate(axPageLayoutControl1.ActiveView.ScreenDisplay);
element.Draw(axPageLayoutControl1.ActiveView.ScreenDisplay, trackCancel);
//使用IGraphicsContainer接口添加显示
container.AddElement(element, 0);
axPageLayoutControl1.Refresh(); //*****************************添加图例***************************
// 获得MapFrame
//根据MapSurround的uid,创建相应的MapSurroundFrame和MapSurround
uid = new UIDClass();
uid.Value = "esriCarto.Legend";
mapSurroundFrame = mapFrame.CreateSurroundFrame(uid, null); //设置图例的属性
ILegend2 legend = mapSurroundFrame.MapSurround as ILegend2;
legend.Title = "图例";
element = mapSurroundFrame as IElement;
envelope = new EnvelopeClass();
envelope.PutCoords(2, 22, 6, 24);
element.Geometry = envelope;
//使用IGraphicsContainer接口添加显示
container.AddElement(element, 0);
activeView.Refresh(); //*****************************添加标题***************************
//创建元素
ITextElement pTextElement = new TextElementClass();
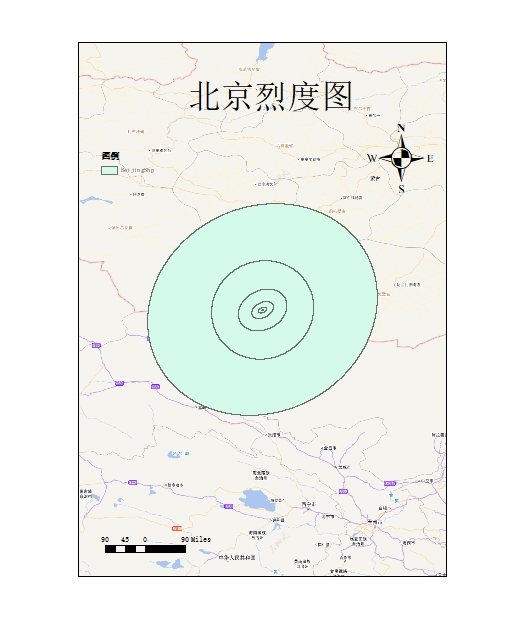
pTextElement.Text = "北京烈度图";
ITextSymbol pTextSymbol = new TextSymbolClass();
pTextSymbol.Size = 50;
pTextElement.Symbol = pTextSymbol;
//设置位置
IElement pElement = pTextElement as IElement;
//pElement.Geometry = axPageLayoutControl1.TrackRectangle();
envelope = new EnvelopeClass();
envelope.PutCoords(10, 23, 12, 28);
pElement.Geometry = envelope;
//将元素添加到容器中
container.AddElement(pElement, 0);
//刷新
axPageLayoutControl1.Refresh(); //*****************************导出图片***************************
double iScreenDispalyResolution = axPageLayoutControl1.ActiveView.ScreenDisplay.DisplayTransformation.Resolution;
// 设置输出文件名
string JpgfileName = OutputPath;
ESRI.ArcGIS.Output.IExport pExport = new ESRI.ArcGIS.Output.ExportJPEGClass();
pExport.ExportFileName = JpgfileName;
// 设置输出分辨率
pExport.Resolution = (short)iScreenDispalyResolution;
// 获取输出范围,获取视图框架对象,进而得到视图范围
tagRECT deviceRect = axPageLayoutControl1.ActiveView.ScreenDisplay.DisplayTransformation.get_DeviceFrame();
IEnvelope pDeviceEnvelop = new EnvelopeClass();
// 设置一个边框范围
pDeviceEnvelop.PutCoords(deviceRect.left, deviceRect.bottom, deviceRect.right, deviceRect.top);
// 将打印像素范围设置给输出对象
pExport.PixelBounds = pDeviceEnvelop;
// 设置跟踪取消对象
ITrackCancel pCancle = new CancelTrackerClass();
// 进行视图控件的视图输出操作,设置对应参数
axPageLayoutControl1.ActiveView.Output(pExport.StartExporting(), (int)pExport.Resolution, ref deviceRect, axPageLayoutControl1.ActiveView.Extent, pCancle);
Application.DoEvents();
pExport.FinishExporting();
pExport.Cleanup();
} }
}
在Form.cs中新建了public void thMap(string InputPath, string OutputPath)方法,其内容包括矢量文件的加载、布局视图的切换、天地图的加载、比例尺等要素的加载和图片文件的导出。至此,C#相关的所有代码都已完成。
1.4生成C#的Dll。
右键SThematicMap项目,点击生成。
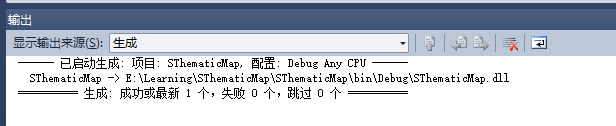
第一步到此完成!
二、调用C#的Dll并生成C++的Dll
2.1右键解决方案,添加新建项目,新建C++的Win32项目,并选择Dll和空项目。

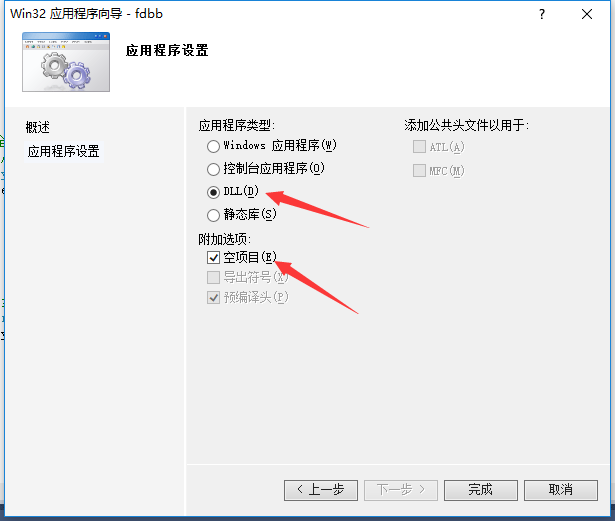
2.2设置项目属性,右键CThMapDll项目,点击属性。

2.3添加cpp文件并书写代码。右键源文件,添加新建项,添加C++文件(main.cpp)。
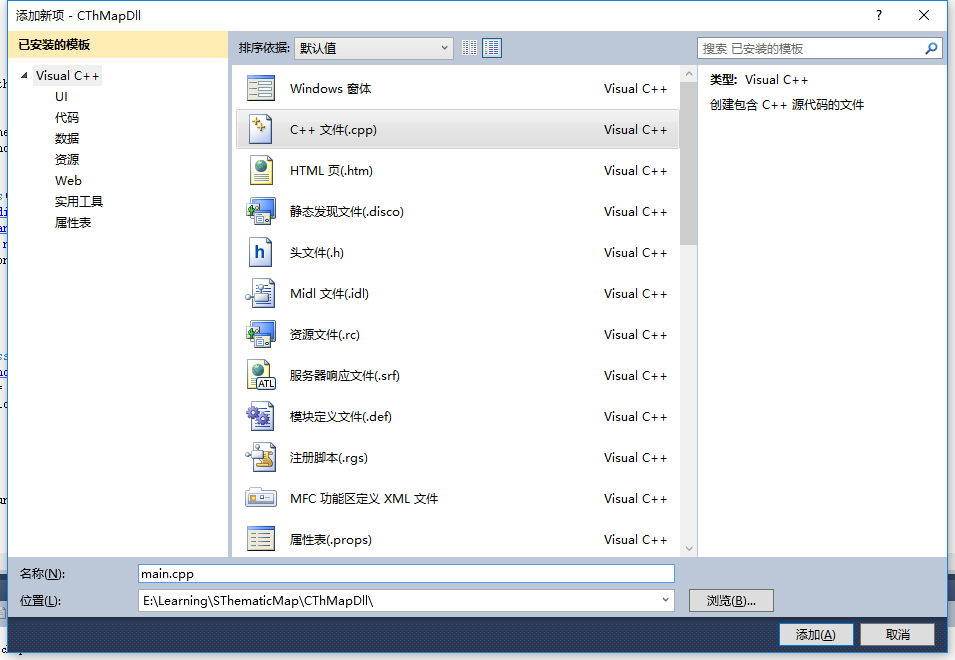
main.cpp代码如下:
/**********************************

声明需要被java调用的方法,该方法和java接口内部方法保持一致

预处理语句目的是暴露函数供外部调用。

************************/

#ifdef MYLIBAPI

#else

#define  MYLIBAPI  extern "C" __declspec(dllimport)

#endif

MYLIBAPI void ThMap(char* inputPath, char* outputPath); //添加函数声明

using namespace System;

using namespace SThematicMap;

void ThMap(char* inputPath, char* outputPath)

{

	String ^inStr = gcnew String(inputPath);

	String ^outStr = gcnew String(outputPath);

	Class1 ^method = gcnew Class1();

	method->ThMap(inStr,outStr);

}
2.4生成C++的Dll,右键CThMapDll项目,点击生成。
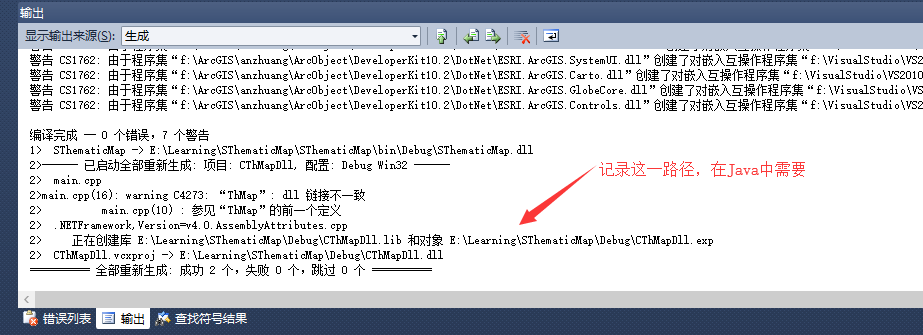
至此,第二步也已经完成!
三、用Java调用并将其发布为服务
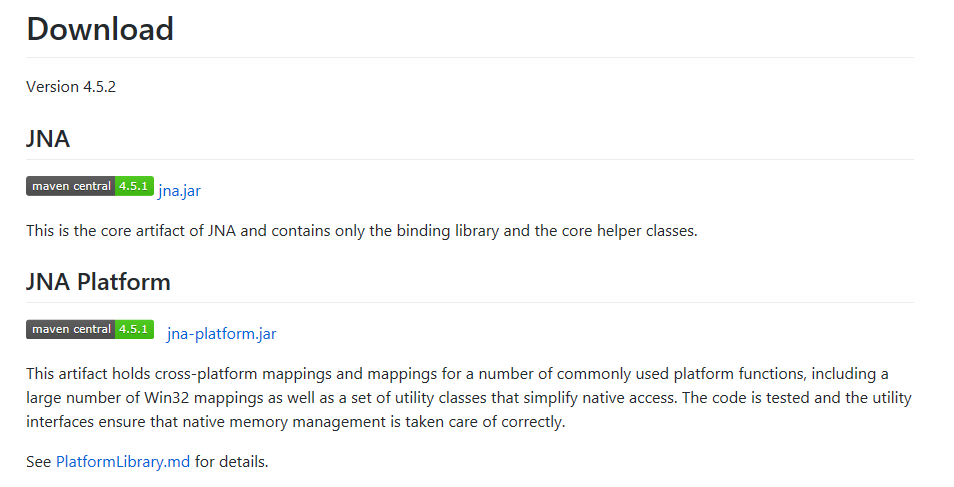
3.1先下载两个jna的Jar包,用于调用C++的Dll,下载地址:Jna下载。
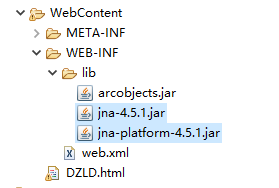
新建Lib文件夹,将两个Jna包导入并添加进项目。
3.2新建Package并添加ThematicMap.java。
其代码如下:
package whu.thematic.map;

import com.sun.jna.Library;

import com.sun.jna.Native;

public class ThematicMap {

	public static void main(String input,String output) throws Exception {

        System.out.println(System.getProperty("java.version"));//输出当前jdk版本号

        System.out.println(System.getProperty("sun.arch.data.model"));//输出当前jdk所用平台

        CLibrary1 clib = CLibrary1.INSTANCE;

        clib.ThMap(input,output);

    }

}

interface CLibrary1 extends Library {

    CLibrary1 INSTANCE = (CLibrary1) Native.

            loadLibrary("E:\\Learning\\SThematicMap\\Debug\\CThMapDll",

            CLibrary1.class);

    /*需要调用的方法,方法与C++方法名相同 */

    void ThMap(String inputPath, String outputPath);

}
需要在服务发布文件中添加如下引用,并声明相关函数:
import whu.thematic.map.*;

String input =new String(request.getParameter("district"));

String output = new String(request.getParameter("anglePath"));

try {

       ThematicMap.main(input, output);

    } catch (Exception e) {

	// TODO Auto-generated catch block

	e.printStackTrace();

}
在显示服务的网页中进行相应设置,其html文件代码如下:
<!DOCTYPE html>

<html>

<head>

<meta charset="utf-8">

<title>专题图制作</title>

<script src="login/js/jquery-1.4.2.min.js"></script>

</head>

<body>

<h1>专题图制作</h1>

    <form name="DZLD" method="get" action="DZLDServlet" id="form">

    	<p>

        <table border="1">

            <tr>

                <td>Input</td>

                <td><input name="district"  value="E:\\Learning\\ShpData\\BeijingShp.shp" type="text" size="50"/></td>

            </tr>

            <tr>

                <td>Output</td>

                <td><input name="anglePath" value="E:\\Learning\\ShpData\\Beijing.jpg" type="text" size="50"/></td>

            </tr>

        </table>

    	</p>

        <tr>

                <td><input type="submit" value="发送" size="50"/></td>

                 <td><input type="button" value="重置" size="50" onclick="formReset()"/></td>

        </tr>

    </form>

    <script type="text/javascript">

    	function formReset() {

        	$("input[name='district']").val("").focus(); // 清空并获得焦点

   		}

    </script>

</body>

</html>
3.3将该工程导入到Tomcat服务中,注意此处Tomcat必须是32位。

还要注意一点,此方法程序只是读到了C++的Dll,还需要将C#的Dll复制粘贴到所用Jre的bin目录下。然后发布并启动服务,在浏览器中输入:http://localhost:8080/image/
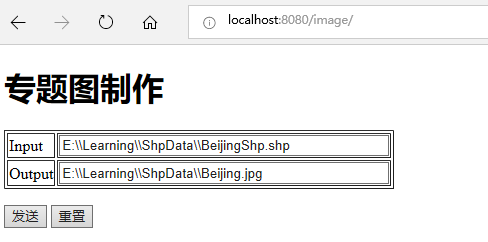
可以看到,WPS服务已经发布成功,点击发送,可在本地文件夹中看到Beijing.jpg
至此,全部工作都已经完成!其他带窗体或不带窗体的AE程序都可以按此种方法发布为服务。
将AE开发的专题图制作功能发布为WPS的更多相关文章
- arcgis api for flex之专题图制作(饼状图,柱状图等)
最近公司给我一个任务,就是利用arcgis api for flex实现在地图上点(业务数据)直接显示饼状图以及柱状图的专题图制作,而不是通过点击点显示气泡窗口的形式来实现,这个公司已经实现了. 经过 ...
- AE开发之默认滚轮缩放功能反置(C#修改注册表数据)
ArcMap默认的滚轮缩放是向下放大,向上缩小 如果想修改成向上放大,向下缩小,直接在ArcMap-Customize-ArcMap Options里, 将最下面的Mouse Wheel and Co ...
- ArcGIS Engine要素渲染和专题图制作(转)
摘要:Feature的常用的绘制方法包括:1.简单绘制:2.唯一值绘制/多字段唯一值绘制:3.点密度/多字段点密度绘制:4.数据分级绘制:5.质量图(饼图/直方图): 6.按比例尺渲染:7.比例符号渲 ...
- 【ArcGIS教程】专题图制作-人口密度分布图——人口密度分析
本篇以湖北省为例,制作人口密度分布图:这里所使用的为湖北省的省.市.县三个级别的行政区划矢量数据,以及居民点数据,进而进行密度分析. 示例数据来源于地理遥感生态网,网站地址www.gisrs.c ...
- 移动端webapp自适应实践(css雪碧图制作小工具实践)图文并茂
为什么要写这个 以前写过关于webapp自适应屏幕的文章(链接),不过写的大多数群众看不懂,所以来个图文并茂的版本.虽然只是一个简单的页面,不过在做的过程中也遇到了一些问题,也算是好事吧! 该示例gi ...
- AE开发能否实现TOC Control里添加多个Data Frame
问题: 在ArcMap中,菜单Insert下Data Frame,可以在TOC中增加Data Frame,在MapControl或者PageLayoutControl下都可以正常显示多个Data Fr ...
- 开发指南专题4:JEECG高速微云开发平台--JEECG开发环境的搭建
开发指南专题4:JEECG微云高速开发平台开发环境搭建 1. JEECG开发环境搭建 JEECG推荐的开发环境为Myeclipse8.5/Eclipse3.7+JDK1.6+Tomcat6.0 1.1 ...
- 开发指南专题六:JEECG微云高速开发平台代码生成
开发指南专题六:JEECG微云高速开发平台代码生 1.1. 代码生成扫描路径配置 用代码生成器生成代码后.须要进行相关配置配置,扫描注入control.service.entity等; 具体操作过程例 ...
- 电脑GIF动图制作方法图文详解
我们在电脑上可以看到很多动态图,有趣的.搞笑的.可爱的等等,只要我们要用哪种类型的,网上应有尽有,但是想不想自己制作图片呢?今天我们就来学习一下GIF动图制作的方法. 使用工具: 电脑 操作方法: 1 ...
随机推荐
- C++判断字符串是否为空的一个小问题
刚才visual studio下处理一个函数字符串入参,判断入参字符串是否为空有点小问题. 接口函数声明是这样的:SHORT GETWFSINFPINKEYDETAIL(LPCTSTR strKeyN ...
- Flask表单(Flask-WTF)
1.request.from获取POST表单数据 # hello.py #coding:utf-8 from flask import Flask,request,render_template ap ...
- Java工具类 通过ResultSet对象返回对应的实体List集合
自从学了JDBC用多了像一下这种代码: List<xxx> list = new Array<xxx>(); if(rs.next()){ xxx x = new xxx(); ...
- python_code list_3
>>> seq=['foo','x41','?','***']>>> def func(x): return x.isalnum() >>> li ...
- 节流throttle和防抖debounce
underscore.js提供了很多很有用的函数,今天想说说其中的两个.这两个函数都用于限制函数的执行. debounce 在解释这个函数前,我们先从一个例子看下这个函数的使用场景.假设我们网站有个搜 ...
- MySQL中横表和竖表相互转换
一 竖表转横表 1. 首先创建竖表 create table student ( id varchar(32) primary key, name varchar (50) not null, su ...
- const用法体会
const三个原则: 第一,如果你参数里面的变量在函数体内不改变,那么把该参数定义成const... : 第二,如果你的函数不会改变类里面的成员变量,把该函数定义成const成员函数,Eg: int ...
- 解决MyEclipse注册失败的问题
https://jingyan.baidu.com/article/acf728fd49519ff8e410a361.html
- Java Web之九九乘法表
NineTabs.jsp 1 <%@ page language="java" import="java.util.*" contentType=&quo ...
- sql server 死锁排查
记得以前客户在使用软件时,有偶发出现死锁问题,因为发生的时间不确定,不好做问题的重现,当时解决问题有点棘手了. 现总结下查看死锁的常用二种方式: 第一种是图形化监听: sqlserver --> ...