OpenCV使用二维特征点(Features2D)和单映射(Homography)寻找已知物体
使用二维特征点(Features2D)和单映射(Homography)寻找已知物体
理论
代码
这个教程的源代码如下所示。你还可以从 以下链接下载到源代码
#include <stdio.h>

#include <iostream>

#include "opencv2/core/core.hpp"

#include "opencv2/features2d/features2d.hpp"

#include "opencv2/highgui/highgui.hpp"

#include "opencv2/calib3d/calib3d.hpp"

using namespace cv;

void readme();

/** @function main */

int main( int argc, char** argv )

{

  if( argc != 3 )

  { readme(); return -1; }

  Mat img_object = imread( argv[1], CV_LOAD_IMAGE_GRAYSCALE );

  Mat img_scene = imread( argv[2], CV_LOAD_IMAGE_GRAYSCALE );

  if( !img_object.data || !img_scene.data )

  { std::cout<< " --(!) Error reading images " << std::endl; return -1; }

  //-- Step 1: Detect the keypoints using SURF Detector

  int minHessian = 400;

  SurfFeatureDetector detector( minHessian );

  std::vector<KeyPoint> keypoints_object, keypoints_scene;

  detector.detect( img_object, keypoints_object );

  detector.detect( img_scene, keypoints_scene );

  //-- Step 2: Calculate descriptors (feature vectors)

  SurfDescriptorExtractor extractor;

  Mat descriptors_object, descriptors_scene;

  extractor.compute( img_object, keypoints_object, descriptors_object );

  extractor.compute( img_scene, keypoints_scene, descriptors_scene );

  //-- Step 3: Matching descriptor vectors using FLANN matcher

  FlannBasedMatcher matcher;

  std::vector< DMatch > matches;

  matcher.match( descriptors_object, descriptors_scene, matches );

  double max_dist = 0; double min_dist = 100;

  //-- Quick calculation of max and min distances between keypoints

  for( int i = 0; i < descriptors_object.rows; i++ )

  { double dist = matches[i].distance;

    if( dist < min_dist ) min_dist = dist;

    if( dist > max_dist ) max_dist = dist;

  }

  printf("-- Max dist : %f \n", max_dist );

  printf("-- Min dist : %f \n", min_dist );

  //-- Draw only "good" matches (i.e. whose distance is less than 3*min_dist )

  std::vector< DMatch > good_matches;

  for( int i = 0; i < descriptors_object.rows; i++ )

  { if( matches[i].distance < 3*min_dist )

     { good_matches.push_back( matches[i]); }

  }

  Mat img_matches;

  drawMatches( img_object, keypoints_object, img_scene, keypoints_scene,

               good_matches, img_matches, Scalar::all(-1), Scalar::all(-1),

               vector<char>(), DrawMatchesFlags::NOT_DRAW_SINGLE_POINTS );

  //-- Localize the object

  std::vector<Point2f> obj;

  std::vector<Point2f> scene;

  for( int i = 0; i < good_matches.size(); i++ )

  {

    //-- Get the keypoints from the good matches

    obj.push_back( keypoints_object[ good_matches[i].queryIdx ].pt );

    scene.push_back( keypoints_scene[ good_matches[i].trainIdx ].pt );

  }

  Mat H = findHomography( obj, scene, CV_RANSAC );

  //-- Get the corners from the image_1 ( the object to be "detected" )

  std::vector<Point2f> obj_corners(4);

  obj_corners[0] = cvPoint(0,0); obj_corners[1] = cvPoint( img_object.cols, 0 );

  obj_corners[2] = cvPoint( img_object.cols, img_object.rows ); obj_corners[3] = cvPoint( 0, img_object.rows );

  std::vector<Point2f> scene_corners(4);

  perspectiveTransform( obj_corners, scene_corners, H);

  //-- Draw lines between the corners (the mapped object in the scene - image_2 )

  line( img_matches, scene_corners[0] + Point2f( img_object.cols, 0), scene_corners[1] + Point2f( img_object.cols, 0), Scalar(0, 255, 0), 4 );

  line( img_matches, scene_corners[1] + Point2f( img_object.cols, 0), scene_corners[2] + Point2f( img_object.cols, 0), Scalar( 0, 255, 0), 4 );

  line( img_matches, scene_corners[2] + Point2f( img_object.cols, 0), scene_corners[3] + Point2f( img_object.cols, 0), Scalar( 0, 255, 0), 4 );

  line( img_matches, scene_corners[3] + Point2f( img_object.cols, 0), scene_corners[0] + Point2f( img_object.cols, 0), Scalar( 0, 255, 0), 4 );

  //-- Show detected matches

  imshow( "Good Matches & Object detection", img_matches );

  waitKey(0);

  return 0;

  }

  /** @function readme */

  void readme()

  { std::cout << " Usage: ./SURF_descriptor <img1> <img2>" << std::endl; }
解释
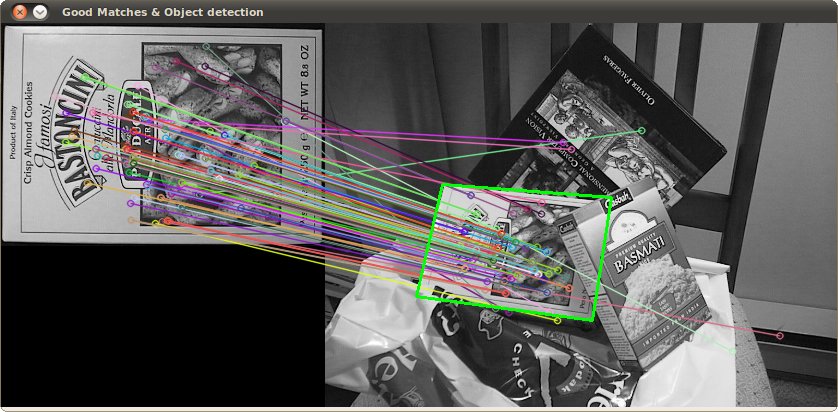
结果
检测到的目标结果 (用绿色标记出来的部分)
翻译者
Shuai Zheng, <kylezheng04@gmail.com>, http://www.cbsr.ia.ac.cn/users/szheng/
from: http://www.opencv.org.cn/opencvdoc/2.3.2/html/doc/tutorials/features2d/feature_homography/feature_homography.html#feature-homography
OpenCV使用二维特征点(Features2D)和单映射(Homography)寻找已知物体的更多相关文章
- OpenCV 使用二维特征点(Features2D)和单映射(Homography)寻找已知物体
#include <stdio.h> #include <iostream> #include "opencv2/core/core.hpp" #inclu ...
- OpenCV开发笔记(六十九):红胖子8分钟带你使用传统方法识别已知物体(图文并茂+浅显易懂+程序源码)
若该文为原创文章,未经允许不得转载原博主博客地址:https://blog.csdn.net/qq21497936原博主博客导航:https://blog.csdn.net/qq21497936/ar ...
- 开发环境配置--Ubuntu+Qt4+OpenCV(二)
同系列文章 1. 开发环境配置--Ubuntu+Qt4+OpenCV(一) 2. 开发环境配置--Ubuntu+Qt4+OpenCV(二) 3. 开发环境配置--Ubuntu+Qt4+OpenCV(三 ...
- 使用OpenCV查找二值图中最大连通区域
http://blog.csdn.net/shaoxiaohu1/article/details/40272875 使用OpenCV查找二值图中最大连通区域 标签: OpenCVfindCoutour ...
- OpenCV图像变换二 投影变换与极坐标变换实现圆形图像修正
投影变换 在放射变换中,物体是在二维空间中变换的.如果物体在三维空间中发生了旋转,那么这种变换就成为投影变换,在投影变换中就会出现阴影或者遮挡,我们可以运用二维投影对三维投影变换进行模块化,来处理阴影 ...
- PyTorch深度学习实践——处理多维特征的输入
处理多维特征的输入 课程来源:PyTorch深度学习实践--河北工业大学 <PyTorch深度学习实践>完结合集_哔哩哔哩_bilibili 这一讲介绍输入为多维数据时的分类. 一个数据集 ...
- VS2010/MFC编程入门之二(利用MFC向导生成单文档应用程序框架)
VS2010/MFC编程入门之二(利用MFC向导生成单文档应用程序框架)-软件开发-鸡啄米 http://www.jizhuomi.com/software/141.html 上一讲中讲了VS20 ...
- 第二十二章 Django会话与表单验证
第二十二章 Django会话与表单验证 第一课 模板回顾 1.基本操作 def func(req): return render(req,'index.html',{'val':[1,2,3...]} ...
- opencv统计二值图黑白像素个数
#include "iostream" #include "queue" #include "Windows.h" #include < ...
随机推荐
- 洛谷 P1296奶牛的耳语 题解
题目传送门 这道题很显然可以用O(n2)的方法来做(记得排序),由于数据较水...但还是在for循环中加一些优化:++i,据说这样会快一些... #include<bits/stdc++.h&g ...
- fastdfs5.x Java客户端简单例子
下载源码, 使用maven编译并安装 https://github.com/happyfish100/fastdfs-client-java.git 新建maven工程,引入fastdfs-clien ...
- mac如何运行vue项目
由于本人使用的是mac系统,因此在vue.js 的环境搭建上遇到许许多多的坑.感谢 showonne.yubang 技术指导,最终成功解决.下面是个人的搭建过程,权当是做个笔记吧. 由于mac非常人性 ...
- react + redux 实现幻灯片
写在前面: 这一篇是我 使用scss + react + webpack + es6实现幻灯片 的进阶篇,效果请点我,将会使用上redux的基础用法,因为一开始没有理解好redux的用法,单纯看文档, ...
- lr_get_attrib_string的使用
loadrunner controller 传递参数的一个方法: lr_get_attrib_string lang = lr_get_attrib_string("lang&quo ...
- SQL 如何查找一个表里,每个班级各个学科的最高分?
SQL 如何查找一个表里,每个班级各个学科的最高分? 学生表:STUDENT(S#,SNAME,SAGE,SSEX,CLASSNO) 班级表:CLASS(CLASSNO,CLASSNAME) 课程表: ...
- POJ 2019 Cornfields [二维RMQ]
题目传送门 Cornfields Time Limit: 1000MS Memory Limit: 30000K Total Submissions: 7963 Accepted: 3822 ...
- BZOJ4653 [NOI2016]区间 [线段树,离散化]
题目传送门 区间 Description 在数轴上有 n个闭区间 [l1,r1],[l2,r2],...,[ln,rn].现在要从中选出 m 个区间,使得这 m个区间共同包含至少一个位置.换句话说,就 ...
- python log的处理方式
python log的处理方式 配置文件 #! /usr/bin/env python # -*- coding: utf-8 -*- # __author__ = "Q1mi" ...
- quartz定时任务,已过期的内容自动下线
概念: Quartz是一个开源的作业调度框架,可以让计划的程序任务一个预定义的日期和时间运行.Quartz可以用来创建简单或复杂的日程安排执行几十,几百,甚至是十万的作业数. 框架架构: 简单实例: ...