一步步实现ArcMenu效果
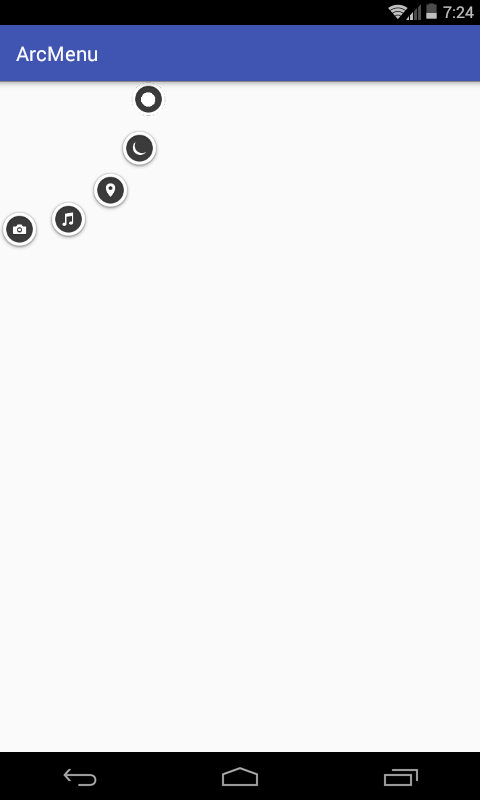
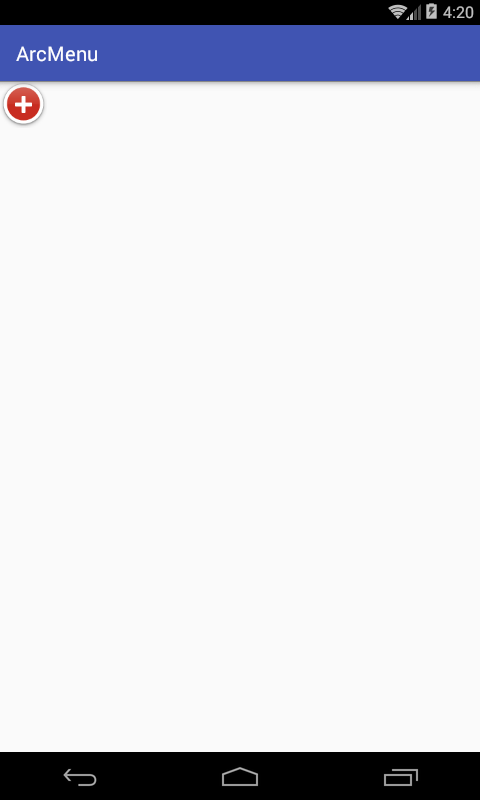
先来看一下最终要实验的效果:
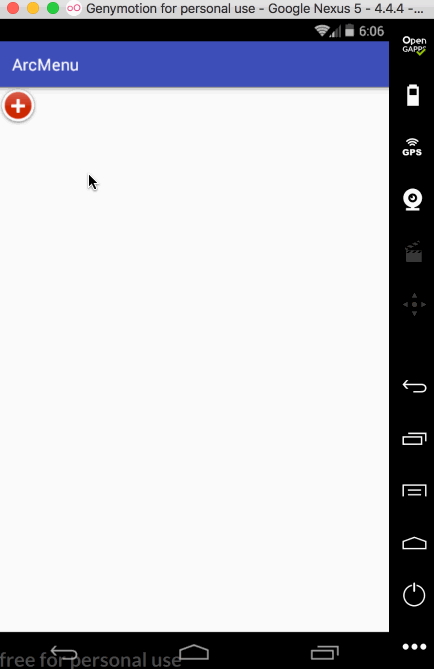
是不是跟国外的一款Path的菜单效果类似,这里的动画采用补间动画去实现,正而操练一下补间动画。
布局和子视图的测量处理:
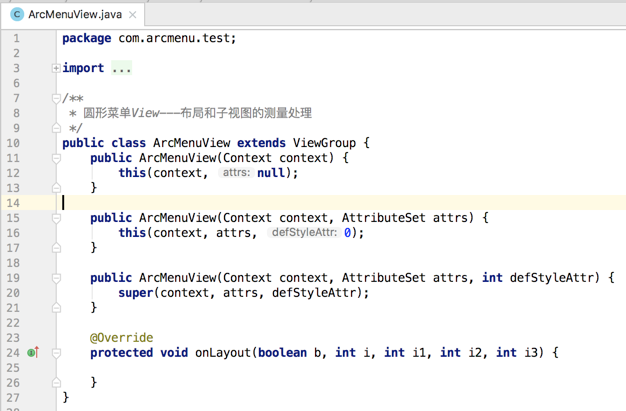
新建一自定义View继承ViewGroup:
然后在布局中进行声明:
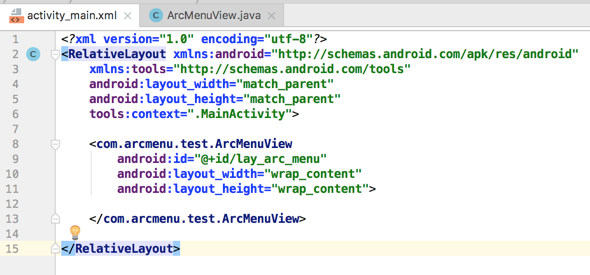
然后在ViewGroup中需要准备子菜单元素,这里直接在布局文件中的ArcMenuView里面进行声明,首先是菜单的“+”号,由两张图片构成:
composer_button.png:
composer_icn_plus.png:

然后再准备展开的5个菜单项,可以由ImageView组成,定义在布局文件中如下:
<?xml version="1.0" encoding="utf-8"?>

<RelativeLayout xmlns:android="http://schemas.android.com/apk/res/android"

    xmlns:tools="http://schemas.android.com/tools"

    android:layout_width="match_parent"

    android:layout_height="match_parent"

    tools:context=".MainActivity">

    <com.arcmenu.test.ArcMenuView

        android:id="@+id/lay_arc_menu"

        android:layout_width="wrap_content"

        android:layout_height="wrap_content">

        <!-- "+"按钮 -->

        <RelativeLayout

            android:id="@+id/lay_plus"

            android:layout_width="wrap_content"

            android:layout_height="wrap_content"

            android:gravity="center">

            <ImageView

                android:layout_width="wrap_content"

                android:layout_height="wrap_content"

                android:layout_centerInParent="true"

                android:src="@drawable/composer_button" />

            <ImageView

                android:layout_width="wrap_content"

                android:layout_height="wrap_content"

                android:layout_centerInParent="true"

                android:src="@drawable/composer_icn_plus" />

        </RelativeLayout>

        <!-- 相机按钮 -->

        <ImageView

            android:layout_width="wrap_content"

            android:layout_height="wrap_content"

            android:src="@drawable/composer_camera" />

        <!-- 音乐按钮 -->

        <ImageView

            android:layout_width="wrap_content"

            android:layout_height="wrap_content"

            android:src="@drawable/composer_music" />

        <!-- 定位按钮 -->

        <ImageView

            android:layout_width="wrap_content"

            android:layout_height="wrap_content"

            android:src="@drawable/composer_place" />

        <!-- 月亮按鈕 -->

        <ImageView

            android:layout_width="wrap_content"

            android:layout_height="wrap_content"

            android:src="@drawable/composer_sleep" />

        <!-- 太阳按钮 -->

        <ImageView

            android:layout_width="wrap_content"

            android:layout_height="wrap_content"

            android:src="@drawable/composer_sun" />

    </com.arcmenu.test.ArcMenuView>

</RelativeLayout>
其资源图如下:


此时运行肯定看不到任何效果:
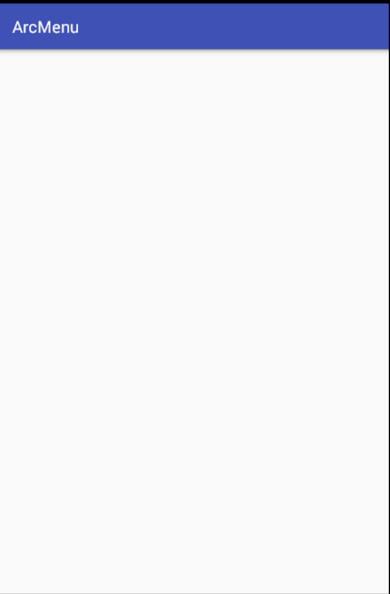
因为咱们还得处理子视图的测试及位置摆放处理,毕境不像系统写好的四大布局,所以接下来对子视图进行测量:
子视图布局处理的细节分析:
当测量好之后,要想让子视图显示成咱们想要的样子,接下来就得对子视图如何布局进行处理了,在实现之前首先得对其进行分析一下:
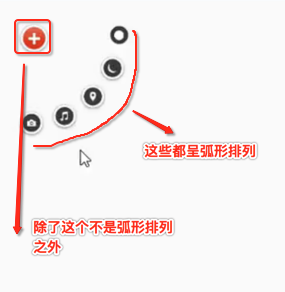
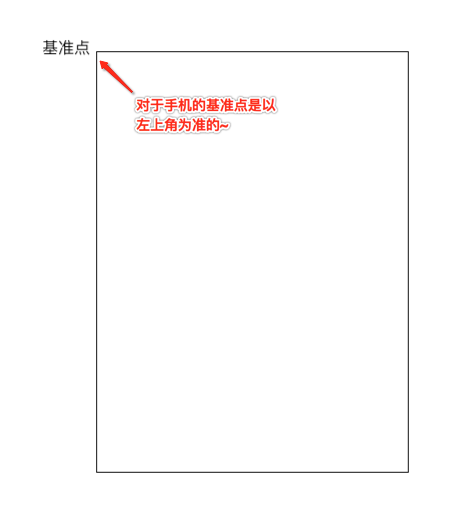
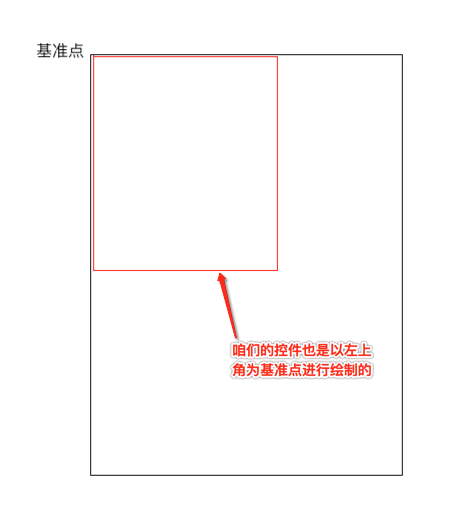
对于第一个“+”号应该就是在默认左上角的位置,而对于其它的元素则应该以弧形的样式进行摆放,那这个弧形具体的摆放规则是怎么样的呢?
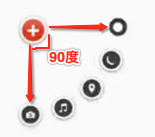
也就是这五个元素均等分了90度,现在的问题就是怎么来算这些点的摆放位置的左上右下,还是以草图进行分析:
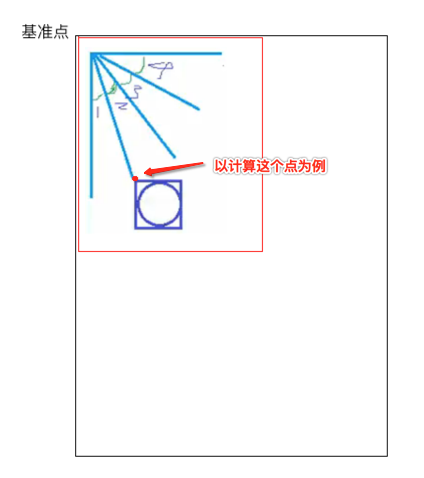
∠1 = ∠2 = ∠3 = ∠4 = π / 2 / 4。
然后咱们可以定一个半径的长度,也就是目前已知的条件有:
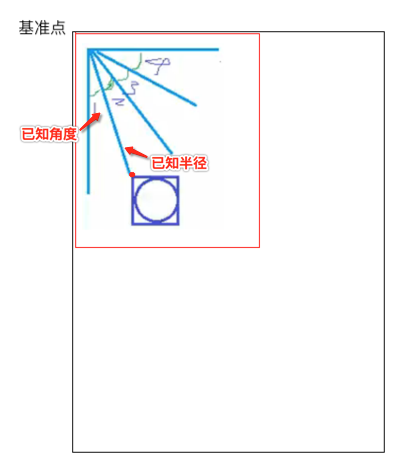
要求x、y:
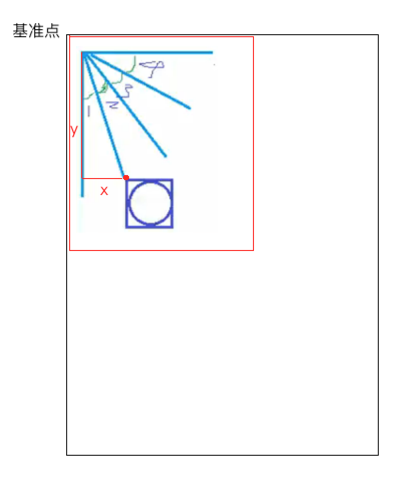
根据三角函数就可轻松求解,如下:
x = radius * Math.sin(π / 2 / 4);
y = radius * Math.cos(π / 2 / 4);
而求得了left和top,那right和bottom就比较简单了,直接加相应控件的宽高既可求得。
那如果再换一个元素其求法又有啥变化呢?

只是角度由原来的1变为了1+2,也就是2倍的角度1,因为每个夹角都是相等的,于是随着元素的变化不断去更改夹角的度数既可,其计算公式是一样的,好,有了实现的思路之后下面来用代码来实现一下子视图弧形的排列。
子视图弧形排列实现:
由于第一个"+"号元素不参与弧形的排列,所以先将它拿出来稍后再单独对它进行处理:

/**
* 圆形菜单View---布局和子视图的测量处理
*/
public class ArcMenuView extends ViewGroup { /* 定义要摆放圆的半径,其子视图的摆放位置需要依据它来计算 */
private static final float RADIUS = 130f; public ArcMenuView(Context context) {
this(context, null);
} public ArcMenuView(Context context, AttributeSet attrs) {
this(context, attrs, 0);
} public ArcMenuView(Context context, AttributeSet attrs, int defStyleAttr) {
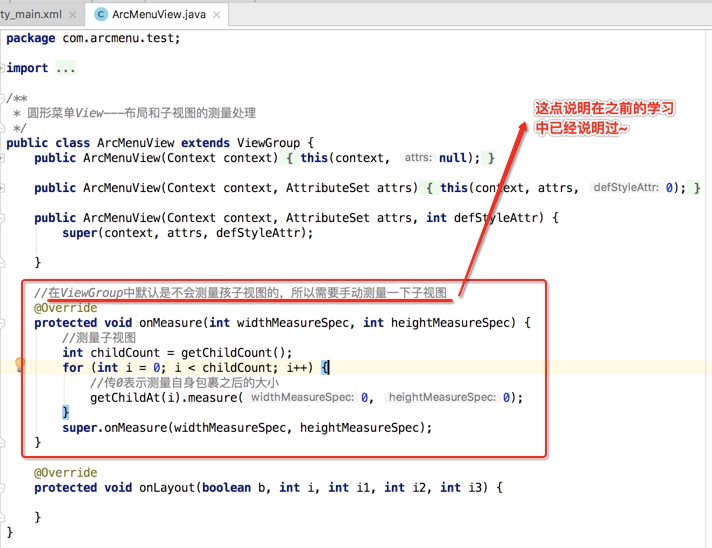
super(context, attrs, defStyleAttr); } //在ViewGroup中默认是不会测量孩子视图的,所以需要手动测量一下子视图
@Override
protected void onMeasure(int widthMeasureSpec, int heightMeasureSpec) {
//测量子视图
int childCount = getChildCount();
for (int i = 0; i < childCount; i++) {
//传0表示测量自身包裹之后的大小
getChildAt(i).measure(0, 0);
}
super.onMeasure(widthMeasureSpec, heightMeasureSpec);
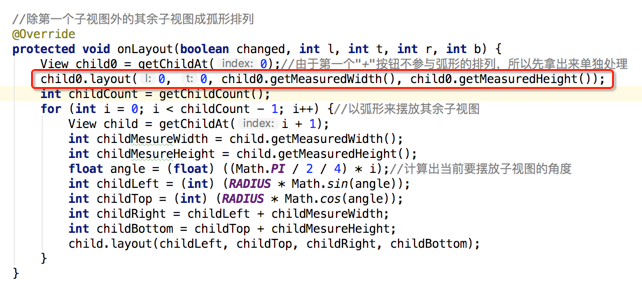
} //除第一个子视图外的其余子视图成孤形排列
@Override
protected void onLayout(boolean changed, int l, int t, int r, int b) {
View child0 = getChildAt(0);//由于第一个"+"按钮不参与弧形的排列,所以先拿出来单独处理
int childCount = getChildCount();
for (int i = 0; i < childCount - 1; i++) {//以弧形来摆放其余子视图
View child = getChildAt(i + 1);
int childMesureWidth = child.getMeasuredWidth();
int childMesureHeight = child.getMeasuredHeight();
float angle = (float) ((Math.PI / 2 / 4) * i);//计算出当前要摆放子视图的角度
int childLeft = (int) (RADIUS * Math.sin(angle));
int childTop = (int) (RADIUS * Math.cos(angle));
int childRight = childLeft + childMesureWidth;
int childBottom = childTop + childMesureHeight;
child.layout(childLeft, childTop, childRight, childBottom);
}
}
}
编译运行:
接着还差一个“+”号的摆放,这个比较简单,稍加处理一下:
再次编译运行:
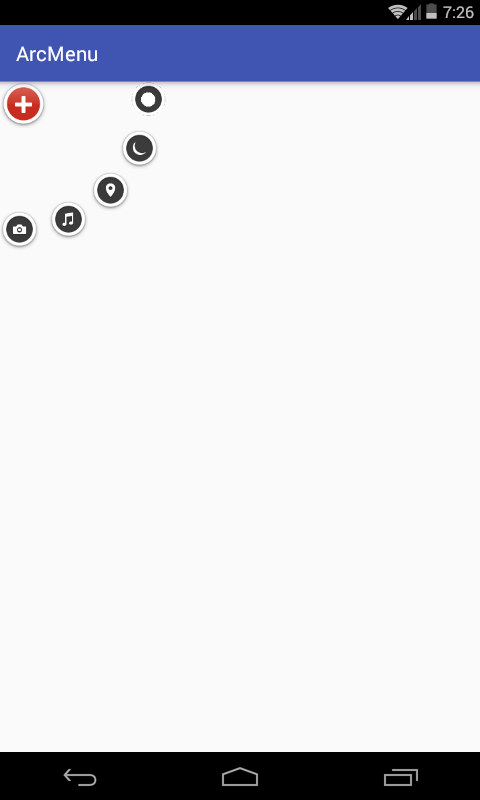
第0个和其余的子视图的旋转处理:
接下来增加点击的动画效果,首先处理旋转效果,先处理点击“+”号的旋转,先给“+”View增加点击事件:
/**

 * 圆形菜单View---第0个和其余子视图的旋转处理

 */

public class ArcMenuView extends ViewGroup implements View.OnClickListener {

    /* 定义要摆放圆的半径,其子视图的摆放位置需要依据它来计算 */

    private static final float RADIUS = 130f;

    public ArcMenuView(Context context) {

        this(context, null);

    }

    public ArcMenuView(Context context, AttributeSet attrs) {

        this(context, attrs, 0);

    }

    public ArcMenuView(Context context, AttributeSet attrs, int defStyleAttr) {

        super(context, attrs, defStyleAttr);

    }

    //在ViewGroup中默认是不会测量孩子视图的,所以需要手动测量一下子视图

    @Override

    protected void onMeasure(int widthMeasureSpec, int heightMeasureSpec) {

        //测量子视图

        int childCount = getChildCount();

        for (int i = 0; i < childCount; i++) {

            //传0表示测量自身包裹之后的大小

            getChildAt(i).measure(0, 0);

        }

        super.onMeasure(widthMeasureSpec, heightMeasureSpec);

    }

    //除第一个子视图外的其余子视图成孤形排列

    @Override

    protected void onLayout(boolean changed, int l, int t, int r, int b) {

        View child0 = getChildAt(0);//由于第一个"+"按钮不参与弧形的排列,所以先拿出来单独处理

        child0.layout(0, 0, child0.getMeasuredWidth(), child0.getMeasuredHeight());

        child0.setOnClickListener(this);

        int childCount = getChildCount();

        for (int i = 0; i < childCount - 1; i++) {//以弧形来摆放其余子视图

            View child = getChildAt(i + 1);

            int childMesureWidth = child.getMeasuredWidth();

            int childMesureHeight = child.getMeasuredHeight();

            float angle = (float) ((Math.PI / 2 / 4) * i);//计算出当前要摆放子视图的角度

            int childLeft = (int) (RADIUS * Math.sin(angle));

            int childTop = (int) (RADIUS * Math.cos(angle));

            int childRight = childLeft + childMesureWidth;

            int childBottom = childTop + childMesureHeight;

            child.layout(childLeft, childTop, childRight, childBottom);

        }

    }

    @Override

    public void onClick(View view) {

        switch (view.getId()) {

            case R.id.lay_plus:

                rotateChild0(view);

                break;

        }

    }

    private void rotateChild0(View view) {

        RotateAnimation rotateAnimation = new RotateAnimation(0, 360, RotateAnimation.RELATIVE_TO_SELF, 0.5f, RotateAnimation.RELATIVE_TO_SELF, 0.5f);

        rotateAnimation.setDuration(2000);

        rotateAnimation.setFillAfter(true);

        view.startAnimation(rotateAnimation);

    }

}
编译运行:
接下来再让其它的子元素也进行相应的旋转,如下:
/**

 * 圆形菜单View---第0个和其余子视图的旋转处理

 */

public class ArcMenuView extends ViewGroup implements View.OnClickListener {

    /* 定义要摆放圆的半径,其子视图的摆放位置需要依据它来计算 */

    private static final float RADIUS = 130f;

    public ArcMenuView(Context context) {

        this(context, null);

    }

    public ArcMenuView(Context context, AttributeSet attrs) {

        this(context, attrs, 0);

    }

    public ArcMenuView(Context context, AttributeSet attrs, int defStyleAttr) {

        super(context, attrs, defStyleAttr);

    }

    //在ViewGroup中默认是不会测量孩子视图的,所以需要手动测量一下子视图

    @Override

    protected void onMeasure(int widthMeasureSpec, int heightMeasureSpec) {

        //测量子视图

        int childCount = getChildCount();

        for (int i = 0; i < childCount; i++) {

            //传0表示测量自身包裹之后的大小

            getChildAt(i).measure(0, 0);

        }

        super.onMeasure(widthMeasureSpec, heightMeasureSpec);

    }

    //除第一个子视图外的其余子视图成孤形排列

    @Override

    protected void onLayout(boolean changed, int l, int t, int r, int b) {

        View child0 = getChildAt(0);//由于第一个"+"按钮不参与弧形的排列,所以先拿出来单独处理

        child0.layout(0, 0, child0.getMeasuredWidth(), child0.getMeasuredHeight());

        child0.setOnClickListener(this);

        int childCount = getChildCount();

        for (int i = 0; i < childCount - 1; i++) {//以弧形来摆放其余子视图

            View child = getChildAt(i + 1);

            int childMesureWidth = child.getMeasuredWidth();

            int childMesureHeight = child.getMeasuredHeight();

            float angle = (float) ((Math.PI / 2 / 4) * i);//计算出当前要摆放子视图的角度

            int childLeft = (int) (RADIUS * Math.sin(angle));

            int childTop = (int) (RADIUS * Math.cos(angle));

            int childRight = childLeft + childMesureWidth;

            int childBottom = childTop + childMesureHeight;

            child.layout(childLeft, childTop, childRight, childBottom);

        }

    }

    @Override

    public void onClick(View view) {

        switch (view.getId()) {

            case R.id.lay_plus:

                rotateChild0(view);

                rotateOtherChildren();

                break;

        }

    }

    private void rotateChild0(View view) {

        RotateAnimation rotateAnimation = new RotateAnimation(0, 360, RotateAnimation.RELATIVE_TO_SELF, 0.5f, RotateAnimation.RELATIVE_TO_SELF, 0.5f);

        rotateAnimation.setDuration(2000);

        rotateAnimation.setFillAfter(true);

        view.startAnimation(rotateAnimation);

    }

    private void rotateOtherChildren() {

        int childCount = getChildCount();

        for (int i = 0; i < childCount - 1; i++) {

            View child = getChildAt(i + 1);

            RotateAnimation rotateAnimation = new RotateAnimation(0, 360, RotateAnimation.RELATIVE_TO_SELF, 0.5f, RotateAnimation.RELATIVE_TO_SELF, 0.5f);

            rotateAnimation.setDuration(2000);

            rotateAnimation.setFillAfter(true);

            child.startAnimation(rotateAnimation);

        }

    }

}
编译运行:

平移处理:
接下来处理点击“+”进行子view的平稳,默认其弧形菜单项应该是隐藏,只显示一个“+”,处理如下:

编译运行:
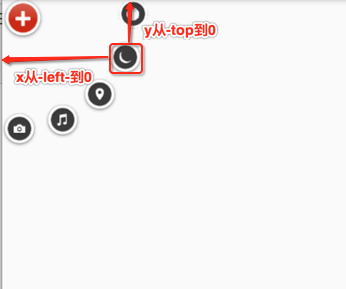
接下来则需要处理一点击“+”,需要让弧形的元素平移旋转出来,那如何平移呢,以其中的一个元素来分析:
所以具体代码如下:
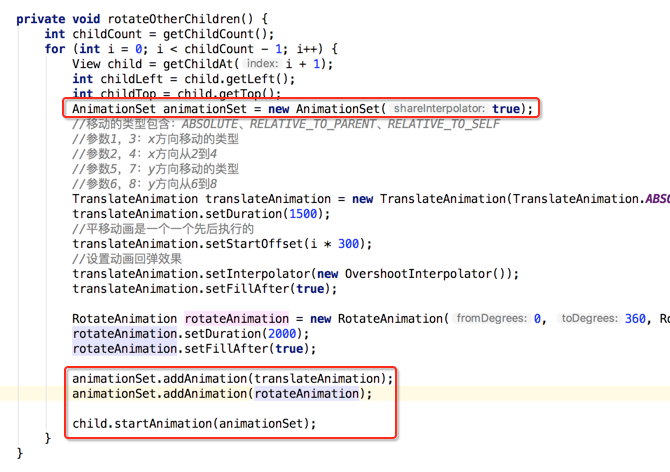
private void rotateOtherChildren() {

        int childCount = getChildCount();

        for (int i = 0; i < childCount - 1; i++) {

            View child = getChildAt(i + 1);

            int childLeft = child.getLeft();

            int childTop = child.getTop();

            //移动的类型包含:ABSOLUTE、RELATIVE_TO_PARENT、RELATIVE_TO_SELF

            //参数1,3:x方向移动的类型

            //参数2,4:x方向从2到4

            //参数5,7:y方向移动的类型

            //参数6,8:y方向从6到8

            TranslateAnimation translateAnimation = new TranslateAnimation(TranslateAnimation.ABSOLUTE, -childLeft, TranslateAnimation.ABSOLUTE, 0, TranslateAnimation.ABSOLUTE, -childTop, TranslateAnimation.ABSOLUTE, 0);

            translateAnimation.setDuration(1500);

            translateAnimation.setFillAfter(true);

            RotateAnimation rotateAnimation = new RotateAnimation(0, 360, RotateAnimation.RELATIVE_TO_SELF, 0.5f, RotateAnimation.RELATIVE_TO_SELF, 0.5f);

            rotateAnimation.setDuration(2000);

            rotateAnimation.setFillAfter(true);

            child.startAnimation(translateAnimation);

        }

    }
先只做平移处理,旋转暂且不加,编译运行:
目前弧形菜单项是同时间平移的,而实际效果是需要一个个有个先后顺序出来,所以这里需要处理一个属性来达到此效果,如下:

再次编译运行:

另外原效果在每个弧形菜单平移完之后都会有一个回调效果,所以此时就需要加入一个插值器来达到这样的效果,如下:

再来看效果:

好这个平移效果基本差不多,此时在平移过程中把之前的旋转动画给加进来,具体如下:

呃~~动画出问题了,这是因为目前是先添加的平移动画之后再添加的旋转动画,这个旋转的中心坐标会被不断改变,调一个顺序既可,如下:

嗯~~动画是对了,不过在动画执行完之后元素又消失了,这是因为默认元素是INVISIBLE状态的,这里简单处理就是在执行动画之前将其置为显示既可,如下:
再来看:

另外还有一个旋转的小细节,目前在动画执行过程中的旋转貌似停掉了,也就是旋转的因数少了点,加大旋转角度:
编译运行:
另外在点“+”时应该可以控制圆弧菜单项的打开和关闭,所以这里需要给程序定义状态:
/**

 * 圆形菜单View---非第0个子视图的平移处理

 */

public class ArcMenuView extends ViewGroup implements View.OnClickListener {

    /* 定义要摆放圆的半径,其子视图的摆放位置需要依据它来计算 */

    private static final float RADIUS = 130f;

    private CurrentStatus currentStatus = CurrentStatus.CLOSE;

    /* 定义卫星菜单打开和关闭状态 */

    public enum CurrentStatus {

        OPEN, CLOSE

    }

    public ArcMenuView(Context context) {

        this(context, null);

    }

    public ArcMenuView(Context context, AttributeSet attrs) {

        this(context, attrs, 0);

    }

    public ArcMenuView(Context context, AttributeSet attrs, int defStyleAttr) {

        super(context, attrs, defStyleAttr);

    }

    //在ViewGroup中默认是不会测量孩子视图的,所以需要手动测量一下子视图

    @Override

    protected void onMeasure(int widthMeasureSpec, int heightMeasureSpec) {

        //测量子视图

        int childCount = getChildCount();

        for (int i = 0; i < childCount; i++) {

            //传0表示测量自身包裹之后的大小

            getChildAt(i).measure(0, 0);

        }

        super.onMeasure(widthMeasureSpec, heightMeasureSpec);

    }

    //除第一个子视图外的其余子视图成孤形排列

    @Override

    protected void onLayout(boolean changed, int l, int t, int r, int b) {

        View child0 = getChildAt(0);//由于第一个"+"按钮不参与弧形的排列,所以先拿出来单独处理

        child0.layout(0, 0, child0.getMeasuredWidth(), child0.getMeasuredHeight());

        child0.setOnClickListener(this);

        int childCount = getChildCount();

        for (int i = 0; i < childCount - 1; i++) {//以弧形来摆放其余子视图

            View child = getChildAt(i + 1);

            int childMesureWidth = child.getMeasuredWidth();

            int childMesureHeight = child.getMeasuredHeight();

            float angle = (float) ((Math.PI / 2 / 4) * i);//计算出当前要摆放子视图的角度

            int childLeft = (int) (RADIUS * Math.sin(angle));

            int childTop = (int) (RADIUS * Math.cos(angle));

            int childRight = childLeft + childMesureWidth;

            int childBottom = childTop + childMesureHeight;

            child.layout(childLeft, childTop, childRight, childBottom);

            child.setVisibility(INVISIBLE);

        }

    }

    @Override

    public void onClick(View view) {

        switch (view.getId()) {

            case R.id.lay_plus:

                rotateChild0(view);

                animateOtherChildren();

                break;

        }

    }

    private void rotateChild0(View view) {

        RotateAnimation rotateAnimation = new RotateAnimation(0, 720, RotateAnimation.RELATIVE_TO_SELF, 0.5f, RotateAnimation.RELATIVE_TO_SELF, 0.5f);

        rotateAnimation.setDuration(2000);

        rotateAnimation.setFillAfter(true);

        view.startAnimation(rotateAnimation);

    }

    private void animateOtherChildren() {

        int childCount = getChildCount();

        for (int i = 0; i < childCount - 1; i++) {

            View child = getChildAt(i + 1);

            child.setVisibility(VISIBLE);

            int childLeft = child.getLeft();

            int childTop = child.getTop();

            AnimationSet animationSet = new AnimationSet(true);

            //移动的类型包含:ABSOLUTE、RELATIVE_TO_PARENT、RELATIVE_TO_SELF

            //参数1,3:x方向移动的类型

            //参数2,4:x方向从2到4

            //参数5,7:y方向移动的类型

            //参数6,8:y方向从6到8

            TranslateAnimation translateAnimation = new TranslateAnimation(TranslateAnimation.ABSOLUTE, -childLeft, TranslateAnimation.ABSOLUTE, 0, TranslateAnimation.ABSOLUTE, -childTop, TranslateAnimation.ABSOLUTE, 0);

            translateAnimation.setDuration(1500);

            //平移动画是一个一个先后执行的

            translateAnimation.setStartOffset(i * 300);

            //设置动画回弹效果

            translateAnimation.setInterpolator(new OvershootInterpolator());

            translateAnimation.setFillAfter(true);

            RotateAnimation rotateAnimation = new RotateAnimation(0, 720, RotateAnimation.RELATIVE_TO_SELF, 0.5f, RotateAnimation.RELATIVE_TO_SELF, 0.5f);

            rotateAnimation.setDuration(2000);

            rotateAnimation.setFillAfter(true);

            animationSet.addAnimation(rotateAnimation);

            animationSet.addAnimation(translateAnimation);

            child.startAnimation(animationSet);

        }

        changeCurrentStatus();

    }

    private void changeCurrentStatus() {

        currentStatus = currentStatus == CurrentStatus.CLOSE ? CurrentStatus.OPEN : CurrentStatus.CLOSE;

    }

}
编译运行:

状态不对,这个平移应该根据打开和关闭需要改变起始坐标和结束坐标,具体如下:
/**

 * 圆形菜单View---非第0个子视图的平移处理

 */

public class ArcMenuView extends ViewGroup implements View.OnClickListener {

    /* 定义要摆放圆的半径,其子视图的摆放位置需要依据它来计算 */

    private static final float RADIUS = 130f;

    private CurrentStatus currentStatus = CurrentStatus.CLOSE;

    /* 定义卫星菜单打开和关闭状态 */

    public enum CurrentStatus {

        OPEN, CLOSE

    }

    public ArcMenuView(Context context) {

        this(context, null);

    }

    public ArcMenuView(Context context, AttributeSet attrs) {

        this(context, attrs, 0);

    }

    public ArcMenuView(Context context, AttributeSet attrs, int defStyleAttr) {

        super(context, attrs, defStyleAttr);

    }

    //在ViewGroup中默认是不会测量孩子视图的,所以需要手动测量一下子视图

    @Override

    protected void onMeasure(int widthMeasureSpec, int heightMeasureSpec) {

        //测量子视图

        int childCount = getChildCount();

        for (int i = 0; i < childCount; i++) {

            //传0表示测量自身包裹之后的大小

            getChildAt(i).measure(0, 0);

        }

        super.onMeasure(widthMeasureSpec, heightMeasureSpec);

    }

    //除第一个子视图外的其余子视图成孤形排列

    @Override

    protected void onLayout(boolean changed, int l, int t, int r, int b) {

        View child0 = getChildAt(0);//由于第一个"+"按钮不参与弧形的排列,所以先拿出来单独处理

        child0.layout(0, 0, child0.getMeasuredWidth(), child0.getMeasuredHeight());

        child0.setOnClickListener(this);

        int childCount = getChildCount();

        for (int i = 0; i < childCount - 1; i++) {//以弧形来摆放其余子视图

            View child = getChildAt(i + 1);

            int childMesureWidth = child.getMeasuredWidth();

            int childMesureHeight = child.getMeasuredHeight();

            float angle = (float) ((Math.PI / 2 / 4) * i);//计算出当前要摆放子视图的角度

            int childLeft = (int) (RADIUS * Math.sin(angle));

            int childTop = (int) (RADIUS * Math.cos(angle));

            int childRight = childLeft + childMesureWidth;

            int childBottom = childTop + childMesureHeight;

            child.layout(childLeft, childTop, childRight, childBottom);

            child.setVisibility(INVISIBLE);

        }

    }

    @Override

    public void onClick(View view) {

        switch (view.getId()) {

            case R.id.lay_plus:

                rotateChild0(view);

                animateOtherChildren();

                break;

        }

    }

    private void rotateChild0(View view) {

        RotateAnimation rotateAnimation = new RotateAnimation(0, 720, RotateAnimation.RELATIVE_TO_SELF, 0.5f, RotateAnimation.RELATIVE_TO_SELF, 0.5f);

        rotateAnimation.setDuration(2000);

        rotateAnimation.setFillAfter(true);

        view.startAnimation(rotateAnimation);

    }

    private void animateOtherChildren() {

        int childCount = getChildCount();

        for (int i = 0; i < childCount - 1; i++) {

            final View child = getChildAt(i + 1);

            child.setVisibility(VISIBLE);

            int childLeft = child.getLeft();

            int childTop = child.getTop();

            AnimationSet animationSet = new AnimationSet(true);

            //移动的类型包含:ABSOLUTE、RELATIVE_TO_PARENT、RELATIVE_TO_SELF

            //参数1,3:x方向移动的类型

            //参数2,4:x方向从2到4

            //参数5,7:y方向移动的类型

            //参数6,8:y方向从6到8

            TranslateAnimation translateAnimation = null;

            if (CurrentStatus.CLOSE == currentStatus) {

                translateAnimation = new TranslateAnimation(TranslateAnimation.ABSOLUTE, -childLeft, TranslateAnimation.ABSOLUTE, 0, TranslateAnimation.ABSOLUTE, -childTop, TranslateAnimation.ABSOLUTE, 0);

            } else {

                translateAnimation = new TranslateAnimation(TranslateAnimation.ABSOLUTE, 0, TranslateAnimation.ABSOLUTE, -childLeft, TranslateAnimation.ABSOLUTE, 0, TranslateAnimation.ABSOLUTE, -childTop);

            }

            translateAnimation.setDuration(1500);

            //平移动画是一个一个先后执行的

            translateAnimation.setStartOffset(i * 300);

            //设置动画回弹效果

            translateAnimation.setInterpolator(new OvershootInterpolator());

            translateAnimation.setFillAfter(true);

            translateAnimation.setAnimationListener(new Animation.AnimationListener() {

                @Override

                public void onAnimationStart(Animation animation) {

                }

                @Override

                public void onAnimationEnd(Animation animation) {

                    if (CurrentStatus.CLOSE == currentStatus) {

                        child.setVisibility(INVISIBLE);

                    }

                }

                @Override

                public void onAnimationRepeat(Animation animation) {

                }

            });

            RotateAnimation rotateAnimation = new RotateAnimation(0, 720, RotateAnimation.RELATIVE_TO_SELF, 0.5f, RotateAnimation.RELATIVE_TO_SELF, 0.5f);

            rotateAnimation.setDuration(2000);

            rotateAnimation.setFillAfter(true);

            animationSet.addAnimation(rotateAnimation);

            animationSet.addAnimation(translateAnimation);

            child.startAnimation(animationSet);

        }

        changeCurrentStatus();

    }

    private void changeCurrentStatus() {

        currentStatus = currentStatus == CurrentStatus.CLOSE ? CurrentStatus.OPEN : CurrentStatus.CLOSE;

    }

}
编译运行:

至此整个效果就实现完了,可见如果不用补间动画来实现,而是采用纯View绘制的方式来实现那是何等的麻烦~
一步步实现ArcMenu效果的更多相关文章
- Google Chrome开发者工具
Google Chrome开发者工具 是内嵌到浏览器的开发工具,打开方式有两种:第一“按F12”,第二:shift+ctrl+i(火狐.360等浏览器也可以这么用) Console介绍 Console ...
- JavaScript美术馆进化史
内容选自<<JavaScript DOM 编程艺术>>第4-6章,跟着作者一起见证美术馆的进化吧. 先放效果图,然后一步步做出每个效果.每个效果都有它实用的地方,且知道过程可以 ...
- winfrom dataGridView 自定义分页实现
Winfrom 基本处于忘光的阶段.先需要做个winfrom 的软件.然后自己扩展了DataGridView带分页的控件.废话不多说 上图先 现在一步步实现其效果. 1.添加用户控件 上图即可知道 ...
- xcode6下使用autolayout+sizeclass实践
历史车轮滚滚向前,将autolayout配合sizeclass做布局的方式推上了主流,虽然有点晚,但最终还是进行了一次完整的实践,特此记录一下: 因为网上已经有很多博客介绍了autolayout配合s ...
- JavaScript学习总结【8】、面向对象编程
1.什么是面向对象编程 要理解面向对象,得先搞清楚什么是对象,首先需要明确一点这里所说的对象,不是生活中的搞男女朋友对象,面向对象就是面向着对象,换在代码中,就是一段代码相中了另一段代码,自此夜以继日 ...
- 2.4 chrome 开发者工具
开发者工具顶部有Elements.Console.Network等八个栏目.常用的有三个:Elements,用来查看需爬取字段的HTML标签信息:Console,可以检测你的JS代码:Network, ...
- 【分享】用Canvas实现画板功能
前言 PC端测试:QQ浏览器全屏绘画完成.缩小时内容会被清空,切换背景颜色内容会被重置,其他暂无发现: 手机端测试:微信内置浏览器不通过:Safari 浏览器使用画笔时没固定页面会有抖动效果,使用橡皮 ...
- 还在为不停build 烦恼么?看这里~~
如果你是一名开发者,还在为偶尔改一个坐标或者颜色值 就要重新build 好久,然后如果层次深 还要一步步进去看效果么?下面 为大家介绍一个很好的开源库 DYCI 他的github地址,首先下载到本 ...
- Android自己定义组件系列【11】——实现3D立体旋转效果
今天在网上看到一篇文章写关于Android实现3D旋转(ca=drs-">http://www.ibm.com/developerworks/cn/opensource/os-cn-a ...
随机推荐
- ffmpeg学习笔记-音频解码
在之前的文章已经初步对视频解码有个初步的认识了,接下来来看一看音频解码 音频解码步骤 音频解码与视频解码一样,有者固有的步骤,只要按照步骤来,就能顺利的解码音频 以上是ffmpeg的解码流程图,可以看 ...
- Odoo 13 released..
origin https://medium.com/@jc_57445/odoo-13-is-fantastic-f2b421696b49 Most striking changes The most ...
- apue-ubuntu环境搭建
目录 apue环境搭建 title: apue环境搭建 date: 2019/11/19 19:25:18 toc: true --- apue环境搭建 下载编译 wget http://www.ap ...
- [转帖]NTLM说明
[思路/技术]Windows认证 | 网络认证 来源:https://bbs.ichunqiu.com/thread-53598-1-1.html 圣乱X无心i春秋-核心白帽 发表于 5 ...
- 使用power designer,PL/SQL,cmd建立oracle数据库
这一系列操作需要powerDesigner,PL/SQL工具 1.首先使用powerDesigner建立概念模型 2.概念模型界面例子 3.其中建立概念模型操作图标详解 4.建立物理模型 5.生成数据 ...
- flink两种安装方式
Flink Standalone 集群 HA 配置 1. HA 集群环境规划 使用三台节点实现两主两从集群(由于笔记本性能限制,不能开启太多虚拟机,其实使用三 台和四台机器在安装配置上没有本质区别) ...
- 【转载】CASE WHEN 及 SELECT CASE WHEN的用法
原文链接:https://www.cnblogs.com/aipan/p/7770611.html Case具有两种格式.简单Case函数和Case搜索函数. 简单Case函数 CASE sex WH ...
- (六)mybatis 全局配置文件讲解
目录 properties (属性) settings 全局参数配置 typeAliases 别名设置 typeHandlers 类型处理器 mapper (映射器) 细节 properties (属 ...
- HDU 1325 有根树的判断
Is It A Tree? Time Limit: 2000/1000 MS (Java/Others) Memory Limit: 65536/32768 K (Java/Others)Total ...
- 认识函数(python)
一般的函数都是有参数的,函数的参数都是放在函数定义的括号里的,函数参数的命名规则和我们说的变量的命名规则基本一样,一定要清晰明了.(能概括出它的意义,让人阅读你的代码,就知道这个参数是干嘛的就行).当 ...