
深度学习之DCGAN
1、知识点
"""

DCGAN:相比GAN而言,使用了卷积网络替代全连接

卷积:256*256*3 --- > 28*28*14  -->结果 ,即H,W变小,特征图变多

反卷积(就是把卷积的前向和反向传播完全颠倒了) :4*4*1024 ---> 28 * 28 *1  -->结果 即H,W变大,特征图变少

特点:

    1、判别模型:使用带步长的卷积(strided convolutions)取代了的空间池化(spatial pooling),容许网络学习自己的空间下采样(spatial downsampling)。

    2、生成模型:使用微步幅卷积(fractional strided),容许它学习自己的空间上采样(spatial upsampling)。

    3、激活函数: LeakyReLU

    4、Batch Normalization 批标准化:解决因糟糕的初始化引起的训练问题,使得梯度能传播更深层次。 Batch Normalization证明了生成模型初始化的重要性,避免生成模型崩溃:生成的所有样本都在一个点上(样本相同),这是训练GANs经常遇到的失败现象。


简而言之,DCGAN是利用数据生成图片的过程
"""
2、代码
# coding: utf-8

import numpy as np

import tensorflow as tf

import pickle

import matplotlib.pyplot as plt

get_ipython().run_line_magic('matplotlib', 'inline')

from tensorflow.examples.tutorials.mnist import input_data

mnist = input_data.read_data_sets('/MNIST_data/')

# ## 获得数据

# In[4]:

def get_inputs(noise_dim, image_height, image_width, image_depth):

    inputs_real = tf.placeholder(tf.float32, [None, image_height, image_width, image_depth], name='inputs_real')

    inputs_noise = tf.placeholder(tf.float32, [None, noise_dim], name='inputs_noise')

    return inputs_real, inputs_noise

# # 生成器

# In[5]:

def get_generator(noise_img, output_dim, is_train=True, alpha=0.01):

    with tf.variable_scope("generator", reuse=(not is_train)):

        # 100 x 1 to 4 x 4 x 512

        # 全连接层

        layer1 = tf.layers.dense(noise_img, 4*4*512)

        layer1 = tf.reshape(layer1, [-1, 4, 4, 512])

        # batch normalization

        layer1 = tf.layers.batch_normalization(layer1, training=is_train)

        # Leaky ReLU

        layer1 = tf.maximum(alpha * layer1, layer1)

        # dropout

        layer1 = tf.nn.dropout(layer1, keep_prob=0.8)

        # 4 x 4 x 512 to 7 x 7 x 256

        layer2 = tf.layers.conv2d_transpose(layer1, 256, 4, strides=1, padding='valid')

        layer2 = tf.layers.batch_normalization(layer2, training=is_train)

        layer2 = tf.maximum(alpha * layer2, layer2)

        layer2 = tf.nn.dropout(layer2, keep_prob=0.8)

        # 7 x 7 256 to 14 x 14 x 128

        layer3 = tf.layers.conv2d_transpose(layer2, 128, 3, strides=2, padding='same')

        layer3 = tf.layers.batch_normalization(layer3, training=is_train)

        layer3 = tf.maximum(alpha * layer3, layer3)

        layer3 = tf.nn.dropout(layer3, keep_prob=0.8)

        # 14 x 14 x 128 to 28 x 28 x 1

        logits = tf.layers.conv2d_transpose(layer3, output_dim, 3, strides=2, padding='same')

        # MNIST原始数据集的像素范围在0-1,这里的生成图片范围为(-1,1)

        # 因此在训练时,记住要把MNIST像素范围进行resize

        outputs = tf.tanh(logits)

        return outputs

# ## 判别器

# In[6]:

def get_discriminator(inputs_img, reuse=False, alpha=0.01):

    with tf.variable_scope("discriminator", reuse=reuse):

        # 28 x 28 x 1 to 14 x 14 x 128

        # 第一层不加入BN

        layer1 = tf.layers.conv2d(inputs_img, 128, 3, strides=2, padding='same')

        layer1 = tf.maximum(alpha * layer1, layer1)

        layer1 = tf.nn.dropout(layer1, keep_prob=0.8)

        # 14 x 14 x 128 to 7 x 7 x 256

        layer2 = tf.layers.conv2d(layer1, 256, 3, strides=2, padding='same')

        layer2 = tf.layers.batch_normalization(layer2, training=True)

        layer2 = tf.maximum(alpha * layer2, layer2)

        layer2 = tf.nn.dropout(layer2, keep_prob=0.8)

        # 7 x 7 x 256 to 4 x 4 x 512

        layer3 = tf.layers.conv2d(layer2, 512, 3, strides=2, padding='same')

        layer3 = tf.layers.batch_normalization(layer3, training=True)

        layer3 = tf.maximum(alpha * layer3, layer3)

        layer3 = tf.nn.dropout(layer3, keep_prob=0.8)

        # 4 x 4 x 512 to 4*4*512 x 1

        flatten = tf.reshape(layer3, (-1, 4*4*512))

        logits = tf.layers.dense(flatten, 1)

        outputs = tf.sigmoid(logits)

        return logits, outputs

# ## 目标函数

# In[7]:

def get_loss(inputs_real, inputs_noise, image_depth, smooth=0.1):

    g_outputs = get_generator(inputs_noise, image_depth, is_train=True)

    d_logits_real, d_outputs_real = get_discriminator(inputs_real)

    d_logits_fake, d_outputs_fake = get_discriminator(g_outputs, reuse=True)

    # 计算Loss

    g_loss = tf.reduce_mean(tf.nn.sigmoid_cross_entropy_with_logits(logits=d_logits_fake,

                                                                    labels=tf.ones_like(d_outputs_fake)*(1-smooth)))

    d_loss_real = tf.reduce_mean(tf.nn.sigmoid_cross_entropy_with_logits(logits=d_logits_real,

                                                                         labels=tf.ones_like(d_outputs_real)*(1-smooth)))

    d_loss_fake = tf.reduce_mean(tf.nn.sigmoid_cross_entropy_with_logits(logits=d_logits_fake,

                                                                         labels=tf.zeros_like(d_outputs_fake)))

    d_loss = tf.add(d_loss_real, d_loss_fake)

    return g_loss, d_loss

# ## 优化器

# In[8]:

def get_optimizer(g_loss, d_loss, beta1=0.4, learning_rate=0.001):

    train_vars = tf.trainable_variables()

    g_vars = [var for var in train_vars if var.name.startswith("generator")]

    d_vars = [var for var in train_vars if var.name.startswith("discriminator")]

    # Optimizer

    with tf.control_dependencies(tf.get_collection(tf.GraphKeys.UPDATE_OPS)):

        g_opt = tf.train.AdamOptimizer(learning_rate).minimize(g_loss, var_list=g_vars)

        d_opt = tf.train.AdamOptimizer(learning_rate).minimize(d_loss, var_list=d_vars)

    return g_opt, d_opt

# In[9]:

def plot_images(samples):

    fig, axes = plt.subplots(nrows=1, ncols=25, sharex=True, sharey=True, figsize=(50,2))

    for img, ax in zip(samples, axes):

        ax.imshow(img.reshape((28, 28)), cmap='Greys_r')

        ax.get_xaxis().set_visible(False)

        ax.get_yaxis().set_visible(False)

    fig.tight_layout(pad=0)

# In[10]:

def show_generator_output(sess, n_images, inputs_noise, output_dim):

    cmap = 'Greys_r'

    noise_shape = inputs_noise.get_shape().as_list()[-1]

    # 生成噪声图片

    examples_noise = np.random.uniform(-1, 1, size=[n_images, noise_shape])

    samples = sess.run(get_generator(inputs_noise, output_dim, False),

                       feed_dict={inputs_noise: examples_noise})

    result = np.squeeze(samples, -1)

    return result

# ## 训练网络

# In[11]:

# 定义参数

batch_size = 64

noise_size = 100

epochs = 5

n_samples = 25

learning_rate = 0.001

# In[12]:

def train(noise_size, data_shape, batch_size, n_samples):

    # 存储loss

    losses = []

    steps = 0

    inputs_real, inputs_noise = get_inputs(noise_size, data_shape[1], data_shape[2], data_shape[3])

    g_loss, d_loss = get_loss(inputs_real, inputs_noise, data_shape[-1])

    g_train_opt, d_train_opt = get_optimizer(g_loss, d_loss, beta1, learning_rate)

    with tf.Session() as sess:

        sess.run(tf.global_variables_initializer())

        # 迭代epoch

        for e in range(epochs):

            for batch_i in range(mnist.train.num_examples//batch_size):

                steps += 1

                batch = mnist.train.next_batch(batch_size)

                batch_images = batch[0].reshape((batch_size, data_shape[1], data_shape[2], data_shape[3]))

                # scale to -1, 1

                batch_images = batch_images * 2 - 1

                # noise

                batch_noise = np.random.uniform(-1, 1, size=(batch_size, noise_size))

                # run optimizer

                _ = sess.run(g_train_opt, feed_dict={inputs_real: batch_images,

                                                     inputs_noise: batch_noise})

                _ = sess.run(d_train_opt, feed_dict={inputs_real: batch_images,

                                                     inputs_noise: batch_noise})

                if steps % 101 == 0:

                    train_loss_d = d_loss.eval({inputs_real: batch_images,

                                                inputs_noise: batch_noise})

                    train_loss_g = g_loss.eval({inputs_real: batch_images,

                                                inputs_noise: batch_noise})

                    losses.append((train_loss_d, train_loss_g))

                    # 显示图片

                    samples = show_generator_output(sess, n_samples, inputs_noise, data_shape[-1])

                    plot_images(samples)

                    print("Epoch {}/{}....".format(e+1, epochs),

                          "Discriminator Loss: {:.4f}....".format(train_loss_d),

                          "Generator Loss: {:.4f}....". format(train_loss_g))

# In[13]:

with tf.Graph().as_default():

    train(noise_size, [-1, 28, 28, 1], batch_size, n_samples)
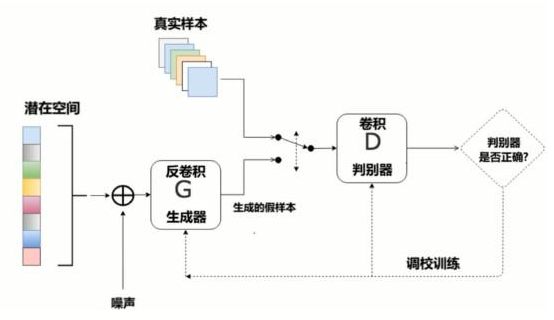
3、结构图
深度学习之DCGAN的更多相关文章
- 【神经网络与深度学习】DCGAN及其TensorFlow源码
上一节我们提到G和D由多层感知机定义.深度学习中对图像处理应用最好的模型是CNN,那么如何把CNN与GAN结合?DCGAN是这方面最好的尝试之一.源码:https://github.com/Newmu ...
- 【深度学习】--DCGAN从入门到实例应用
一.前述 DCGAN就是Deep Concolutions应用到GAN上,但是和传统的卷积应用还有一些区别,最大的区别就是没有池化层.本文将详细分析卷积在GAN上的应用. 二.具体 1.DCGAN和传 ...
- 深度学习算法 之DCGAN(写得不系统,后期再总结,大家可简单阅览一下)
目录 1.基本介绍 2.模型 3.优缺点/其他 参考 1.基本介绍 DCGAN是生成对抗网络GAN中一种常见的模型结构.其中的生成器和判别器都是神经网络模型. GAN是一种生成式对抗网络,即通过对抗的 ...
- GitHub 上 57 款最流行的开源深度学习项目
转载:https://www.oschina.net/news/79500/57-most-popular-deep-learning-project-at-github GitHub 上 57 款最 ...
- CNCC2017中的深度学习与跨媒体智能
CNCC2017中的深度学习与跨媒体智能 转载请注明作者:梦里茶 目录 机器学习与跨媒体智能 传统方法与深度学习 图像分割 小数据集下的深度学习 语音前沿技术 生成模型 基于贝叶斯的视觉信息编解码 珠 ...
- Hinton“深度学习之父”和“神经网络先驱”,新论文Capsule将推翻自己积累了30年的学术成果时
Hinton“深度学习之父”和“神经网络先驱”,新论文Capsule将推翻自己积累了30年的学术成果时 在论文中,Capsule被Hinton大神定义为这样一组神经元:其活动向量所表示的是特定实体类型 ...
- (zhuan) 126 篇殿堂级深度学习论文分类整理 从入门到应用
126 篇殿堂级深度学习论文分类整理 从入门到应用 | 干货 雷锋网 作者: 三川 2017-03-02 18:40:00 查看源网址 阅读数:66 如果你有非常大的决心从事深度学习,又不想在这一行打 ...
- (zhuan) 深度学习全网最全学习资料汇总之模型介绍篇
This blog from : http://weibo.com/ttarticle/p/show?id=2309351000224077630868614681&u=5070353058& ...
- Github上Stars最多的53个深度学习项目,TensorFlow遥遥领先
原文:https://github.com/aymericdamien/TopDeepLearning 项目名称 Stars 项目介绍 TensorFlow 29622 使用数据流图计算可扩展机器学习 ...
随机推荐
- php的小数位数最长多少位
在php中, echo 0.1234567890123456;exit; // 结果为:0.12345678901235, 整数部分为0时,最多到14位小数,如果后面还有,就自动四舍五入 echo 7 ...
- 【异常】ssh无法登录验证,非root用户ssh本机无法成功
1 自己搭建的是伪分布式环境,需要以非root用户启动Hadoop集群,之前root已经配置了ssh免密登录,但是自己切换到hdfs用户重新生成了一套ssh key, 但是切换到hdfs始终无法成功登 ...
- easyUI 布局
Layout(布局) 布局容器有5个区域:北.南.东.西和中间.中间区域面板是必须的,边缘的面板都是可选的. 每个边缘区域面板都可以通过拖拽其边框改变大小,也可以点击折叠按钮将面板折叠起来.布局可以进 ...
- Linux查找并杀死僵尸进程(转)
1.查看系统是否有僵尸进程 使用Top命令查找,当zombie前的数量不为0时,即系统内存在相应数量的僵尸进程. 2.定位僵尸进程 使用命令ps -A -ostat,ppid,pid,cmd |gre ...
- u-boot从nand 启动时的问题解决记录
u-boot从nand 启动时的问题解决记录 问题描述: 使用u-boot-1.1.6版本u-boot移植到JZ2440开发板上,当前已经能够从Nor启动,但是不能从Nand正常启动(u-boot大小 ...
- 图像处理---《Canny 边缘检测》
图像处理---<Canny 边缘检测> 很想系统的把图像处理之边缘检测部分详细的过一遍,对比一个各个算子的优良性能.时间紧,精力有限,现在只能走哪补哪,随手记. 有几个简单的场景,有需要, ...
- string::crbegin string::crend
const_reverse_iterator crbegin() const noexcept;功能:crbegin是最后一个字符,crend第一个字符的前一个.迭代器向左移动是“+”,向右移动是“- ...
- Django的 select_related 和 prefetch_related 函数对 QuerySet 查询的优化
引言 在数据库存在外键的其情况下,使用select_related()和prefetch_related()很大程度上减少对数据库的请求次数以提高性能 1.实例准备 模型: from django.d ...
- 粗暴,干就完了----徐晓冬似的C语言自学笔记---字符数组相关技术
字符串拼接函数 strcat() 字符串----作为很多编程语言的鼻祖C语言,没有字符串类型,取而代之的字符数组,很多数组在声明的时候会给定数组长度,然而我们却可以这样写 char mywords[] ...
- Codeforces Round #452 (Div. 2) 899E E. Segments Removal
题 OvO http://codeforces.com/contest/899/problem/E Codeforces Round #452 (Div. 2) - e 899E 解 用两个并查集(记 ...