多节点bigchaindb集群部署
文章比较的长,安装下来大概4个小时左右,我个人使用的服务器,速度会快一点。

安装环境
|
ostname |
ip |
os |
|
node-admin |
192.168.237.130 |
ubuntu 18.04.2 desktop |
|
node1 |
192.168.237.131 |
ubuntu 18.04.2 server |
|
node2 |
192.168.237.132 |
ubuntu 18.04.2 server |
|
node3 |
192.168.237.133 |
ubuntu 18.04.2 server |
|
node4 |
192.168.237.134 |
ubuntu 18.04.2 server |
|
node5 |
192.168.237.135 |
ubuntu 18.04.2 server |
其中node-admin用来使用ansible来执行远程命令(为了部署便利),node1-node5为bigchain DB节点。所有机器用户均为root
需要首先安装ansible,
sudo apt-add-repository ppa:ansible/ansible
sudo apt-get update
sudo apt-get install ansible
首先在所有节点上安装openssh-server,并允许root用户ssh。具体方式为修改/etc/ssh/sshd_config,修改为PermitRootLogin yes,然后重启ssh服务。
安装与配置ansible
接下来在node-admin上安装与配置ansible。
sudo apt-add-repository ppa:ansible/ansible

apt-get update && apt-get upgrade

apt-get install ansible
然后修改/etc/ansible/hosts:
root@node-admin:~# grep -Ev  "^$|#" /etc/ansible/hosts

[bigchain]

192.168.237.131 ansible_ssh_pass=123

192.168.237.132 ansible_ssh_pass=123

192.168.237.133 ansible_ssh_pass=123

192.168.237.134 ansible_ssh_pass=123

192.168.237.135 ansible_ssh_pass=123

root@node-admin:~#
设置为首次链接不需要key认证
sed -i "s/^#\(host_key_checking\).*/\1 = False/g" /etc/ansible/ansible.cfg
设置好了,可以测试一下:
ansible bigchain -m ping

如果这里测试失败,那就是安装ansible失败,最好,每一个节点单独安装一下。
安装bigchainDB
默认是在node-admin上执行
- 同步时钟
# 测试是否能ping通cn.pool.ntp.org

ansible bigchain -m command -a "ping cn.pool.ntp.org -c 4"

# 同步

ansible bigchain -m command -a "ntpdate cn.pool.ntp.org"
这里需要在每一个节点安装ntpdate
sudo apt-get install ntpdate
- 安装mongoDB
编辑sources.list
echo "deb [ arch=amd64 ] http://repo.mongodb.org/apt/ubuntu trusty/mongodb-org/3.4 multiverse" > mongodb-org-3.4.list
备用 清华的源 https://mirrors.tuna.tsinghua.edu.cn/help/mongodb/
echo "deb [ arch=amd64 ] https://mirrors.tuna.tsinghua.edu.cn/mongodb/apt/ubuntu trusty/mongodb-org/3.4 multiverse" > mongodb-org-3.4.list
创建mongod.yml,内容如下:
vim mongod.yml
---

- hosts: bigchain

  remote_user: root

  # invoke setup module to gather facts before executing tasks

  gather_facts: true

  tasks:

  - name: debug

    debug: msg="myhostname={{ansible_hostname}}"

  - name: apt-key

    command: sudo apt-key adv --keyserver hkp://keyserver.ubuntu.com:80 --recv 0C49F3730359A14518585931BC711F9BA15703C6

  - name: sources.list

    template:

      src: mongodb-org-3.4.list

      dest: /etc/apt/sources.list.d/mongodb-org-3.4.list

      owner: root

      group: root

      mode: 0644

  - name: update

    command: apt-get update -y

  - name: install packages

    apt:

      name: "{{item}}"

      force: yes

    with_items:

      - mongodb-org

      - g++

      - python3-dev

      - libffi-dev

      - python3-pip

  - name: setuptools

    command: pip3 install --upgrade pip setuptools

  - name: db

    command: mkdir -p /data/db
运行yml(耗时很长,中间需要等待所有的安装)
ansible-playbook mongod.yml
- 启动mongod
# 启动mongo

ansible bigchain -m command -a "mongod --replSet bigchain --fork --logpath /var/log/mongodb/mongod.log"
- 创建副本集
在node1执行,其它节点就会同步。
# 进入mongodb 命令行模式下
mongo

config = {_id: 'bigchain', members: [{

    "_id": 0,

    "host":"192.168.237.131:27017"

    }]

    }

    rs.initiate(config);

    rs.add("192.168.237.132:27017")

    rs.add("192.168.237.133:27017")

    rs.add("192.168.237.134:27017")

    rs.add("192.168.237.135:27017")
- 安装bigchainDB
ansible bigchain -m command -a "pip3 install --upgrade bigchaindb"

ansible bigchain -m command -a "bigchaindb -y configure mongodb"
- 修改bigchainDB配置
允许接收所有地址信息
ansible bigchain -m raw -a "sed -i 's/\(\"bind\": \"\)localhost:9984\"/\192.168.237.0:9984\"/g' /root/.bigchaindb"
修改replSet名称为bigchain(之前mongod的replset名称):
ansible bigchain -m raw -a "sed -i 's/\(\"replicaset\": \"\).*/\1bigchain\",/g' /root/.bigchaindb"
还需要修改keyring选项,使之存储除本节点之外的所有其他的节点的keyring的公钥。先来获取所有节点的keyring的公钥
ansible bigchain -m raw -a "cat .bigchaindb | grep public | awk -F\\\" '{print \$4}'"
输出如下:
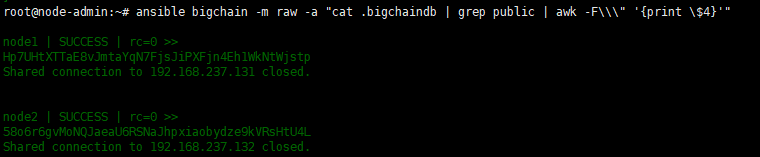
这里的keyring是需要记录下来,下面会用到。
在/root下创建conf.py文件
import sys

import json

keyring = {

    "192.168.237.131": "7772APkwHENC8j3tDaUK2WJYPF3AMrTkVgR7sW1y3bkZ",

    "192.168.237.132": "GRTkTmFuYETDaXAftSZW1SdCMMwaYs6p6yhAn5C4QBZv",

    "192.168.237.134": "Eok1FnDbKpak9t6SpJVpFsMqkvNiVGsys6BP8UbSiCTv",

    "192.168.237.133": "8bXEbEJVCDNhptYyAJ5WWHCngiie6VuwTKF5NmZ4Fazv",

    "192.168.237.135": "GH3uAPwi1MzXsxy4PJdj4p5m55nXuLAakNtpFNJw7cqH"

}

rets = []

for key, value in keyring.items():

    if key != sys.argv[1]:

        rets.append(value)

conf = json.load(open("/root/.bigchaindb"))

conf['keyring'] = rets

json.dump(conf, open("/root/.bigchaindb", "w"), indent=2)
继续在/root下创建bigchain.yml,用来分发该脚本,并执行该脚本
--

- hosts: bigchain

  remote_user: root

  # invoke setup module to gather facts before executing tasks

  gather_facts: true

  tasks:

  - name: debug

    debug: msg="my ip of eth0 is {{ansible_eth0.ipv4.address}}"

  - name: copy file

    template:

      src: conf.py

      dest: /root/conf.py

      owner: root

      group: root

      mode: 0644

  - name: modify configuration

    command: python conf.py {{ansible_eth0.ipv4.address}}
在node-admin下执行:
ansible-playbook bigchain.yml
执行成功后,可以看到node1-node5的.bigchaindb里keyring均成功写入。
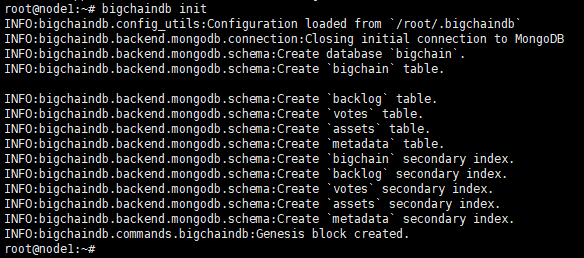
- 启动bigchainDB
任选一节点(如node1上)执行:
bigchaindb init
然后启动所有节点的bigchaindb
bigchaindb start

# 或者后台启动

nohup bigchaindb start > /dev/null 2>&1 &

# 启动全部

ansible bigchain -m shell -a "nohup bigchaindb start > /dev/null 2>&1 &"

# kill全部

ansible bigchain -m raw -a "kill -9 \$(ps -ef | grep bigchaindb | awk 'NR>1{print p}{p=\$2}')"
使用bigchaindb
首先安装bigchaindb的python driver
- git安装方式:
ansible bigchain -m command -a "apt-get install git -y"

ansible bigchain -m command -a "apt-get install libssl-dev -y"

ansible bigchain -m command -a "pip3 install --process-dependency-links git+https://github.com/bigchaindb/bigchaindb-driver.git"
ansible bigchain -m command -a "pip3 install bigchaindb-driver"
测试实例可以参考官网:https://docs.bigchaindb.com/projects/py-driver/en/latest/usage.html
多节点bigchaindb集群部署的更多相关文章
- rancher三节点k8s集群部署例子
rancher三节点k8s集群部署例子 待办 https://rorschachchan.github.io/2019/07/25/使用Rancher2-1部署k8s/
- ActiveMQ的单节点和集群部署
平安寿险消息队列用的是ActiveMQ. 单节点部署: 下载解压后,直接cd到bin目录,用activemq start命令就可启动activemq服务端了. ActiveMQ默认采用61616端口提 ...
- 2、Redis 底层原理:Cluster 集群部署与详解
Redis 简介 Redis 提供数据缓存服务,内部数据都存在内存中,所以访问速度非常快. 早期,Redis 单应用服务亦能满足企业的需求.之后,业务量的上升,单机的读写能力满足不了业务的需求,技术上 ...
- 浅入深出ETCD之【集群部署与golang客户端使用】
前言 之前说了etcd的简介,命令行使用,一些基本原理.这次来说说现实一点的集群部署和golang版本的客户端使用.因为在实际使用过程中,etcd的节点肯定是需要2N+1个进行部署的,所以有必要说明一 ...
- RocketMQ的高可用集群部署
RocketMQ的高可用集群部署 标签(空格分隔): 消息队列 部署 1. RocketMQ 集群物理部署结构 Rocket 物理部署结构 Name Server: 单点,供Producer和Cons ...
- Windows下ELK环境搭建(单机多节点集群部署)
1.背景 日志主要包括系统日志.应用程序日志和安全日志.系统运维和开发人员可以通过日志了解服务器软硬件信息.检查配置过程中的错误及错误发生的原因.经常分析日志可以了解服务器的负荷,性能安全性,从而及时 ...
- Hadoop分布式集群部署(单namenode节点)
Hadoop分布式集群部署 系统系统环境: OS: CentOS 6.8 内存:2G CPU:1核 Software:jdk-8u151-linux-x64.rpm hadoop-2.7.4.tar. ...
- Kubernetes(k8s)集群部署(k8s企业级Docker容器集群管理)系列之部署master/node节点组件(四)
0.前言 整体架构目录:ASP.NET Core分布式项目实战-目录 k8s架构目录:Kubernetes(k8s)集群部署(k8s企业级Docker容器集群管理)系列目录 1.部署master组件 ...
- 在 Linux 部署多节点 Kubernetes 集群与 KubeSphere 容器平台
KubeSphere 是在 Kubernetes 之上构建的以应用为中心的企业级容器平台,所有供为用户提供简单易用的操作界面以及向导式操作方式.同时,KubeSphere Installer 提供了 ...
随机推荐
- 控制 Python 工具箱中的许可行为
def isLicensed(self): """Allow the tool to execute, only if the ArcGIS 3D Analyst 扩展模 ...
- 到达型01背包---P1504 积木城堡
P1504 积木城堡 题解 到达型01背包 对于每一组城堡,它可以到达一些高度 但是我们要求的是所有背包可以到达的公共高度的最大值 f[ i ] 表示对于一组城堡,能否到达高度 j ,然后我们跑 n ...
- C# 将文本写入到文件
将字符串数组写入到文件,每个元素为一行 string[] lines = { "First line", "Second line", "Third ...
- Docs-.NET-C#-指南-语言参考-预处理器指令:#endif(C# 参考)
ylbtech-Docs-.NET-C#-指南-语言参考-预处理器指令:#endif(C# 参考) 1.返回顶部 1. #endif(C# 参考) 2015/07/20 #endif 指定条件指令的末 ...
- Angular 开发工具介绍
1.Webstorm2.Visual Studio Code (推荐) 记得 安装angular插件
- 【分类算法】感知机(Perceptron)
0 - 算法描述 感知机算法是一类二分类算法,其问题描述为,给定一个训练数据集 $$T=\{(x_1,y_1),(x_2,y_2),\cdots,(x_N,y_N)\},$$ 其中$x_i\in \m ...
- (十三)static关键字
--摘自孤傲苍狼博客 一.static关键字
- charles 工具菜单总结
本文参考:charles 工具菜单总结 主要是下面的功能,具体可以点击对应菜单查看 工具菜单总结 禁用缓存 禁用Cookies 远程映射到URL地址 映射到本地 重写工具 黑名单 白名单 DNS欺骗 ...
- 三节课MINI计划第三周
第一部分 微信读书的产品分析 一.任务背景 二.做什么 三.TASK8 业务流程图 四.TASK9 五.周会 六.周报
- 关于VS2010工程各种路径注意事项汇总
关于VS2010工程各种路径注意事项汇总 声明:引用请注明出处http://blog.csdn.net/lg1259156776/ 说明:前段时间调试,利用cmake生成的vs2010工程文件,虽然该 ...