
[转]An introduction to OAuth 2.0 using Facebook in ASP.NET Core
本文转自:http://andrewlock.net/an-introduction-to-oauth-2-using-facebook-in-asp-net-core/
This is the next post in a series on authentication and authorisation in ASP.NET Core. In this post I look in moderate depth at the OAuth 2.0 protocol as it pertains to ASP.NET Core applications, walking through the protocol as seen by the user of your website as well as the application itself. Finally, I show how you can configure your application to use a Facebook social login when you are using ASP.NET Core Identity.
OAuth 2.0
OAuth 2.0 is an open standard for authorisation. It is commonly used as a way for users to login to a particular website (say, catpics.com) using a third party account such as a Facebook or Google account, without having to provide catpics.com the password for their Facebook account.
While it is often used for authentication, being used to log a user in to a site, it is actually an authorisationprotocol. We'll discuss the detail of the flow of requests in the next sections, but in essence, you as a user are providing permission for the catpics.com website to access some sort of personal information from the OAuth provider website (Facebook). So catpics.com is able to access your personal Facebook cat pictures, without having full access to your account, and without requiring you to provide your password directly.
There are a number of different ways you can use OAuth 2.0, each of which require different parameters and different user interactions. Which one you should use depends on the nature of the application you are developing, for example:
- Resource Owner Grant - Requires the user to directly enter their username and password to the application. Useful when you are developing a 1st party application to authenticate with your own servers, e.g. the Facebook mobile app might use a Resource Owner Grant to authenticate with Facebook's servers.
- Implicit Grant - Authenticating with a server returns an access token to the browser which can then be used to access resources. Useful for Single Page Applications (SPA) where communication cannot be private.
- Authorisation Code Grant - The typical OAuth grant used by web applications, such as you would use in your ASP.NET apps. This is the flow I will focus on for the rest of the article.
The Authorisation Code Grant
Before explaining the flow fully, we need to clarify some of the terminology. This is where I often see people getting confused with the use of overloaded terms like 'Client'. Unfortunately, these are taken from the official spec, so I will use them here as well, but for the remainder of the article I'll try and use disambiguated names instead.
We will consider an ASP.NET application that finds cats in your Facebook photos by using Facebook's OAuth authorisation.
- Resource owner (e.g. the user) - This technically doesn't need to be a person as OAuth allows machine-to-machine authorisation, but for our purposes it is the end-user who is using your application.
- Resource service (e.g. the Facebook API server) - This is the endpoint your ASP.NET application will call to access Facebook photos once it has been given an access token.
- Client (e.g. your app) - This is the application which is actually making the requests to the Resource service. So in this case it is the ASP.NET application.
- Authorisation server (e.g. the Facebook authorisation server) - This is the server that allows the user to login to their Facebook account.
- Browser (e.g. Chrome, Safari) - Not required by OAuth in general, but for our example, the browser is the user-agent that the resource owner/user is using to navigate your ASP.NET application.
The flow
Now we have nailed some of the terminology, we can think about the actual flow of events and data when OAuth 2.0 is in use. The image below gives a detailed overview of the various interactions, from the user first requesting access to a protected resource, to them finally gaining access to it. The flow looks complicated, but the key points to notice are the three calls to Facebook's servers.
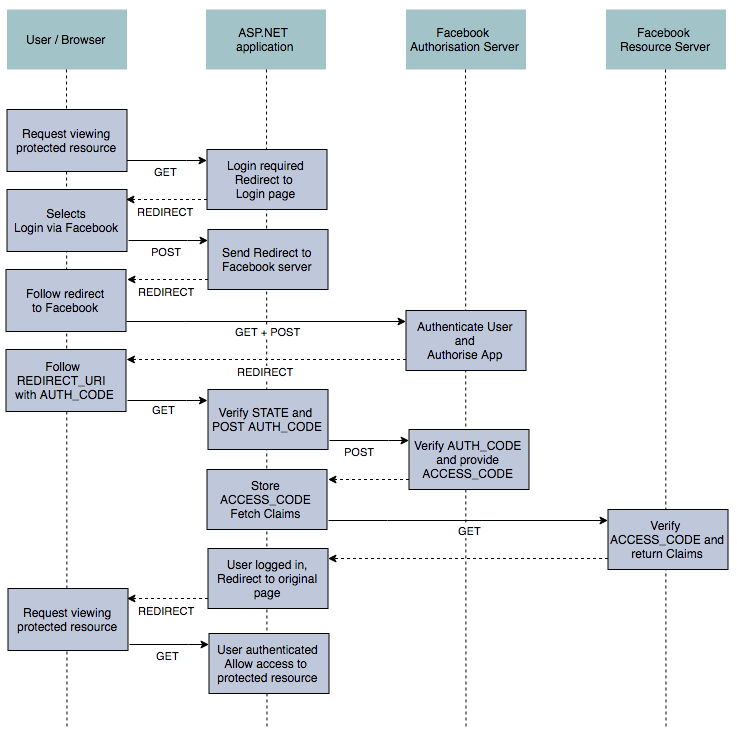
As we go through the flow, we'll illustrate it from a user's point of view, using the default MVC template with ASP.NET Core Identity, configured to use Facebook as an external authentication mechanism.
Before you can use OAuth in your application, you first need to register your application with the Authorisation server (Facebook). There you will need to provide a REDIRECT_URI and you will be provided a CLIENT_ID and CLIENT_SECRET. The process is different for each Authorisation server so it is best to consult their developer docs for how to go about this. I'll cover how to register your application with Facebook later in this article.
Authorising to obtain an authorisation code
When the user requests a page on your app that requires authorisation, they will be redirected to the login page. Here they can either login using a username and password to create an account directly with the site, or they can choose to login with an external provider - in this case just Facebook.
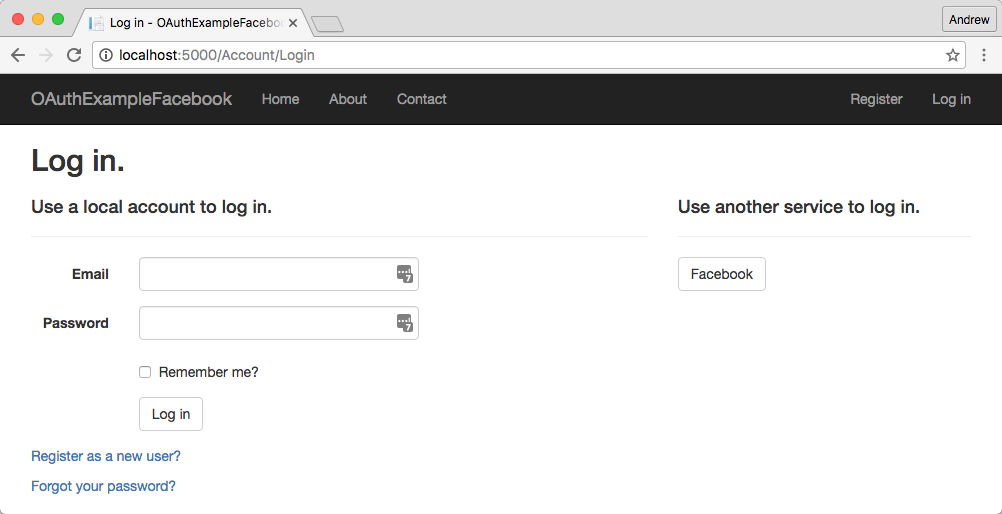
When the user clicks on the Facebook button, the ASP.NET application sends a 302 to the user's browser, with a url similar to the following:
https://www.facebook.com/v2.6/dialog/oauth?client_id=CLIENT_ID&scope=public_profile,email&response_type=code&redirect_uri=REDIRECT_URI&state=STATE_TOKEN
This url points to the Facebook Authorisation server, and contains a number of replacement fields. TheCLIENT_ID and REDIRECT_URI are the ones we registered and were provided when we registered our app in Facebook. The STATE_TOKEN is a CSRF token generated automatically by our application for security reasons (that I won't go into). Finally, the scope field indicates what resources we have requested access to - namely public_profile and their email.
Following this link, the user is directed in their browser to their Facebook login page. Once they have logged in, or if they are already logged in, they must grant authorisation to our registered ASP.NET application to access the requested fields:
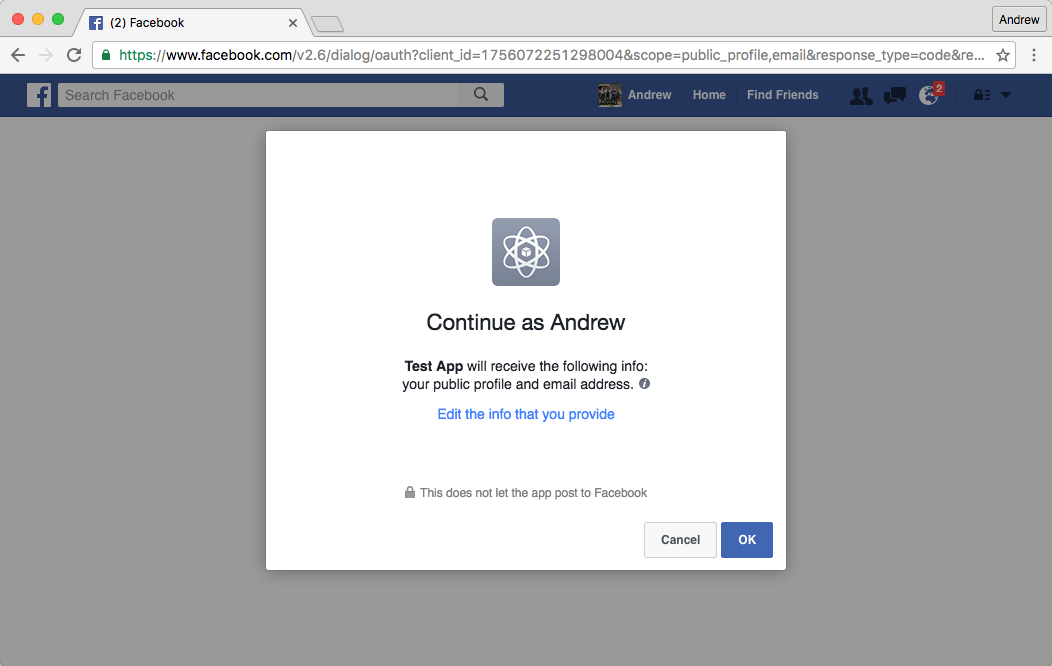
If the user clicks OK, then Facebook sends another 302 response to the browser, with a url similar to the following:
http://localhost:5000/signin-facebook?code=AUTH_CODE&state=STATE_TOKEN
Facebook has provided an AUTH_CODE, along with the STATE_TOKEN we supplied with the initial redirect. The state can be verified to ensure that requests are not being forged by comparing it to the version stored in our session state in the ASP.NET application. The AUTH_CODE however is only temporary, and cannot be directly used to access the user details we need. Instead, we need to exchange it for an access token with the Facebook Authorisation server.
Exchanging for an access token
This next portion of the flow occurs entirely server side - communication occurs directly between our ASP.NET application and the Facebook authorisation server.
Our ASP.NET application constructs a POST request to the Facebook Authorization server, to an Access token endpoint. The request sends our app's registered details, including the CLIENT_SECRET and theAUTH_TOKEN to the Facebook endpoint:
POST /v2.6/oauth/access_token HTTP/1.1

Host: graph.facebook.com

Content-Type: application/x-www-form-urlencoded

grant_type=authorization_code&

code=AUTH_CODE&

redirect_uri=REDIRECT_URI&

client_id=CLIENT_ID&

client_secret=CLIENT_SECRET
If the token is accepted by Facebook's Authorisation server, then it will respond with (among other things) an ACCESS_TOKEN. This access token allows our ASP.NET application to access the resources (scopes) we requested at the beginning of the flow, but we don't actually have the details we need in order to create the Claims for our user yet.
Accessing the protected resource
After receiving and storing the access token, our app can now contact Facebook's Resource server. We are still completely server-side at this point, communicating directly with Facebook's user information endpoint.
Our application constructs a GET request, providing the ACCESS_TOKEN and a comma separated (and URL encoded) list of requested fields in the querystring:
GET /v2.6/me?access_token=ACCESS_TOKEN&fields=name%2Cemail%2Cfirst_name%2Clast_name

Host: graph.facebook.com
Assuming all is good, Facebook's resource server should respond with the requested fields. Your application can then add the appropriate Claims to the ClaimsIdentity and your user is authenticated!
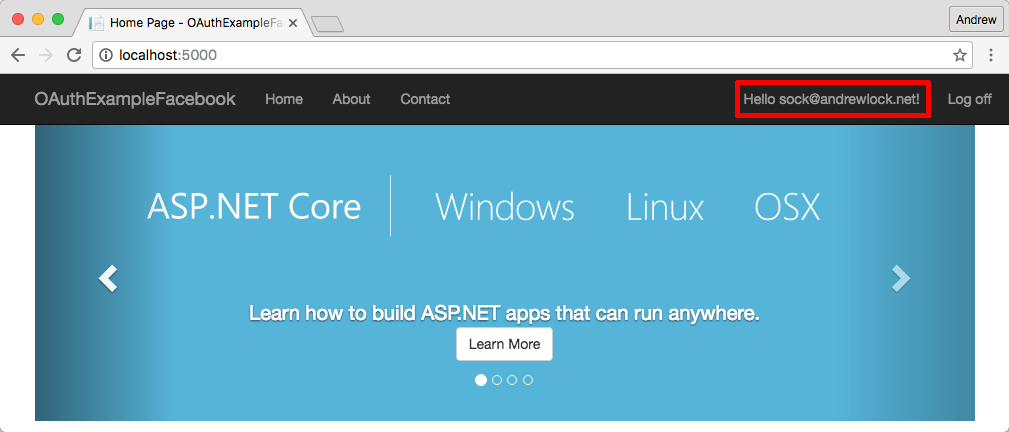
The description provided here omits a number of things such as handling expiration and refresh tokens, as well as the ASP.NET Core Identity process or associating the login to an email, but hopefully it provides an intermediate view of what is happening as part of a social login.
Example usage in ASP.NET Core
If you're anything like me, when you first start looking at how to implement OAuth in your application, it all seems a bit daunting. There's so many moving parts, different grants and backchannel communication that it seems like it will be a chore to setup.
Luckily, the ASP.NET Core team have solved a massive amount of the headache for you! If you are using ASP.NET Core Identity, then adding external providers is a breeze. The ASP.NET Core documentationprovides a great walkthrough to creating your application and getting it all setup.
Essentially, if you have an app that uses ASP.NET Core Identity, all that is required to add facebook authentication is to install the package in your project.json:
{

  "dependencies": {

    "Microsoft.AspNetCore.Authentication.Facebook": "1.0.0"

  }

}
and configure the middleware in your Startup.Configure method:
public void Configure(IApplicationBuilder app, IHostingEnvironment env)

{

    app.UseStaticFiles();

    app.UseIdentity();

    app.UseFacebookAuthentication(new FacebookOptions

    {

        AppId = Configuration["facebook:appid"],

        AppSecret = Configuration["facebook:appsecret"],

        Scope = { "email" },

        Fields = { "name", "email" },

        SaveTokens = true,

    });

    app.UseMvc(routes =>

    {

        routes.MapRoute(

            name: "default",

            template: "{controller=Home}/{action=Index}/{id?}");

    });

}
You can see we are loading the AppId and AppSecret (our CLIENT_ID and CLIENT_SECRET) from configuration. On a development machine, these should be stored using the user secrets manager or environment variables (never commit them directly to your repository).
If you want to use a different external OAuth provider then you have several options. Microsoft provide a number of packages similar to the Facebook package shown which make integrating external logins simple. There are currently providers for Google, Twitter and (obviously) Microsoft accounts.
In addition, there are a number of open source libraries that provide similar handling of common providers. In particular, the AspNet.Security.OAuth.Providers repository has middleware for providers like GitHub, Foursquare, Dropbox and many others.
Alternatively, if a direct provider is not available, you can use the genericMicrosoft.AspNetCore.Authentication.OAuth package on which these all build. For example Jerrie Pelser has an excellent post on configuring your ASP.NET Core application to use LinkedIn.
Registering your application with Facebook Graph API
As discussed previously, before you can use an OAuth provider, you must register your application with the provider to obtain the CLIENT_ID and CLIENT_SECRET, and to register your REDIRECT_URI. I will briefly show how to go about doing this for Facebook.
First, navigate to https://developers.facebook.com and login. If you have not already registered as a developer, you will need to register and agree to Facebook's policies.

Once a developer, you can create a new web application by following the prompts or navigating tohttps://developers.facebook.com/quickstarts/?platform=web. Here you will be prompted to provide a name for your web application, and then to configure some basic details about it.
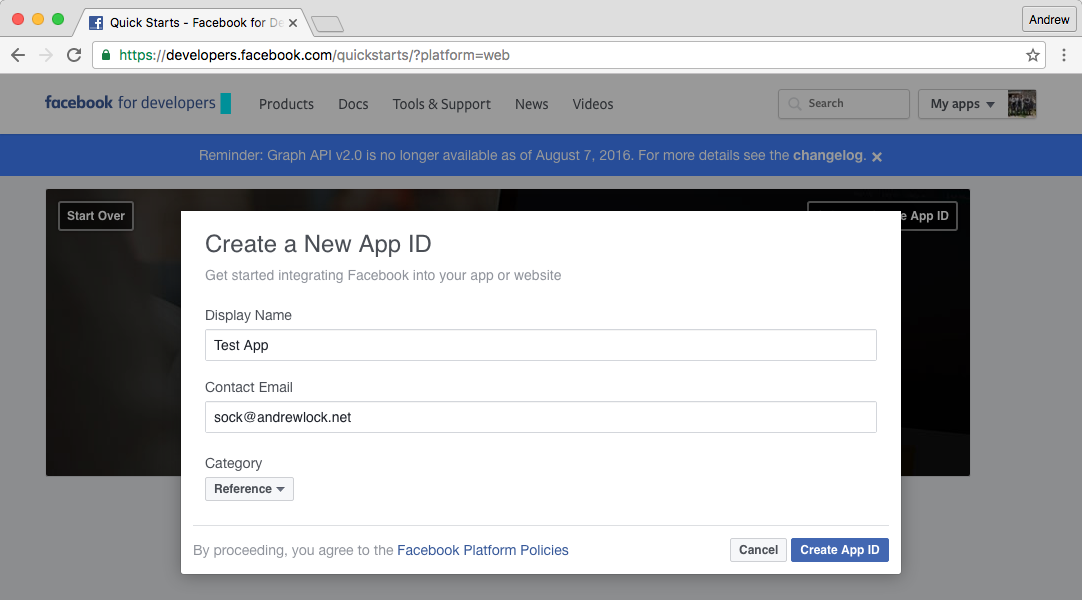
Once created, navigate to https://developers.facebook.com/apps and click on your application's icon. You will be taken to your app's basic details. Here you can obtain the App Id and App Secret you will need in your application. Make a note of them (store them using your secrets manager).

The last step is to configure the redirect URI for your application. Click on '+ Add Product' at the bottom of the menu and choose Facebook Login. This will enable OAuth for your application, and allow you to set the REDIRECT_URI for your application.
The redirect path for the Facebook middleware is /signin-facebook. In my case, I was only running the app locally, so my full redirect url was http://localhost:5000/signin-facebook.
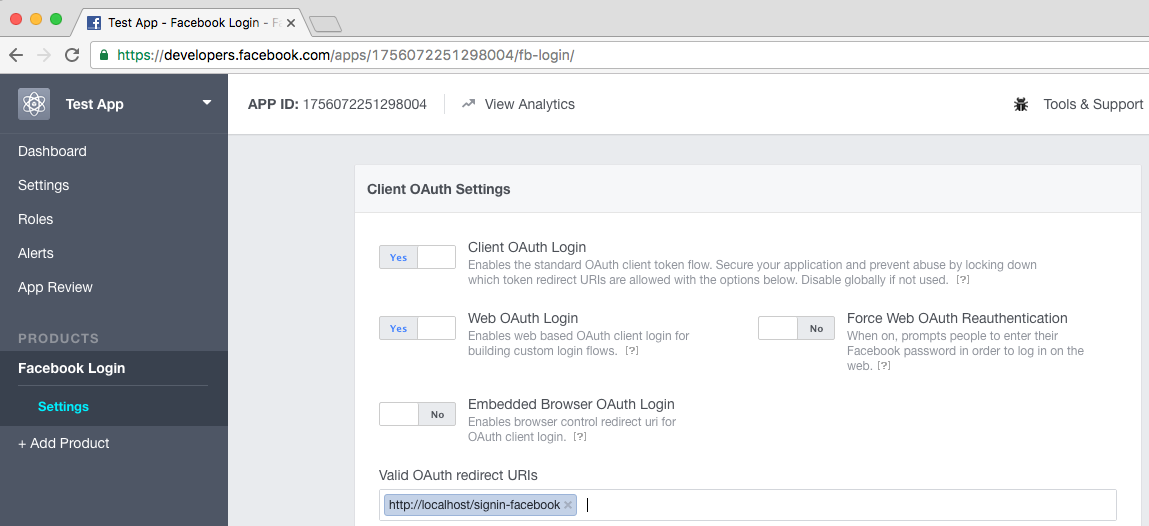
Assuming everything is setup correctly, you should now be able to use OAuth 2.0 to login to your ASP.NET Core application with Facebook!
Final thoughts
In this post I showed how you could use OAuth 2.0 to allow users to login to your ASP.NET Core application with Facebook and other OAuth 2.0 providers.
One point which is often overlooked is the fact that OAuth 2.0 is a protocol for performing authorisation, not authentication. The whole process is aimed at providing access to protected resources, rather than proving the identity of a user, which has some subtle security implications.
Luckily there is an another protocol OpenId Connect, which deals with many of these issues, which essentially provides and additional layer on top of the OAuth 2.0 protocol. I'll be doing a post on OpenId Connect soon, but if you want to learn more, I've provided some additional details below.
In the mean time, enjoy your social logins!
Further links
- https://github.com/aspnet-contrib/AspNet.Security.OAuth.Providers
- https://docs.asp.net/en/latest/security/authentication/sociallogins.html
- https://auth0.com/blog/authenticating-a-user-with-linkedin-in-aspnet-core/
- http://nat.sakimura.org/2011/05/15/dummys-guide-for-the-difference-between-oauth-authentication-and-openid/
- http://nat.sakimura.org/2012/01/20/openid-connect-nutshell/
- http://www.thread-safe.com/2012/01/problem-with-oauth-for-authentication.html
[转]An introduction to OAuth 2.0 using Facebook in ASP.NET Core的更多相关文章
- Asp.net Core 1.0.1升级到Asp.net Core 1.1.0 Preview版本发布到Windows Server2008 R2 IIS中的各种坑
Asp.net Core 1.0.1升级到Asp.net Core 1.1.0后,程序无法运行了 解决方案:在project.json中加入runtime节点 "runtimes" ...
- C# 6 与 .NET Core 1.0 高级编程 - 40 ASP.NET Core(上)
译文,个人原创,转载请注明出处(C# 6 与 .NET Core 1.0 高级编程 - 40 章 ASP.NET Core(上)),不对的地方欢迎指出与交流. 章节出自<Professiona ...
- C# 6 与 .NET Core 1.0 高级编程 - 40 ASP.NET Core(下)
译文,个人原创,转载请注明出处(C# 6 与 .NET Core 1.0 高级编程 - 40 章 ASP.NET Core(下)),不对的地方欢迎指出与交流. 章节出自<Professiona ...
- 探索 ASP.Net Core 3.0系列三:ASP.Net Core 3.0中的Service provider validation
前言:在本文中,我将描述ASP.NET Core 3.0中新的“validate on build”功能. 这可以用来检测您的DI service provider是否配置错误. 具体而言,该功能可检 ...
- 探索ASP.Net Core 3.0系列六:ASP.NET Core 3.0新特性启动信息中的结构化日志
前言:在本文中,我将聊聊在ASP.NET Core 3.0中细小的变化——启动时记录消息的方式进行小的更改. 现在,ASP.NET Core不再将消息直接记录到控制台,而是正确使用了logging 基 ...
- ASP.NET Core 2.0 MVC 发布部署--------- ASP.NET Core 发布的具体操作
ASP.NET Core 发布的具体操作 下面使用C# 编写的ASP.NET Core Web项目示例说明发布的全过程. 1.创建项目 选择“文件” > “新建” > “项目”. 在“添加 ...
- 简单理解 OAuth 2.0 及资料收集,IdentityServer4 部分源码解析
简单理解 OAuth 2.0 及资料收集,IdentityServer4 部分源码解析 虽然经常用 OAuth 2.0,但是原理却不曾了解,印象里觉得很简单,请求跳来跳去,今天看完相关介绍,就来捋一捋 ...
- ASP.NET 中OAUTH 2.0 及OPENID CONNECT的介绍
了解以下内容对ASP.NET 5中的验证中间件应用有很大帮助! OAUTH2是目前很多大型网站都使用的对外提供开放资源接口的应用标准,比入taobao\alipay\腾讯\豆瓣等.它和目前的另 ...
- OAuth 2.0、OIDC 原理
OAuth 目录 OAuth 什么是 OAuth? 为什么是 OAuth? SAML OAuth 和 API OAuth 主要组件 OAuth 作用域 OAuth 参与者 OAuth 令牌 OAuth ...
随机推荐
- SQL Server 多实例下的复制
一.本文所涉及的内容(Contents) 本文所涉及的内容(Contents) 背景(Contexts) 搭建步骤(Procedure) 注意事项(Attention) 二.背景(Contexts) ...
- 多线程条件通行工具——Semaphore
Semaphore的作用是,限制线程通行的数量,如果线程进入时达到通行数量,便等待其它正在通行的线程释放. acquire()获取通行 release()释放通行 availablePermits() ...
- 初谈SQL Server逻辑读、物理读、预读
前言 本文涉及的内容均不是原创,是记录自己在学习IO.执行计划的过程中学习其他大牛的博客和心得并记录下来,之所以想写下来是为了记录自己在追溯的过程遇到的几个问题,并把这些问题弄清楚. 本章最后已贴出原 ...
- 自己动手,实现一种类似List<T>的数据结构(二)
前言: 首先,小匹夫要祝各位看官圣诞快乐,新年愉快-.上一篇文章<自己动手,实现一种类似List<T>的数据结构(一)> 介绍了一下不依靠List<T>实现的各种接 ...
- iOS: 在UIViewController 中添加Static UITableView
如果你直接在 UIViewController 中加入一个 UITableView 并将其 Content 属性设置为 Static Cells,此时 Xcode 会报错: Static table ...
- Rafy 框架 - 执行SQL或存储过程
有时候,开发者不想通过实体来操作数据库,而是希望通过 SQL 语句或存储过程来直接访问数据库.Rafy 也提供了一组 API 来方便实现这类需求. IDbAccesser 接口 为了尽量屏蔽各数据库中 ...
- 虚拟机安装CentOS6.4
1 概述 虚拟机(Virtual Machine)指通过软件模拟的具有完整硬件系统功能的.运行在一个完全隔离环境中的完整计算机系统,运行在主机上,完全独立,虚拟机里面的所有操作不会影响主机,即使虚拟 ...
- C# - 多线程 之 Process与Thread与ThreadPool
Process 进程类, // 提供对本地和远程进程的访问,启动/停止本地系统进程 public class Process : Component { public int Id { get; } ...
- 基础总结之Activity
一.万事开头的序 网上看见大牛们的博客写的那样精彩,各种羡慕之情溢于言表.几次冲动均想效仿牛人写些博客来记录下自己的心得体会,但均无感亦或是感觉容易被喷,相信很多菜鸟和我一样都有过这样的担忧.万事开头 ...
- python学习笔记(字符串操作、字典操作、三级菜单实例)
字符串操作 name = "alex" print(name.capitalize()) #首字母大写 name = "my name is alex" pri ...