转 Android中shape中的属性大全
<shape>
<!-- 实心 -->
<solid android:color="#ff9d77"/>
<!-- 渐变 -->
<gradient
android:startColor="#ff8c00"
android:endColor="#FFFFFF"
android:angle="270" />
<!-- 描边 -->
<stroke
android:width="2dp"
android:color="#dcdcdc" />
<!-- 圆角 -->
<corners
android:radius="2dp" />
<padding
android:left="10dp"
android:top="10dp"
android:right="10dp"
android:bottom="10dp" />
</shape>
solid:实心,就是填充的意思
android:color指定填充的颜色
gradient:渐变
android:startColor和android:endColor分别为起始和结束颜色,ndroid:angle是渐变角度,必须为45的整数倍。
另外渐变默认的模式为android:type="linear",即线性渐变,可以指定渐变为径向渐变,android:type="radial",径向渐变需要指定半径android:gradientRadius="50"。
stroke:描边
android:width="2dp" 描边的宽度,android:color 描边的颜色。
我们还可以把描边弄成虚线的形式,设置方式为:
android:dashWidth="5dp"
android:dashGap="3dp"
其中android:dashWidth表示'-'这样一个横线的宽度,android:dashGap表示之间隔开的距离。
corners:圆角
android:radius为角的弧度,值越大角越圆。
我们还可以把四个角设定成不同的角度,方法为:
<corners
android:topRightRadius="20dp" 右上角
android:bottomLeftRadius="20dp" 右下角
android:topLeftRadius="1dp" 左上角
android:bottomRightRadius="0dp" 左下角
/>
这里有个地方需要注意,bottomLeftRadius是右下角,而不是左下角,这个有点郁闷,不过不影响使用,记得别搞错了就行。
还有网上看到有人说设置成0dp无效,不过我在测试中发现是可以的,我用的是2.2,可能修复了这个问题吧,如果无效的话那就只能设成1dp了。
padding:间隔
这个就不用多说了,XML布局文件中经常用到。
大体的就是这样,以下是一个使用的具体示例:用在Selector中作为Button的背景,分别定义了按钮的一般状态、获得焦点状态和按下时的状态,具体代码如下:
main.xml:
<Button
android:layout_width="wrap_content"
android:layout_height="wrap_content"
android:text="TestShapeButton"
android:background="@drawable/button_selector"
/>
button_selector.xml:
<?xml version="1.0" encoding="utf-8"?>
<selector
xmlns:android="http://schemas.android.com/apk/res/android">
<item android:state_pressed="true" >
<shape>
<!-- 渐变 -->
<gradient
android:startColor="#ff8c00"
android:endColor="#FFFFFF"
android:type="radial"
android:gradientRadius="50" />
<!-- 描边 -->
<stroke
android:width="2dp"
android:color="#dcdcdc"
android:dashWidth="5dp"
android:dashGap="3dp" />
<!-- 圆角 -->
<corners
android:radius="2dp" />
<padding
android:left="10dp"
android:top="10dp"
android:right="10dp"
android:bottom="10dp" />
</shape>
</item>
<item android:state_focused="true" >
<shape>
<gradient
android:startColor="#ffc2b7"
android:endColor="#ffc2b7"
android:angle="270" />
<stroke
android:width="2dp"
android:color="#dcdcdc" />
<corners
android:radius="2dp" />
<padding
android:left="10dp"
android:top="10dp"
android:right="10dp"
android:bottom="10dp" />
</shape>
</item>
<item>
<shape>
<solid android:color="#ff9d77"/>
<stroke
android:width="2dp"
android:color="#fad3cf" />
<corners
android:topRightRadius="5dp"
android:bottomLeftRadius="5dp"
android:topLeftRadius="0dp"
android:bottomRightRadius="0dp"
/>
<padding
android:left="10dp"
android:top="10dp"
android:right="10dp"
android:bottom="10dp" />
</shape>
</item>
</selector>
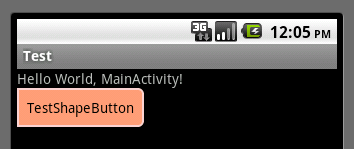
运行效果如下图:
一般状态:
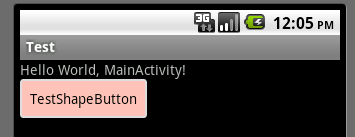
获得焦点状态:
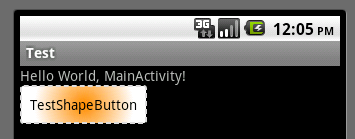
按下状态:
原址:http://www.oschina.net/question/166763_34833
转 Android中shape中的属性大全的更多相关文章
- Android中shape中的属性大全
---恢复内容开始--- <shape> <!-- 实心 --> <solid android:color="#ff9d77"/> <!- ...
- Android中shape属性详解
一.简单使用 刚开始,就先不讲一堆标签的意义及用法,先简单看看shape标签怎么用. 1.新建shape文件 首先在res/drawable文件夹下,新建一个文件,命名为:shape_radius.x ...
- android中通过自定义xml实现你需要的shape效果 xml属性配置
在Android开发过程中,经常需要改变控件的默认样式, 那么通常会使用多个图片来解决.不过这种方式可能需要多个图片,比如一个按钮,需要点击时的式样图片,默认的式样图片,然后在写一个selector的 ...
- shape和selector是Android UI设计中经常用到的
shape和selector是Android UI设计中经常用到的,比如我们要自定义一个圆角Button,点击Button有些效果的变化,就要用到shape和selector.可以这样说,shape和 ...
- firemonkey中stringgrid属性大全
StringGrid之属性大全: Align: //确定组件在父类组件区内的对齐方式(alScale:随窗口 放大缩小) AlterRowBack ...
- Android布局中涉及的一些属性
Android:gravity属性 线性布局常见的就是利用LinearLayout进行布局,其中有个比较重要的属性就是android:gravity,在官方文档中是这么描述这个属性的:指定一个元素怎么 ...
- android中ImageView的ScaleType属性
android中ImageView的ScaleType属性 ScaleType的值分别代表的意义: ImageView是Android中的基础图片显示控件,该控件有个重要的属性是ScaleType,该 ...
- 这些Android系统样式中的颜色属性你知道吗?
Android 系统样式中的颜色属性 推荐阅读看完后彻底搞清楚Android中的 Attr . Style .Theme 几个常用的颜色属性 先放上一张经典的图片,图片来自网络. 这张图在网上很是流传 ...
- Android(java)学习笔记101:WindowManager 中LayoutParams的各种属性
WindowManager 中LayoutParams的各种属性 WindowManager.LayoutParams 是 WindowManager 接口的嵌套类(内部类):它继承于 ViewGro ...
随机推荐
- [Code::Blocks] Install wxWidgets & openCV
The open source, cross platform, free C++ IDE. Code::Blocks is a free C++ IDE built to meet the most ...
- 自动化运维工具之 Ansible 介绍及安装使用
一.初识Ansible 介绍: Absible 使用 模块(Modules)来定义配置任务.模块可以用标准脚本语言(Python,Bash,Ruby,等等)编写,这是一个很好的做法,使每个模块幂等.A ...
- SQL Server 存储(2/8):理解数据记录结构
在SQL Server :理解数据页结构我们提到每条记录都有7 bytes的系统行开销,那这个7 bytes行开销到底是一个什么样的结构,我们一起来看下. 数据记录存储我们具体的数据,换句话说,它存在 ...
- Angular系列---- AngularJS入门教程03:AngularJS 模板(转载)
是时候给这些网页来点动态特性了——用AngularJS!我们这里为后面要加入的控制器添加了一个测试. 一个应用的代码架构有很多种.对于AngularJS应用,我们鼓励使用模型-视图-控制器(MVC)模 ...
- sprint3(第四天)
今天继续完成前台和后台的整合 燃尽图:
- 快速暴力解决Eclipse ADT和Android Studio兼容问题,创建同时兼容ADT和AS的安卓工程
环境:AS 2.1.2+Java1.7+Gradle 2.14+ADT 24.0.2+MyEclipse 2015 前言:因为比赛要求使用ADT,而我本身比较习惯使用AS开发,遂想办法打造兼容两个ID ...
- 【助教】Java获取数据库数据展示
本文将给出一个最简单的Java查询数据库中一张表的数据并将查询结果展示在页面的例子. 实际上,我们要解决以下两个问题: Java与数据库交互(以JDBC为例) 数据展示在前台页面(以Servlet+J ...
- SQL Server分布式数据库技术(LinkedServer,CT,SSB)
SQL Server自定义业务功能的数据同步 在不同业务需求的驱动下,数据库的模块化拆分将会面临一些比较特殊的业务逻辑处理需求.例如,在数据库层面的数据同步需求.同步过程中,可能会有一些比较复杂的业务 ...
- 2015 Multi-University Training Contest 1 - 10010 Y sequence
Y sequence Problem's Link: http://acm.hdu.edu.cn/showproblem.php?pid=5297 Mean: 有连续数列A={1,2,3,4,5,6, ...
- windbg学习进阶之——windbg字段名及其意义
要使用windbg分析dump必须加载正确的符号,可以通过设置Symbols File Path为"D:/Symbols;SRV*D:/Symbols*http://msdl.microso ...