
【03】SpringBoot2核心技术-核心功能—数据访问_单元测试_指标监控
3、数据访问(SQL)
3.1 数据库连接池的自动配置-HikariDataSource
1、导入JDBC场景
<dependency>

    <groupId>org.springframework.boot</groupId>

    <artifactId>spring-boot-starter-data-jdbc</artifactId>

</dependency>
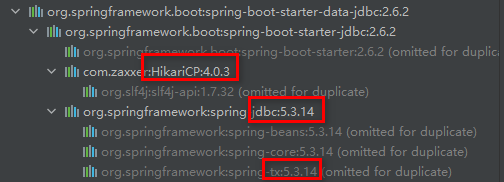
- HikariCP:数据源(数据库连接池)
- jdbc:jdbc
- tx:事务
为什么导入JDBC场景的时候,没有导入数据库驱动?
因为此时并不知道程序员要操作哪个数据库,要使用哪个数据库驱动。但是对于要导入的数据库驱动,springboot已经做好了版本仲裁,只需要导入一下即可,无需注明版本(但如果数据库的版本不符,则需要显示声明版本)。
<dependency>

    <groupId>mysql</groupId>

    <artifactId>mysql-connector-java</artifactId>

</dependency>

修改版本的方法:

	1、直接依赖引入的具体版本(Maven依赖就近原则) <version>版本号</version>

	2、重新声明版本(Maven属性就近原则)

		    <properties>

        		<mysql.version>5.1.49</mysql.version>

    		</properties>
2、分析自动配置
DataSourceAutoConfiguration.class : 数据源(数据库连接池)的自动配置
修改数据源相关的配置:spring.datasource

数据库连接池的配置(DataSourceConfiguration.class),是自己容器中没有DataSource才自动配置的
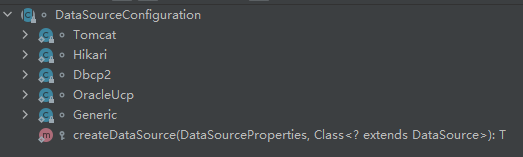
可以看到怎么初始化数据库连接池,以及各个数据库连接池创建的条件,我们可以通过spring.datasource.type去指定数据库连接池
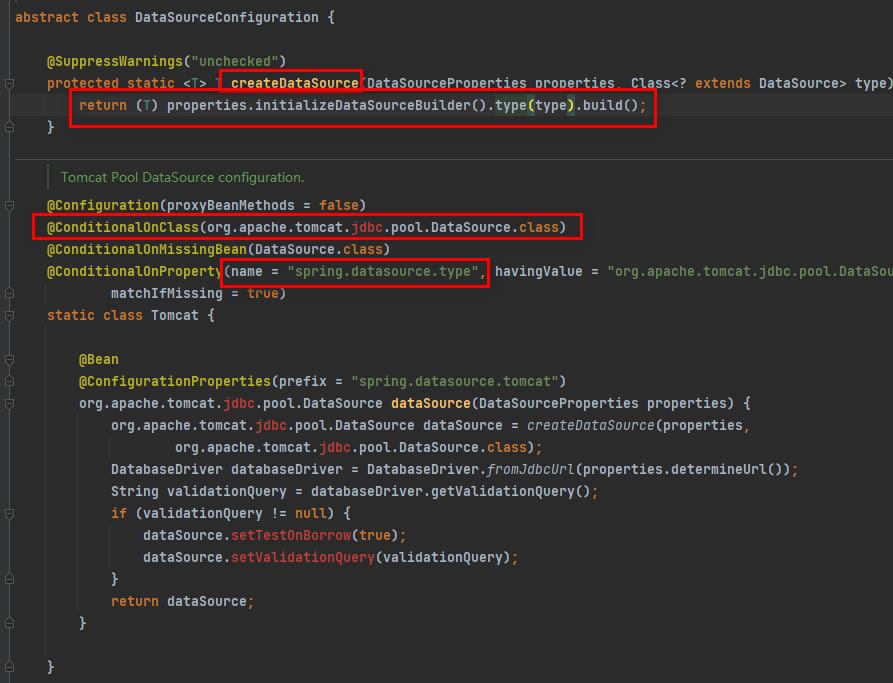
- 底层配置好的连接池是:HikariDataSource
@Configuration(proxyBeanMethods = false)

@Conditional(PooledDataSourceCondition.class)

@ConditionalOnMissingBean({ DataSource.class, XADataSource.class })

@Import({ DataSourceConfiguration.Hikari.class, DataSourceConfiguration.Tomcat.class,

         DataSourceConfiguration.Dbcp2.class, DataSourceConfiguration.OracleUcp.class,

         DataSourceConfiguration.Generic.class, DataSourceJmxConfiguration.class })

protected static class PooledDataSourceConfiguration{

    ...

}
DataSourceTransactionManagerAutoConfiguration: 事务管理器的自动配置
JdbcTemplateAutoConfiguration: JdbcTemplate的自动配置,可以来对数据库进行crud(Spring操作数据库的小组件,一般用MyBatis)
可以修改这个配置项@ConfigurationProperties(prefix = "spring.jdbc") 来修改JdbcTemplate
@Bean@Primary JdbcTemplate;容器中有这个组件
@Configuration(proxyBeanMethods = false)

@ConditionalOnMissingBean(JdbcOperations.class)

class JdbcTemplateConfiguration {

	@Bean

	@Primary

	JdbcTemplate jdbcTemplate(DataSource dataSource, JdbcProperties properties) {

		JdbcTemplate jdbcTemplate = new JdbcTemplate(dataSource);

		JdbcProperties.Template template = properties.getTemplate();

		jdbcTemplate.setFetchSize(template.getFetchSize());

		jdbcTemplate.setMaxRows(template.getMaxRows());

		if (template.getQueryTimeout() != null) {

			jdbcTemplate.setQueryTimeout((int) template.getQueryTimeout().getSeconds());

		}

		return jdbcTemplate;

	}

}
JndiDataSourceAutoConfiguration: jndi的自动配置
XADataSourceAutoConfiguration: 分布式事务相关的
3、修改配置项
spring:

  datasource:

    url: jdbc:mysql://localhost:3306/ssm_crud?allowMultiQueries=true

    username: root

    password: zouwenhao

    driver-class-name: com.mysql.cj.jdbc.Driver

#    type: com.zaxxer.hikari.HikariDataSource

  jdbc:

    template:

      query-timeout: 3
4、测试
@SpringBootTest

class Boot05WebAdminApplicationTests {

    @Autowired

    JdbcTemplate jdbcTemplate;

    @Test

    void contextLoads() {

        Long aLong = jdbcTemplate.queryForObject("select count(*) from tbl_emp", Long.class);

        System.out.println(aLong); // 600

    }

}
3.2 使用Druid数据源
1、Druid官方地址
https://github.com/alibaba/druid
整合第三方技术的两种方式:
- 自定义(自己配置)
- springboot官方是否提供了启动器starter
<dependency>

    <groupId>com.alibaba</groupId>

    <artifactId>druid</artifactId>

    <version>1.2.8</version>

</dependency>
2、自定义数据库连接池方式(不推荐)
@Configuration

public class DBSourceConfig {

    /*

    * 默认的自动配置生效,是在@ConditionalOnMissingBean(DataSource.class)条件成立时

    *   如果我们现在需要引入一个第三方的DataSource,此时创建一个数据库连接池组件放入容器中

    *       那么自动配置的数据库连接池HikariDataSource就会失效

    * */

    @Bean

    @ConfigurationProperties("spring.datasource")

    public DataSource dataSource() {

        DruidDataSource druidDataSource = new DruidDataSource();

        // 可以使用配置文件导入,springboot会自动将属性值封装,这样就无需再配置

//        druidDataSource.setUrl();

//        druidDataSource.setName();

//        druidDataSource.setPassword();

        return druidDataSource;

    }

    /**

     * 配置 druid的监控页功能

     * @return

     */

   @Bean

    public ServletRegistrationBean statViewServlet(){

        StatViewServlet statViewServlet = new StatViewServlet();

        ServletRegistrationBean<StatViewServlet> registrationBean = new ServletRegistrationBean<>(statViewServlet, "/druid/*");

        // 给监控页设置登录账号和密码

        registrationBean.addInitParameter("loginUsername","admin");

        registrationBean.addInitParameter("loginPassword","123456");

        return registrationBean;

    }

    /**

     * WebStatFilter 用于采集web-jdbc关联监控的数据。

     */

	@Bean

    public FilterRegistrationBean webStatFilter(){

        WebStatFilter webStatFilter = new WebStatFilter();

        FilterRegistrationBean<WebStatFilter> filterRegistrationBean = new FilterRegistrationBean<>(webStatFilter);

        filterRegistrationBean.setUrlPatterns(Arrays.asList("/*")); // 监控的请求路径

        filterRegistrationBean.addInitParameter("exclusions","*.js,*.gif,*.jpg,*.png,*.css,*.ico,/druid/*"); // 哪些请求不需要监控(被拦截)

        return filterRegistrationBean;

    }

}
3、使用官方starter方式
1、引入druid-starter
<dependency>

    <groupId>com.alibaba</groupId>

    <artifactId>druid-spring-boot-starter</artifactId>

    <version>1.2.8</version>

</dependency>
2、分析Druid自动配置
DruidDataSourceAutoConfigure.class
Druid数据库连接池的配置需要在官方数据库连接池自动配置之前,因为需要在官方配置之前在容器中创建好DruidDataSource。
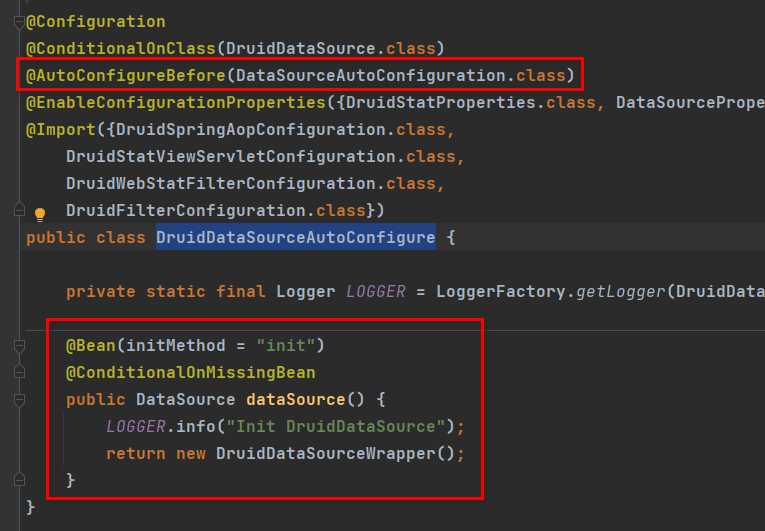
涉及到两个配置类DataSourceProperties和DruidStatProperties,其中扩展配置类的前缀配置是 spring.datasource.druid
此外,导入了四个类:
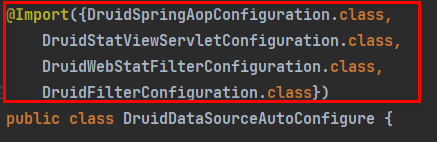
DruidSpringAopConfiguration.class:监控SpringBean(监控spring组件)
- 配置项:spring.datasource.druid.aop-patterns**
DruidStatViewServletConfiguration.class:监控页的配置
- spring.datasource.druid.stat-view-servlet;默认开启
DruidWebStatFilterConfiguration.class:web监控配置
- spring.datasource.druid.web-stat-filter;默认开启
DruidFilterConfiguration.class:所有Druid涉及到filter的组件配置
private static final String FILTER_STAT_PREFIX = "spring.datasource.druid.filter.stat";

private static final String FILTER_CONFIG_PREFIX = "spring.datasource.druid.filter.config";

private static final String FILTER_ENCODING_PREFIX = "spring.datasource.druid.filter.encoding";

private static final String FILTER_SLF4J_PREFIX = "spring.datasource.druid.filter.slf4j";

private static final String FILTER_LOG4J_PREFIX = "spring.datasource.druid.filter.log4j";

private static final String FILTER_LOG4J2_PREFIX = "spring.datasource.druid.filter.log4j2";

private static final String FILTER_COMMONS_LOG_PREFIX = "spring.datasource.druid.filter.commons-log";

private static final String FILTER_WALL_PREFIX = "spring.datasource.druid.filter.wall";

private static final String FILTER_WALL_CONFIG_PREFIX = FILTER_WALL_PREFIX + ".config";
最后,我们只需要将相应配置属性在配置文件(yaml或properties)中使用相应的前缀进行设置即可。配置示例:
spring:

  datasource:

    url: jdbc:mysql://localhost:3306/ssm_crud?allowMultiQueries=true

    username: root

    password: zouwenhao

    driver-class-name: com.mysql.cj.jdbc.Driver

    druid:

      aop-patterns: com.atguigu.admin.*  #监控SpringBean

      filters: stat,wall     # 底层开启功能,stat(sql监控),wall(防火墙)

      stat-view-servlet: # 配置监控页功能

        enabled: true

        login-username: admin

        login-password: admin

        resetEnable: false

      web-stat-filter: # 监控web

        enabled: true

        urlPattern: /*

        exclusions: '*.js,*.gif,*.jpg,*.png,*.css,*.ico,/druid/*'

      filter:

        stat: # 对上面filters里面的stat的详细配置

          slow-sql-millis: 1000

          logSlowSql: true

          enabled: true

        wall:

          enabled: true

          config:

            drop-table-allow: false
3.3 整合MyBatis操作
引入starter
SpringBoot官方的Starter:spring-boot-starter-*
第三方的: *-spring-boot-starter
<dependency>

    <groupId>org.mybatis.spring.boot</groupId>

    <artifactId>mybatis-spring-boot-starter</artifactId>

    <version>2.2.0</version>

</dependency>
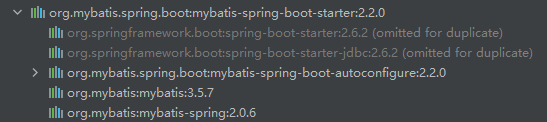
1、自动配置原理
全局配置文件:MybatisAutoConfiguration.class

MyBatis的配置在当前环境中只有一个数据库连接池的条件下才自动配置
MyBatis的配置类是:MybatisProperties.class
@ConfigurationProperties(prefix = MybatisProperties.MYBATIS_PREFIX)

public class MybatisProperties {

    ...

}
是在数据库连接池配置完之后,才对MyBatis进行配置
SqlSessionFactory: 自动配置好了
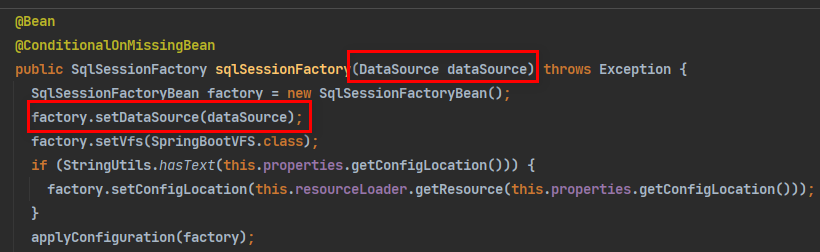
- MyBatis自动配置当前环境中配置好的数据库连接池
SqlSession:自动配置了 SqlSessionTemplate(这个类实现了SqlSession接口)
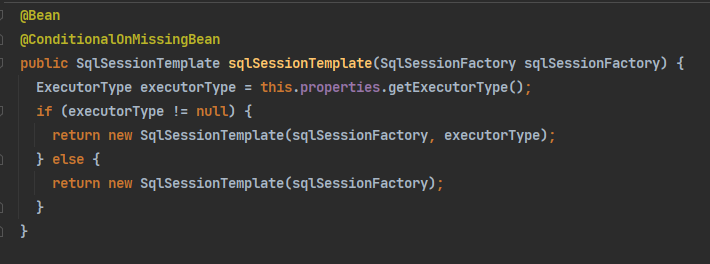

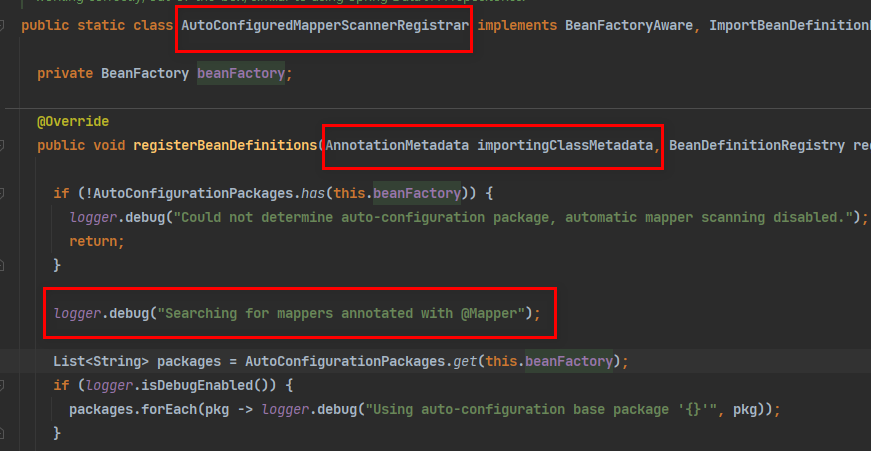
@Import(AutoConfiguredMapperScannerRegistrar.class);
Mapper: 只要我们写的操作MyBatis的接口标准了 @Mapper 就会被自动扫描进来
2、配置并测试
1、文件目录
静态资源目录resources下(idea下可以安装MyBatisX插件)
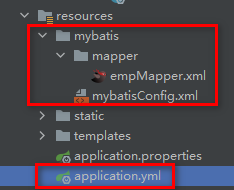
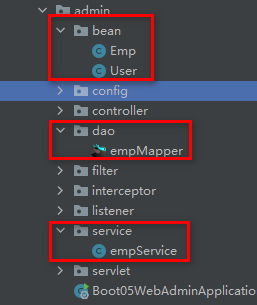
dao层、bean层、service层
2、配置MyBatis
spring:

  datasource:

    url: jdbc:mysql://localhost:3306/ssm_crud?allowMultiQueries=true

    username: root

    password: password

    driver-class-name: com.mysql.cj.jdbc.Driver

# 配置Mybatis的规则

mybatis:

#  config-location: classpath:mybatis/mybatisConfig.xml

  mapper-locations: classpath:mybatis/mapper/*.xml

  configuration: # 一旦使用yaml或者properties进行配置,就不能再使用config-location

    # 开启驼峰命名

    map-underscore-to-camel-case: true
当然也可以使用xml配置方式,但是需要注明配置文件的位置,注意的是:一旦我们在yaml或者是properties文件中进行了config配置,那么config-location就不能使用,否则mybatis不知道应该加载哪个配置文件,会造成冲突。
3、测试
dao:注意,在spring中是需要配置扫描自定义Mybatis的mapper接口的,而在SpringBoot中,由于我们使用了starter,只需要在dao层下的接口文件添加上@Mapper注解,就会被扫描到并添加到IOC容器中。
@Mapper

public interface empMapper {

    public Emp getEmpById(int id);

}
service(service+serviceImpl)
public interface empService {

    public Emp getEmpById(int id);

}
@Service

public class EmpServiceImpl implements empService {

    @Autowired

    empMapper empMapper;

    @Override

    public Emp getEmpById(int id) {

        return empMapper.getEmpById(id);

    }

}
mapper.xml映射
<?xml version="1.0" encoding="UTF-8" ?>

<!DOCTYPE mapper

        PUBLIC "-//mybatis.org//DTD Mapper 3.0//EN"

        "http://mybatis.org/dtd/mybatis-3-mapper.dtd">

<mapper namespace="com.atguigu.admin.dao.empMapper">

    <!--public Emp getEmpById(int id);-->

    <select id="getEmpById" resultType="com.atguigu.admin.bean.Emp">

        select * from tbl_emp where emp_id = #{id}

    </select>

</mapper>
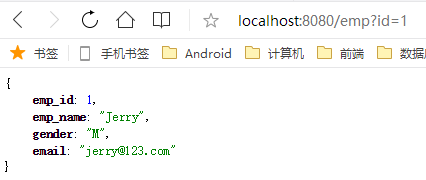
测试
@Controller

public class MyBatisController {

    @Autowired

    empService empService;

    @ResponseBody

    @RequestMapping("/emp")

    public Emp getempById(@RequestParam("id")int id){

        return empService.getEmpById(id);

    }

}
3、纯注解开发及注解配置混合开发
1、纯注解版(适用于查询sql语句比较简单的情况)
在上一小节中,不难发现如果在yaml文件中进行配置的话,是可以省去mybatisConfig.xml。对于mapper.xml映射文件也可以省去,使用@Select注解。
在dao层的接口文件中:
@Mapper

public interface empMapper {

    @Select("select * from tbl_emp where emp_id = #{id}")

    public Emp getEmpById(int id);

}
2、注解配置混合开发
对于一些比较复杂的sql查询功能的实现,显然仅仅使用纯注解开发是行不通的,因此还是需要在mapper.xml文件中进行复杂sql查询功能的实现。
@Mapper

public interface empMapper {

    @Select("select * from tbl_emp where emp_id = #{id}")

    public Emp getEmpById(int id);

    pubilc void insertEmp(Emp emp);

}
对于上面例子中的insert方法,还是能用注解的:
@Insert("insert into  tbl_emp(`emp_name`,`mail`,`gender`) values(#{name},#{mail},#{gender})")

@Options(useGeneratedKeys = true,keyProperty = "emp_id")

public void insertEmp(Emp emp)
4、最佳实战
引入mybatis-starter
配置application.yaml中,指定mapper-location位置即可
编写Mapper接口并标注@Mapper注解
简单方法直接注解方式
复杂方法编写mapper.xml进行绑定映射
在配置类上添加@MapperScan("com.atguigu.admin.dao") ,可以是主程序类。就可以简化在其他的接口不用标注@Mapper注解(在MyBatis中,最好还是在dao层接口上一个一个加上吧)
3.4 整合MyBatis-Plus完成CURD
1、什么是MyBatis-Plus
MyBatis-Plus(简称 MP)是一个 MyBatis 的增强工具,在 MyBatis 的基础上只做增强不做改变,为简化开发、提高效率而生。
建议安装 MybatisX 插件
2、整合Mybatis-plus
- 引入Mybatis-plus的starter,就可以不用引入jdbc和mybatis了
<dependency>

    <groupId>com.baomidou</groupId>

    <artifactId>mybatis-plus-boot-starter</artifactId>

    <version>3.4.3.4</version>

</dependency>
自动配置
MybatisPlusAutoConfiguration 配置类,MybatisPlusProperties 配置项绑定。
- 前缀为**mybatis-plus:xxx **,就是对mybatis-plus的配置定制
SqlSessionFactory 自动配置好(与mybatis同)。底层是容器中已经配置好的数据库连接池
mapperLocations 自动配置好的。
有默认值:classpath*:/mapper/**/*.xml;任意包的类路径下的所有mapper文件夹下任意路径下的所有xml都是sql映射文件。 (即,类路径文件夹下mapper文件夹中)
/* 是拦截所有的文件夹,不包含子文件夹
/** 是拦截所有的文件夹及里面的子文件夹建议以后sql映射文件,放在类路径下mapper文件夹中
容器中也自动配置好了 SqlSessionTemplate
@Mapper 标注的接口也会被自动扫描
- @MapperScan("com.atguigu.admin.mapper") 批量扫描也行(MyBatisPlus中推荐使用这种)
优点:
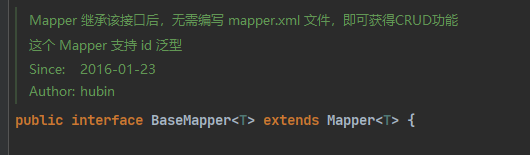
- 只需要我们的Mapper继承 BaseMapper 就可以拥有crud能力
@Mapper

public interface empMapperPlus extends BaseMapper<Emp> {

}
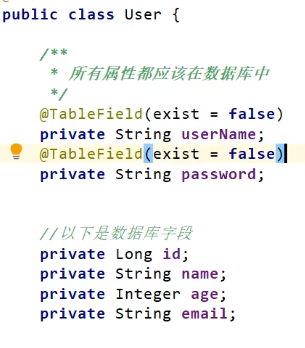
- 如果bean类中,有参数不是数据库中的元素,可以使用@TableField(exist = false)声明不是数据库中表的属性。这样表中不存在,也就不会去查询这些属性的值。
如果bean类与数据库中对应的表的名字不一致的话,可以使用@TableName进行指定。(数据库表与bean类的映射关系)
@Data

@AllArgsConstructor

@NoArgsConstructor

@TableName("tbl_emp")

public class Emp {

    private Integer emp_id;

    private String emp_name;

    private char gender;

    private String email;

    @TableField(exist = false)

    private String dept_id;

}
3、一次完整的使用流程(MyBatisPlus)
后台管理模板的数据显示与删除操作(数据库相关配置已经配置完成,上文有)
bean层(entity层):注意,如果不声明@TableName和@TableId,可能会造成绑定失败,报500的错误
@Data

@AllArgsConstructor

@NoArgsConstructor

@TableName("tbl_emp") // 将该类与数据库中tbl_emp表建立映射关系

public class Emp {

    @TableId

    private Integer empId; // 需使用注解声明主键

    private String empName;

    private String gender;

    private String email;

    @TableField(exist = false)

    private String deptId;  // 数据库表中外的数据

}
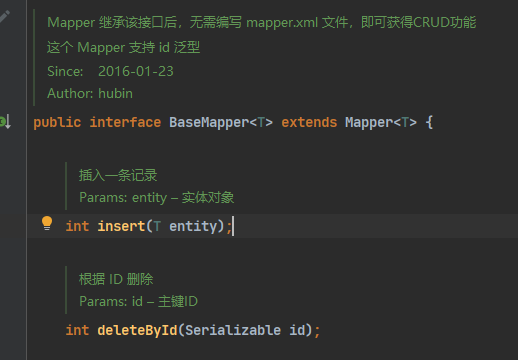
dao层:Mapper 继承BaseMapper接口后,无需编写 mapper.xml 文件,即可获得CRUD功能,需要和IService顶级service类结合使用
@Mapper // 注明@Mapper,相当于进行了mybatis自定义mapper接口扫描

public interface empMapperPlus extends BaseMapper<Emp> {

}
service层:由业务逻辑接口和业务逻辑实现类组成
service接口:继承了IService类(IService),无需手动添加CURD操作方法
public interface empServicePlus extends IService<Emp> {

}
业务逻辑实现类:同样,需要继承IService 实现类(ServiceImpl),才能使用CURD方法
@Service

public class EmpServicePlusImpl extends ServiceImpl<empMapperPlus, Emp> implements empServicePlus {

}
controller层:
@Slf4j

@Controller

public class TableController {

    @Autowired

    empServicePlus empServicePlus;

    @GetMapping("/dynamic_table")

    public String dynamic_table(@RequestParam(value = "pn", defaultValue = "1")Integer pn,

                                Model model){

//        // 表格的内容动态遍历出来

//        List<User> users = Arrays.asList(new User("zhangsan", "123456"),

//                new User("lisi", "12365"),

//                new User("wangwu", "656"),

//                new User("xiaoming", "6545465"));

//        model.addAttribute("users", users);

        // 一来到这个请求,就要从数据库中获取数据,并展示

        List<Emp> emps = empServicePlus.list();

//        log.info(emps.toString());

        for (Emp emp : emps) {

            if(emp.getGender().equals(String.valueOf('M'))) {

                emp.setGender("男");

            } else {

                emp.setGender("女");

            }

        }

        model.addAttribute("emps", emps);

        // 使用分页查询数据,必须整合分页插件(需要配置一个拦截器,见官方文档使用)

        Page<Emp> empPage = new Page<>(pn, 15);

        // 分页查询的结果

        Page<Emp> page = empServicePlus.page(empPage, null);

        List<Emp> records = page.getRecords(); // 查询结果封装在page.getRecords(),等同于 List<Emp> emps = empServicePlus.list();

        long pages = page.getPages();

        long current = page.getCurrent();

        long total = page.getTotal();

        model.addAttribute("page", page);

        return "table/dynamic_table";

    }

    @GetMapping("/emp/delete/{id}")

    public String deleteEmpById(@PathVariable("id")Long id,

                                @RequestParam("pn")Integer pn,

                                RedirectAttributes ra){

        empServicePlus.removeById(id);

        ra.addAttribute("pn", pn); // 重定向携带参数

        return "redirect:/dynamic_table";

    }

    .......

}
html
<div class="panel-body">

    <div class="adv-table">

        <table class="display table table-bordered" id="hidden-table-info">

            <thead>

                <tr>

                    <th>#</th>

                    <th>用户名</th>

                    <th>性别</th>

                    <th>邮箱</th>

                    <th>操作</th>

                </tr>

            </thead>

            <tbody>

                <tr class="gradeX" th:each="emp, status:${emps}">

                    <td th:text="${status.count}">Trident</td>

                    <td th:text="${emp.empName}">name</td>

                    <td>[[${emp.gender}]]</td>

                    <td th:text="${emp.email}">email</td>

                    <td>

                        <a th:href="@{/emp/delete/{id}(id=${emp.empId},pn=${page.current})}" class="btn btn-danger btn-sm" type="button">

                            删除

                        </a>

                    </td>

                </tr>

            </tbody>

        </table>

    </div>

    <!--                        <div class="row-fluid">-->

    <!--                            <div class="span6">-->

    <!--                                <div class="dataTables_info" id="hidden-table-info_info">-->

    <!--                                    当前第 [[${page.current}]] 页 总计 [[${page.pages}]] 页 共 [[${page.total}]] 条记录-->

    <!--                                </div>-->

    <!--                            </div>-->

    <!--                        </div>-->

</div>
3.5 NoSQL(待更新)
4、SpringBoot与单元测试
4.1 JUnit5的变化
Spring Boot 2.2.0 版本开始引入 JUnit 5 作为单元测试默认库
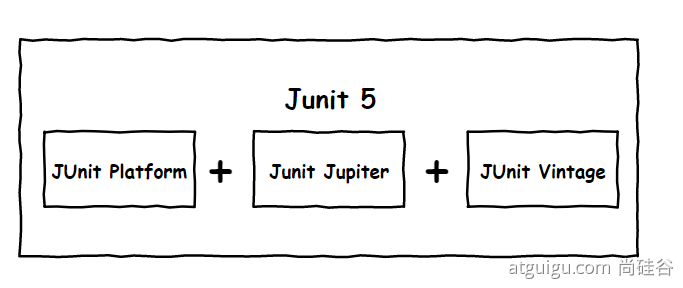
作为最新版本的JUnit框架,JUnit5与之前版本的Junit框架有很大的不同。由三个不同子项目的几个不同模块组成。
JUnit 5 = JUnit Platform + JUnit Jupiter + JUnit Vintage
JUnit Platform: Junit Platform是在JVM上启动测试框架的基础,不仅支持Junit自制的测试引擎,其他测试引擎也都可以接入。
JUnit Jupiter: JUnit Jupiter提供了JUnit5的新的编程模型,是JUnit5新特性的核心。内部包含了一个测试引擎,用于在Junit Platform上运行。
JUnit Vintage: 由于JUint已经发展多年,为了照顾老的项目,JUnit Vintage提供了兼容JUnit4.x,Junit3.x的测试引擎
注意:
SpringBoot 2.4 以上版本移除了默认对 Vintage 的依赖。如果需要兼容junit4需要自行引入(不能使用junit4的功能 @Test)
JUnit 5’s Vintage Engine Removed from spring-boot-starter-test,如果需要继续兼容junit4需要自行引入vintage
<!--兼容Junit4-->

<dependency>

    <groupId>org.junit.vintage</groupId>

    <artifactId>junit-vintage-engine</artifactId>

    <scope>test</scope>

    <exclusions>

        <exclusion>

            <groupId>org.hamcrest</groupId>

            <artifactId>hamcrest-core</artifactId>

        </exclusion>

    </exclusions>

</dependency>
使用Junit5:在项目生成的时候,spring-boot-starter-test会导入Junit的包,会默认生成了测试环境,如果需要在整个项目中使用,那么需要把test去掉。
<dependency>

  <groupId>org.springframework.boot</groupId>

  <artifactId>spring-boot-starter-test</artifactId>

  <scope>test</scope>

</dependency>
项目中会生成一个test测试环境:@SpringBootTest
@Slf4j

@SpringBootTest

class Boot05WebAdminApplicationTests {

    @Autowired

    JdbcTemplate jdbcTemplate;

    @Autowired

    DataSource dataSource;

    @Test

    void contextLoads() {

        Long aLong = jdbcTemplate.queryForObject("select count(*) from tbl_emp", Long.class);

        log.info("记录总数:{}", aLong);

        log.info("数据库连接池的类型:{}", dataSource.getClass());

    }

}
以前的老版本操作:
@SpringBootTest + @RunWith(SpringTest.class)
SpringBoot整合Junit以后:
- 编写测试方法:@Test标注(注意需要使用Junit5版本的注解)
- Junit类具有Spring的功能,@Autowired、比如 @Transactional 标注测试方法,测试完成后自动回滚
- 导入Junit5的包路径:org.junit.jupiter.api.Test
- 导入Junit4的包路径:org.junit.Test
4.2 JUnit5常用注解
JUnit5的注解与JUnit4的注解有所变化
https://junit.org/junit5/docs/current/user-guide/#writing-tests-annotations
@Test :表示方法是测试方法。但是与JUnit4的@Test不同,他的职责非常单一不能声明任何属性,拓展的测试将会由Jupiter提供额外测试
@ParameterizedTest :表示方法是参数化测试,下方会有详细介绍
@RepeatedTest :表示方法可重复执行,下方会有详细介绍
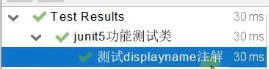
@DisplayName :为测试类或者测试方法设置展示名称
@BeforeEach :表示在每个单元测试之前执行
@AfterEach :表示在每个单元测试之后执行
@BeforeAll :表示在所有单元测试之前执行
@AfterAll :表示在所有单元测试之后执行
@Tag :表示单元测试类别,类似于JUnit4中的@Categories
@Disabled :表示测试类或测试方法不执行,类似于JUnit4中的@Ignore
@Timeout :表示测试方法运行如果超过了指定时间将会返回错误
@ExtendWith :为测试类或测试方法提供扩展类引用
@SpringBootTest:使用SpringBoot环境进行测试,使用AOP容器
@RepeatedTest:重复测试,例如@RepeatedTest(5)重复测试五次
/*@RunWith*/

/**

 * @BootstrapWith(SpringBootTestContextBootstrapper.class)

 * @ExtendWith(SpringExtension.class)

 */

//@SpringBootTest

@DisplayName("junit5功能测试类")

public class Junit5Test {

    @Autowired

    JdbcTemplate jdbcTemplate;

    /**

     * 测试前置条件

     */

    @DisplayName("测试前置条件")

    @Test

    void testassumptions(){

        Assumptions.assumeTrue(false,"结果不是true");

        System.out.println("111111");

    }

    @DisplayName("测试displayname注解")

    @Test

    void testDisplayName() {

        System.out.println(1);

        System.out.println(jdbcTemplate); //null值,只有加上@SpringBootTest注解后,才能使用SpringBoot的配置,使用AOP容器

    }

    @Disabled

    @DisplayName("测试方法2")

    @Test

    void test2() {

        System.out.println(2);

    }

    @RepeatedTest(5)

    @Test

    void test3() {

        System.out.println(5);

    }

    /**

     * 规定方法超时时间。超出时间测试出异常

     *

     * @throws InterruptedException

     */

    @Timeout(value = 500, unit = TimeUnit.MILLISECONDS)

    @Test

    void testTimeout() throws InterruptedException {

        Thread.sleep(600);

    }

    @BeforeEach

    void testBeforeEach() {

        System.out.println("测试就要开始了...");

    }

    @AfterEach

    void testAfterEach() {

        System.out.println("测试结束了...");

    }

    @BeforeAll

    static void testBeforeAll() {

        System.out.println("所有测试就要开始了...");

    }

    @AfterAll

    static void testAfterAll() {

        System.out.println("所有测试以及结束了...");

    }

}
4.3 断言(assertions)
断言(assertions)是测试方法中的核心部分,用来对测试需要满足的条件进行验证。这些断言方法都是 org.junit.jupiter.api.Assertions 的静态方法。JUnit 5 内置的断言可以分成如下几个类别:
检查业务逻辑返回的数据是否合理;
所有的测试运行结束以后,会有一个详细的测试报告;
4.3.1 简单断言
用来对单个值进行简单的验证。如:
| 方法 | 说明 |
|---|---|
| assertEquals | 判断两个对象或两个原始类型是否相等 |
| assertNotEquals | 判断两个对象或两个原始类型是否不相等 |
| assertSame | 判断两个对象引用是否指向同一个对象 |
| assertNotSame | 判断两个对象引用是否指向不同的对象 |
| assertTrue | 判断给定的布尔值是否为 true |
| assertFalse | 判断给定的布尔值是否为 false |
| assertNull | 判断给定的对象引用是否为 null |
| assertNotNull | 判断给定的对象引用是否不为 null |
| assertArrayEquals | 判断两个对象或原始类型的数组是否相等 |
//@SpringBootTest // 使用该注解,就可以使用SpringBoot的环境配置,比如AOP容器

@DisplayName("Junit5Test")

public class Junit5Test {

    @BeforeAll

    static public void beforeAll(){

        System.out.println("启动测试....");

    }

    int cal(int a, int b){

        return a + b;

    }

    /**

     * 断言:若是在方法中,前面有一个断言判断条件失败,那么后面的代码都不会执行

     */

    @Test

    @DisplayName("测试简单断言(1)")

    public void testSimpleAssertions(){

        int cal = cal(3, 4);

        // 断言的判断:错误会有提示信息,当然也可以自定义断言失败时的错误信息

        Assertions.assertEquals(6, cal, "加法结果错误");

        Object o = new Object();

        Object o1 = new Object();

        Assertions.assertSame(o, o1, "两个对象不一样");

    }

    @AfterAll

    static public void afterAll(){

        System.out.println("测试结束....");

    }

}
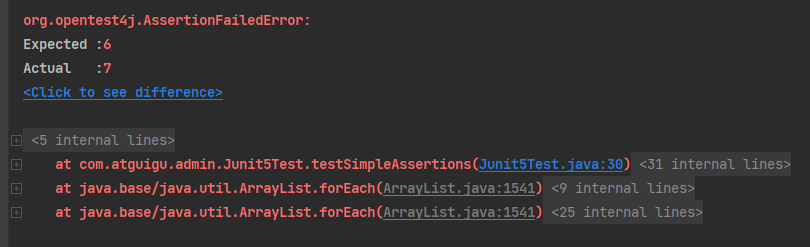
没有自定义错误信息时
自定义错误信息时
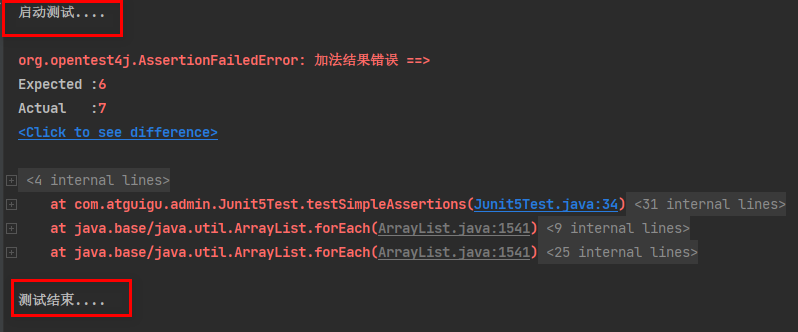
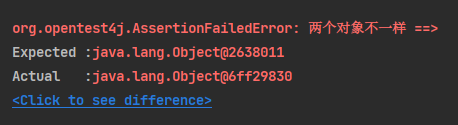
可以看到前一个断言判断条件失败后,下一个判断对象的断言并没有执行
第一个断言判断成功,往下执行下一个断言
4.3.2 组合断言
assertAll 方法接受多个 org.junit.jupiter.api.Executable 函数式接口的实例作为要验证的断言,可以通过 lambda 表达式很容易的提供这些断言。
@Test

@DisplayName("assert all")

public void all() { // 第一个参数传入组合断言的名称

 assertAll("Math",

    () -> assertEquals(2, 1 + 1),

    () -> assertTrue(1 > 0)

 );

}
4.3.3 异常断言
在JUnit4时期,想要测试方法的异常情况时,需要用@Rule注解的ExpectedException变量还是比较麻烦的。而JUnit5提供了一种新的断言方式Assertions.assertThrows() ,配合函数式编程就可以进行使用。
断定业务逻辑一定会出现异常
@Test

@DisplayName("异常测试")

public void exceptionTest() { //断定业务逻辑一定会出现异常

    ArithmeticException exception = Assertions.assertThrows(

           //扔出断言异常

            ArithmeticException.class, () -> System.out.println(1 % 0));

   // 另一种写法

    assertThrows(ArithmeticException.class, ()->{

        int i = 10/2;

    }, "业务逻辑仍然在执行中.....");

}
4.3.4 超时断言
Junit5还提供了Assertions.assertTimeout() 为测试方法设置了超时时间
@Test

@DisplayName("超时测试")

public void timeoutTest() {

    //如果测试方法时间超过1s将会异常

    Assertions.assertTimeout(Duration.ofMillis(1000), () -> Thread.sleep(500));

}
4.3.5 快速失败
通过 fail 方法直接使得测试失败
@Test

@DisplayName("快速失败")

public void shouldFail() {

    // 快速失败

    if(1 == 1) {

        fail("测试失败");

    }

}
4.4 前置条件(assumptions)
JUnit 5 中的前置条件(assumptions【假设】)类似于断言,不同之处在于不满足的断言会使得测试方法失败,而不满足的前置条件只会使得测试方法的执行终止。前置条件可以看成是测试方法执行的前提,当该前提不满足时,就没有继续执行的必要,就跳过。
@DisplayName("前置条件")

@Test

public void assumptionsTest(){

    assumeTrue(false, "前置执行条件不满足");

    System.out.println("执行程序中.......");

}
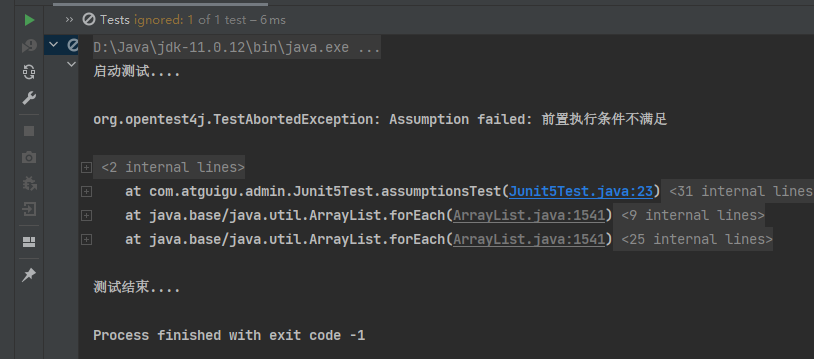
当前置条件不满足时,只是不执行,打印信息,执行结束(相当于跳过)。并不会像断言那样报错。
4.5 嵌套测试(assumptions)
JUnit 5 可以通过 Java 中的内部类和@Nested 注解实现嵌套测试,从而可以更好的把相关的测试方法组织在一起。在内部类中可以使用@BeforeEach 和@AfterEach 注解,而且嵌套的层次没有限制。
@Nested:注明这是一个嵌套测试类
下面的例子好好看看,帮助理解:
@DisplayName("A stack")

class TestingAStackDemo {

    Stack<Object> stack; // 并没有创建一个对象实例

    @Test

    @DisplayName("new Stack()")

    void isInstantiatedWithNew() {

        new Stack<>();

        // 嵌套测试的情况下,外层的Test不能驱动内层测试类的方法(如BeforeEach等)

        assertNotNull(stack); // false,stack为null,这条断言条件不成立,报错

    }

    @Nested // 这是一个嵌套测试

    @DisplayName("when new")

    class WhenNew {

        @BeforeEach

        void createNewStack() {

            stack = new Stack<>();

        }

        @Test

        @DisplayName("is empty")

        void isEmpty() { //@BeforeEach会创建一个栈的实例,但现在栈中没有元素,所以是empty的

            assertTrue(stack.isEmpty());// true

        }

        @Test

        @DisplayName("throws EmptyStackException when popped")

        void throwsExceptionWhenPopped() {

            // 由于栈空,执行不了pop操作,肯定会抛出栈空的异常,所以这条断言能顺利执行

            assertThrows(EmptyStackException.class, stack::pop);

        }

        @Test

        @DisplayName("throws EmptyStackException when peeked")

        void throwsExceptionWhenPeeked() {

            //栈为空,想查看第一个元素,必定会抛出栈空的异常。这也是我们希望的,所以也是能够执行的,断言是成功的

            assertThrows(EmptyStackException.class, stack::peek);

        }

        @Nested

        @DisplayName("after pushing an element")

        class AfterPushing {

            String anElement = "an element";

            @BeforeEach

            void pushAnElement() {// 注意这个嵌套方法,测试之前添加了元素,而栈的实例化,是已经在外层测试中创建了。也就是内层Test能够驱动外层的Test

                stack.push(anElement);

            }

            @Test

            @DisplayName("it is no longer empty")

            void isNotEmpty() {// 此时栈中已经有元素了,不再为空

                assertFalse(stack.isEmpty());// 当前断言成功,即栈不是空栈

            }

            @Test

            @DisplayName("returns the element when popped and is empty")

            void returnElementWhenPopped() {

                assertEquals(anElement, stack.pop());// 一定等于

                assertTrue(stack.isEmpty());// 因为出栈了,所以栈一定为空,断言成功

            }

            @Test

            @DisplayName("returns the element when peeked but remains not empty")

            void returnElementWhenPeeked() {

                assertEquals(anElement, stack.peek());//只查看元素,不弹出移除元素

                assertFalse(stack.isEmpty());// 所以当前栈肯定不为空,断言成功

            }

        }

    }

}
- 嵌套测试的情况下,外层的Test不能驱动内层测试类的方法(如BeforeEach等)
- 而内层Test能够驱动外层的Test
4.6 参数化测试
参数化测试是JUnit5很重要的一个新特性,可以用不同的参数多次运行测试。
利用@ValueSource等注解,指定入参,我们将可以使用不同的参数进行多次单元测试,而不需要每新增一个参数就新增一个单元测试。
参数测试的一些注解:
@ParameterizedTest:这是一个参数化测试(必须注明)
@ValueSource: 为参数化测试指定入参来源,支持八大基础类以及String类型,Class类型
@NullSource: 表示为参数化测试提供一个null的入参
@EnumSource: 表示为参数化测试提供一个枚举入参
@CsvFileSource:表示读取指定CSV文件内容作为参数化测试入参
@MethodSource:表示读取指定方法的返回值作为参数化测试入参(注意方法返回需要是一个流)
    @ParameterizedTest

    @DisplayName("参数化测试")

    @ValueSource(ints = {1,2,3,4,5})

    public void parameterizedTest(int i){

        System.out.println(i);

    }

    @ParameterizedTest

    @DisplayName("参数化测试2")

    @MethodSource("stringProvider")

    public void parameterizedTest2(String str){

        System.out.println(str);

    }

    static Stream<String> stringProvider(){

        return Stream.of("apple", "banana", "orange");

    }
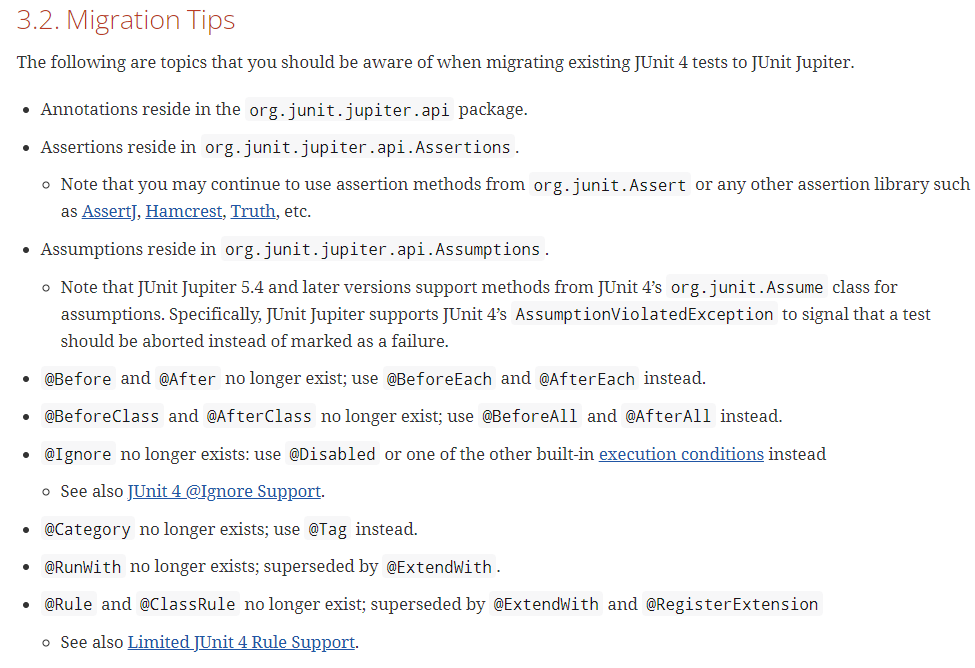
4.7 迁移指南
5、指标监控(SpringBoot Actuator)
5.1 简介
未来每一个微服务在云上部署以后,我们都需要对其进行监控、追踪、审计、控制等。SpringBoot就抽取了Actuator场景,使得我们每个微服务快速引用即可获得生产级别的应用监控、审计等功能。
<dependency>

    <groupId>org.springframework.boot</groupId>

    <artifactId>spring-boot-starter-actuator</artifactId>

</dependency>
5.2 如何使用
引入场景(starter)
访问 http://localhost:8080/actuator/**(注意actuator前缀)
监控端点
默认在web中只开启了health这个端点,JMX开启的可以去Jconsol查看
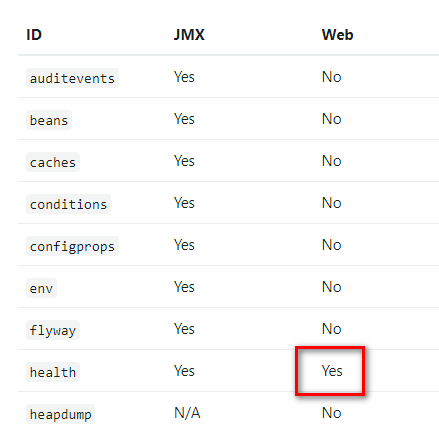
暴露所有监控信息为HTTP(给web方式开启监控端点)
在配置管理文件文件yaml或properties中进行配置:
management:

  endpoints:

    enabled-by-default: true # 默认开启所有端点

    web:

      exposure:

        include: '*'  # 以web方式暴露
测试
http://localhost:8080/actuator/beans
http://localhost:8080/actuator/configprops
http://localhost:8080/actuator/metrics
http://localhost:8080/actuator/metrics/jvm.gc.pause
http://localhost:8080/actuator/endpointName/detailPath
5.3 常用端点
| ID | 描述 |
|---|---|
auditevents |
暴露当前应用程序的审核事件信息。需要一个AuditEventRepository组件。 |
beans |
显示应用程序中所有Spring Bean的完整列表。 |
caches |
暴露可用的缓存。 |
conditions |
显示自动配置的所有条件信息,包括匹配或不匹配的原因。 |
configprops |
显示所有@ConfigurationProperties。 |
env |
暴露Spring的属性ConfigurableEnvironment |
flyway |
显示已应用的所有Flyway数据库迁移。 需要一个或多个Flyway组件。 |
health |
显示应用程序运行状况信息。 |
httptrace |
显示HTTP跟踪信息(默认情况下,最近100个HTTP请求-响应)。需要一个HttpTraceRepository组件。 |
info |
显示应用程序信息。 |
integrationgraph |
显示Spring integrationgraph 。需要依赖spring-integration-core。 |
loggers |
显示和修改应用程序中日志的配置。 |
liquibase |
显示已应用的所有Liquibase数据库迁移。需要一个或多个Liquibase组件。 |
metrics |
显示当前应用程序的“指标”信息。 |
mappings |
显示所有@RequestMapping路径列表。 |
scheduledtasks |
显示应用程序中的计划任务。 |
sessions |
允许从Spring Session支持的会话存储中检索和删除用户会话。需要使用Spring Session的基于Servlet的Web应用程序。 |
shutdown |
使应用程序正常关闭。默认禁用。 |
startup |
显示由ApplicationStartup收集的启动步骤数据。需要使用SpringApplication进行配置BufferingApplicationStartup。 |
threaddump |
执行线程转储。 |
如果您的应用程序是Web应用程序(Spring MVC,Spring WebFlux或Jersey),则可以使用以下附加端点:
| ID | 描述 |
|---|---|
heapdump |
返回hprof堆转储文件。 |
jolokia |
通过HTTP暴露JMX bean(需要引入Jolokia,不适用于WebFlux)。需要引入依赖jolokia-core。 |
logfile |
返回日志文件的内容(如果已设置logging.file.name或logging.file.path属性)。支持使用HTTPRange标头来检索部分日志文件的内容。 |
prometheus |
以Prometheus服务器可以抓取的格式公开指标。需要依赖micrometer-registry-prometheus。 |
最常用的Endpoint
Health:监控状况
Metrics:运行时指标
Loggers:日志记录
5.4 Health Endpoint
健康检查端点,我们一般用于在云平台,平台会定时的检查应用的健康状况,我们就需要Health Endpoint可以为平台返回当前应用的一系列组件健康状况的集合。
http://localhost:8080/actuator/health
重要的几点:
health endpoint返回的结果,应该是一系列健康检查后的一个总汇总报告
很多的健康检查默认已经自动配置好了,比如:数据库、redis等
可以很容易的添加自定义的健康检查机制
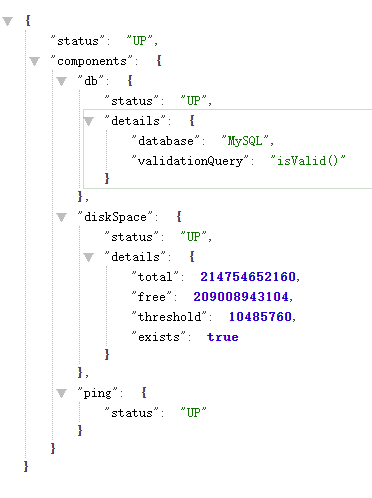
在yaml或者properties中的配置文件
# management:是所有actuator的配置

# management.endpoint.端口名.xxx 对某个端点的具体配置

management:

  endpoints: # 所有端点的设置

    enabled-by-default: false # 默认是开启所有端点 true(相当于总开关)

    web:

      exposure:

        include: '*'  # 以web方式暴露

  endpoint: # 单个端点的设置

    health:

      show-details: always

      enabled: true

    beans:

      enabled: true # 如果关闭总开关的话,就要分别挨个开启组件

    metrics:

      enabled: true
5.5 Metrics Endpoint
提供详细的、层级的、空间指标信息,这些信息可以被pull(主动推送)或者push(被动获取)方式得到;
通过Metrics对接多种监控系统
简化核心Metrics开发
添加自定义Metrics或者扩展已有Metrics
测试:
访问:http://localhost:8080/actuator/metrics/
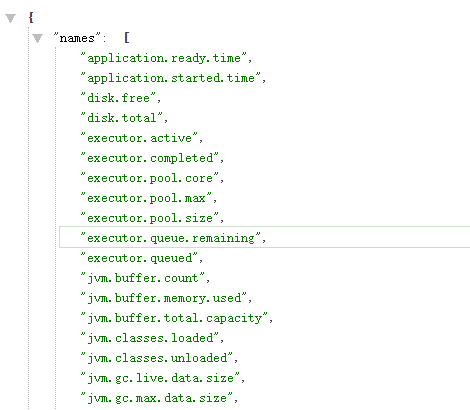
进一步查看某行的具体信息,如jvm.buffer.memory.used
http://localhost:8080/actuator/metrics/jvm.buffer.memory.used
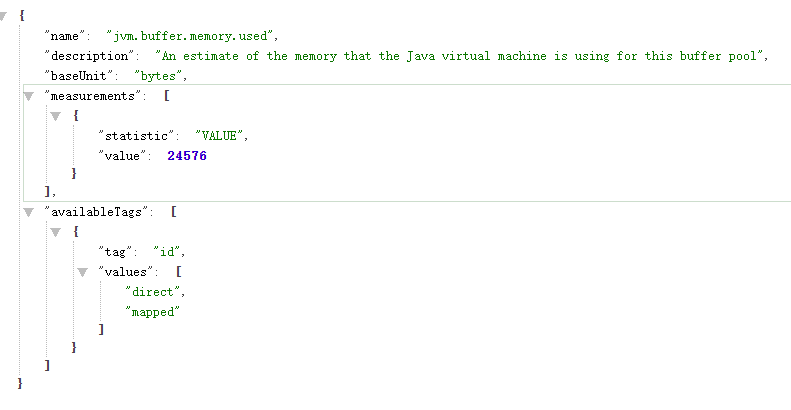
5.6 定制EndPoint
5.6.1 定制Health信息
继承 extends AbstractHealthIndicator
@Component

public class MyComHealthIndicator extends AbstractHealthIndicator {

    /**

     * 真实的检查方法

     * @param builder

     * @throws Exception

     */

    @Override

    protected void doHealthCheck(Health.Builder builder) throws Exception {

        //mongodb。  获取连接进行测试

        Map<String,Object> map = new HashMap<>();

        // 检查完成

        if(1 == 1){

//            builder.up(); //健康

            builder.status(Status.UP);

            map.put("count",1);

            map.put("ms",100);

        }else {

//            builder.down();

            builder.status(Status.OUT_OF_SERVICE);

            map.put("err","连接超时");

            map.put("ms",3000);

        }

        builder.withDetail("code",100)

                .withDetails(map);

    }

}
management:

    health:

      enabled: true

      show-details: always #总是显示详细信息。可显示每个模块的状态信息
5.6.2 定制info信息
http://localhost:8080/actuator/info 会输出所有的info信息
一般常用有两种方式:
通过配置文件定制
info:

  appName: SpringBoot-Admin

  appVersion: 1.0.0

  mavenProjectName: "@project.artifactId@" #使用@@可以获取maven的pom文件值

  mavenProjectVersion: "@project.version@"
实现InfoContributor接口
@Component

public class AppInfoInfoContributor implements InfoContributor {

    @Override

    public void contribute(Info.Builder builder) {

        builder.withDetail("msg","你好")

                .withDetail("hello","atguigu")

                .withDetails(Collections.singletonMap("world","666600"));

    }

}
5.6.3 定制Metrics信息
1、SpringBoot支持自动适配的Metrics
JVM metrics, report utilization of:
- Various memory and buffer pools
- Statistics related to garbage collection
- Threads utilization
- Number of classes loaded/unloaded
CPU metrics
File descriptor metrics
Kafka consumer and producer metrics
Log4j2 metrics: record the number of events logged to Log4j2 at each level
Logback metrics: record the number of events logged to Logback at each level
Uptime metrics: report a gauge for uptime and a fixed gauge representing the application’s absolute start time
Tomcat metrics (
server.tomcat.mbeanregistry.enabledmust be set totruefor all Tomcat metrics to be registered)Spring Integration metrics
2、增加定制Metrics
class MyService{

    Counter counter;

    public MyService(MeterRegistry meterRegistry){

         counter = meterRegistry.counter("myservice.method.running.counter");

    }

    public void hello() {

        counter.increment();

    }

}

//也可以使用下面的方式

@Bean

MeterBinder queueSize(Queue queue) {

    return (registry) -> Gauge.builder("queueSize", queue::size).register(registry);

}
5.6.4 定制Endpoint
@Component

@Endpoint(id = "myservice")

public class MyServiceEndPoint {

    @ReadOperation

    public Map getDockerInfo(){

        //端点的读操作  http://localhost:8080/actuator/myservice

        return Collections.singletonMap("dockerInfo","docker started.....");

    }

    @WriteOperation

    public void stopDocker(){

        System.out.println("docker stopped.....");

    }

}
6、Boot-Admin-Server
https://github.com/codecentric/spring-boot-admin
开源的可视化监控平台
客户端:
  boot:

    admin:

      client:

        url: http://localhost:8888

        instance:

          prefer-ip: true  #使用ip注册进来

  application: # 应用名称

    name: boot-05-web-admin
【03】SpringBoot2核心技术-核心功能—数据访问_单元测试_指标监控的更多相关文章
- oracle ebs应用产品安全性-数据访问权限集
定义 数据访问权限集是一个重要的.必须设定的系统配置文件选项.对具有相同科目表.日历和期间类型的分类帐及其所有平衡段值或管理段值的定义读写权限,系统管理员将其分配至不同的责任以控制不同的责任对分类帐数 ...
- discuz论坛apache日志hadoop大数据分析项目:清洗数据核心功能解说及代码实现
discuz论坛apache日志hadoop大数据分析项目:清洗数据核心功能解说及代码实现http://www.aboutyun.com/thread-8637-1-1.html(出处: about云 ...
- 存储更弹性,详解 Fluid “ECI 环境数据访问” 新功能
近期,Fluid 支持了阿里云 ECI 应用,并将 JuiceFS Runtime Controller 设置为默认安装:JuiceFS 也就此功能与 Fluid 完成了集成和测试工作. 用户可以在 ...
- ado.net 实体类_数据访问类
实体类: using System; using System.Collections.Generic; using System.Linq; using System.Text; namespace ...
- php数据访问:pdo用法、事物回滚功能和放sql注入功能
PDO: 一.含义: 数据访问抽象层 二.作用 通过PDO能够访问其它的数据库 三. 用法: 1.造对象 ① $pdo ...
- PDO(数据访问抽象层)、pdo事务功能和预处理功能---2017-05-05
之前所学的数据访问都是用mysqli做成类来访问的,但是mysqli这个类只是针对mysql这个数据库的:那么如果访问其他类型的数据库呢? 那么这就用到了PDO(数据访问抽象层). 一.关于PDO基本 ...
- PHP中关于PDO数据访问抽象层的功能操作
PDO:数据访问抽象层 具有三大特点: 1.可以访问其它数据库 所有数据库都可以 2.具有事务功能 3.带有预处理语句功能(防止SQL注入攻击) 实例操作代码如下: <?php //1.造PD ...
- springboot核心技术(四)-----Docker、数据访问、自定义starter
Docker 1.简介 Docker是一个开源的应用容器引擎:是一个轻量级容器技术: Docker支持将软件编译成一个镜像:然后在镜像中各种软件做好配置,将镜像发布出去,其他使用者可以直接使 用这个镜 ...
- 【01】SpringBoot2核心技术-基础入门
SpringBoot 2 1. SpringBoot2核心技术-基础入门 01 Spring与SpringBoot 1.Spring 能做什么 1.1 Spring的能力 微服务:将一个应用的所有功能 ...
随机推荐
- typora使用快捷键
1. Ctrl+/ 切换源码模式2. ```css 选择语言 回车.4. `code` ctrl+shit+` 5. # 1号标题 ctrl+1 ### 3号标题 ctrl+3 ######6号标题 ...
- IDEA 使用rest client测试
一.进入 rest 控制台 idea 导航栏 ==> Tools ==> HTTP Client ==> Test RESTFUL Web Service 如图: 一般来说,idea ...
- Markdown随时记录
Markdown学习 推荐文本编译器 Typora 标题(支持六级) 一级标题:# + 空格 + 内容 二级标题:## + 空格 + 内容 三级标题:### + 空格 + 内容 . . . 字体 粗体 ...
- SQLyog 社区免费版下载
SQLyog 是一个快速而简洁的图形化管理MYSQL数据库的工具,它能够在任何地点有效地管理你的数据库,由业界著名的Webyog公司出品.使用SQLyog可以快速直观地让您从世界的任何角落通过网络来维 ...
- 【死磕Java并发】—–深入分析volatile的实现原理
通过前面一章我们了解了synchronized是一个重量级的锁,虽然JVM对它做了很多优化,而下面介绍的volatile则是轻量级的synchronized.如果一个变量使用volatile,则它比使 ...
- (转)synchronize线程同步例子
在CSDN开了博客后,一直也没在上面发布过文章,直到前一段时间与一位前辈的对话,才发现技术博客的重要,立志要把CSDN的博客建好.但一直没有找到好的开篇的主题,今天再看JAVA线程互斥.同步的时候又有 ...
- LuoguP7426 [THUPC2017] 体育成绩统计 题解
Update \(\texttt{2021.3.11}\) 修复了一个笔误. Content 太长了,请直接跳转回题面查看. 数据范围:\(n\leqslant 10^4\),\(0\leqslant ...
- Solon 1.6.10 重要发布,现在有官网喽!
关于官网 千呼万唤始出来: https://solon.noear.org .整了一个月多了,总体样子有了...还得不断接着整! 关于 Solon Solon 是一个轻量级应用开发框架.支持 Web. ...
- RuoYi项目整合Mybatis-Plus 框架
RuoYi框架默认使用的是Mybatis框架 但是有的习惯使用MP框架,这就很不方便, 不过可以简单进行整合 引入依赖 <dependency> <groupId>com.ba ...
- SpringBoot整合nacos启动报错:java.lang.NoClassDefFoundError: org/springframework/boot/context/properties/ConfigurationBeanFactoryMetadata
报错信息 org.springframework.beans.factory.BeanCreationException: Error creating bean with name 'nacosCo ...