SpringBoot之oauth2.0学习之服务端配置快速上手
现在第三方登录的例子数见不鲜。其实在这种示例当中,oauth2.0是使用比较多的一种授权登录的标准。oauth2.0也是从oauth1.0升级过来的。那么关于oauth2.0相关的概念及其原理,大家可以参考这篇文章,这篇文章中会有更详细的解释,下来我们直接进入正题。
1.1、gradle依赖
      compile('org.springframework.cloud:spring-cloud-starter-oauth2')

      compile('org.springframework.cloud:spring-cloud-starter-security')
在这里我直接引入的是spring-cloud的依赖项,这种依赖的jar包更全面一些,这里面的核心基础还是spring-security。这里SpringBoot的版本为2.0.6.REALEASE
1.2、@EnableAuthorizationServer
在这里我着重强调一下这个注解:@EnableAuthorizationServer,这个注解源代码如下:
    @Target(ElementType.TYPE)

    @Retention(RetentionPolicy.RUNTIME)

    @Documented

    @Import({AuthorizationServerEndpointsConfiguration.class, AuthorizationServerSecurityConfiguration.class})

    public @interface EnableAuthorizationServer {

    }
这个注解主要是导入两个配置类,分别是:
AuthorizationServerEndpointsConfiguration,这个配置类主要配置授权端点,获取token的端点。大家就把对应的端点想象成controller即可,在这个controller下开放了若干个@RequestMapping,比如常见的有:/oauth/authorize(授权路径),/oauth/token(获取token)等AuthorizationServerSecurityConfiguration,主要是做spring-security的安全配置,我们可以看一下相关代码:
      public class AuthorizationServerSecurityConfiguration extends WebSecurityConfigurerAdapter {

         @Autowired

      	private List<AuthorizationServerConfigurer> configurers = Collections.emptyList();

      	@Autowired

      	private ClientDetailsService clientDetailsService;

      	@Autowired

      	private AuthorizationServerEndpointsConfiguration endpoints;

      	@Autowired

      	public void configure(ClientDetailsServiceConfigurer clientDetails) throws Exception {

      		for (AuthorizationServerConfigurer configurer : configurers) {

      			configurer.configure(clientDetails);

      		}

      	}

      	@Override

      	protected void configure(AuthenticationManagerBuilder auth) throws Exception {

      		// Over-riding to make sure this.disableLocalConfigureAuthenticationBldr = false

      		// This will ensure that when this configurer builds the AuthenticationManager it will not attempt

      		// to find another 'Global' AuthenticationManager in the ApplicationContext (if available),

      		// and set that as the parent of this 'Local' AuthenticationManager.

      		// This AuthenticationManager should only be wired up with an AuthenticationProvider

      		// composed of the ClientDetailsService (wired in this configuration) for authenticating 'clients' only.

      	}

      	@Override

      	protected void configure(HttpSecurity http) throws Exception {

      		//....省略部分代码

      		String tokenEndpointPath = handlerMapping.getServletPath("/oauth/token");

      		String tokenKeyPath = handlerMapping.getServletPath("/oauth/token_key");

      		String checkTokenPath = handlerMapping.getServletPath("/oauth/check_token");

      		if (!endpoints.getEndpointsConfigurer().isUserDetailsServiceOverride()) {

      			UserDetailsService userDetailsService = http.getSharedObject(UserDetailsService.class);

      			endpoints.getEndpointsConfigurer().userDetailsService(userDetailsService);

      		}

      		// @formatter:off

              //上述节点的请求需要授权验证

      		http

              	.authorizeRequests()

                  	.antMatchers(tokenEndpointPath).fullyAuthenticated()

                  	.antMatchers(tokenKeyPath).access(configurer.getTokenKeyAccess())

                  	.antMatchers(checkTokenPath).access(configurer.getCheckTokenAccess())

              .and()

              	.requestMatchers()

                  	.antMatchers(tokenEndpointPath, tokenKeyPath, checkTokenPath)

              .and()

              	.sessionManagement().sessionCreationPolicy(SessionCreationPolicy.NEVER);

      		// @formatter:on

      		http.setSharedObject(ClientDetailsService.class, clientDetailsService);

      	}

      	protected void configure(AuthorizationServerSecurityConfigurer oauthServer) throws Exception {

      		for (AuthorizationServerConfigurer configurer : configurers) {

      			configurer.configure(oauthServer);

      		}

      	}

      }
1.2.1、AuthorizationServerConfigurer
这个接口是认证授权配置的核心接口,不过既然是SpringBoot我们就先来看看它怎么帮我们装配的,我们可以在org.springframework.boot.autoconfigure.security.oauth2.authserver这个包下面找到对应配置的Bean:
    @Configuration

    @ConditionalOnClass(EnableAuthorizationServer.class)

    @ConditionalOnMissingBean(AuthorizationServerConfigurer.class)

    @ConditionalOnBean(AuthorizationServerEndpointsConfiguration.class)

    @EnableConfigurationProperties(AuthorizationServerProperties.class)

    public class OAuth2AuthorizationServerConfiguration

    		extends AuthorizationServerConfigurerAdapter {

    	//....

        @Override

    	public void configure(ClientDetailsServiceConfigurer clients) throws Exception {

            //默认基于内存创建ClientDetails

    		ClientDetailsServiceBuilder<InMemoryClientDetailsServiceBuilder>.ClientBuilder builder = clients

    				.inMemory().withClient(this.details.getClientId());

    		builder.secret(this.details.getClientSecret())

    				.resourceIds(this.details.getResourceIds().toArray(new String[0]))

    				.authorizedGrantTypes(

    						this.details.getAuthorizedGrantTypes().toArray(new String[0]))

    				.authorities(

    						AuthorityUtils.authorityListToSet(this.details.getAuthorities())

    								.toArray(new String[0]))

    				.scopes(this.details.getScope().toArray(new String[0]));

    		if (this.details.getAutoApproveScopes() != null) {

    			builder.autoApprove(

    					this.details.getAutoApproveScopes().toArray(new String[0]));

    		}

    		if (this.details.getAccessTokenValiditySeconds() != null) {

    			builder.accessTokenValiditySeconds(

    					this.details.getAccessTokenValiditySeconds());

    		}

    		if (this.details.getRefreshTokenValiditySeconds() != null) {

    			builder.refreshTokenValiditySeconds(

    					this.details.getRefreshTokenValiditySeconds());

    		}

    		if (this.details.getRegisteredRedirectUri() != null) {

    			builder.redirectUris(

    					this.details.getRegisteredRedirectUri().toArray(new String[0]));

    		}

    	}

    	@Override

    	public void configure(AuthorizationServerEndpointsConfigurer endpoints)

    			throws Exception {

    		if (this.tokenConverter != null) {

    			endpoints.accessTokenConverter(this.tokenConverter);

    		}

    		if (this.tokenStore != null) {

    			endpoints.tokenStore(this.tokenStore);

    		}

    		if (this.details.getAuthorizedGrantTypes().contains("password")) {

    			endpoints.authenticationManager(this.authenticationManager);

    		}

    	}

    	@Override

    	public void configure(AuthorizationServerSecurityConfigurer security)

    			throws Exception {

    		security.passwordEncoder(NoOpPasswordEncoder.getInstance());

    		if (this.properties.getCheckTokenAccess() != null) {

    			security.checkTokenAccess(this.properties.getCheckTokenAccess());

    		}

    		if (this.properties.getTokenKeyAccess() != null) {

    			security.tokenKeyAccess(this.properties.getTokenKeyAccess());

    		}

    		if (this.properties.getRealm() != null) {

    			security.realm(this.properties.getRealm());

    		}

    	}

    	@Configuration

    	@ConditionalOnMissingBean(BaseClientDetails.class)

    	protected static class BaseClientDetailsConfiguration {

    		private final OAuth2ClientProperties client;

    		protected BaseClientDetailsConfiguration(OAuth2ClientProperties client) {

    			this.client = client;

    		}

            /**

            	由此可知它会寻找security.oauth2.client的配置

            */

    		@Bean

    		@ConfigurationProperties(prefix = "security.oauth2.client")

    		public BaseClientDetails oauth2ClientDetails() {

    			BaseClientDetails details = new BaseClientDetails();

    			if (this.client.getClientId() == null) {

    				this.client.setClientId(UUID.randomUUID().toString());

    			}

    			details.setClientId(this.client.getClientId());

    			details.setClientSecret(this.client.getClientSecret());

    			details.setAuthorizedGrantTypes(Arrays.asList("authorization_code",

    					"password", "client_credentials", "implicit", "refresh_token"));

    			details.setAuthorities(

    					AuthorityUtils.commaSeparatedStringToAuthorityList("ROLE_USER"));

    			details.setRegisteredRedirectUri(Collections.<String>emptySet());

    			return details;

    		}

    	}

    }
如果没有用spring-boot的用户,可以也可以参考上述的配置方法,自行配置
1.3、application.yml的配置
根据上述代码我们可以知道,springboot通过外部化配置的security.oauth2.client的前缀来配置客户端。那么因此我们不妨在外部化配置文件里做如下配置:
    server:

      port: 8080

    security:

      oauth2:

        client:

          client-id: root

          client-secret: root

          scope:

            - email

            - username

            - face

    spring:

      security:

        user:

          name: root

          password: root

          roles: ADMIN
这里先做最基本的配置,配置client-id,client-secret,scope。特别注意oauth2.0一定要先经过springsecurity的auth认证,因此需要在这里配置一个内存用户名与密码为root与root
1.4、配置资源服务器
通过资源服务器来保护我们指定的资源,必须在获取授权认证的时候才能访问。在SpringBoot当中,我们可以通过@EnableResourceServer注解来开启此功能。该注解定义如下:
    @Target(ElementType.TYPE)

    @Retention(RetentionPolicy.RUNTIME)

    @Documented

    @Import(ResourceServerConfiguration.class)

    public @interface EnableResourceServer {

    }
我们可以看到这个注解导入了默认的资源配置信息:ResourceServerConfiguration,它的源代码如下:
    @Configuration

    public class ResourceServerConfiguration extends WebSecurityConfigurerAdapter implements Ordered {

        //....

        	@Override

    	protected void configure(HttpSecurity http) throws Exception {

    		ResourceServerSecurityConfigurer resources = new ResourceServerSecurityConfigurer();

    		ResourceServerTokenServices services = resolveTokenServices();

    		if (services != null) {

    			resources.tokenServices(services);

    		}

    		else {

    			if (tokenStore != null) {

    				resources.tokenStore(tokenStore);

    			}

    			else if (endpoints != null) {

    				resources.tokenStore(endpoints.getEndpointsConfigurer().getTokenStore());

    			}

    		}

    		if (eventPublisher != null) {

    			resources.eventPublisher(eventPublisher);

    		}

            //配置资源

    		for (ResourceServerConfigurer configurer : configurers) {

    			configurer.configure(resources);

    		}

    		// @formatter:off

    		http.authenticationProvider(new AnonymousAuthenticationProvider("default"))

    		// N.B. exceptionHandling is duplicated in resources.configure() so that

    		// it works

    		.exceptionHandling()

    				.accessDeniedHandler(resources.getAccessDeniedHandler()).and()

    				.sessionManagement()

    				.sessionCreationPolicy(SessionCreationPolicy.STATELESS).and()

    				.csrf().disable();

    		// @formatter:on

    		http.apply(resources);

    		if (endpoints != null) {

    			// Assume we are in an Authorization Server

    			http.requestMatcher(new NotOAuthRequestMatcher(endpoints.oauth2EndpointHandlerMapping()));

    		}

    		for (ResourceServerConfigurer configurer : configurers) {

    			// Delegates can add authorizeRequests() here

    			configurer.configure(http);

    		}

            //如果没有任何配置资源,则所有请求保护

    		if (configurers.isEmpty()) {

    			// Add anyRequest() last as a fall back. Spring Security would

    			// replace an existing anyRequest() matcher with this one, so to

    			// avoid that we only add it if the user hasn't configured anything.

    			http.authorizeRequests().anyRequest().authenticated();

    		}

    	}

        //....

    }
在这里主要是配置资源服务器的配置,我们可以得到如下几点信息:
- 资源配置的核心
ResourceServerConfigurer,在这里如果没有任何配置,则所有请求都要进行token认证 TokenStore主要定义了对token的增删改查操作,用于持久化tokenResourceServerTokenServices资源服务的service(服务层),这里主要还是根据token来拿到OAuth2Authentication与OAuth2AccessToken
1.5、完整示例
1.5.1、资源认证配置
    @Configuration

    @EnableResourceServer

    public class ResourceConfigure extends ResourceServerConfigurerAdapter {

        @Override

        public void configure(HttpSecurity http) throws Exception {

            http.csrf().disable().sessionManagement().sessionCreationPolicy(SessionCreationPolicy.IF_REQUIRED)

                    .and().authorizeRequests().antMatchers("/free/**").permitAll().and()

                    .authorizeRequests().anyRequest().authenticated()

                    .and().formLogin().permitAll();//必须认证过后才可以访问

        }

    }
在这里如果以/free/**请求路径的,都允许直接访问。否则,都必须携带access_token才能访问。
1.5.2 、授权认证配置
    @Configuration

    public class WebSecurityConfig extends WebSecurityConfigurerAdapter {

        @Override

        protected void configure(HttpSecurity http) throws Exception {

            http.csrf().disable().requestMatchers().anyRequest().and().authorizeRequests()

                    .antMatchers("/oauth/*").authenticated().and().formLogin().permitAll();

        }

    }
根据上文所述,AuthorizationServerEndpoint与TokenEndpoint会开放/oauth/authorize与/oauth/token端点,因此我们必须保证访问端点进行授权认证前,通过springsecurity的用户认证,因此在这里配置了/oauth/*
1.5.3、启动类
    @SpringBootApplication

    @EnableAuthorizationServer

    @Controller

    public class AuthorizationServer {

       @GetMapping("/order")

        public ResponseEntity<String> order() {

            ResponseEntity<String> responseEntity = new ResponseEntity("order", HttpStatus.OK);

            return responseEntity;

        }

        @GetMapping("/free/test")

        public ResponseEntity<String> test() {

            ResponseEntity<String> responseEntity = new ResponseEntity("free", HttpStatus.OK);

            return responseEntity;

        }

         public static void main(String[] args) {

            SpringApplication.run(AuthorizationServer.class, args);

        }

    }
1.5.4、访问请求
首先我们通过postman 访问http://localhost:8080/order会得到如下界面:
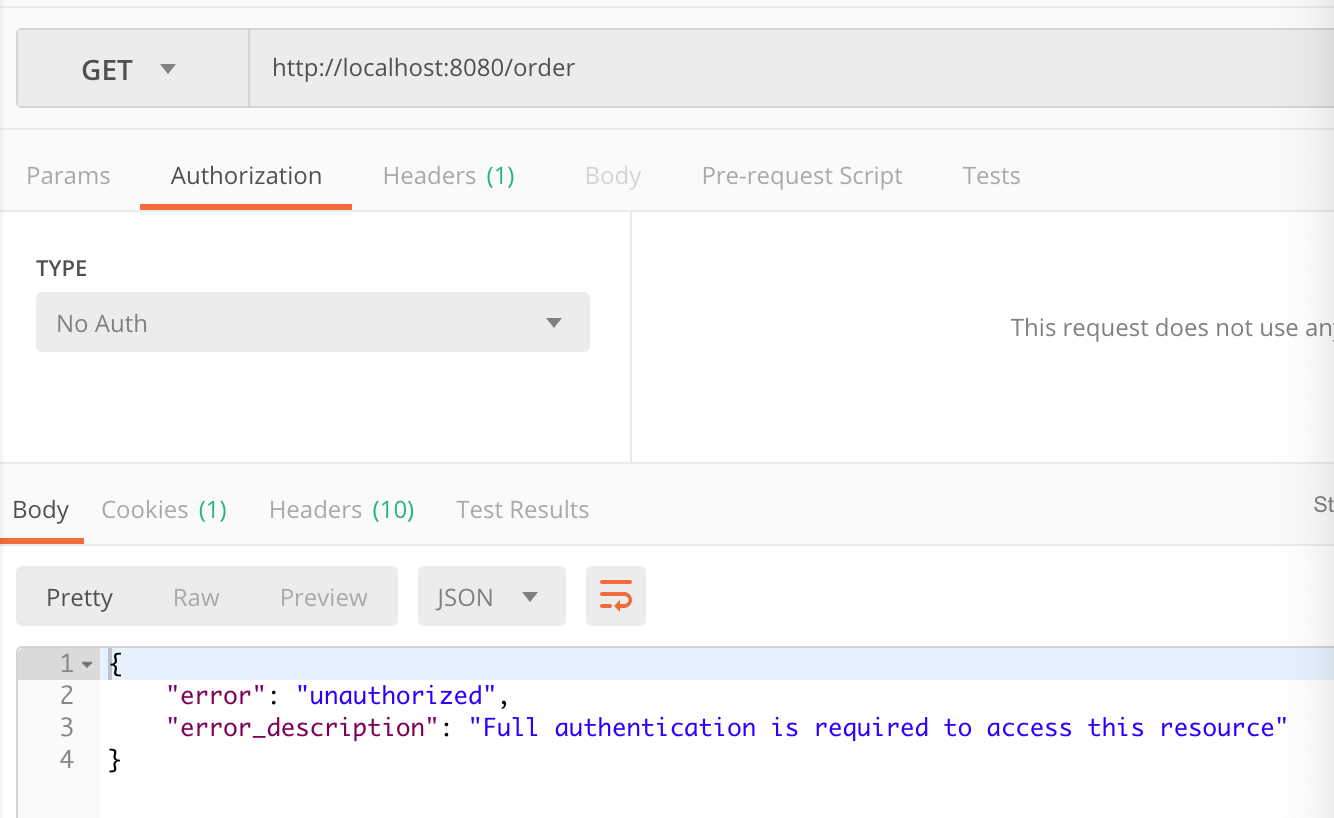
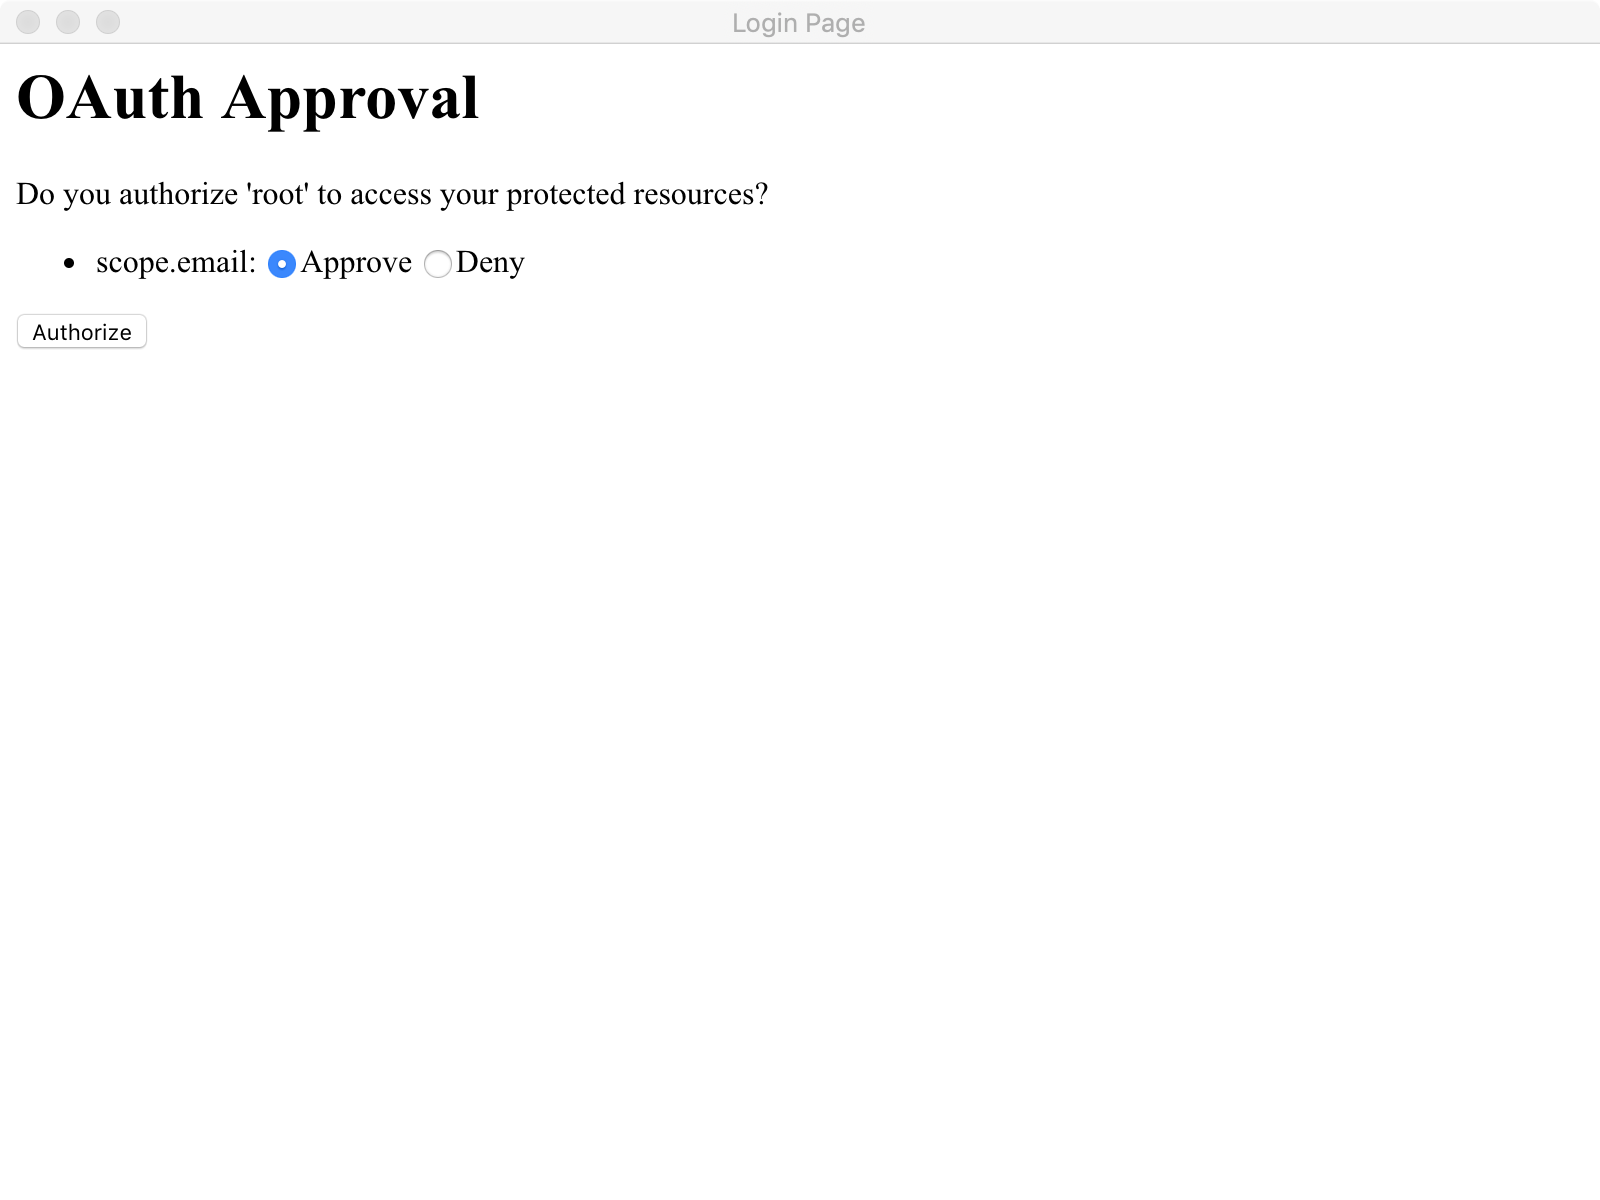
此时我们明显可以看到对应的资源需要携带有效的token才可以访问,那么我们此时要在postman的Authorization进行oauth2.0配置认证。截图如下:
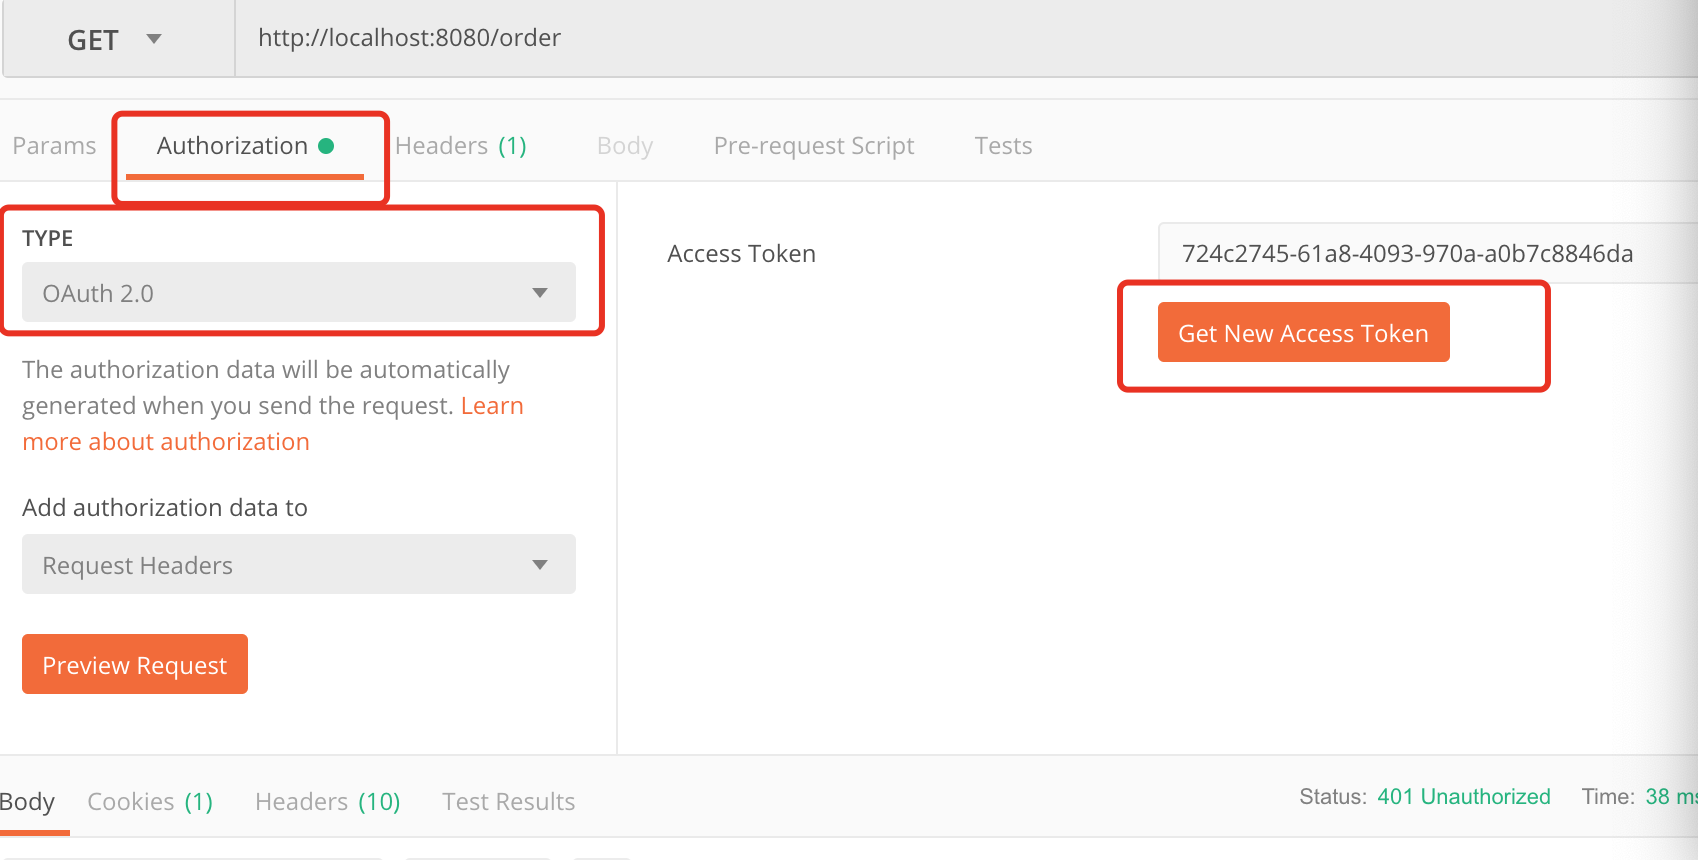
在这里点击Get New Access Token 来从认证服务器获取token,点击后配置如下:
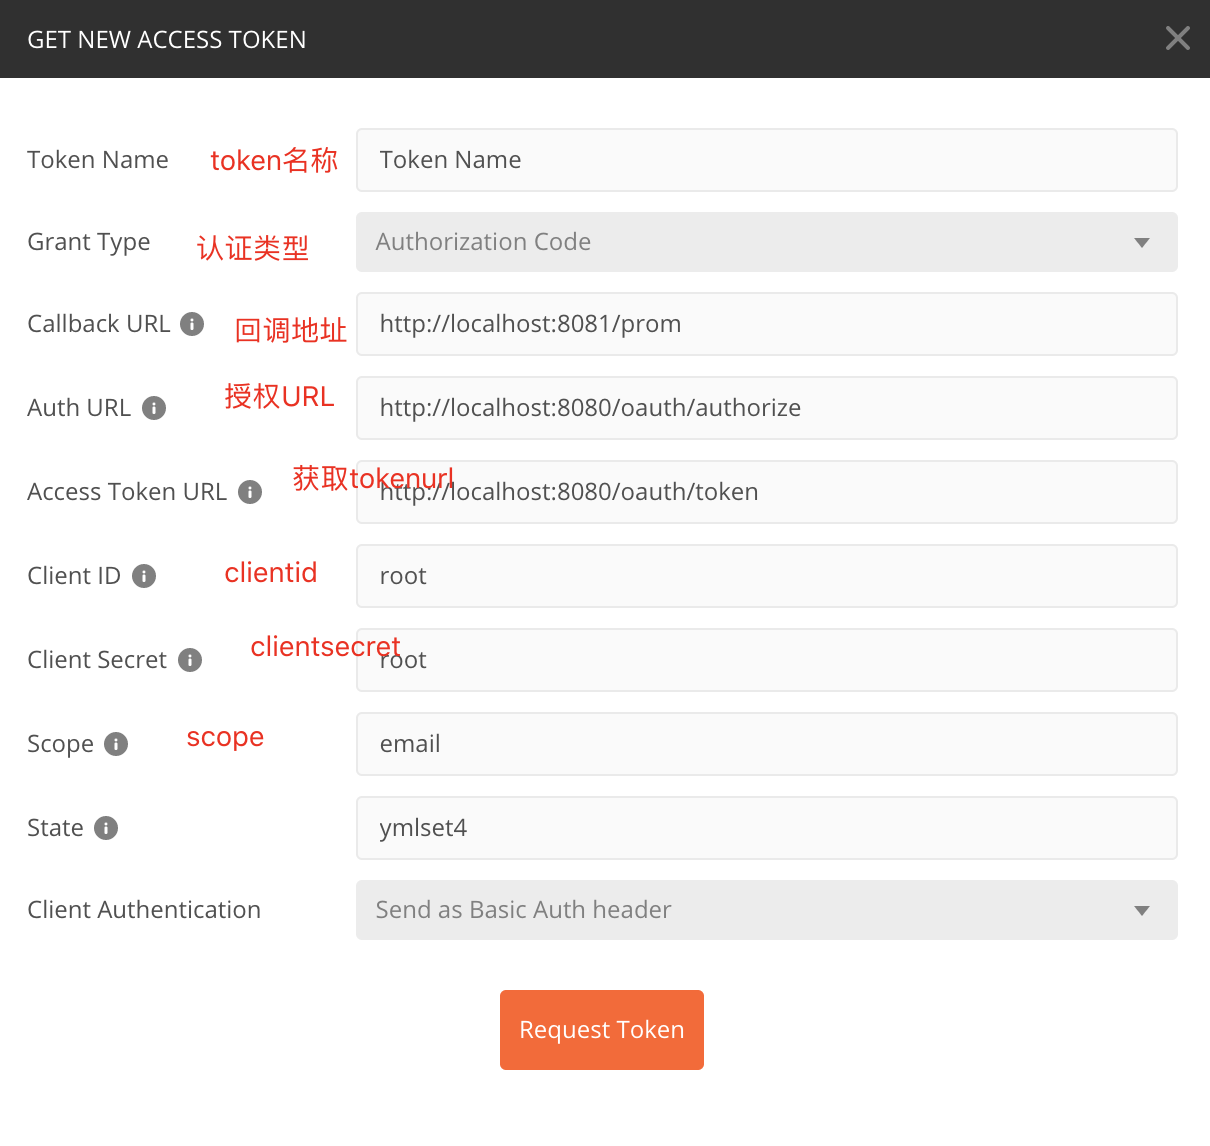
scope配置对应application.yml中的配置信息,这里面可以放置用户的属性信息,比如说昵称 头像 电话等等State代表状态码,设置一个State标志- 回调地址这里必须配置,通过这个地址当同意授权后会返回一个认证的code给我们,我们根据这个code请求token
- 认证地址与获取token的地址请填写,相关Endpoint生成的地址
当经过一连串认证后,我们即可拿到token:
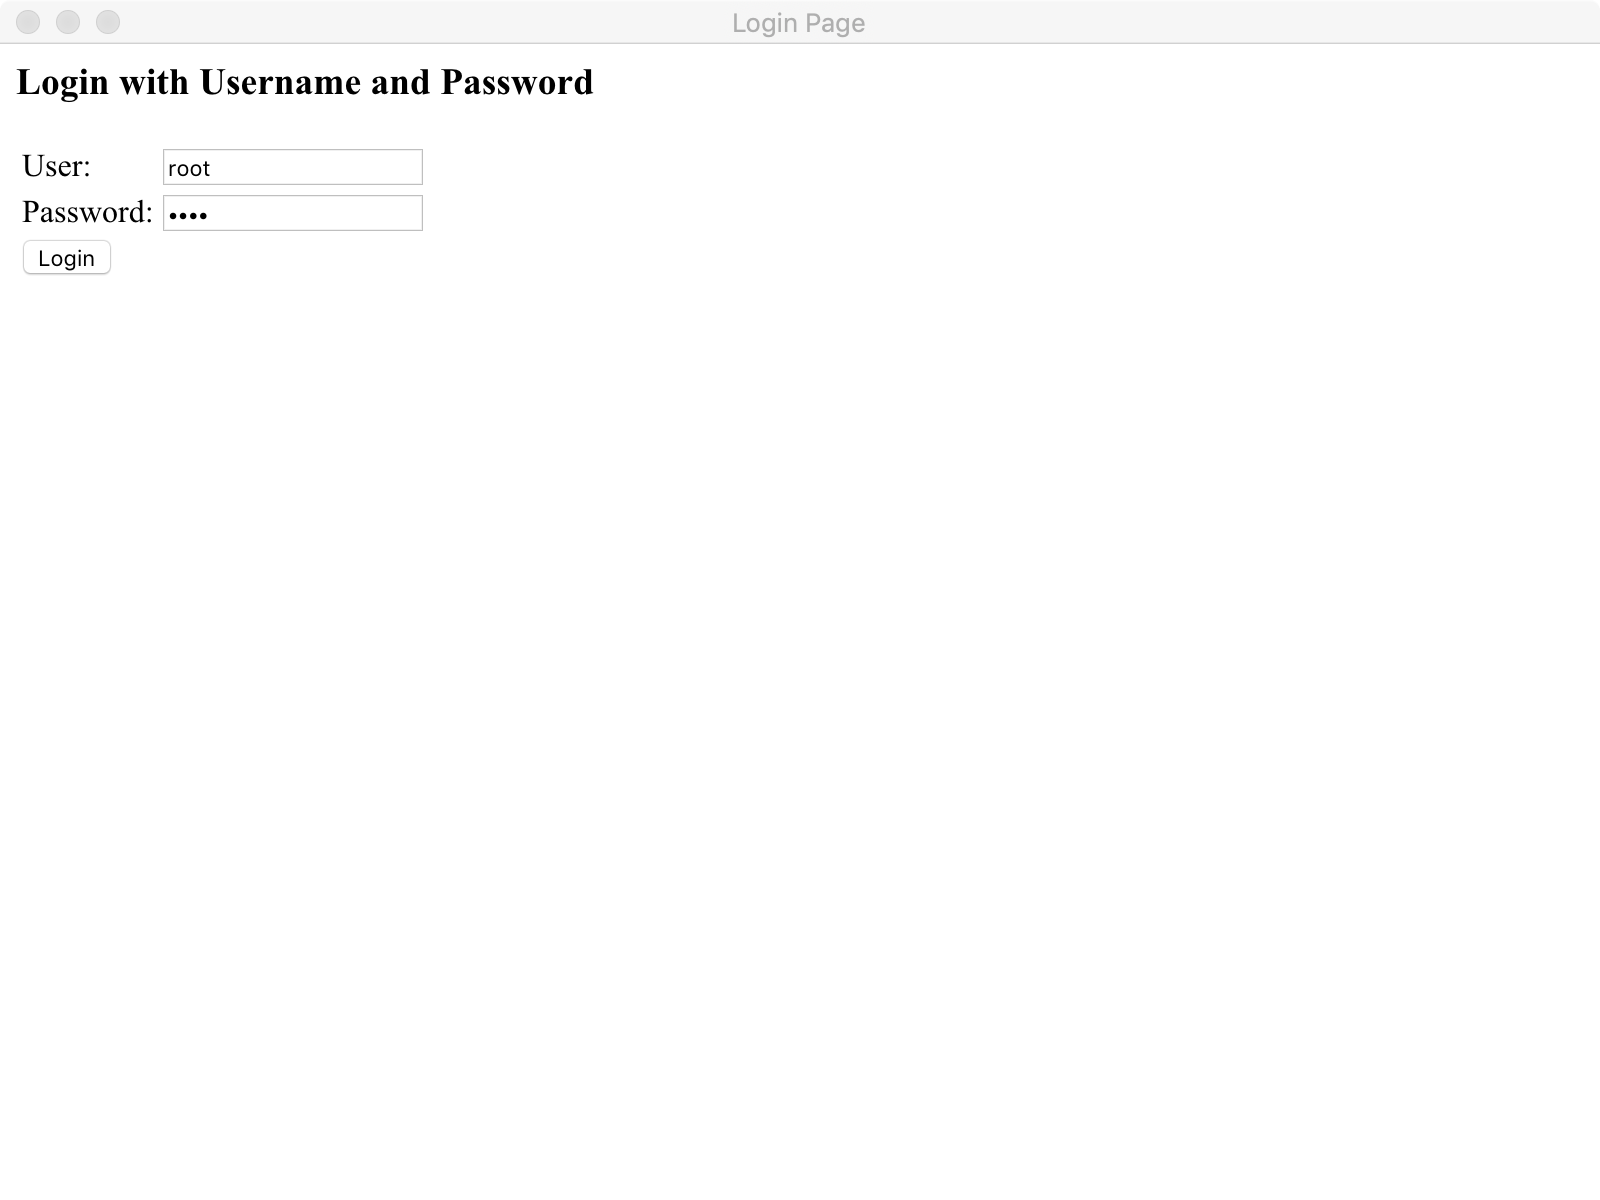
当我们获取到最新的token以后,我们即可访问到对应的请求资源:

SpringBoot之oauth2.0学习之服务端配置快速上手的更多相关文章
- SpringBoot之OAuth2.0学习之客户端快速上手
2.1.@EnableOAuth2Sso 这个注解是为了开启OAuth2.0的sso功能,如果我们配置了WebSecurityConfigurerAdapter,它通过添加身份验证过滤器和身份验证(e ...
- OAuth2.0学习(1-12)开源的OAuth2.0项目和比较
OAuth2.0学习(2-1)OAuth的开源项目 1.开源项目列表 http://www.oschina.net/project/tag/307/oauth?lang=19&sort=t ...
- Spring Cloud Zuul 网关使用与 OAuth2.0 认证授权服务
API 网关的出现的原因是微服务架构的出现,不同的微服务一般会有不同的服务地址,而外部客户端可能需要调用多个服务的接口才能完成一个业务需求,如果让客户端直接与各个微服务通信,会有以下的问题: 客户端会 ...
- Orleans[NET Core 3.1] 学习笔记(三)( 3 )服务端配置
服务端配置 Silo通过SiloHostBuilder和许多补充选项类以编程方式进行配置. Silo配置有几个关键方面: Orleans集群信息 集群提供程序(不知道咋翻译) Silo到Silo和Cl ...
- 【试水CAS-4.0.3】第06节_CAS服务端配置HTTPS
完整版见https://jadyer.github.io/2012/05/30/tomcat-https/ /** * @see CAS服务端配置HTTPS * @see -------------- ...
- Oracle10g客户端链接服务端配置
Oracle10g客户端工具plsql链接服务端配置 Oracle10g客户端工具比如plsql,在网络中链接服务端问题比较多中国菜刀,经常出现很多莫名其妙的问题.实际上不是plsql的配置,问题还是 ...
- mpush 服务端配置 for windows 服务自动运行
mpush 服务端配置 以下安装部分是参照官方的步骤, 一.安装jdk1.8并配置环境变量 示例: http://www.cnblogs.com/endv/p/6439860.html 二.Wind ...
- Rsync同步部署web服务端配置
Rsync同步部署web服务端配置 1,参数详解: -v, --verbose 详细模式输出. -q, --quiet 精简输出模式. -c, --checksum 打开校验开关,强制对文件传输进行校 ...
- day28 rsync服务端配置和客户端
2. rsync守护进程部署方式 客户端---服务端 上厕所 4 rsync守护进程服务端配置: 第一个历程: 下载安装软件 rpm -qa|grep rsync yum install -y rsy ...
随机推荐
- javaweb开发.页面中文乱码问题
1.设置eclips , window->Preferences->web->JSP Files中的Encoding选项为UTF-8 2.修改jsp文件头部为UTF-8 <%@ ...
- RNA-seq差异表达基因分析之TopHat篇
RNA-seq差异表达基因分析之TopHat篇 发表于2012 年 10 月 23 日 TopHat是基于Bowtie的将RNA-Seq数据mapping到参考基因组上,从而鉴定可变剪切(exon-e ...
- redis安全删key脚本(模糊匹配,长list,大set等)
两种情况: 1.删除指定前缀开头的rediskey ,扫描和删除过程中对线上无感知 2.删除一个大的list,set,zset,hash,这种得分批次减少大小,一直缩到0再删 第一种情况:只要知道线上 ...
- redis主从复制详述
一.主从复制详述 原理其实很简单,master启动会生成一个run id,首次同步时会发送给slave,slave同步命令会带上run id以及offset,显然,slave启动(初次,重启)内存中没 ...
- python 常用知识点
1,字典get用法 如果key没有值,返回一个None >>> dic = {'k1':'v1','k2':'v2','k3':'v3'} >>> dic.get( ...
- PyCharm选择性忽略PEP8代码风格警告信息
用了几天的PyCharm,发现确实在编写Python代码上非常好用,但有一点体验不太好,就是代码编写时要按照PEP8代码风格编写,不然会有波浪线的警告信息.解决方法如下: 方法一: 将鼠标移到提示的地 ...
- 2019.03.04 bzoj5308: [Zjoi2018]胖(二分答案+st表)
传送门 想题5分钟调题两小时系列 其实还是我tcl 读完题之后自然会知道一个关键点能够更新的点是一段连续的区间,于是我们对于每个点能到的左右区间二分答案,用ststst表维护一下查询即可. 代码: # ...
- 2019.02.12 bzoj3944: Sum(杜教筛)
传送门 题意: 思路:直接上杜教筛. 知道怎么推导就很简单了,注意预处理的范围. 然后我因为预处理范围不对被zxyoi教育了(ldx你这个傻×两倍常数活该被卡TLE) 喜闻乐见 代码: #includ ...
- springboot读取properties和yml配置文件
一.新建maven工程:springboot-configfile-demo,完整工程如下: pom.xml <?xml version="1.0" encoding=&qu ...
- virtual关键字
出于多态的考虑,为了覆盖, 子类同名覆盖函数(函数名.参数.返回值都相同) virtual void print(): 这也许会使人联想到函数的重载,但稍加对比就会发现两者是完全不同的:(1)重载的几 ...