
Jupyter Notebook 快捷键和技巧
Jupyter Notebook 有两种键盘输入模式。
编辑模式,允许你往单元中键入代码或文本,这时的单元框线是绿色的。
命令模式,键盘输入运行程序命令;这时的单元框线是蓝色。
命令模式 (按键 Esc 开启)
- Enter : 转入编辑模式
- Shift-Enter : 运行本单元,选中下个单元
- Ctrl-Enter : 运行本单元
- Alt-Enter : 运行本单元,在其下插入新单元
- Y : 单元转入代码状态
- M :单元转入markdown状态
- R : 单元转入raw状态
- 1 : 设定 1 级标题
- 2 : 设定 2 级标题
- 3 : 设定 3 级标题
- 4 : 设定 4 级标题
- 5 : 设定 5 级标题
- 6 : 设定 6 级标题
- Up : 选中上方单元
- K : 选中上方单元
- Down : 选中下方单元
- J : 选中下方单元
- Shift-K : 扩大选中上方单元
- Shift-J : 扩大选中下方单元
- A : 在上方插入新单元
- B : 在下方插入新单元
- X : 剪切选中的单元
- C : 复制选中的单元
- Shift-V : 粘贴到上方单元
- V : 粘贴到下方单元
- Z : 恢复删除的最后一个单元
- D,D : 删除选中的单元
- Shift-M : 合并选中的单元
- Ctrl-S : 文件存盘
- S : 文件存盘
- L : 转换行号
- O : 转换输出
- Shift-O : 转换输出滚动
- Esc : 关闭页面
- Q : 关闭页面
- H : 显示快捷键帮助
- I,I : 中断Notebook内核
- 0,0 : 重启Notebook内核
- Shift : 忽略
- Shift-Space : 向上滚动
- Space : 向下滚动
编辑模式 ( Enter 键启动)
- Tab : 代码补全或缩进
- Shift-Tab : 提示
- Ctrl-] : 缩进
- Ctrl-[ : 解除缩进
- Ctrl-A : 全选
- Ctrl-Z : 复原
- Ctrl-Shift-Z : 再做
- Ctrl-Y : 再做
- Ctrl-Home : 跳到单元开头
- Ctrl-Up : 跳到单元开头
- Ctrl-End : 跳到单元末尾
- Ctrl-Down : 跳到单元末尾
- Ctrl-Left : 跳到左边一个字首
- Ctrl-Right : 跳到右边一个字首
- Ctrl-Backspace : 删除前面一个字
- Ctrl-Delete : 删除后面一个字
- Esc : 进入命令模式
- Ctrl-M : 进入命令模式
- Shift-Enter : 运行本单元,选中下一单元
- Ctrl-Enter : 运行本单元
- Alt-Enter : 运行本单元,在下面插入一单元
- Ctrl-Shift-- : 分割单元
- Ctrl-Shift-Subtract : 分割单元
- Ctrl-S : 文件存盘
- Shift : 忽略
- Up : 光标上移或转入上一单元
- Down :光标下移或转入下一单元
HELP可以帮助我们直接进入对应的官方文档
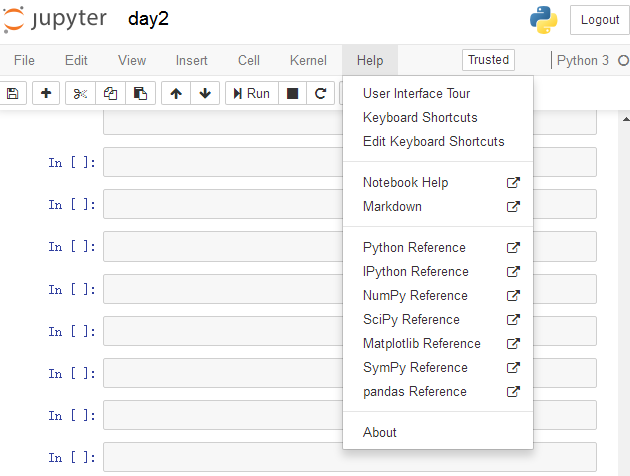
Keyboard Shortcuts 原文档
Command Mode (press Esc to enable)Edit Shortcuts
Edit Mode (press Enter to enable)
Jupyter Notebook 快捷键和技巧的更多相关文章
- jupyter notebook快捷键速查手册
jupyter notebook快捷键速查手册 Enter : 转入编辑模式 Shift-Enter : 运行本单元,选中下个单元 Ctrl-Enter : 运行本单元 Alt-Enter : 运行本 ...
- Jupyter Notebook 快捷键
Jupyter Notebook 快捷键 从命令模式进入编辑模式需按 Enter 键,从编辑模式切换到命令模式需按Esc 键. Jupyter Notebook 是一个交互式笔记本程序, 其有丰富的快 ...
- Jupyter Notebook 快捷键(基本)
Jupyter Notebook 快捷键 Jupyter Notebook 有两种键盘输入模式.编辑模式,允许你往单元中键入代码或文本:这时的单元框线是绿色的.命令模式,键盘输入运行程序命令:这时的单 ...
- Jupyter Notebook使用小技巧
在 C:\Windows\Fonts目录下找到Mircosoft YaHei UI字体,然后复制到[你的Python安装路径]/Lib/site-packages/matplotlib/mpl-dat ...
- jupyter notebook快捷键使用指南
Jupyter Notebook 是一个交互式笔记本程序, 其有丰富的快捷键来便捷的完成工作.Notebook 有两种键盘输入模式.即命令模式和编辑模式,这与 Vim 有些类似.在编辑模式下,可以往单 ...
- Jupyter Notebook 快捷键使用指南
因为使用Jupyter Notebook用鼠标选择菜单影响效率,遂将快捷命令记录于此 转自:http://blog.konghy.cn/2017/05/04/jupyter-notebook-hotk ...
- Jupyter Notebook快捷键总结
1. Jupyter Notebook有两种mode Enter:进入edit模式 Esc:进入command模式 2. Command命令快捷键: A:在上方增加一个cell B:在下方增加一个ce ...
- jupyter notebook快捷键使用的注意点
来源:https://zhidao.baidu.com/question/1800695798976401387.html 本文做进一步的阐释: 1.使行出现,但是光标要点击到有line空白区域 直接 ...
- Jupyter Notebook 介绍 安装和使用技巧
Jupyter Notebook介绍.安装及使用教程 原文链接:https://www.jianshu.com/p/91365f343585 目录一.什么是Jupyter Notebook? 1. 简 ...
随机推荐
- [转] 梦里Babel知多少(一)
平时开发中,经常需要用到ES6/ES7的语法.那么就需要用到Babel来对代码进行转码处理. 之前用Vue比较多,所以以Vue-cli作为参考来分析. 第一张图是几个月前的Vue-cli生成的 第二 ...
- Socket.Io+HttpWebRequest 请求Api
Socket 接收代码 <html> <head> <title>Socket Client Demo</title> <script src=& ...
- 51Nod1868 彩色树 虚树
原文链接https://www.cnblogs.com/zhouzhendong/p/51Nod1868.html 题目传送门 - 51Nod1868 题意 给定一颗 $n$个点的树,每个点一个 $[ ...
- 启动 ServiceFabric Windows服务报1053
Remote Procedure Call (RPC) Locator和 Windows Firewall是否启动. 以管理员身份运行PowerShell,输入Unregister-Scheduled ...
- 做生活的有心人——xxx系统第一阶段总结
2017秋,桃子已经步入大学三年级了,觉得格外幸运 因为现在,有了学习的动力. 如果你和我一样也是在大学中后部分才意识到,自己是个大人了,思维模式开始转变开始融入一些前所未有的认知,觉得自己渺小得如沧 ...
- Maya Max python PySide集成 shiboken版本对应关系
Maya_Max _python_PySide集成_shiboken版本对应关系 1.如何查看 Maya Max 集成的 Python版本: Maya:在 Maya 的安装目录下的 bin 文件夹中找 ...
- Java常用API及Math类
一.API的概述 API——Application Programing Interface:应用程序编程接口,是java提供的一些预定义的函数: 目的:基于API实现程序的快速编写,只需了解其作用, ...
- POJ 3104 Drying (经典)【二分答案】
<题目链接> 题目大意: 有一些衣服,每件衣服有一定水量,有一个烘干机,每次可以烘一件衣服,每分钟可以烘掉k滴水.每件衣服没分钟可以自动蒸发掉一滴水,用烘干机烘衣服时不蒸发.问最少需要多少 ...
- Shell学习之环境变量配置文件(三)
Shell学习之环境变量配置文件 目录 环境变量配置文件简介 环境变量配置文件作用 其他配置文件和登录信息 环境变量配置文件简介 环境变量配置文件简介 环境变量配置文件中主要是定义对系统操作环境生效的 ...
- logback中logger详解
前言 logback实践笔记 上一篇主要对root进行了实践总结,现在基于上一篇中的springboot代码环境对logback.xml中的logger来进行实践和自己遇到的坑. logger简介 ...