Android之微信布局篇
一、准备工作:
1、 下载好相关的图片:

2、创建一个名WeiChat的项目,将图片复制到res-----》drawable-hdpi目录下。

二、编写代码:
1、 最终效果:
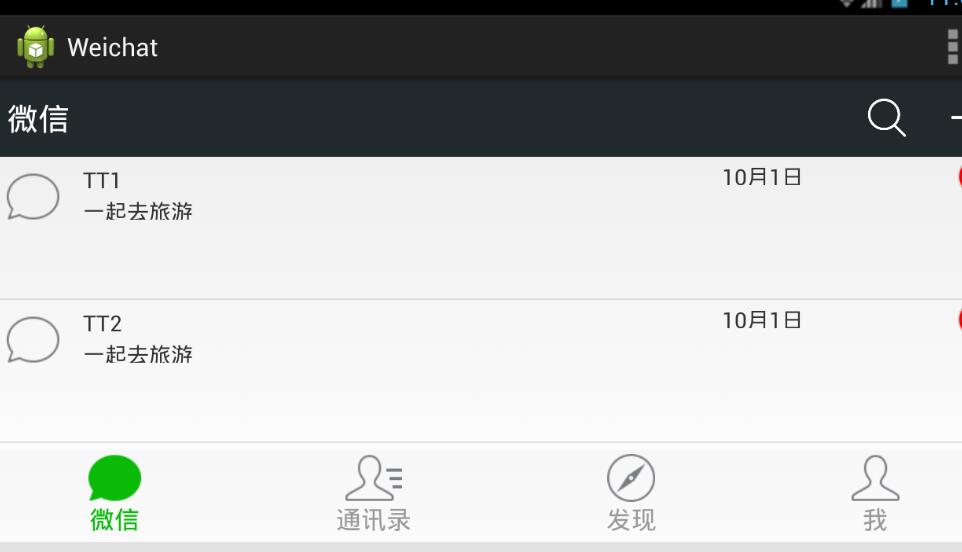
2、微信可划分为头、中间、尾三部分,最后我们将这三部分合并在同一界面。
①头部:headlayout
headlayout.xml文件:
<?xml version="1.0" encoding="utf-8"?>

<LinearLayout xmlns:android="http://schemas.android.com/apk/res/android"

      android:layout_width="match_parent"

    android:layout_height="50dp"

    android:orientation="horizontal"

    android:background="#21292c" >

      <TextView

        android:id="@+id/textView1"

        android:layout_width="wrap_content"

        android:layout_height="wrap_content"

        android:text="@string/weixin"

        android:textColor="#ffffff"

        android:textSize="20sp"

        android:layout_gravity="center"

        android:padding="10dp"/>

    <TextView

         android:layout_width="wrap_content"

        android:layout_height="wrap_content"

        android:layout_weight="1"/>

    <LinearLayout

        android:layout_width="wrap_content"

        android:layout_height="match_parent"

        android:gravity="center">

        <ImageView

            android:id="@+id/imageView2"

            android:layout_width="40dp"

            android:layout_height="30dp"

            android:src="@drawable/fdj"

            android:layout_marginRight="10dp"/>

        <ImageView

            android:id="@+id/imageView1"

            android:layout_width="40dp"

            android:layout_height="30dp"

            android:src="@drawable/barbuttonicon_add" />

    </LinearLayout>

</LinearLayout>
1、通过LinearLayout布局,设置android:orientation="horizontal",android:background="#21292c"两个属性显示背景为灰黑色。
2 、我们通过两个TextView控件来显示“微信” 和字体与右边图片隔离,通过两个ImageView控件显示最右边的两张图片,有LinearLayout布局水平方向让图片对齐。
3、通过gravity属性设置图片在LinearLayout居中,设置ImageView的layout_marginRight设置两张图片不相连。
效果图:

②尾部:footlayout
footlayout.xml文件:
<?xml version="1.0" encoding="utf-8"?>

<LinearLayout xmlns:android="http://schemas.android.com/apk/res/android"

    android:layout_width="match_parent"

    android:layout_height="match_parent"

    android:orientation="vertical" >

<RadioGroup

        android:id="@+id/radioGroup1"

        android:layout_width="match_parent"

        android:layout_height="60dp"

        android:orientation="horizontal"

        android:background="@drawable/group_buton_nomal"

        android:gravity="center">

        <RadioButton

            android:id="@+id/radio0"

            android:layout_width="wrap_content"

            android:layout_height="wrap_content"

            android:checked="true"

            android:text="@string/weixin"

               style="@style/radioStyle"

               android:drawableTop="@drawable/weicho1"/>

        <RadioButton

            android:id="@+id/radio1"

            android:layout_width="wrap_content"

            android:layout_height="wrap_content"

            android:text="@string/addressList"

               style="@style/radioStyle"

               android:drawableTop="@drawable/weicho2"/>

        <RadioButton

            android:id="@+id/radio2"

            android:layout_width="wrap_content"

            android:layout_height="wrap_content"

            android:text="@string/find"

               style="@style/radioStyle"

               android:drawableTop="@drawable/weicho3"/>

         <RadioButton

            android:id="@+id/radio3"

            android:layout_width="wrap_content"

            android:layout_height="wrap_content"

            android:text="@string/set"

               style="@style/radioStyle"

               android:drawableTop="@drawable/weicho4"/>

    </RadioGroup>

</LinearLayout>
1、通过四个RadioButton单选控件来显示下面四张图片,drawableTop属性设置图片,通过styles。xml文件设置样式。
① 设置值为@null将去掉空心圆,设置每个RadioButton控件的layout_weight="1"位权为1,平分位置。
styles.xml文件:
<style name="radioStyle">

        <item name="android:button">@null</item>

        <item name="android:layout_weight">1</item>

        <item name="android:gravity">center</item>

        <item name="android:textColor">@drawable/choscolor</item>

    </style>
2、点击变色:点击图标时图标和文字变为绿色,而其他的则为浅灰色。RadioButton有个checked点击属性。
3、我们添加了五个selector类型的xml文件,分别命名为weicho1到weicho4,最后一命名为choscolor.xml文件(用来设置字体颜色)。
4、当checked=true时就设置drawable属性为绿色图片,通过styles.xml文件的radioStyle设置字体颜色为绿色。(注:其他3个xml文件与weicho1.xml文件一样只是图片名称不一样)
weicho1.xml文件:
<?xml version="1.0" encoding="utf-8"?>

<selector xmlns:android="http://schemas.android.com/apk/res/android" >

    <item android:state_checked="true"

        //绿色图片

        android:drawable="@drawable/tabbar_mainframehl"></item>

    <item

        android:drawable="@drawable/tabbar_mainframe"></item>

</selector>
choscolor.xml文件:
<?xml version="1.0" encoding="utf-8"?>

<selector xmlns:android="http://schemas.android.com/apk/res/android" >

    <item android:state_checked="true"

        android:color="@color/green"></item>

    <item

        android:color="@color/grey"></item>

</selector>
效果图片:
③中间:listviewon1
listviewon1.xml文件:
<?xml version="1.0" encoding="utf-8"?>

<LinearLayout xmlns:android="http://schemas.android.com/apk/res/android"

    android:layout_width="match_parent"

    android:layout_height="match_parent"

    android:orientation="vertical" >

     <ListView

        android:id="@+id/listView1"

        android:layout_width="match_parent"

        android:layout_height="match_parent" >

    </ListView>

</LinearLayout>
1、我们通过一个ListView实现动态添加数据,现在我们就站一个位置,不这么快添加数据。(注见下一章listview动态添加数据篇)。
④合并头、中间、尾三部分:weichatlayout
weichatlayout.xml文件:
<?xml version="1.0" encoding="utf-8"?>

<LinearLayout xmlns:android="http://schemas.android.com/apk/res/android"

    android:layout_width="match_parent"

    android:layout_height="match_parent"

    android:orientation="vertical" >

    <!-- head -->

    <LinearLayout

        android:layout_width="match_parent"

        android:layout_height="wrap_content" >

        <include layout="@layout/headlayout"/>

    </LinearLayout>

    <!-- 中间 -->

    <LinearLayout

        android:layout_width="match_parent"

        android:layout_height="wrap_content"

        android:layout_weight="1">

        <include layout="@layout/listviewon1"/>

    </LinearLayout>

    <!-- 底部 -->

    <LinearLayout

        android:layout_width="match_parent"

        android:layout_height="wrap_content" >

        <include layout="@layout/footlayout"/>

    </LinearLayout>

</LinearLayout>
1、我们通过3个LinearLayout布局设置头,中,尾。
2、通过layout_weight="1"设置中的位权占满剩余的空间,固定头和尾的大小。
3、通过include的layout属性设置相关的布局 。
效果图片:

Android之微信布局篇的更多相关文章
- android 安卓 微信布局 [1]
微信布局 直接上代码吧 ---------------------------------------- 头部 -------------------------------------------- ...
- Android开发--微信布局(ListView)基本运用
ListView 1.ListVeiw 用来展示列表的View. 2.适配器 用来把数据映射到ListView上的中介. 3.数据 具体的将被映射的字符串,图片,或者基本组件. 根据列表的适配器 ...
- Android视图篇之一:Android常见基本布局
Android中,布局都是直接或间接的继承自ViewGroup类,其中,ViewGroup的直接子类目前有: AbsoluteLayout, AdapterView<T extends Adap ...
- 【详细】Android入门到放弃篇-YES OR NO-》各种UI组件,布局管理器,单元Activity
问:达叔,你放弃了吗? 答:不,放弃是不可能的,丢了Android,你会心疼吗?如果别人把你丢掉,你是痛苦呢?还是痛苦呢?~ 引导语 有人说,爱上一个人是痛苦的,有人说,喜欢一个人是幸福的. 人与人之 ...
- Android UI-仿微信底部导航栏布局
现在App基本的标配除了侧滑菜单,还有一个就是底部导航栏,常见的聊天工具QQ,微信,购物App都有底部导航栏,用户可以随便切换看不同的内容,说是情怀也好,用户体验也罢.我们开发的主要的还是讲的是如何如 ...
- 使用wepy开发微信小程序商城第三篇:购物车(布局篇)
使用wepy开发微信小程序商城 第三篇:购物车(布局篇) 前两篇如下: 使用wepy开发微信小程序商城第一篇:项目初始化 使用wepy开发微信小程序商城第二篇:路由配置和页面结构 基于上两篇内容,开始 ...
- Android开发之五大布局篇
一.Android中常用的5大布局方式有以下几种: 线性布局(LinearLayout):按照垂直或者水平方向布局的组件. 相对布局(RelativeLayout):相对其它组件的布局方式. 绝对布局 ...
- Android仿微信图片上传,可以选择多张图片,缩放预览,拍照上传等
仿照微信,朋友圈分享图片功能 .可以进行图片的多张选择,拍照添加图片,以及进行图片的预览,预览时可以进行缩放,并且可以删除选中状态的图片 .很不错的源码,大家有需要可以下载看看 . 微信 微信 微信 ...
- Android FoldingLayout 折叠布局 原理及实现(二)
转载请标明出处:http://blog.csdn.net/lmj623565791/article/details/44283093,本文出自:[张鸿洋的博客] 1.概述 在上一篇Android Fo ...
随机推荐
- css绘制内扣圆角
纯静态的一种效果绘制,避免使用图标浪费内存.效果如下 废话不多说,代码如下: <!DOCTYPE html> <html lang="en"> <he ...
- EBS 请求输出Html报表集成Echarts
百度开源的ECharts有样式丰富且美观的报表类型可供选用,可以将其集成至EBS请求输出的Html报表中,这其实就是一个生成Html数据的过程. 定义输出类型为HTML的请求我就不在此处赘述. 我 ...
- python 多个脚本
1.增删改查haproxy.conf配置文件 1.查询输入:www.oldboy1.com 2.删除输入:{'backend': 'www.oldboy2.org','record':{'server ...
- 【深入理解Java集合框架】红黑树讲解(上)
来源:史上最清晰的红黑树讲解(上) - CarpenterLee 作者:CarpenterLee(转载已获得作者许可,如需转载请与原作者联系) 文中所有图片点击之后均可查看大图! 史上最清晰的红黑树讲 ...
- 浅谈URI和URL
URI(Uniform Resource Identifier)字面上的意思是,统一资源标示符 URL(Uniform Resource Locator),统一资源定位符 光从字面上的意思,这个2个东 ...
- leetcode题解2. Add Two Numbers
题目: You are given two non-empty linked lists representing two non-negative integers. The digits are ...
- 蓝牙协议分析(3)_BLE协议栈介绍
1. 前言 通过“蓝牙协议分析(2)_协议架构”的介绍,大家对蓝牙协议栈应该有了简单的了解,但是,肯定还有“似懂非懂.欲说还休”的感觉.有这种感觉太正常了,毕竟蓝牙协议是一个历史悠久又比较庞大的协议, ...
- Python 进程池的同步方法
import time from multiprocessing import Process,Pool def f1(n): time.sleep(1) #print(n) return n*n i ...
- Css3新属性:calc()
一.前言 calc()看起来像是javascript中的一个函数,而事实上它是用在Css中的,可以用它来计算长度(宽度或高度),能够自动根据不同尺寸的屏幕自动调接数值,从而很轻松的实现自适应布局展示在 ...
- Eclipse安装Activiti Designer插件
本人使用的是在线安装: 打开Eclipse -> Help -> Install New SoftWare-> Add 然后按照如下对话框输入: Name:Activiti BPMN ...