
vue04-动画、组件
一、vue中使用动画
文档:https://cn.vuejs.org/v2/guide/transitions.html
1. Vue 中的过渡动画
<!DOCTYPE html>

<html lang="en">

<head>

    <meta charset="UTF-8">

    <title>Title</title>

    <style>

        .box{

            width: 200px;

            height: 200px;

            background-color:yellow;

        }

        .fade-enter,.fade-leave-to{

            opacity: 0;

            transform: translateX(200px);

        }

        .fade-enter-active,.fade-leave-active{

            transition: all 0.5s ease-in-out;

        }

    </style>

</head>

<body>

<div id="app">

    <button @click="show=!show">切换</button>

    <transition name="fade">

        <div class="box" v-if="show">始于1886,可口可乐</div>

    </transition>

</div>

<script src="js/vue.js"></script>

<script>

    new Vue({

        el:'#app',

        data:{

            show:true

        },

    });

</script>

</body>

</html>

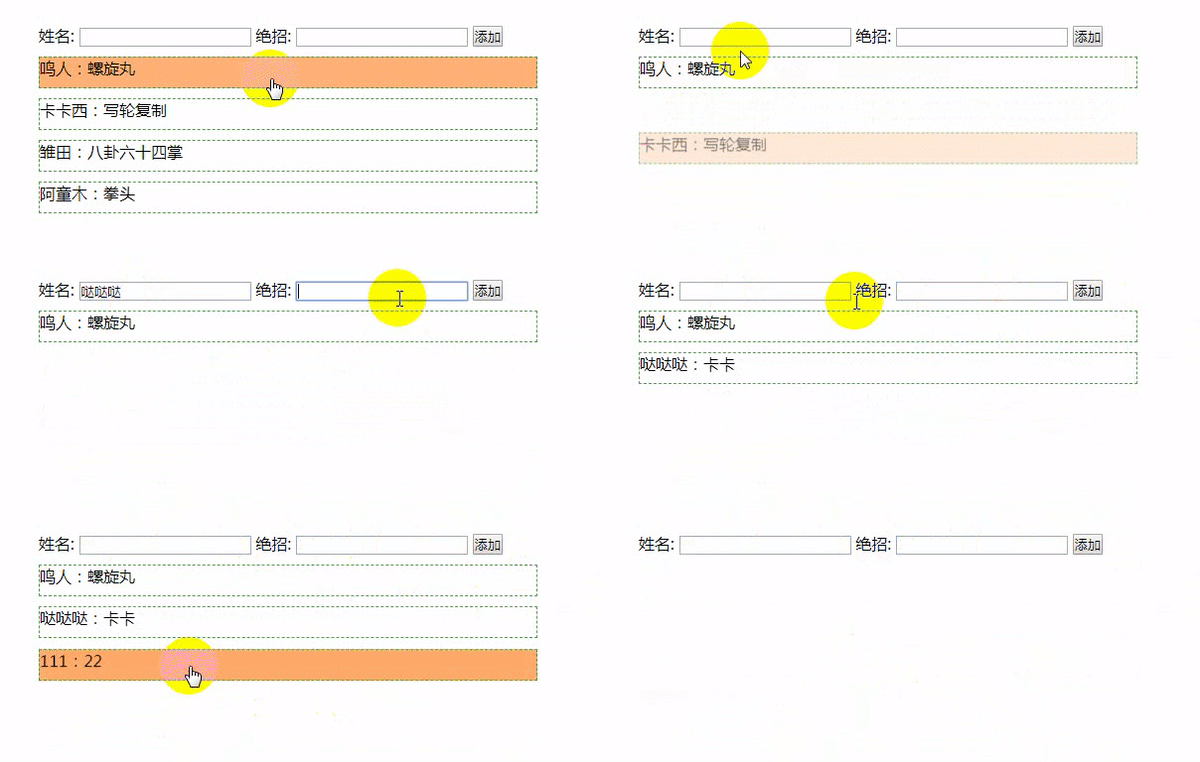
2. 过渡动画 案例
<!DOCTYPE html>

<html lang="en">

<head>

    <meta charset="UTF-8">

    <title>Title</title>

    <style>

        *{

            padding: 0;

            margin: 0;

            list-style: none;

        }

        #app{

            width: 600px;

            margin: 50px auto;

        }

        li{

            width: 500px;

            height: 30px;

            border: 1px dashed #3fa435;

            margin-top: 10px;

        }

        li:hover{

            cursor: pointer;

            background-color: #ff7408;

            transition: all 0.8s ease;  /* hover 动画效果  */

        }

        /*从这里开始设置 vue 的动画*/

        .hero-enter, .hero-leave-to{

            opacity: 0;

            transform: translateY(80px);

        }

        .hero-enter-active, .hero-leave-active{

            transition: all 0.5s ease;

        }

        .hero-move{

            transition: all 1s ease-in-out;

        }

    </style>

</head>

<body>

<div id="app">

    <div>

        <label>姓名: <input type="text" v-model="name"></label>

        <label>绝招: <input type="text" v-model="unique_skill"></label>

        <button @click="add()">添加</button>

    </div>

    <transition-group tag="ul" name="hero">

        <li v-for="(list,index) in lists" @click="del(index)" :key="index">

            {{list.name}}:{{list.unique_skill}}

        </li>

    </transition-group>

</div>

<script src="js/vue.js"></script>

<script>

    new Vue({

        el:'#app',

        data:{

            name:'',

            unique_skill:'',

            lists:[

                {name:'鸣人',unique_skill:'螺旋丸'},

                {name:'卡卡西',unique_skill:'写轮复制'},

                {name:'雏田',unique_skill:'八卦六十四掌'},

                {name:'阿童木',unique_skill:'拳头'}

            ]

        },

        methods:{

            del(index){

                this.lists.splice(index,1)

            },

            add(){

                this.lists.push({name:this.name,unique_skill:this.unique_skill});

                this.name = '';

                this.unique_skill = '';

            }

        }

    })

</script>

</body>

</html>
3. 用第三方动画库 animate.css
<!DOCTYPE html>

<html lang="en">

<head>

    <meta charset="UTF-8">

    <title>Title</title>

    <link rel="stylesheet" href="css/animate.css">

</head>

<body>

<div id="app">

    <button @click="flag = !flag">切换</button>

    <br>

    <transition

        enter-active-class="bounceIn"

        leave-active-class="bounceIn"

        :duration="{enter:1000,leave:500}"

    >

        <img v-if="flag" src="img/1.jpg" alt="" class="animated">

    </transition>

    <h1 class="animated infinite bounce delay-2s">↑↑↑↑↑</h1>

</div>

<script src="js/vue.js"></script>

<script>

    new Vue({

        el:'#app',

        data:{

            flag:false,

        }

    })

</script>

</body>

</html>

其他动画操作方式,查看vue官网文档,这里先不记录了。
二、Vue 组件
以下演示的组件的各种创建方式。在工程化开发中.
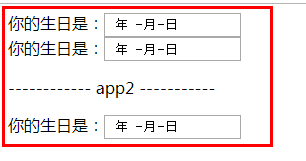
1.全局 Vue 组件
全局组件,所有实例都可以使用
<!DOCTYPE html>

<html lang="en">

<head>

    <meta charset="UTF-8">

    <title></title>

</head>

<body>

<div id="app">

    <my-date></my-date>

    <my-date></my-date>

</div>

<div id="app2">

    <p>------------ app2 -----------</p>

     <my-date></my-date>

</div>

<script src="js/vue.js"></script>

<script>

    // 1. 组件构造器

    let Profile = Vue.extend({

        // 模板选项

        template:

            `

        <div>

            <span>你的生日是:</span><input type="date">

        </div>

        `

    });

    // 2. 注册全局组件

    Vue.component('my-date',Profile);

    // 1. 创建Vue的实例

    new Vue({

        el: '#app',

        data: {

            msg: '哒哒哒'

        }

    });

    new Vue({

        el:'#app2'

    })

</script>

</body>

</html>
2. 局部 Vue 组件
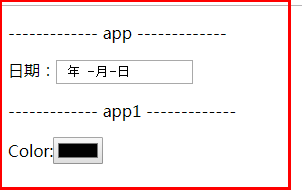
局部组件在各自的实例里面注册。
<!DOCTYPE html>

<html lang="en">

<head>

    <meta charset="UTF-8">

    <title></title>

</head>

<body>

<div id="app">

    <p>------------- app -------------</p>

    <my-date></my-date>

    <!-- my-color 这里写里也没用-->

    <my-color></my-color>

</div>

<div id="app1">

    <p>------------- app1 -------------</p>

    <my-color></my-color>

</div>

<script src="js/vue.js"></script>

<script>

    // 1. 组件构造器

    let Profile = Vue.extend({

        // 模板选项

        template: `

          <div>

              <span>日期:</span><input type="date">

          </div>

          `

    });

    let Profile1 = Vue.extend({

        // 模板选项

        template: `

          <div>

              <span>Color:</span><input type="color">

          </div>

          `

    });

    // 1. 创建Vue的实例

    new Vue({

        el: '#app',

        data: {

            msg: '撩课学院'

        },

        components: {

            'my-date': Profile

        }

    });

    new Vue({

        el: '#app1',

        components: {

            'my-color': Profile1

        }

    })

</script>

</body>

</html>
3. 另一种注册组件的方式
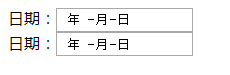
全局组件:
<html lang="en">

<head>

    <meta charset="UTF-8">

    <title></title>

</head>

<body>

<div id="app">

    <my-date></my-date>

</div>

<div id="app1">

    <my-date></my-date>

</div>

<script src="js/vue.js"></script>

<script>

    //  注册全局组件

    Vue.component('my-date', {

        template: `

          <div>

              <span>日期:</span><input type="date">

          </div>

          `

    });

    // 1. 创建Vue的实例

    new Vue({

        el: '#app',

    });

    new Vue({

        el: '#app1',

    });

</script>

</body>

</html>
局部组件:
<body>

<div id="app">

    <my-date></my-date>

    <my-color></my-color>

</div>

<script src="js/vue.js"></script>

<script>

    new Vue({

        el:'#app',

        data:{},

        components:{

            'my-date':{

                template:`<div> <span>日期:</span> <input type="date"> </div>`

            },

            'my-color': {

                template: `

          <div>

              <span>Color:</span><input type="color">

          </div>

          `

            },

        }

    })

</script>

</body>

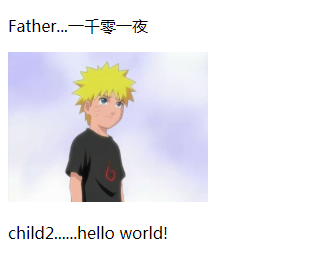
4.父子组件
<body>

<div id="app">

    <parent></parent>

    <!--<child></child>-->

</div>

<script src="js/vue.js"></script>

<script>

    // 1.构造子组件

    let child1 = Vue.extend({

        template:`<img src="img/1.jpg" width="200px">`

    });

    Vue.component('child',child1);

    let child2 = Vue.extend({

        template:`<p>child2......hello world!</p>`

    });

    // 2.构造父组件

    Vue.component('parent',{

        components:{

            'my-child1':child1,

            'my-child2':child2

        },

        template:

        `

        <div>

            <p>Father...一千零一夜</p>

            <my-child1></my-child1>

            <my-child2></my-child2>

        </div>

        `

    });

    new Vue({

        el:'#app',

    });

</script>

</body>
5. vue 组件中的 template标签
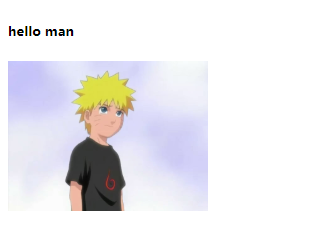
<body>

<div id="app">

    <g_box></g_box>

</div>

<template id="g_box">

    <div>

        <h5>hello man</h5>

        <img src="img/1.jpg" width="200px" alt="">

    </div>

</template>

<script src="js/vue.js"></script>

<script>

    Vue.component('g_box',{

        template:'#g_box'

    });

    new Vue({

        el:'#app',

    })

</script>

</body>
6.Vue组件中的 script 标签
这种方式不常用。
<body>

<div id="app">

    <g_div></g_div>

</div>

<script type="text/template" id="g_div">

    <div>

        <h5>hello Nurato!</h5>

        <img src="img/1.jpg" width="200px" alt="">

    </div>

</script>

<script src="js/vue.js"></script>

<script>

    Vue.component('g_div',{

       template:'#g_div'

    });

    new Vue({

        el:'#app'

    })

</script>

</body>

三、组件中间的数据通信
1.Vue的组件数据传递-data
在这里,data选项必须为函数,必须要用函数返回的方式传递数据
<body>

<div id="app">

    <g_div></g_div>

</div>

<template id="g_div">

    <div>

        <h5>{{msg}}</h5>

        <img src="img/1.jpg" width="200px" alt="">

    </div>

</template>

<script src="js/vue.js"></script>

<script>

    Vue.component('g_div',{

        template:'#g_div',

        // 这里data 只能通过函数返回的方式来,因为这样申明的话,和new Vue 里的data会互相污染

        // data:{

        //     msg:'hello man'

        // }

        data(){

            return {msg:'hello man'}

        }

    });

    new Vue({

        el:'#app',

        data:{

        }

    })

</script>

</body>

2.Vue的组件之间的通信
<body>

<div id="app">

    <g_box msg="hello Nurato" imgSrc="img/1.jpg"></g_box>

</div>

<template id="g_box">

    <div>

        <h5>{{msg}}</h5>

        <img :src="imgsrc" width="200px" alt="">

    </div>

</template>

<script src="js/vue.js"></script>

<script>

    // 1 创建组件

    Vue.component('g_box',{

        template:'#g_box',

        props:['msg','imgsrc']

    });

    // 2 创建实例

    new Vue({

        el:'#app',

        data:{

            msg:''

        }

    })

</script>

</body>

3.Vue的组件之间的通信-多层
<div id="app">

    <!-- 1. 这种不带 : 号的,可以直接填值,但是用不了 实例中 data 里的数据  -->

    <!--<my-parent imgsrc="img/1.jpg" img_title="Nurato"></my-parent>-->

    <!-- 2. 图片,imgsrc 如果是用 实例中的data,必须是用加 : 号的方式  -->

    <my-parent :img_title="title" :imgsrc="img"></my-parent>

</div>

<!-- 子组件 1 -->

<template id="my_img">

    <img :src="imgsrc"width="200px"  alt="">

</template>

<!-- 子组件 2 -->

<template id="my_title">

    <h5>{{title}}</h5>

</template>

<!-- 父级组件 -->

<div id="my_parent">

    <div>

        <child1 :imgsrc="imgsrc"></child1>

        <child2 :title="img_title"></child2>

    </div>

</div>

<script src="js/vue.js"></script>

<script>

    // 1.子组件实例

    let child1 = Vue.extend({

        template:'#my_img',

        props:['imgsrc']

    });

    let child2 = Vue.extend({

        template:'#my_title',

        props:['title']

    });

    // 父组件

    Vue.component('my-parent',{

        props:['imgsrc','img_title'],

        components:{

            'child1':child1,

            'child2':child2

        },

        template:'#my_parent'

    });

    new Vue({

        el:'#app',

        data:{

            img:'img/1.jpg',

            title:'2.哒哒哒'

        }

    })

</script>

</body>

vue04-动画、组件的更多相关文章
- 视图属性+对象动画组件ViewPropertyObjectAnimator
视图属性+对象动画组件ViewPropertyObjectAnimator ViewPropertyObjectAnmator组件是一款对象动画(ObjectAnimator)封装组件.它将视图属 ...
- 爆炸销毁动画组件Explosions
爆炸销毁动画组件Explosions 爆炸销毁动画通常应用于界面元素的移除.使用该动画效果可以将移除操作表现的更为直观生动.Explosions组件是一款专门实现爆炸销动画效果的组件,它可以展示界 ...
- XamarinAndroid组件教程RecylerView动画组件使用动画(3)
XamarinAndroid组件教程RecylerView动画组件使用动画(3) (8)打开Main.axml文件,构建主界面.代码如下: <?xml version="1.0&quo ...
- XamarinAndroid组件教程RecylerView动画组件使用动画(2)
XamarinAndroid组件教程RecylerView动画组件使用动画(2) 如果开发者要为RecylerView的子元素添加动画效果,需要使用RecyclerView类中的SetItemAnim ...
- React动画组件——React-Transitio-group动画实现
React动画组件--React-Transitio-group动画实现 安装 项目目录下使用命令行 yarn add react-transition-group 安装组件.在需要使用动画的页面加入 ...
- Xamarin Android组件篇教程RecylerView动画组件RecylerViewAnimators(1)
Xamarin Android组件篇教程RecylerView动画组件RecylerViewAnimators(1) RecyclerView是比ListView和GridView更为强大的布局视图, ...
- RecylerView动画组件RecylerViewAnimators
RecylerView动画组件RecylerViewAnimators RecyclerView是比ListView和GridView更为强大的布局视图,可以用于展现大量的数据.RecylerVi ...
- vue的动画组件(transition)
当插入或删除包含在 transition 组件中的元素时,Vue 将会做以下处理: 自动嗅探目标元素是否应用了 CSS 过渡或动画,如果是,在恰当的时机添加/删除 CSS 类名. v-enter: 定 ...
- 效果超赞的基于js的chat组件和图形动画组件
chat组件的地址是:http://ecomfe.github.io/echarts/doc/doc.html 图像动画组件的地址是:http://ecomfe.github.io/zrender/i ...
- 基于 React 实现一个 Transition 过渡动画组件
过渡动画使 UI 更富有表现力并且易于使用.如何使用 React 快速的实现一个 Transition 过渡动画组件? 基本实现 实现一个基础的 CSS 过渡动画组件,通过切换 CSS 样式实现简单的 ...
随机推荐
- 【Chromium】GPU进程启动流程
本篇文档以gpu进程的创建和启动为例,讲述chormium如何启动一个browser进程的子进程 PS:本文使用的chromium代码版本为71 前言 GPU进程的启动时机是由browser进程负责的 ...
- 《JavaWeb从入门到改行》JSP+EL+JSTL大杂烩汤
title: Servlet之JSP tags: [] notebook: javaWEB --- JSP是什么 ? JSP就是Servlet,全名是"JavaServer Pages&qu ...
- OpenStack IceHouse 部署 - 4 - 计算节点部署
Nova计算服务(计算节点) 参考 本页内容依照官方安装文档进行,具体参见Configure a compute node(nova service) 前置工作 数据库 由于我们在Nova(计算管理 ...
- safari
http://www.zhangxinxu.com/wordpress/2014/10/mobilebone-js-mobile-web-app-core/ http://rawgit.com/zha ...
- BZOJ 3809Gty的二逼妹子序列 解题报告+data marker
--BZOJ http://www.lydsy.com/JudgeOnline/problem.php?id=3809 考虑对l,r跑莫队,对一组维护美丽度出现次数的桶修改, 然后把桶序列用分块维护查 ...
- C# 按部门拆分excel文件
按照所属部门不同将excel文件拆分成多个文件 string excel_path = @"G:\zhyue\backup\2018-08-01 读取腾讯邮箱接口-获取一个月内未接收到外部邮 ...
- OSMC Vs. OpenELEC Vs. LibreELEC – Kodi Operating System Comparison
Kodi's two slim-and-trim kid brothers LibreELEC and OpenELEC were once great solutions for getting t ...
- Java基础之创建实例化对象的方式
Java中创建(实例化)对象的五种方式 1.用new语句直接创建对象,这是最常见的创建对象的方法. 2.通过工厂方法返回对象,如:String str = String.valueOf(23); 3 ...
- 在Windows下为PHP5.6安装redis扩展和memcached扩展
一.php安装redis扩展 1.使用phpinfo()函数查看PHP的版本信息,这会决定扩展文件版本 2.根据PHP版本号,编译器版本号和CPU架构, 选择php_redis-2.2 ...
- react native学习资料
一:基础学习: react-native中文文档(react native中文网,人工翻译,官网完全同步)http://react-native.cn/docs/getting-started.htm ...