
Cobbler无人值守安装linux系统
简介
Cobbler是一个Linux服务器安装的服务,可以通过网络启动(PXE)的方式来快速安装、重装物理服务器和虚拟机,同时还可以管理DHCP,DNS等。
Cobbler可以使用命令行方式管理,也提供了基于Web的界面管理工具(cobbler-web),还提供了API接口,可以方便二次开发使用。
Cobbler是较早前的kickstart的升级版,优点是比较容易配置,还自带web界面比较易于管理。
Cobbler内置了一个轻量级配置管理系统,但它也支持和其它配置管理系统集成,如Puppet,暂时不支持SaltStack。
kickstart基本原理拓扑图
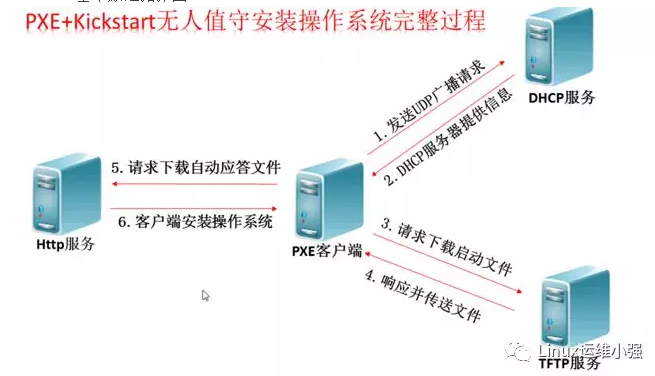
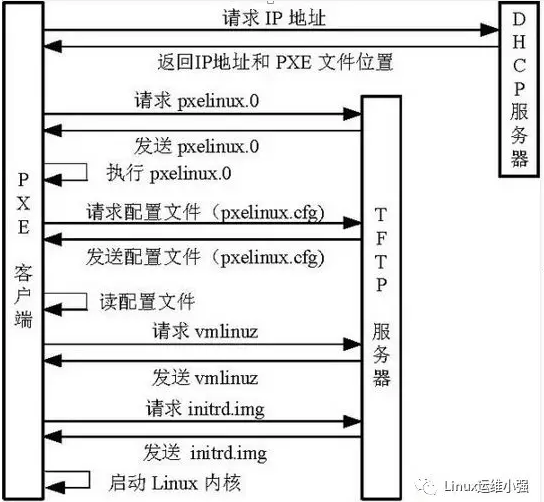
cobbler和kickstart原理是一致的,只是个人认为cobbler比较好用
搭建
直接给命令了,红字(不包括前边的#,#只是代表命令行)
环境准备
系统版本CentOS7.2
# cat /etc/redhat-release
CentOS Linux release 7.2.1511 (Core)
关闭selinux
# getenforce
Disabled
关闭防火墙
# systemctl status firewalld.service
● firewalld.service - firewalld - dynamic firewall daemon
Loaded: loaded (/usr/lib/systemd/system/firewalld.service; disabled; vendor preset: enabled)
Active: inactive (dead)
# hostname -I #本机IP地址
192.168.110.18
yum源
# curl -o /etc/yum.repos.d/CentOS-Base.repohttp://mirrors.aliyun.com/repo/Centos-7.repo
# curl -o /etc/yum.repos.d/epel.repo http://mirrors.aliyun.com/repo/epel-7.repo
使用yum安装cobbler
# yum -y install cobbler cobbler-web dhcp tftp-serverpykickstart httpd
启动http和cobbler
# systemctl start httpd.service
# systemctl start cobblerd.service
进行语法检查
# cobbler check
出现8个错,英文的让你修改配置
解决报错
# cp /etc/cobbler/settings{,.ori}
# sed -i 's/server: 127.0.0.1/server: 192.168.110.18/'/etc/cobbler/settings
# sed -i 's/next_server: 127.0.0.1/next_server: 192.168.110.18/'/etc/cobbler/settings
# sed -i 's/manage_dhcp: 0/manage_dhcp: 1/'/etc/cobbler/settings #防止重装
# sed -i 's/pxe_just_once: 0/pxe_just_once: 1/'/etc/cobbler/settings #修改dhcp模板
# sed -ri "/default_password_crypted/s#(.*:).*#\1\" `openssl passwd -1 -salt cobbler '123456'` \"#"/etc/cobbler/settings ###123456是root密码
# sed -i 's#yes#no#' /etc/xinetd.d/tftp
配置dhcp 照着改吧
# vim /etc/cobbler/dhcp.template
subnet 192.168.110.0 netmask 255.255.255.0 {
optionrouters 192.168.110.1; #网关
optionsubnet-mask 255.255.255.0; #子网掩码
rangedynamic-bootp 192.168.110.33 192.168.110.99; ##自动分配的ip段
default-lease-time 21600;
max-lease-time 43200;
:wq #改完了保存退出
重启
# systemctl restart rsyncd tftp.socket cobblerd
# systemctl enable rsyncd tftp.socket cobblerd
启动rsync服务
# systemctl start rsyncd.service
# systemctl enable rsyncd.service
同步 (每次改完配置都要同步)
# cobbler sync
下载包所需的软件包(cobbler下载自己所需要的文件)
# cobbler get-loaders
# ls /var/lib/cobbler/loaders
COPYING.elilo elilo-ia64.efi menu.c32 yaboot
COPYING.syslinux grub-x86_64.efi pxelinux.0
COPYING.yaboot grub-x86.efi README
debian相关无需修改(不用debian就不需要管了)
再次检查
# cobbler check
The following are potential configurationitems that you may want to fix:
1 : debmirror package is not installed, itwill be required to manage debian deployments and repositories
2 : fencing tools were not found, and arerequired to use the (optional) power management features. install cman orfence-agents to use them
Restart cobblerd and then run 'cobblersync' to apply changes.
重启所有服务
systemctl restart httpd cobblerd dhcpd rsyncdtftp.socket
cobbler安装完成,下面进行web界面的操作。
cobbler的web及界面操作
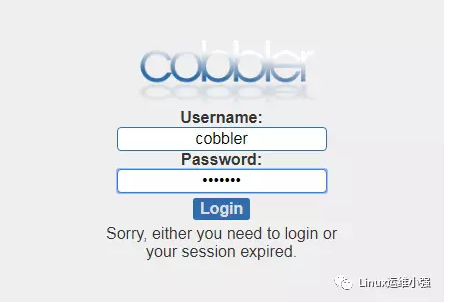
浏览器访问https://192.168.110.18/cobbler_web
注意CentOS7中cobbler只支持https访问。
账号密码默认均为cobbler
操作说明--导入镜像
在虚拟机上添加上镜像
vmware:
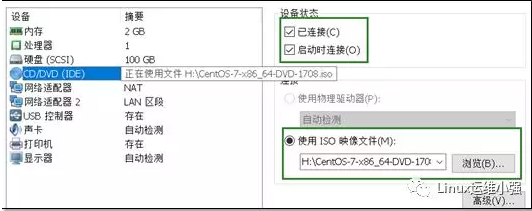
挂载上镜像
# mount /dev/cdrom /mnt/
mount: /dev/sr0 is write-protected,mounting read-only
# df -h |grep mnt
/dev/sr0 4.3G 4.3G 0 100% /mnt
进行导入镜像
选择ImportDVD 输入Prefix(命名),Arch(架构),Breed(版本),Path(镜像的路径)
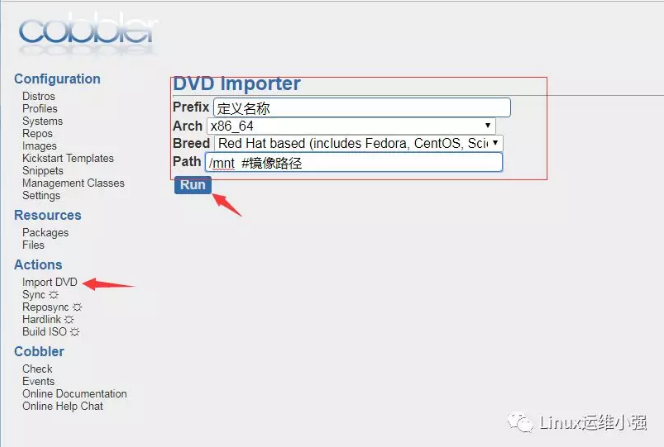
# ls /var/www/cobbler/ks_mirror/
CentOS7x86_64 config
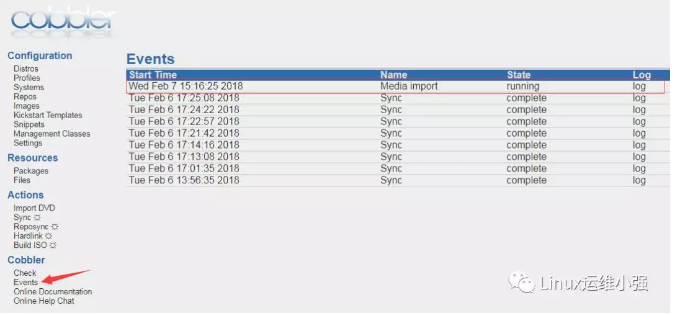
导入过程使用rsync进行导入,三个进程消失表示导入完毕
# ps -ef |greprsync
创建一台空白虚拟机,进行测试网路安装
注意:虚拟机的内存不能小于2G,网卡的配置要保证网络互通
启动虚拟机
启动虚拟机即可发现会有cobbler的选择界面
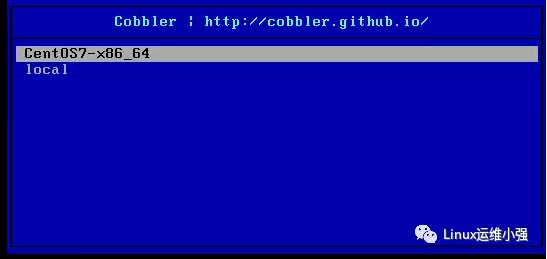
此界面修改
# more /etc/cobbler/pxe/pxedefault.template
DEFAULT menu
PROMPT 0
MENU TITLE Cobbler | http://cobbler.github.io/
TIMEOUT 100
TOTALTIMEOUT 6000
ONTIMEOUT $pxe_timeout_profile
MENU DEFAULT
$pxe_menu_items
LABEL local
MENU LABEL(local)
LOCALBOOT -1
MENU end
定制化安装操作系统
添加内核参数
查看导入的镜像,点击edit
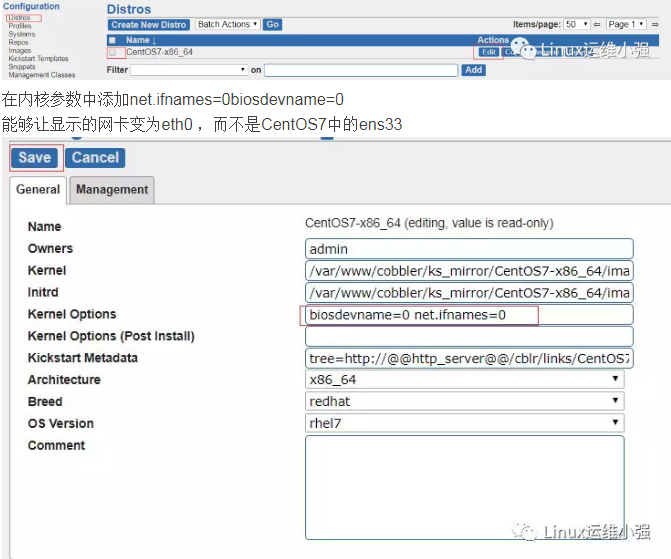
在内核参数中添加net.ifnames=0biosdevname=0
能够让显示的网卡变为eth0 ,而不是CentOS7中的ens33
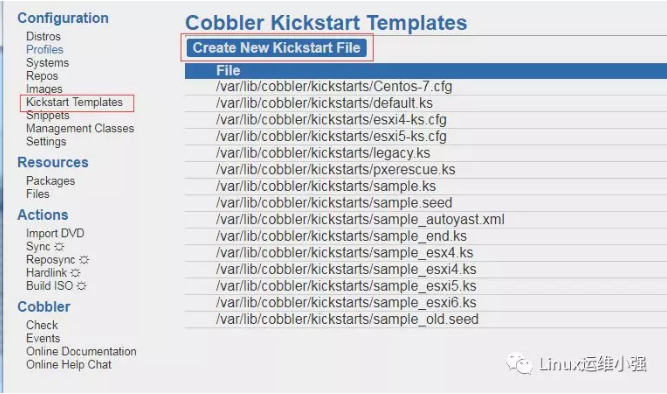
编写ks文件
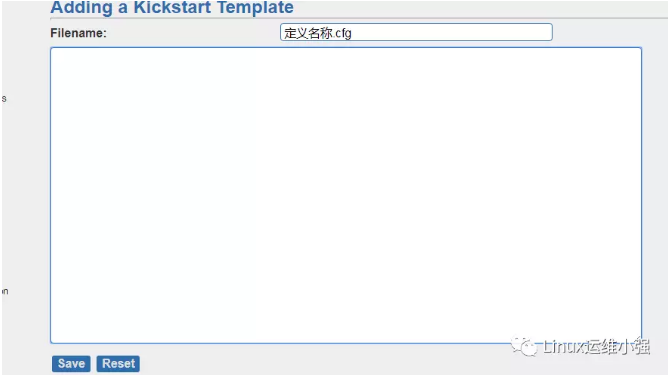
参考
install
url --url=$tree
text
lang en_US.UTF-8
keyboard us
zerombr
bootloader --location=mbr --driveorder=sda--append="crashkernel=auto rhgb quiet"
#Network information
$SNIPPET('network_config')
#network --bootproto=dhcp --device=eth0--onboot=yes --noipv6 --hostname=CentOS7
timezone --utc Asia/Shanghai
authconfig --enableshadow --passalgo=sha512
rootpw --iscrypted $default_password_crypted
clearpart --all --initlabel
part /boot --fstype xfs --size 1024
part swap --size 2048
part / --fstype xfs --size 1 --grow
firstboot --disable
selinux --disabled
firewall --disabled
logging --level=info
reboot
%pre
$SNIPPET('log_ks_pre')
$SNIPPET('kickstart_start')
$SNIPPET('pre_install_network_config')
# Enable installation monitoring
$SNIPPET('pre_anamon')
%end
%packages
@^minimal
@compat-libraries
@core
@debugging
@development
bash-completion
chrony
dos2unix
kexec-tools
lrzsz
nmap
sysstat
telnet
tree
vim
wget
lsof
net-tools
%end
%post
systemctl disable postfix.service
%end
路径为/var/lib/cobbler/kickstarts/
小技巧:如果想定义开机执行命令在倒数第二行添加
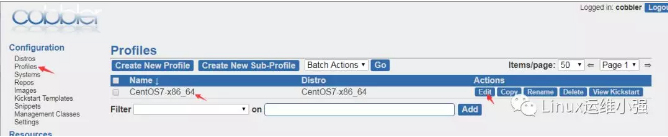
设置profile
选择刚才创建的cfg文件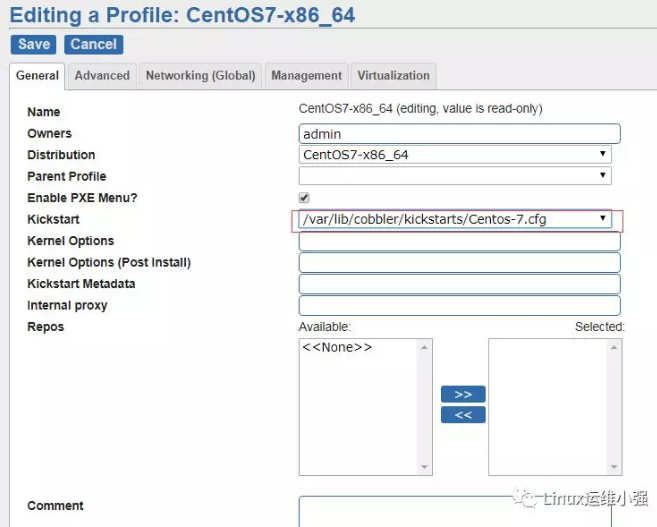
自定义安装系统
选择systems 创建一个新的系统
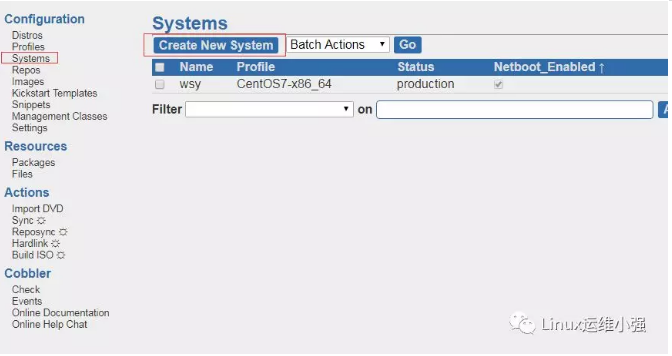
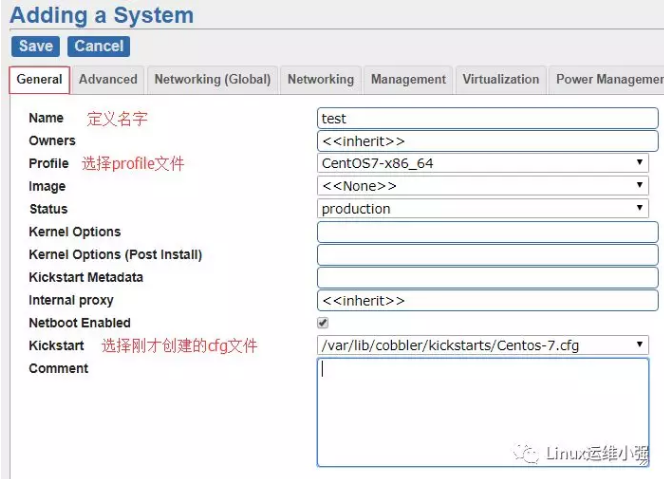
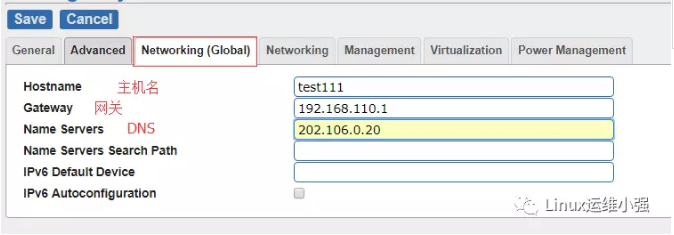
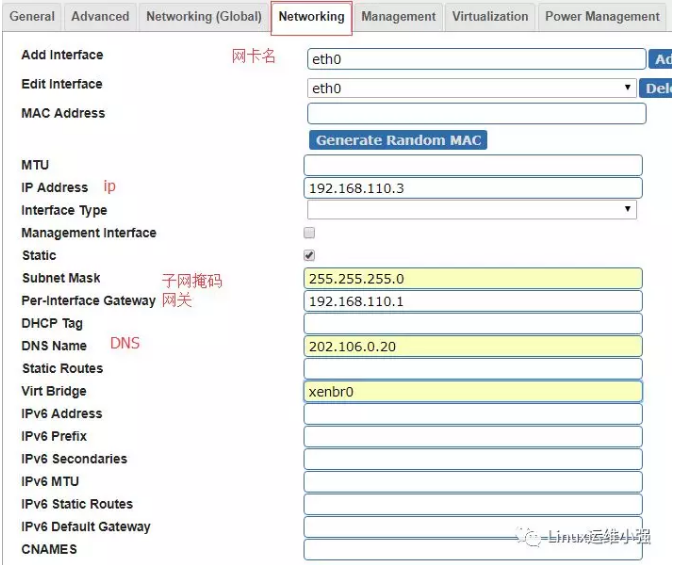
以上的所有配置完成后,点击Save进行保存
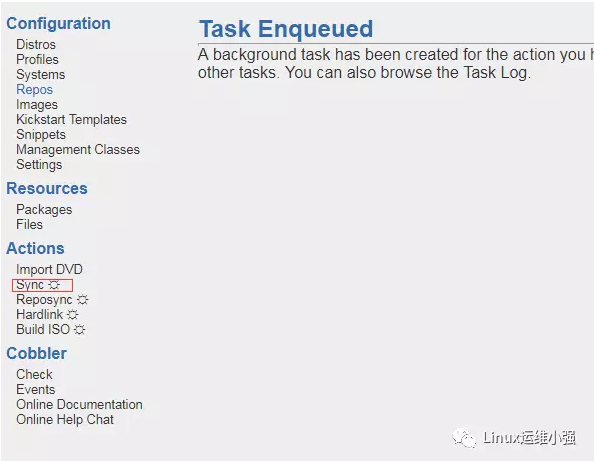
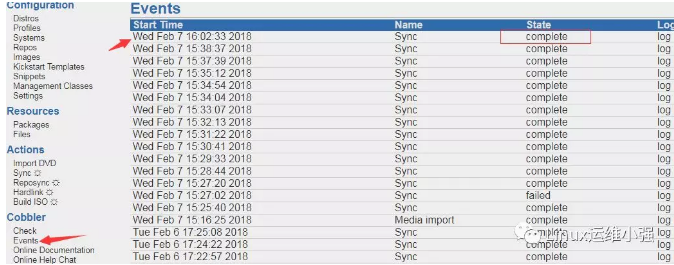
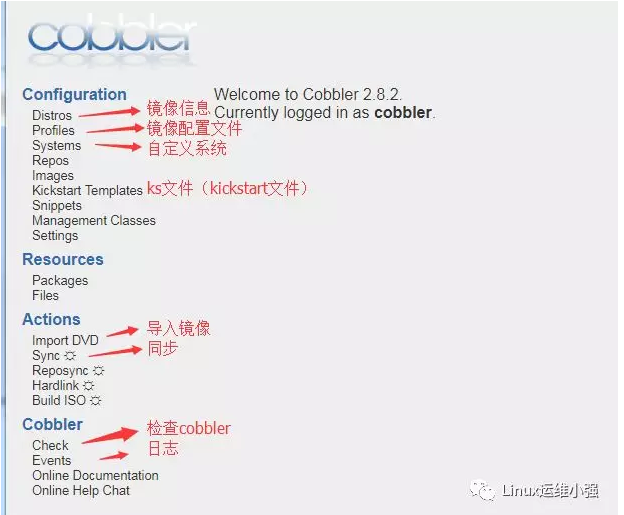
开启虚拟机
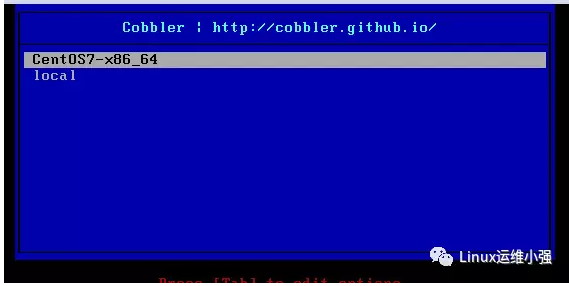
回车~
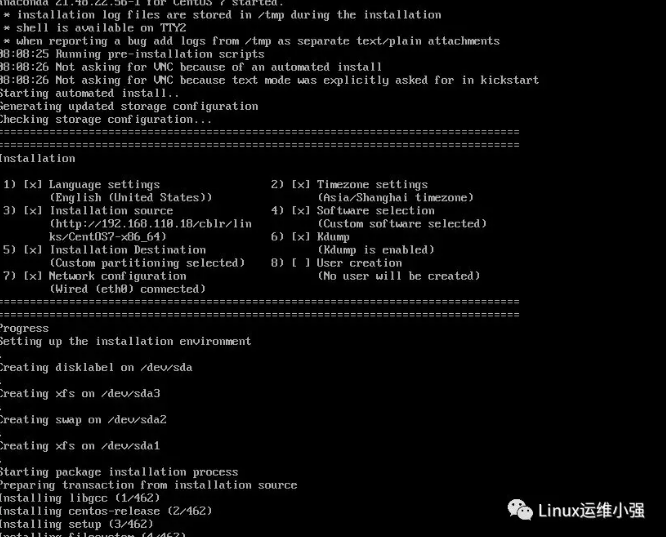
一键装机到此结束
Cobbler无人值守安装linux系统的更多相关文章
- 如何无人值守安装linux系统(上)
如何开始 Linux 的无人值守安装 一.预备知识: I.什么是PXE PXE并不是一种安装方式,而是一种引导方式.进行PXE安装的必要条件是要安装的计算机中包含一个PXE支持的网卡(NIC),即网卡 ...
- 无人值守安装linux系统
需要使用到的服务:PXE + DHCP+TFTP+ Kickstart+ FTP KickStart是一种无人职守安装方式 执行 PXE + KickStart安装需要准备内容: • DHCP 服务 ...
- (转)Cobbler无人值守批量安装Linux系统
本文目录: 1.1 pxe安装系统 1.2 cobbler基本介绍 1.3 安装和配置cobbler 1.3.1 安装cobbler 1.3.2 配置dhcp和tftp 1.4 cobbler从本地光 ...
- CentOS7.x安装cobbler无人值守安装系统
CentOS7.x cobbler无人值守安装 cobbler介绍 自打若干年前 Red Hat,推出了 Kickstart,不再需要刻了光盘一台一台地安装 Linux,只要搞定 PXE.DHCP.T ...
- 其他综合-Cobbler无人值守安装系统 CentOS 7
Cobbler 无人值守安装系统 CentOS 7 1.实验描述 1.1 概述 作为运维,在公司经常遇到一些机械性重复工作要做,例如:为新机器装系统,一台两台机器装系统,可以用光盘.U盘等介质安装,1 ...
- Vmware部署Linux无人值守安装Centos7系统
Linux - 无人值守安装服务 # 需求分析 - 使用光盘镜像来安装 Linux 系统的方式; 坦白讲, 该方法适用于只安装少量 Linux 系统的情况, 如果生产环境中有数百台服务器都需安装系统, ...
- (转)COBBLER无人值守安装
COBBLER无人值守安装 说在最前面的话 在看Cobbler之前请大家先看一下Kickstart无人值守安装,了解一下Cobbler的实现原理.但是Cobbler是独立的,不需要先安装Kicksta ...
- Linux:U盘安装Linux系统
前天一个同学找我帮忙安装Linux系统,没有光盘,也不想在虚拟机里安装,在此情况下,我就采用U盘方式来安装Linux系统了.又想到还有其他人可能也不会 使用U盘安装系统,这里就作一个简单的介绍. 1. ...
- 虚拟机安装Linux系统图文教程
虚拟机安装Linux系统图文教程 | 浏览:523 | 更新:2014-09-16 15:31 1 2 3 4 5 6 7 分步阅读 Linux系统的安装 工具/原料 VMware 9.0 虚拟机 L ...
随机推荐
- FDMemTable三层提交数据总是不成功的原因
提交数据的代码如下: procedure TForm1.btnSaveClick(Sender: TObject);var LDeltas: TFDJSONDeltas;begin if FDMemT ...
- 【转发】在SQL Server中通过字段值查询存储该字段的表
-- Copyright © 2002 Narayana Vyas Kondreddi. All rights reserved. -- Purpose: To search all colu ...
- Varnish 学习资料收集
高性能HTTP加速器Varnish(安装配置篇) 利用Varnish构建Cache服务器笔记 Varnish代理服务器部署 Varnish基础概念详解 Varnish的配置语言VCL及其内置变量介绍 ...
- SQL集合运算
注:UserInfo一共29条记录 select * from UserInfo union --并集(29条记录)(相同的只出现一次) select * from UserInfo select * ...
- trace sql log
C:\Windows\system32>cd /d d:\PSSDIAG\pssd_2k12_x64 d:\PSSDIAG\pssd_2k12_x64>pssdiag.cmd 2014/ ...
- 【12c OCP】最新CUUG OCP-071考试题库(52题)
52.(12-11) choose the best answer: Examine the structure and data in the PRICE_LIST table: You plan ...
- 原生JS实现JQuery的addClass和removeClass
代码如下: document.getElementById("btn").classList.add("active"); document.getElemen ...
- Python Pymongo中Connection()与MongoClient()差异
在git找了几个blog的源码,在学习的过程中,发现有人使用Connection(),有人却在使用MongoClient(),那么到底两者有什么差别呢? 且看分析如下: db = Connection ...
- ASP.NET MVC 发布后 IE 访问出现布局错乱问题
ASP.NET MVC 网页debug启动跑一切正常,[Chrome],[FireFox],[Edge],[IE11] 发布后,使用机器名访问,[IE11]出现布局不正常的问题, 在head里:加↓可 ...
- Ubuntu下实现socks代理转http代理
代理(英语:Proxy),也称网络代理,是一种特殊的网络服务,允许一个网络终端(一般为客户端)通过这个服务与另一个网络终端(一般为服务器)进行非直接的连接.一些网关.路由器等网络设备具备网络代理功能. ...