react-router 学习笔记
前言:
本文为个人学习react-router的总结。包括路由基础配置,跳转,权限管理,组件与路由配置的关系,代码分割。欢迎交流指导。
一、路由基础
1.路由配置 & 显示路由组件的view(类比angular的ui-view)
路由配置:路由匹配的规则
render((

    <Router history={ hashHistory }>

        <Route path="/" component={ App }>

            <Route path="select" component={ Select }></Route>

            <Route path="found" component={ Found }></Route>

            <Route path="follow" component={ Follow }></Route>

            <Route path="my" component={ My }>

                <Route path=":myname" component={ MyName }></Route>

                <Route path="mysex" component={ MySex }></Route>

            </Route>

        </Route>

    </Router>

), document.getElementById('root'));
view:放置路由组件的地方(URL匹配了,然后对应的组件应该放到什么地方去),
每一个Route都只是一个组件,子路由就是 this.props.children 里面的组件,Route通过匹配URL决定显示哪一个子路由
class App extends PureComponent {

    render() {

        return (

            <div>

                <GlobalNav />

                { this.props.children } { /* this.props.children 是被嵌套在App的组件,相当于放子路由的View*/}

            </div>

        )

    }

}
二、默认路由(IndexRoute )
组件<App /> 的匹配路径是 ‘/', 有四个子路由,当前路由只是'/',那么<App />应该显示什么页面呢?
这里给与IndexRoute组件 -- 若希望直接使用4个其中一个则使用IndexRedirect
render((

    <Router history={ hashHistory }>

        <Route path="/" component={ App }>

            <IndexRoute component={ IndexApp } />

            <Route path="select" component={ Select }></Route>

            <Route path="found" component={ Found }></Route>

            <Route path="follow" component={ Follow }></Route>

            <Route path="my" component={ My }>

                <Route path=":myname" component={ MyName }></Route>

                <Route path="mysex" component={ MySex }></Route>

            </Route>

        </Route>

    </Router>

), document.getElementById('root'));
如果不使用IndexRoute组件,也还有一种投机取巧的方法,直接在 App组件中,使用 {this.props.children || <IndexApp />} ,在ui展示的层面上修改this.props.children为undefined的情况。
缺点:这种形式,没有参与到路由机制中,onEnter,onLeave 等HOOK都无法使用
三、路由跳转
1. IndexLink & Link (active状态之争)
倘若有如下两个链接,正好URL是'/my/mioawwwww', 两个路由都匹配的了,那么就是两个都是active状态(相应地添加activeStyle,activeClassName的样式)
<Link to="/my" >Mypage</Link>

<Link to="/my/:myname" >myname</Link>
若你只想为 <Link to="/my/:myname" >myname</Link> 这一个按钮添加active样式,就可以为 <Link to="/my" >Mypage</Link> 使用IndexLink
<IndexLink to="/my" >Mypage</IndexLink>

<Link to="/my/:myname" >myname</Link>
IndexLink是补充Link的,只要URL完整匹配'/my'的时候才会激活active状态
2.跳转参数 to
2.1:通过 to=’xx/xx' 直接跳转 <Link to={`/my/${myname}/info`}>check my info</Link>
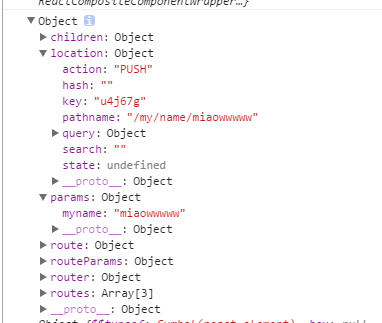
2.2:to=对象,带参数跳转(pathname, query, hash, state(额外数据)),注意:这些参数都被存放到this.props.location中
<li><Link to={{pathname:"/select", hash:'#ahash', query:{foo: 'bar', boo:'boz'}, state:{data:'miao'} }} activeClassName="GlobalNav-active">精选</Link></li>
2.3:to=函数,注册到路由跳转事件中,每一次路由变化,都会执行该函数,并经最新的location作为参数
<Link to={location => ({ ...location, query: { name: 'ryan' } })}>

  Hello

</Link>
2.4:不使用Link,在函数内直接操作router
旧版本:由于router只用的context传递路由信息,因此每一个组件都可以轻易的通过this.context.router获取路由
新版本:router被放置在this.props中,通过this.props.router可以获取路由
注意:push与replace的区别,一个是添加,一个是替换,历史记录中被替换的已经不存在了,所以浏览器回退不到替换前的页面。
    changeRouter = () => {

        console.log(this.props)

        // this.props.router.push('/follow');

        // this.props.router.push({

        //     pathname:'/follow',

        //     state:{name:'xxx'},

        //     query: {foo: 'bar'}

        // })

        // this.props.router.replace('/follow');

        this.props.router.replace({

            pathname: '/follow',

            query: {foo:'bar'}

        })

    }
3.若不是Route组件,而是Route的子组件,则this.props.router === undefined
若不使用Link,有两种方法
3.1 contextTypes
    static contextTypes = {

        router: PropTypes.object

    }

    handleClick = (e) => {

        e.stopPropagation();

        e.preventDefault();

        this.context.router.push('login');

                //...
3.2 引入browserHistory,hashHistory
import {browserHistory} from 'react-router';

//...

    handleClick = (e) => {

        e.stopPropagation();

        e.preventDefault();

        browserHistory.push('login')

        //...
四、重定向
<Redirect>:重定向到同等级的其他路由
<Redirect from="name/xxx" to='mysex' />
render((

    <Router history={ browserHistory }>

        <Route path="/" component={ App }>

            <IndexRoute component={ IndexApp } />

            <Route path="select" component={ Select }></Route>

            <Route path="found" component={ Found } onEnter={onEnterHook} onLeave={onLeaveHook}></Route>

            <Route path="follow" component={ Follow }>

            </Route>

            <Route path="my" component={ My } >

                <Redirect from="name/xxx" to='mysex' />

                <Route path="name/:myname" component={ MyName }>

                    <Route path="info" component={ MyInfo } ></Route>

                </Route>

                <Route path="mysex" component={ MySex } />

            </Route>

            <Redirect from="*" to='/' />

        </Route>

    </Router>

), document.getElementById('root'));
<IndexRedirect>:从父路由的目录开始重定向
<Route path="/" component={App}>

  <IndexRedirect to="/welcome" />

  <Route path="welcome" component={Welcome} />

  <Route path="about" component={About} />

</Route>
五、路由机制的权限
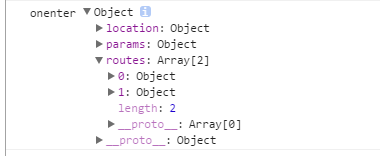
1.onEnter
const onEnterHook = (nextState, replace /*,cb*//*若添加cb参数,钩子变成异步执行,cb返回之前,将发生阻塞*/) => {

    console.log('onenter', nextState);

    // replace // 是router.replace(),若访问者没有权限,则引导到其他页面

}
nextState的属性
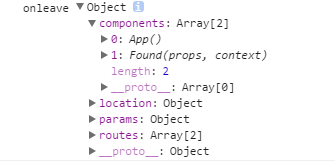
2.onLeave:与onEnter类似,nextState属性不同
3.onChange(prevState, nextState, replace, callback?) ,用于子路由,
进入该路由的某个子路由是触发,或者改变query,hash
一旦添加onChange属性,则子路由通过onChangeHook决定,Link不起作用
六、组件与路由的一一对应关系,按需加载组件
<Route path="follow" component={ Follow }></Route> // this.props.children;

<Route path="follow" component={ {main:Follow, sidebar: Sidebar} }></Route> // const { main, sidebar } = this.props;
异步加载组件,使用(需要加上 require.ensure([], (require) => {}) 实现代码分割
getComponent(nextState, callback) && getComponents(nextState, callback)
cb(err, component)
  getComponent(nextState, cb) {

    require.ensure([], (require) => {

      cb(null, require('./components/Calendar'))

    })

  }
七、每一个Route组件的属性
八、另一种路由配置的方式
const selectRouter = {

    path:'select',

    component: Select

}

const foundRouter = {

    path:'found',

    component: Found

}

const myRouter = {

    path:'my',

    getComponent(nextState,cb) {

        cb(null, My)

    }

}

// import Follow from './components/Follow.js';

const followRouter = {

    path:'follow',

    getComponent(nextState,cb) {

        require.ensure([], (require) => {

            cb(null, require('./components/Follow'))

        })

    }

    // getComponent(nextState, cb) {

    //     cb(null, Follow)

    // }

}

const rootRouter = {

    path: '/',

    component: App,

    // indexRoute: {component:IndexApp},

    childRoutes: [

        selectRouter,

        foundRouter,

        followRouter,

        // require('./components/Follow.index'),

        myRouter

        ]

}

// const rootRouter = {

//     path: '/',

//     component: App,

//     getIndexRoute(partialNextState, cb) {

//         cb(null,  {compoment:IndexApp});

//     },

//     getChildRoutes(location, cb) {

//         cb(null, [

//             selectRouter,

//             foundRouter,

//             followRouter,

//             myRouter

//         ])

//     }

// }

render(

    <Router history={browserHistory} routes={rootRouter} />,

    document.getElementById('root')

)
代码分割的注意事项:
1. require.ensure中分割的组件,需要使用module.export 暴露出来
module.exports = xxx; //可获取xxx组件

export default xxx // 不可获取xxx组件
2. getComponent,getComponents,getIndexRoute,getChildRoutes只是实现了异步加载,要实现代码分割还是要使用require.ensure
react-router 学习笔记的更多相关文章
- React Router学习笔记(转自阮一峰老师博客)
React Router是一个路由库,通过管理URL来实现组件切换和状态转变. 1.安装和使用 $ npm install -S react-router 在使用时,作为React组件导入 impor ...
- React 入门学习笔记整理目录
React 入门学习笔记整理(一)--搭建环境 React 入门学习笔记整理(二)-- JSX简介与语法 React 入门学习笔记整理(三)-- 组件 React 入门学习笔记整理(四)-- 事件 R ...
- The Road to learn React书籍学习笔记(第二章)
The Road to learn React书籍学习笔记(第二章) 组件的内部状态 组件的内部状态也称为局部状态,允许保存.修改和删除在组件内部的属性,使用ES6类组件可以在构造函数中初始化组件的状 ...
- The Road to learn React书籍学习笔记(第三章)
The Road to learn React书籍学习笔记(第三章) 代码详情 声明周期方法 通过之前的学习,可以了解到ES6 类组件中的生命周期方法 constructor() 和 render() ...
- React Native 学习笔记--进阶(二)--动画
React Native 进阶(二)–动画 动画 流畅.有意义的动画对于移动应用用户体验来说是非常必要的.我们可以联合使用两个互补的系统:用于全局的布局动画LayoutAnimation,和用于创建更 ...
- React Redux学习笔记
React Router React Router 使用教程 Redux中间件middleware [译]深入浅出Redux中间件 Redux学习之一:何为middleware? ES6 ES6新特性 ...
- React+Redux学习笔记:React+Redux简易开发步骤
前言 React+Redux 分为两部分: UI组件:即React组件,也叫用户自定义UI组件,用于渲染DOM 容器组件:即Redux逻辑,处理数据和业务逻辑,支持所有Redux API,参考之前的文 ...
- The Road to learn React书籍学习笔记(第一章)
react灵活的生态圈 Small Application Boilerplate: create-react-app Utility: JavaScript ES6 and beyond Styli ...
- React Router学习
React Router教程 本教程引用马伦老师的的教程 React项目的可用的路由库是React-Router,当然这也是官方支持的.它也分为: react-router 核心组件 react-ro ...
- React 入门学习笔记整理(九)——路由
(1)安装路由 React-router React-router提供了一些router的核心api,包括Router, Route, Switch等,但是它没有提供dom操作进行跳转的api. Re ...
随机推荐
- 在XAMPP上建立多个域名的站点
XAMPP默认安装完毕后,站点文件默认放在/xampp/htdocs/ 文件下,并且可以通过http://localhost 进行访问.先前在测试各种程序的时候均是在/xampp/htdocs/ 文件 ...
- h2database. 官方文档
http://www.h2database.com/html/advanced.html http://www.h2database.com/html/tutorial.html#csv http:/ ...
- 11.10document对象练习
<!DOCTYPE html PUBLIC "-//W3C//DTD XHTML 1.0 Transitional//EN" "http://www.w3.org/ ...
- Extjs5.0中的新特性
We are excited that Ext JS 5 is now available! Ext JS 5 introduces many new and exciting improvement ...
- 《算法导论》习题2.3-5 二分搜索 Binary Search
地球人都知道“二分查找”,方法也非常简单,但是你能不能在10分钟内写出一个没有bug的程序呢? 知易行难,自己动手写一下试一试吧. public class BinarySearch { public ...
- thinkphp ,进行关联模型的时候出现的问题,版本是3.2
看的后盾网络视频,里面操作的是3.1. 我用的是onethink,基于3.2. 在关联模式的操作时.主要是user role role_user 3个张表 视频中可以操作,但是本地操作出现问题. ...
- 3)Java学习笔记:内部类
什么是内部类 内部类是指在一个外部类的内部再定义一个类.内部类作为外部类的一个成员,并且依附于外部类而存在的.内部类可为静态,可用protected和private修饰(而外部类只能使用public和 ...
- UVa 908 - Re-connecting Computer Sites
题目大意:有n个网站,由m条线路相连,每条线路都有一定的花费,找出连接所有线路的最小花费. 最小生成树问题(Minimal Spanning Tree, MST),使用Kruskal算法解决. #in ...
- Html 定位position
CSS position属性和实例应用 目前几乎所有主流的浏览器都支持position属性("inherit"除外,"inherit"不支持所有包括IE8和 ...
- 大话设计模式--委托--IOS
最近看了一些关于IOS委托的文章,看完之后,感觉不大好. 引文: 委托delegation是一种简单但是功能强大的设计模式,它的功能是程序中一个对象代表另一个对象,或者一个对象与另外一个对象协同工作. ...