iOS动画案例(1)
受人所托,模仿qq账号信息里的一个动画,感觉挺有意思,也没感觉有多难,就开始做了,结果才发现学的数学知识都还给体育老师了,研究了大半天才做出来。
先看一下动画效果:

用到的知识点:
(1)三角函数
(2)CALayer
(3)CATransaction
(4)UIBezierPath
(5)CAKeyframeAnimation
(6)CAAnimationGroup
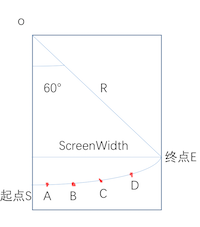
如图,这明显是一段圆弧,那么要确定这段一段圆弧的位置,就得确定这段圆弧的圆心和圆心角。我规定圆心在手机屏幕的左顶点,也就是(0,0),圆心角为60°。别问我为什么这么确定,我也是一点点尝试的。我们先设手机屏幕的宽度为 ScreenWidth,圆弧半径为R;那么R = ScreenWidth/cos(60°);知道了这些开始画圆弧。
    // 屏幕的宽度

    CGFloat width = [UIScreen mainScreen].bounds.size.width;

    // 圆半径

    float r = 2 * width / sqrt(3);

    // 画曲线

    UIColor *color = [UIColor redColor];

    [color set];

    UIBezierPath *path = [UIBezierPath bezierPathWithArcCenter:CGPointMake(0, 0) radius:r startAngle:M_PI / 2 endAngle:M_PI / 6 clockwise:NO];

    path.lineWidth = 1.0;

    path.lineCapStyle = kCGLineCapRound;

    path.lineJoinStyle = kCGLineJoinRound;

    [path stroke];
确定了圆心角和半径就要确定ABCD四个点的坐标了,分别作为四张图片的圆心。圆弧SA和圆弧DE的圆心角一样,设定为7.5°,那么弧AB、弧BC、弧CD的圆心角设定为相等,分别为(60 - 7.5 * 2)/ 3 = 15°。那么A点的坐标就等于(R * sin7.5,R * cos7.5°);B,C,D点的坐标一样用三角函数求,分别为(R * sin22.5,R * cos22.5°),(R * sin37.5,R * cos37.5°),(R * sin52.5,R * cos52.5°)。ABCD其实都是一个按钮,下面开始放按钮。
// 放图片

    for (int i = 0; i < 4; i++) {

        // 一共四个按钮 从左到右index分别为0,1,2,3

        UIButton *button = [UIButton buttonWithType:UIButtonTypeCustom];

        button.frame = [self getButtonFrame:i];

        button.tag = i + 1;

        [button addTarget:self action:@selector(buttonClick:) forControlEvents:UIControlEventTouchUpInside];

        [button setImage:[UIImage imageNamed:[NSString stringWithFormat:@"%d",i + 1]] forState:UIControlStateNormal];

        // 设置按钮为圆

        button.layer.cornerRadius = 25;

        button.layer.borderColor = [UIColor greenColor].CGColor;

        button.layer.masksToBounds = YES;

        button.layer.borderWidth = 2.0f;

        [self addSubview:button];

    }

    // 根据Index确定按钮的坐标

    - (CGRect)getButtonFrame: (int) index {

    float radians = M_PI * (7.5 + 15 * index) / 180;

    CGFloat width = [UIScreen mainScreen].bounds.size.width;

    float r = 2 * width / sqrt(3);

    CGRect frame = CGRectMake(sin(radians) * r, cos(radians) * r, 50, 50);

    frame.origin.x = frame.origin.x - 25;

    frame.origin.y = frame.origin.y - 25;

    return frame;

 }
头像默认放第一个。
    self.head = [[UIImageView alloc] initWithFrame:[self getButtonFrame:0]];

    self.head.image = [UIImage imageNamed:@"myHead"];

    self.head.layer.borderColor = [UIColor greenColor].CGColor;

    self.head.layer.masksToBounds = YES;

    self.head.layer.cornerRadius = 25;

    self.head.layer.borderWidth = 2.0f;

    [self addSubview:self.head];
之后按钮点击之后,头像移动到按钮点击的地方。
// 按钮点击事件

- (void)buttonClick:(UIButton *)button {

    // 原来图片所在按钮的index

    int preIndex = [self getPreviousIndexByFrame:self.head.frame];

    int buttonIndex = (int)button.tag - 1;

    // 点击图片所在按钮 不做任何操作

    if (preIndex == buttonIndex) {

        return;

    }

    CGFloat width = [UIScreen mainScreen].bounds.size.width;

    float r = 2 * width / sqrt(3);

    //加入动画效果

    CALayer *transitionLayer = [[CALayer alloc] init];

    //显式事务默认开启动画效果,kCFBooleanTrue关闭 保证begin和commit 之间的属性修改同时进行

    transitionLayer.contents = self.head.layer.contents;

    transitionLayer.borderColor = [UIColor greenColor].CGColor;

    transitionLayer.masksToBounds = YES;

    transitionLayer.cornerRadius = 25;

    transitionLayer.borderWidth = 2.0f;

    transitionLayer.frame = self.head.frame;

    transitionLayer.backgroundColor=[UIColor blueColor].CGColor;

    [self.layer addSublayer:transitionLayer];

    self.head.hidden = YES;

    UIBezierPath *movePath;

    //路径曲线 贝塞尔曲线

    if (buttonIndex > preIndex) {

        // 向上滑 逆时针

        movePath = [UIBezierPath bezierPathWithArcCenter:CGPointMake(0, 0) radius:r startAngle:[self getAnticlockwiseByIndex:preIndex] endAngle:[self getAnticlockwiseByIndex:buttonIndex] clockwise:NO];

        [movePath moveToPoint:transitionLayer.position];

    }else {

        // 向下滑 顺时针

        movePath = [UIBezierPath bezierPathWithArcCenter:CGPointMake(0, 0) radius:r startAngle:[self getClockwiseAngleByIndex:preIndex] endAngle:[self getClockwiseAngleByIndex:buttonIndex] clockwise:YES];

        [movePath moveToPoint:transitionLayer.position];

    }

    //关键帧动画效果

    CAKeyframeAnimation *positionAnimation = [CAKeyframeAnimation animationWithKeyPath:@"position"];

    // 动画轨迹

    positionAnimation.path = movePath.CGPath;

    // 动画完成之后是否删除动画效果

    positionAnimation.removedOnCompletion = NO;

    // 设置开始的时间

    positionAnimation.beginTime = CACurrentMediaTime();

    CGFloat time =  0.7;

    if (labs(buttonIndex - preIndex) > 1) {

        time = 0.4 * labs(buttonIndex - preIndex);

    }

    //动画总时间

    positionAnimation.duration = time;

    // 动画的方式 淡入淡出

    positionAnimation.timingFunction=[CAMediaTimingFunction functionWithName:kCAMediaTimingFunctionEaseOut];

    // 执行完之后保存最新的状态

    positionAnimation.fillMode = kCAFillModeForwards;

    // 动画完成之后,是否回到原来的地方

    positionAnimation.autoreverses= NO;

    [transitionLayer addAnimation:positionAnimation forKey:@"opacity"];

    [CATransaction setCompletionBlock:^{

        [NSThread sleepForTimeInterval:time];

        self.head.hidden = NO;

        self.head.frame = button.frame;

        [transitionLayer removeFromSuperlayer];

    }];

}

// 根据Index获得顺时针的弧度

- (float)getAnticlockwiseByIndex: (NSInteger)index {

    return M_PI * (0.5  - (7.5 + 15 * index) / 180);

}

// 根据Index获得逆时针的弧度

- (float)getClockwiseAngleByIndex: (NSInteger)index {

    index = 3 - index;

    return M_PI * (30 + 7.5 + 15 * index) / 180;

}
这个动画的难点其实是确定四个按钮的坐标以及圆弧的半径,主要是学的数学都忘的差不多了,还好重新捡起来还算不难。GitHub下载地址,欢迎下载。
iOS动画案例(1)的更多相关文章
- iOS动画案例(2) 仿网易新闻标题动画
由于产品的需要,做了一个和网易新闻标题类似的动画效果,现在新闻类的APP都是采用这样的动画效果,来显示更多的内容.先看一下动画效果: 由于这个动画效果在很多场合都有应用,所以我专门封装了一个控 ...
- iOS动画案例(1) 仿qq账号信息里的一个动画
受人所托,模仿qq账号信息里的一个动画,感觉挺有意思,也没感觉有多难,就开始做了,结果才发现学的数学知识都还给体育老师了,研究了大半天才做出来. 先看一下动画效果: 用到的知识点: ( ...
- 《慕客网:IOS动画案例之会跳动的登入界面(下)》学习笔记 -Sketch的使用
导出选中的一个图片,比如这里我们选中background,然后点击软件的右下角,可以设置导出的尺寸: 然后添加1倍,2倍,3倍的尺寸,因为在ihpne6之后就需要这三个尺寸倍数的UI,以适应不同设备的 ...
- 《慕客网:IOS动画案例之会跳动的登入界面(上)》学习笔记 -Sketch的使用
选中需要放进文件夹里的文件,然后按command+G,就会自动生成文件夹并把需要放进的文件包含进去了.(组 Group) 选中需要锁住的图层,然后按command+shift+L就可以将图层锁住.(锁 ...
- IOS动画(Core Animation)总结 (参考多方文章)
一.简介 iOS 动画主要是指Core Animation框架.官方使用文档地址为:Core Animation Guide. Core Animation是IOS和OS X平台上负责图形渲染与动画的 ...
- (转)iOS动画Core Animation
文章转载:http://blog.sina.com.cn/s/blog_7b9d64af0101b8nh.html 在iOS中动画实现技术主要是:Core Animation. Core Animat ...
- 解析 iOS 动画原理与实现
这篇文章不会教大家如何实现一个具体的动画效果,我会从动画的本质出发,来说说 iOS 动画的原理与实现方式. 什么是动画 动画,顾名思义,就是能“动”的画.人的眼睛对图像有短暂的记忆效应,所以当眼睛看到 ...
- IOS动画隐式,显式,翻页
// ViewController.m // IOS动画0817 // // Created by 张艳锋 on 15/8/17. // Copyright (c) 2015年 张艳锋. Al ...
- iOS动画原理
1. iOS动画原理 本质:动画对象(这里是UIView)的状态,基于时间变化的反应 分类:可以分为显式动画(关键帧动画和逐帧动画)和隐式动画 关键帧和逐帧总结:关键帧动画的实现方式,只需要修改某个属 ...
随机推荐
- CultureInfo中重要的InvariantCulture
CultureInfo简述 CultureInfo类位于System.Globalization命名空间内,这个类和这个命名空间许多人都不了解也认为不需要太多了解,实际上,你写的程序中会经常间接得使用 ...
- phpmailer 的使用
[转载]http://blog.csdn.net/liruxing1715/article/details/7914974 <?php header('Content-Type:text/htm ...
- Unity中的CG编写Shader系列(Blend)
1.不透明度 当我们要将两个半透的纹理贴图到一个材质球上的时候就遇到混合的问题,由于前面的知识我们已经知道了片段着色器以及后面的环节的主要工作是输出颜色与深度到帧缓存中,所以两个纹理在每个像素上的颜色 ...
- iOS_init相关信息
第一.initWithNibName这个方法是在controller的类在IB中创建,但是通过Xcode实例化controller的时候用的. 第二.initWithCoder 是一个类在IB中创建但 ...
- hadoop重新启动之后Datanode无法启动的问题
每次将hadoop重新启动之后我们查看进程就会发现,namenode成功启动,然而datanode却不能重新启动,格式化以后也不行,百思不得其解,最后在终于在厦门大学的一篇博客里面找到了解决的方法,我 ...
- redis 学习
http://blog.csdn.net/z69183787/article/category/2923783
- mysql 千万量级的表的优化
参考: 一 大的优化方向: 数据结构优化,慢查询优化,索引优化,mysql参数设置优化 数据结构优化:先读写分离.再垂直拆分.再水平拆分! 说3点 1. 设计合适的索引,基于主键的查找,上亿数据也是 ...
- 【转】14个最佳的HTML/CSS设计和开发框架
专业的网页设计是既复杂又耗时的.它需要HTML和CSS框架的完美结合.这些框架不仅可以为设计方案增加特定的功能,还可以大大地节省时间和精力. 高效的框架不仅是网站设计的基础,它提供的各种丰富多彩的功能 ...
- 从损坏的wt文件中恢复出WiredTiger集合
Reference: http://dev.guanghe.tv/2016/06/recovering-a-wiredtiger-collection-from-a-corrupt-wt-file.h ...
- spark 1.6 idea本地运行错误
将spark maven更新至1.6,运行原有程序,发现以下错误: java.lang.IllegalArgumentException: System memory must be at least ...