
二维码的扫描和生成--第三方开源--ZXing
ZXing的二维码功能的提取lib下载地址:https://github.com/xuyisheng/ZXingLib
1.扫描二维码:
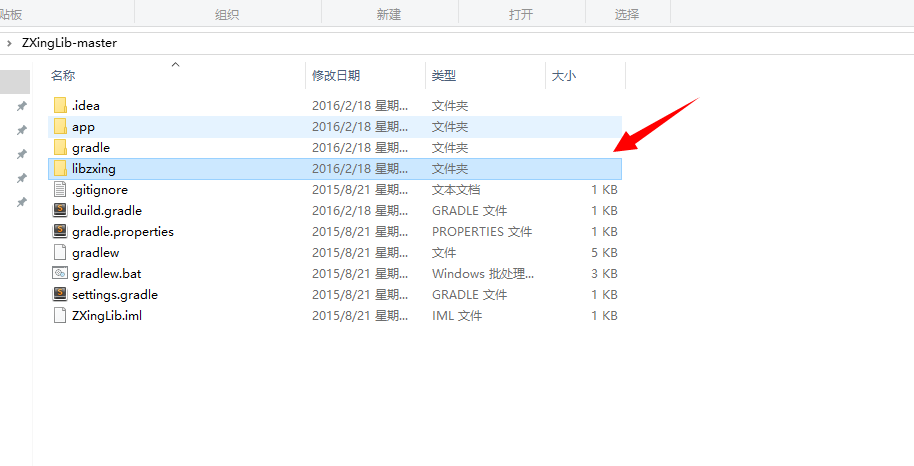
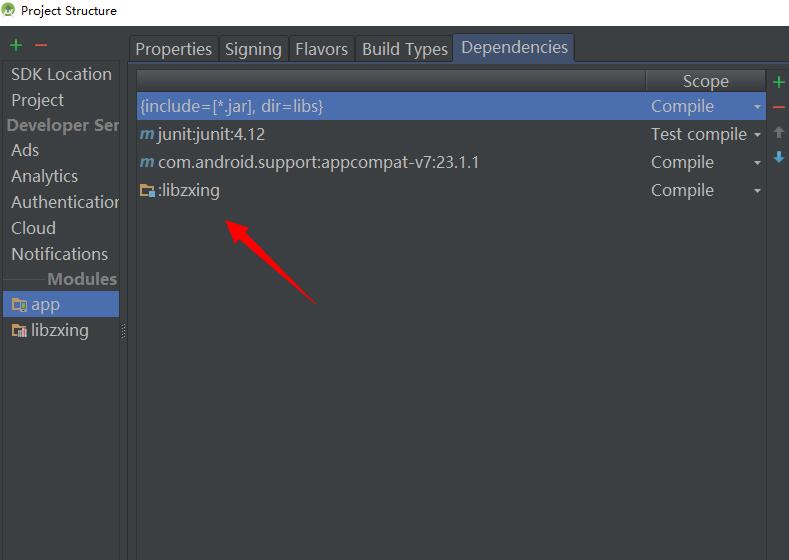
我们扫描就是要用到这个CaptureActivity类,直接把上面下载地址里面下载了里面的libzxing作为Module,如下图:
首先加上权限:
 <!-- 相机 -->

    <uses-permission android:name="android.permission.CAMERA" />

    <!-- 振动 -->

    <uses-permission android:name="android.permission.VIBRATE" />
我们既然把它作为Module了,那么我们也是可以拿来直接用,这里我们可以直接把依赖里面的关于CaptureActivity类的AndroidManifest.xml的注册信息拷贝过来放在我们这个项目中:
<activity

            android:name="com.xys.libzxing.zxing.activity.CaptureActivity"

            android:configChanges="orientation|keyboardHidden"

            android:screenOrientation="portrait"

            android:theme="@android:style/Theme.NoTitleBar.Fullscreen"

            android:windowSoftInputMode="stateAlwaysHidden">

        </activity>
我们在activity_main.xml中声明一个Button:
<Button

        android:id="@+id/btnSan"

        android:layout_width="match_parent"

        android:layout_height="wrap_content"

        android:text="扫描二维码" />
在JAVA代码中,初始化后添加点击事件:
 findViewById(R.id.btnSan).setOnClickListener(new View.OnClickListener() {

            @Override

            public void onClick(View v) {

                startActivityForResult(new Intent(MainActivity.this, CaptureActivity.class), 0);

            }

        });
查看返回的结果就在activity_main.xml中添加一个TextView查看:
<TextView

        android:id="@+id/tv_content"

        android:layout_width="wrap_content"

        android:layout_height="wrap_content" />
初始化后再JAVA代码中添加返回的代码:
 @Override

    protected void onActivityResult(int requestCode, int resultCode, Intent data) {

        // TODO Auto-generated method stub

        super.onActivityResult(requestCode, resultCode, data);

        if (resultCode == RESULT_OK) {

            String result = data.getExtras().getString("result");

            tv_content.setText(result);

        }

    }
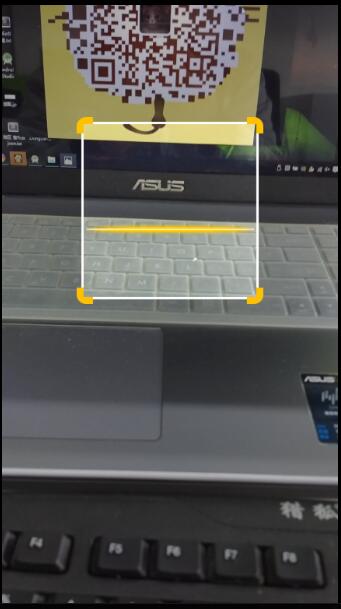
这样我们就可以看到返回的东西了,下面以微信为例子得到的结果:

2.生成二维码:
二维码生成起来,我们需要三个元素,要生成的内容,生成的按钮,生成内容的存放,所以我们layou_main.xml里面要添加这样的
 <EditText

        android:id="@+id/et_input"

        android:layout_width="match_parent"

        android:layout_height="wrap_content"

        android:layout_below="@+id/tv_content"

        android:layout_marginTop="10dp"

        android:hint="请输入要生成的二维码文字" />

    <Button

        android:id="@+id/btn_generate"

        android:layout_width="match_parent"

        android:layout_height="wrap_content"

        android:layout_below="@+id/et_input"

        android:layout_marginTop="10dp"

        android:text="生成二维码" />

    <ImageView

        android:id="@+id/img"

        android:layout_width="wrap_content"

        android:layout_height="wrap_content"

        android:layout_below="@+id/btn_generate"

        android:layout_centerHorizontal="true"

        android:layout_marginTop="10dp" />
我们把这几个控件都初始化一下,然后在Button的点击事件中写:
findViewById(R.id.btn_generate).setOnClickListener(new View.OnClickListener() {

            @Override

            public void onClick(View v) {

                String str = et_input.getText().toString();

                if (str.equals("")) {

                    Toast.makeText(MainActivity.this, "不能为空", Toast.LENGTH_SHORT).show();

                } else {

                    // 位图

                    try {

                        /**

                         * 参数:1.文本 2 3.二维码的宽高 4.二维码中间的那个logo

                         */

                        Bitmap bitmap = EncodingUtils.createQRCode(str, 500, 500, null);

                        // 设置图片

                        img.setImageBitmap(bitmap);

                    } catch (Exception e) {

                        // TODO Auto-generated catch block

                        e.printStackTrace();

                    }

                }

            }

        });
我们来运行一下,二维码就简单的生成了:
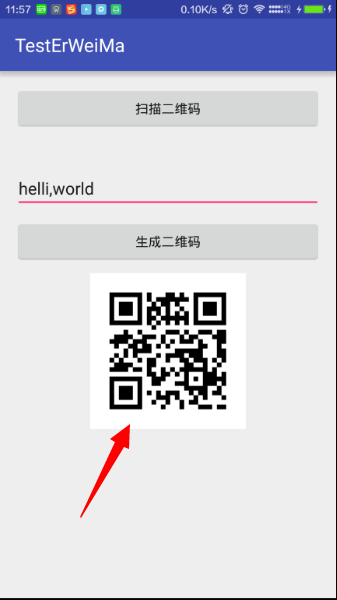
当然这个是没有logo的,如果需要添加logo的话,只需要把
Bitmap bitmap = EncodingUtils.createQRCode(str, 500, 500, null);
后面的null改为自己需要的logo就可以了

下面是完整的代码:
<?xml version="1.0" encoding="utf-8"?>

<RelativeLayout xmlns:android="http://schemas.android.com/apk/res/android"

    xmlns:tools="http://schemas.android.com/tools"

    android:layout_width="match_parent"

    android:layout_height="match_parent"

    android:paddingBottom="@dimen/activity_vertical_margin"

    android:paddingLeft="@dimen/activity_horizontal_margin"

    android:paddingRight="@dimen/activity_horizontal_margin"

    android:paddingTop="@dimen/activity_vertical_margin"

    tools:context="com.zzw.testerweima.MainActivity">

    <Button

        android:id="@+id/btnSan"

        android:layout_width="match_parent"

        android:layout_height="wrap_content"

        android:text="扫描二维码" />

    <TextView

        android:id="@+id/tv_content"

        android:layout_width="wrap_content"

        android:layout_height="wrap_content"

        android:layout_below="@+id/btnSan"

        android:layout_centerHorizontal="true"

        android:layout_marginTop="10dp" />

    <EditText

        android:id="@+id/et_input"

        android:layout_width="match_parent"

        android:layout_height="wrap_content"

        android:layout_below="@+id/tv_content"

        android:layout_marginTop="10dp"

        android:hint="请输入要生成的二维码文字" />

    <Button

        android:id="@+id/btn_generate"

        android:layout_width="match_parent"

        android:layout_height="wrap_content"

        android:layout_below="@+id/et_input"

        android:layout_marginTop="10dp"

        android:text="生成二维码" />

    <ImageView

        android:id="@+id/img"

        android:layout_width="wrap_content"

        android:layout_height="wrap_content"

        android:layout_below="@+id/btn_generate"

        android:layout_centerHorizontal="true"

        android:layout_marginTop="10dp" />

</RelativeLayout>
package com.zzw.testerweima;

import android.content.Intent;

import android.graphics.Bitmap;

import android.support.v7.app.AppCompatActivity;

import android.os.Bundle;

import android.util.Log;

import android.view.View;

import android.widget.EditText;

import android.widget.ImageView;

import android.widget.TextView;

import android.widget.Toast;

import com.xys.libzxing.zxing.activity.CaptureActivity;

import com.xys.libzxing.zxing.encoding.EncodingUtils;

public class MainActivity extends AppCompatActivity {

    private TextView tv_content;

    private EditText et_input;

    private ImageView img;

    @Override

    protected void onCreate(Bundle savedInstanceState) {

        super.onCreate(savedInstanceState);

        setContentView(R.layout.activity_main);

        tv_content = (TextView) findViewById(R.id.tv_content);

        et_input = (EditText) findViewById(R.id.et_input);

        img = (ImageView) findViewById(R.id.img);

        findViewById(R.id.btnSan).setOnClickListener(new View.OnClickListener() {

            @Override

            public void onClick(View v) {

                startActivityForResult(new Intent(MainActivity.this, CaptureActivity.class), 0);

            }

        });

        findViewById(R.id.btn_generate).setOnClickListener(new View.OnClickListener() {

            @Override

            public void onClick(View v) {

                String str = et_input.getText().toString();

                if (str.equals("")) {

                    Toast.makeText(MainActivity.this, "不能为空", Toast.LENGTH_SHORT).show();

                } else {

                    // 位图

                    try {

                        /**

                         * 参数:1.文本 2 3.二维码的宽高 4.二维码中间的那个logo

                         */

                        Bitmap bitmap = EncodingUtils.createQRCode(str, 500, 500, null);

                        // 设置图片

                        img.setImageBitmap(bitmap);

                    } catch (Exception e) {

                        // TODO Auto-generated catch block

                        e.printStackTrace();

                    }

                }

            }

        });

    }

    @Override

    protected void onActivityResult(int requestCode, int resultCode, Intent data) {

        // TODO Auto-generated method stub

        super.onActivityResult(requestCode, resultCode, data);

        if (resultCode == RESULT_OK) {

            String result = data.getExtras().getString("result");

            Log.d("Main", result);

            tv_content.setText(result);

        }

    }

}
二维码的扫描和生成--第三方开源--ZXing的更多相关文章
- Android高级控件(三)—— 使用Google ZXing实现二维码的扫描和生成相关功能体系
Android高级控件(三)-- 使用Google ZXing实现二维码的扫描和生成相关功能体系 摘要 现在的二维码可谓是烂大街了,到处都是二维码,什么都是二维码,扫一扫似乎已经流行到习以为常了,今天 ...
- Android高级控件(三)—— 使用Google ZXing实现二维码的扫描和生成相关功能体系
Android高级控件(三)-- 使用Google ZXing实现二维码的扫描和生成相关功能体系 摘要 如今的二维码可谓是烂大街了.到处都是二维码.什么都是二维码,扫一扫似乎已经流行到习以为常了,今天 ...
- Android - Zxing实现二维码的扫描与生成
Zxing: Zxing是一个开放源码,用java实现的多种格式的1D/2D条码图像处理库,它包含了联系到其他语言的端口.可以实现使用手机内置摄像头完成条形码的扫描以及解码. github: ...
- android 使用开源库zxing生成二维码,扫描二维码【转】
转自:http://blog.csdn.net/qq_16064871/article/details/52422723 zxing是一个开放源码的,用Java实现的多种格式的1D/2D条码图像处理库 ...
- 在UniApp的H5项目中,生成二维码和扫描二维码的操作处理
在我们基于UniApp的H5项目中,需要生成一些二维码进行展示,另外也需要让用户可以扫码进行一定的快捷操作,本篇随笔介绍一下二维码的生成处理和基于H5的扫码进行操作.二维码的生成,使用了JS文件wea ...
- QRCode 扫描二维码、扫描条形码、相册获取图片后识别、生成带 Logo 二维码、支持微博微信 QQ 二维码扫描样式
目录 功能介绍 常见问题 效果图与示例 apk Gradle 依赖 布局文件 自定义属性说明 接口说明 关于我 功能介绍 根据之前公司的产品需求,参考 barcodescanner 改的,希望能帮助到 ...
- ios中二维码的使用之二: 二维码的扫描
二维码的扫描: 1,导入支持框架,<AVFoundation/AVFoundation.h> 2 ,扫描:
- Android下二维码的扫描
Android平台下 二维码的扫描一般采用: Zxing:参考地址 Zxing功能比较强大,支持条形码和二维码的扫描,用的人也比较多,但是Zxing太大,一般开发简单的app,用起来比较麻烦. 所以网 ...
- 【转】 Android 基于google Zxing实现对手机中的二维码进行扫描--不错
原文网址:http://blog.csdn.net/xiaanming/article/details/14450809 转载请注明出处:http://blog.csdn.net/xiaanming/ ...
随机推荐
- 4.1 使用STM32控制MC20拨打电话
需要准备的硬件 MC20开发板 1个 https://item.taobao.com/item.htm?id=562661881042 GSM/GPRS天线 1根 https://item.taoba ...
- Vimium~让您的Chrome起飞
工欲善其事,必先利其器!撸起Vimium,我的Chrome就这么起飞了. 学起(了解几个快捷键即可)And撸起Vimium,想黑客一般在Chrome上飞起.Vimium常用快捷键(注:区分大小写)j, ...
- POJ - 2464 Brownie Points II 【树状数组 + 离散化】【好题】
题目链接 http://poj.org/problem?id=2464 题意 在一个二维坐标系上 给出一些点 Stan 先画一条过一点的水平线 Odd 再画一条 过Stan那条水平线上的任一点的垂直线 ...
- loadrunder之脚本篇——int类型和字符串的相互转换
字符串转化为int型变量 Action2() { int j = 0; j = atoi("12345"); //将字符串变为整形 lr_output_message(" ...
- Python学习进程(4)运算符
本节主要介绍Python的运算符. (1)Python语言支持的运算符类型: .算术运算符 .比较(关系)运算符 .赋值运算符 .逻辑运算符 .位运算符 .成员运算符 .身份运算符 . ...
- 多个网络请求成功返回再执行另外任务的思路分析(iOS)
前言 今天我们来讨论一个经常出现的需求场景,也是一个老话题.在开发中我们往往会遇到需要进行多个网络请求,并且需要多个网络请求成功返回后再做其他事的场景.比如同一个界面显示的内容需要用到两个网络接口,而 ...
- iOS获取设备IP地址
项目用到要获取iOS设备的IP地址,有2种方法: 1)第一种比较简单,但是只有当你的设备连接到WIFI时才能获取到IP地址,倘若你的设备用的是流量,那就不行.代码如下: #import <ifa ...
- Django-Ajax基础知识
Ajax准备知识:json 1.什么是json JSON(JavaScript Object Notation, JS 对象标记) 是一种轻量级的数据交换格式. 它基于 ECMAScript (w3c ...
- NAS、SAN、DAS 说明
NAS 说明 1.NAS(Network Attached Storage:网络附属存储) 2.NAS 是一种采用直接与网络介质相连的特殊设备实现数据存储的机制. 3.NAS本身能够支持多种协议(如N ...
- Android : 反射机制获取或设置系统属性(SystemProperties)【转】
本文转载自:https://blog.csdn.net/wei_lei/article/details/70312512 Android.os.SystemProperties 提供了获取和设置系统属 ...