Coherence代理的负载均衡
Coherence在extend模式下,proxy的负载均衡机制官方解释是
Extend client connections are load balanced across proxy service members. By default, a proxy-based strategy is used that distributes client connections to proxy service members that are being utilized the least. Custom proxy-based strategies can be created or the default strategy can be modified as required. As an alternative, a client-based load balance strategy can be implemented by creating a client-side address provider or by relying on randomized client connections to proxy service members. The random approach provides minimal balancing as compared to proxy-based load balancing.
Proxy-based load balancing is the default strategy that is used to balance client connections between two or more members of the same proxy service. The strategy is weighted by a proxy's existing connection count, then by its daemon pool utilization, and lastly by its message backlog.
The proxy-based load balancing strategy is configured within a <proxy-scheme> definition using a <load-balancer> element that is set to proxy. For clarity, the following example explicitly specifies the strategy. However, the strategy is used by default if no strategy is specified and is not required in a proxy scheme definition.
说的比较模糊,在weblogic作为前端来连入后台coherence cluster的情况下,我们模拟实际的生产环境,看一看实际的运作
针对proxy节点的proxy-override.xml
|
<?xml version="1.0"?> <caching-schemes> </backing-map-scheme> <proxy-scheme> </caching-schemes> |
针对storage节点的storage-override.xml
|
<?xml version="1.0"?> <cache-config> <caching-scheme-mapping> <listener/> |
针对客户端的client.xml
|
<?xml version="1.0"?> <caching-schemes> |
另外一个客户端的配置文件client-2.xml
|
<?xml version="1.0"?> <caching-schemes> |
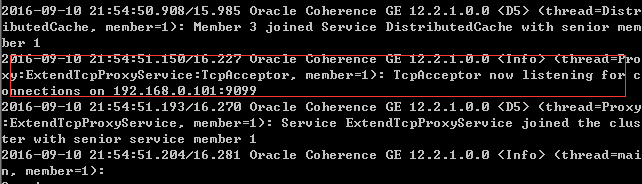
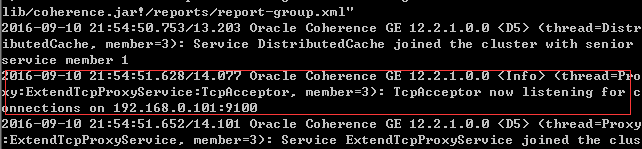
通过proxy-server.cmd启动两个proxy节点,会监听在9099和9100端口
|
"%java_exec%" -server -showversion -Dtangosol.coherence.mode=prod -Dtangosol.coherence.management.remote=true -Dtangosol.coherence.cacheconfig=E:\wls12c\coherence\bin\proxy-override.xml %java_opts% -cp "%coherence_home%\lib\coherence.jar" com.tangosol.net.DefaultCacheServer %* |
通过storage-cmd启动一个storage节点
|
"%java_exec%" -server -showversion -Dtangosol.coherence.mode=prod -Dtangosol.coherence.management.remote=true -Dtangosol.coherence.management=all %java_opts% -Dtangosol.coherence.cacheconfig=E:\wls12c\coherence\bin\storage-override.xml -cp "%coherence_home%\lib\coherence.jar" com.tangosol.net.DefaultCacheServer %* |
在weblogic的setDomainEnv.cmd文件中加入
|
set JAVA_OPTIONS=%JAVA_OPTIONS% -Dtangosol.coherence.cacheconfig="E:\wls12c\coherence\bin\client.xml" -Dtangosol.coherence.tcmp.enabled=false set CLASSPATH=E:\wls1212\coherence\lib\coherence.jar;%CLASSPATH% |
然后部署一个web应用,核心是一个jsp文件coput.jsp,批量放入10000个对象
|
<!DOCTYPE HTML PUBLIC "-//W3C//DTD HTML 4.01 Transitional//EN" <%@ page contentType="text/html;charset=windows-1252"%> <% for (int i=0;i<10000;i++) { %> </body> |
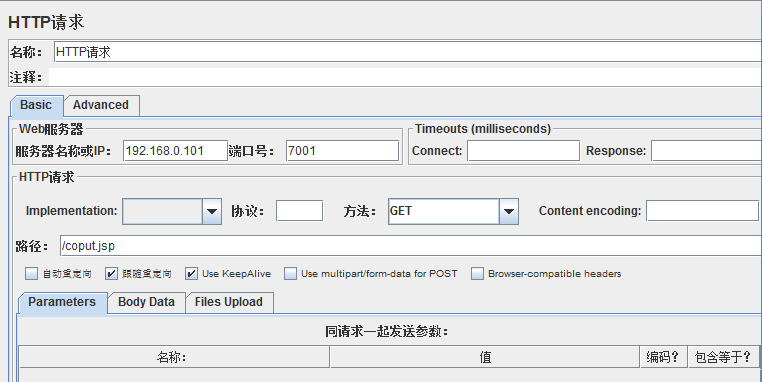
启动weblogic访问,主要连到了9099的proxy server

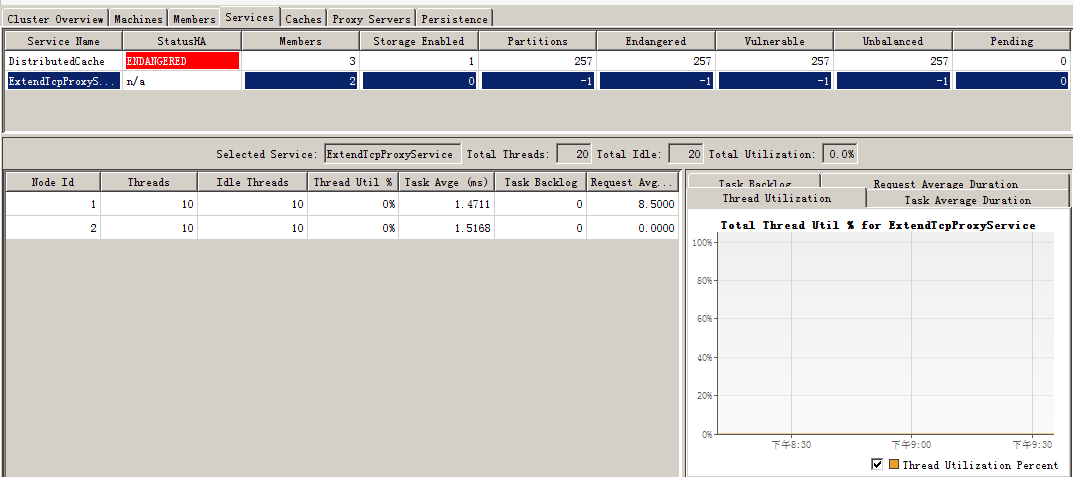
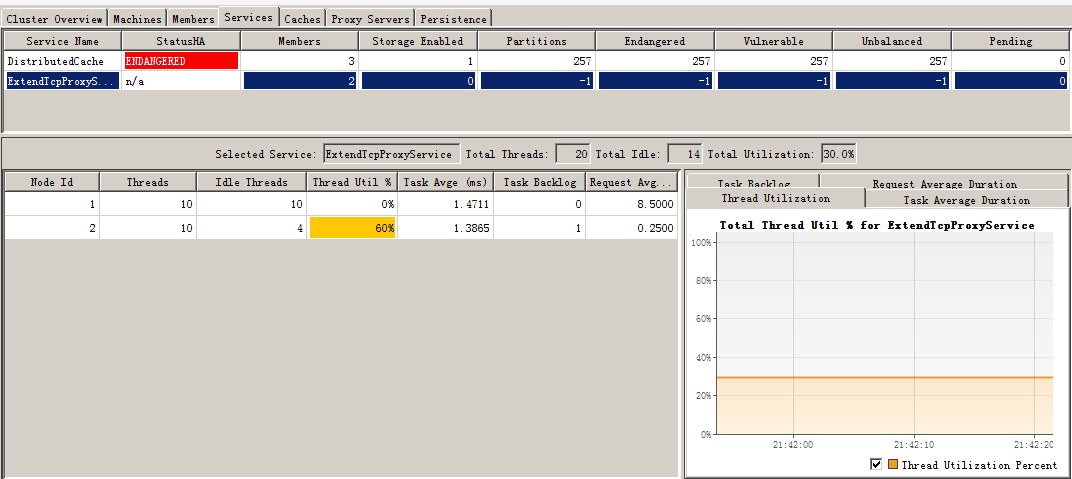
没有压力的时候,通过jvisualvm监控的proxy的线程如下,可以看到有每个都有10个空闲线程:
通过jmeter运行20个线程的压力,压力主要压在weblogic server
压力上来时候线程如下
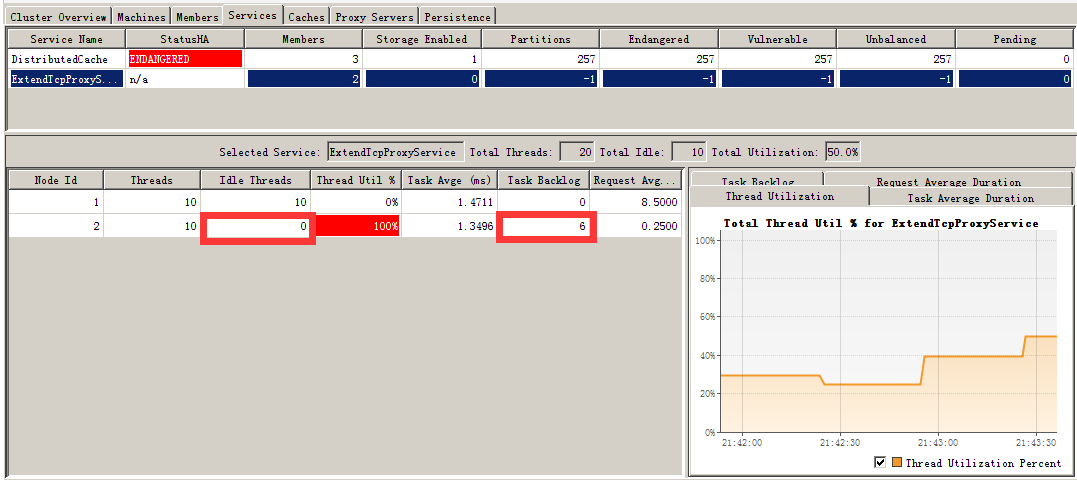
可以看到当空闲线程为0,并且有6个在backlog等待时,都没有分到另外一个proxy.
结论如下:
- Coherence将weblogic server的一个实例当成是一个客户端,并不是基于这个客户端内部的thread进行负载均衡(这不是bug,而是产品设计如此)
- WebLogic Server和Coherence建立的是长连接,除非在超时时间外没有线程访问会断开,在压力比较大的时候,weblogic server会一直用这个连接,并不管这个连接是否已经用完。
- Proxy设置的线程数是有限的,最大512条,proxy占用的资源也是有限的,在压力大的时候可能这个proxy会缓慢甚至挂掉,所以最好的办法还是要把压力分散到不同的proxy上面去。
- 但当多个weblogic实例上来时会进行负载均衡。严格来说,coherence集群是按照client端的NIC和port进行负载均衡的。
修改coput.jsp如下:
也就是会根据不同的thread id,选择加载不同的xml,实现均分。
|
<!DOCTYPE HTML PUBLIC "-//W3C//DTD HTML 4.01 Transitional//EN" <%@ page contentType="text/html;charset=windows-1252"%> <% for (int i=0;i<10000;i++) { %> </body> |
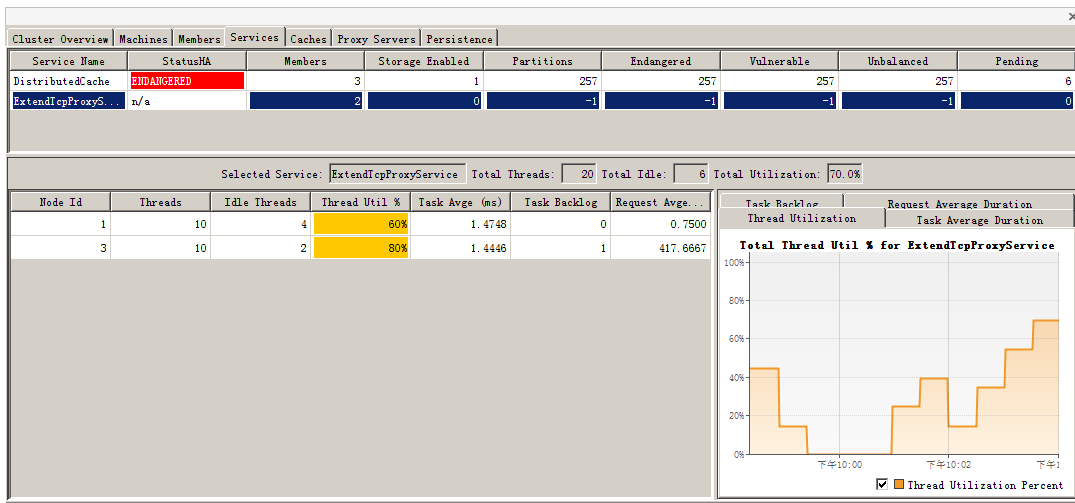
再次进行压力测试,如下:
可以看到压力以及分在两个proxy上.
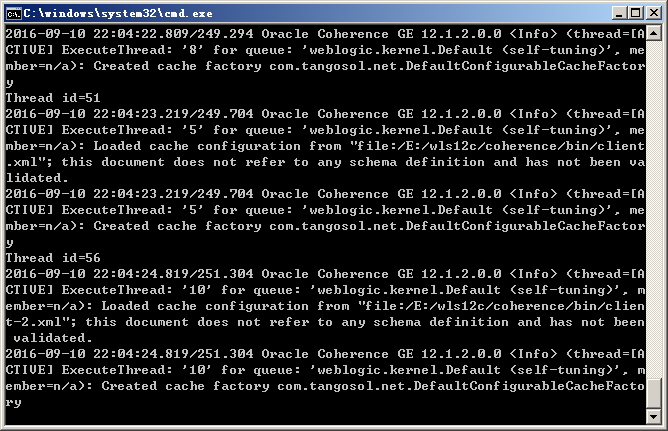
后台weblogic日志,在根据threadid调用.
Coherence代理的负载均衡的更多相关文章
- Windos环境用Nginx配置反向代理和负载均衡
Windos环境用Nginx配置反向代理和负载均衡 引言:在前后端分离架构下,难免会遇到跨域问题.目前的解决方案大致有JSONP,反向代理,CORS这三种方式.JSONP兼容性良好,最大的缺点是只支持 ...
- Nginx反向代理,负载均衡,redis session共享,keepalived高可用
相关知识自行搜索,直接上干货... 使用的资源: nginx主服务器一台,nginx备服务器一台,使用keepalived进行宕机切换. tomcat服务器两台,由nginx进行反向代理和负载均衡,此 ...
- Nginx服务器 之反向代理与负载均衡
一.反向代理 正向代理: 客户端要获取的资源就在服务器上,客户端请求的资源路径就是最终响应资源的服务器路径,这就是正向代理.正向代理的特点:就是我们明确知道要访问哪个网站地址. 反向代理: 客户端想获 ...
- Nginx 反向代理、负载均衡、页面缓存、URL重写及读写分离详解
转载:http://freeloda.blog.51cto.com/2033581/1288553 大纲 一.前言 二.环境准备 三.安装与配置Nginx 四.Nginx之反向代理 五.Nginx之负 ...
- Tomcat:利用Apache配置反向代理、负载均衡
本篇主要介绍apache配置反向代理,介绍了两种情况:第一种是,只使用apache配置反向代理:第二种是,apache与应用服务器(tomcat)结合,配置反向代理,同时了配置了负载均衡. 准备工作 ...
- 通过Nginx+tomcat+redis实现反向代理 、负载均衡及session同步
一直对于负载均衡比较陌生,今天尝试着去了解了一下,并做了一个小的实验,对于这个概念有一些认识,在此做一个简单的总结 什么是负载均衡 负载均衡,英文 名称为Load Balance,指由多台服务器以对称 ...
- nginx的反向代理和负载均衡的一个总结
之前一直觉的nginx的反向代理和负载均衡很厉害的样子,最近有机会接触了一下公司的这方面的技术,发现技术就是一张窗户纸呀,捅破了啥都明白了! 接下来先看一下nginx的反向代理: 简单的来说就是ngi ...
- Nginx反向代理、负载均衡、页面缓存、URL重写及读写分离详解
大纲 一.前言 二.环境准备 三.安装与配置Nginx 四.Nginx之反向代理 五.Nginx之负载均衡 六.Nginx之页面缓存 七.Nginx之URL重写 八.Nginx之读写分离 注,操作系统 ...
- nginx和tomcat实现反向代理、负载均衡和session共享
这类的文章很多,nginx和tomcat实现反向代理.负载均衡实现很容易,可以参照http://blog.csdn.net/liuzhigang1237/article/details/8880752 ...
随机推荐
- 【SQL】数据库更新
1.插入 INSERT INTO R(A1,A2,...An) VALUES(v1, v2, ...,vn) 如果插入了所有属性,并且按照定义的顺序给出,可以省略(A1,A2,...An) 可以只插入 ...
- 驱动模块和装模块的概念——Junit单元测试案例
驱动模块是用来模拟被测试模块的上一级模块,相当于被测模块的主程序.它接收数据,将相关数据传送给被测模块,启用被测模块,并打印出相应的结果. 桩模块(Stub)是指模拟被测试的模块所调用的模块,而不是软 ...
- opencv第四章
1.载入一个带有有趣纹理的图像,使用cvSmooth()函数以多种方法平滑图像,参数为smoothtype = CV_GAUSSIAN. a.使用对称的平滑的平滑窗口,大小依次是3x3,5x5,9x9 ...
- 高速备份还原MYSQL数据库
#安装依赖包yum -y update gccyum -y install gcc+ gcc-c++ #安装cd /usr/local/softwaretar -jxvf p7zip_16.02_sr ...
- (二)shell变量
(1)自定义变量 定义变量 变量名=变量值 变量名必须以字母或下划线开头,不能数字开头,区分大小写,ip=114.114.114.114 引用变量: $变量名 ${变量名} 查看变量: echo $变 ...
- codeforces Round #441 C Classroom Watch【枚举/注意起点】
C. time limit per test 1 second memory limit per test 512 megabytes input standard input output stan ...
- HDU 2555 陷阱(模拟,结构体数组)
这道题目意思很明白,有不确定的数据沙包和陷阱,还要排序···那就必须要用结构体+数组 /* 在地面上有N 个大小不等的长方形陷阱,每个陷阱的周长各不相同,每个参赛者都有一个沙包,闭上眼睛把它扔向地面, ...
- 暴力 【p4098】[HEOI2013]ALO
Description Welcome to ALO ( Arithmetic and Logistic Online).这是一个 VR MMORPG, 如名字所见,到处充满了数学的谜题 现在你拥有 ...
- DP 贪心【p2134】百日旅行
Background 重要的不是去哪里,而是和你在一起.--小红 对小明和小红来说,2014年7月29日是一个美好的日子.这一天是他们相识100天的纪念日. (小明:小红,感谢你2场大考时默默的支持, ...
- Diamond Collector (动态规划)
问题 I: Diamond Collector 时间限制: 1 Sec 内存限制: 64 MB提交: 22 解决: 7[提交][状态][讨论版] 题目描述 Bessie the cow, alwa ...