Django快速开发之投票系统
https://docs.djangoproject.com/en/1.8/intro/tutorial01/
参考官网文档,创建投票系统。
================
Windows 7/10
Python 2.7.10
Django 1.8.2
================
1、创建项目(mysite)与应用(polls)
D:\pydj>django-admin.py startproject mysite
D:\pydj>cd mysite
D:\pydj\mysite>python manage.py startapp polls
添加到setting.py
# Application definition

INSTALLED_APPS = (

    'django.contrib.admin',

    'django.contrib.auth',

    'django.contrib.contenttypes',

    'django.contrib.sessions',

    'django.contrib.messages',

    'django.contrib.staticfiles',

    'polls',

)
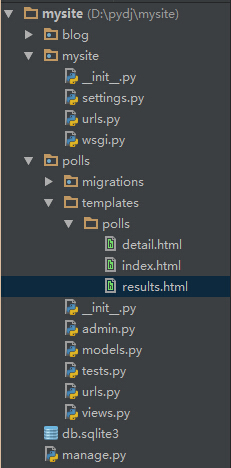
最终哪个目录结构:
2、创建模型(即数据库)
一般web开发先设计数据库,数据库设计好了,项目就完了大半了,可见数据库的重要性。打开polls/models.py编写如下:
# coding=utf-8

from django.db import models

# Create your models here.

# 问题

class Question(models.Model):

    question_text = models.CharField(max_length=200)

    pub_date = models.DateTimeField('date published')

    def __unicode__(self):

        return self.question_text

# 选择

class Choice(models.Model):

    question = models.ForeignKey(Question)

    choice_text = models.CharField(max_length=200)

    votes = models.IntegerField(default=0)

    def __unicode__(self):

        return self.choice_text
执行数据库表生成与同步。
D:\pydj\mysite>python manage.py makemigrations polls

Migrations for 'polls':

  0001_initial.py:

    - Create model Question

    - Create model Choice

    - Add field question to choice

D:\pydj\mysite>python manage.py syncdb

……

You have installed Django's auth system, and don't have any superusers defined.

Would you like to create one now? (yes/no): yes

Username (leave blank to use 'fnngj'):    用户名(默认当前系统用户名)

Email address: fnngj@126.com     邮箱地址

Password:     密码

Password (again):    重复密码

Superuser created successfully.
3、admin管理
django提供了强大的后台管理,对于web应用来说,后台必不可少,例如,当前投票系统,如何添加问题与问题选项?直接操作数据库添加,显然麻烦,不方便,也不安全。所以,管理后台就可以完成这样的工作。
打开polls/admin.py文件,编写如下内容:
from django.contrib import admin

from .models import Question, Choice

# Register your models here.

class ChoiceInline(admin.TabularInline):

    model = Choice

    extra = 3

class QuestionAdmin(admin.ModelAdmin):

    fieldsets = [

        (None,               {'fields': ['question_text']}),

        ('Date information', {'fields': ['pub_date'], 'classes': ['collapse']}),

    ]

    inlines = [ChoiceInline]

    list_display = ('question_text', 'pub_date')

admin.site.register(Choice)

admin.site.register(Question, QuestionAdmin)
当前脚本的作用就是将模型(数据库表)交由admin后台管理。
运行web容器:
D:\pydj\mysite>python manage.py runserver

Performing system checks...

System check identified no issues (0 silenced).

October 05, 2015 - 13:08:12

Django version 1.8.2, using settings 'mysite.settings'

Starting development server at http://127.0.0.1:8000/

Quit the server with CTRL-BREAK.
登录后台:http://127.0.0.1:8000/admin
登录密码就是在执行数据库同步时设置的用户名和密码。

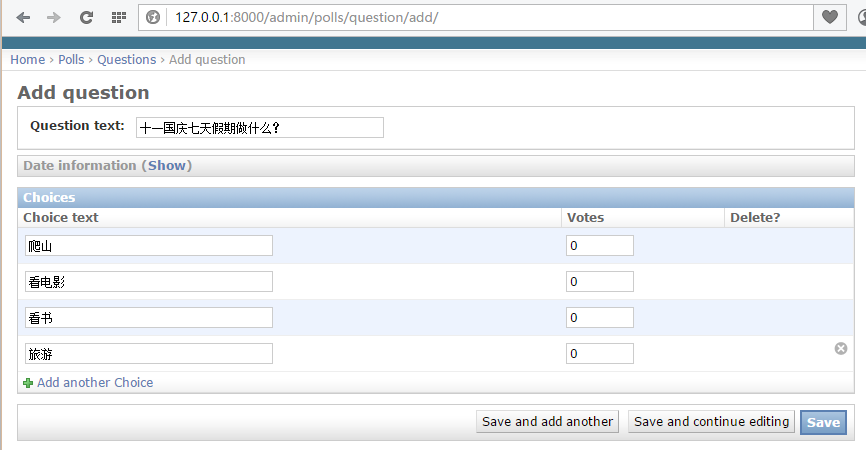
点击“add”添加问题。
4、编写视图
视图起着承前启后的作用,前是指前端页面,后是指后台数据库。将数据库表中的内容查询出来显示到页面上。
编写polls/views.py文件:
# coding=utf-8

from django.shortcuts import render, get_object_or_404

from django.http import HttpResponseRedirect, HttpResponse

from django.core.urlresolvers import reverse

from .models import Question, Choice

# Create your views here.

# 首页展示所有问题

def index(request):

    # latest_question_list2 = Question.objects.order_by('-pub_data')[:2]

    latest_question_list = Question.objects.all()

    context = {'latest_question_list': latest_question_list}

    return render(request, 'polls/index.html', context)

# 查看所有问题

def detail(request, question_id):

    question = get_object_or_404(Question, pk=question_id)

    return render(request, 'polls/detail.html', {'question': question})

# 查看投票结果

def results(request, question_id):

    question = get_object_or_404(Question, pk=question_id)

    return render(request, 'polls/results.html', {'question': question})

# 选择投票

def vote(request, question_id):

    p = get_object_or_404(Question, pk=question_id)

    try:

        selected_choice = p.choice_set.get(pk=request.POST['choice'])

    except (KeyError, Choice.DoesNotExist):

        # Redisplay the question voting form.

        return render(request, 'polls/detail.html', {

            'question': p,

            'error_message': "You didn't select a choice.",

        })

    else:

        selected_choice.votes += 1

        selected_choice.save()

        # Always return an HttpResponseRedirect after successfully dealing

        # with POST data. This prevents data from being posted twice if a

        # user hits the Back button.

        return HttpResponseRedirect(reverse('polls:results', args=(p.id,)))
5、配置url
url是一个请求配置文件,页面中的请求转交给由哪个函数处理,由该文件决定。
首先配置polls/urls.py(该文件需要创建)
from django.conf.urls import url

from . import views

urlpatterns = [

    # ex : /polls/

    url(r'^$', views.index, name='index'),

    # ex : /polls/5/

    url(r'^(?P<question_id>[0-9]+)/$', views.detail, name='detail'),

    # ex : /polls/5/results/

    url(r'^(?P<question_id>[0-9]+)/results/$', views.results, name='results'),

    # ex : /polls/5/vote

    url(r'^(?P<question_id>[0-9]+)/vote/$', views.vote, name='vote'),

]
接着,编辑mysite/urls.py文件。
from django.conf.urls import include, url

from django.contrib import admin

urlpatterns = [

    url(r'^polls/', include('polls.urls', namespace="polls")),

    url(r'^admin/', include(admin.site.urls)),

]
6、创建模板
模板就是前端页面,用来将数据显示到web页面上。
首先创建polls/templates/polls/目录,分别在该目录下创建index.html、detail.html和results.html文件。
index.html
{% if latest_question_list %}

    <ul>

    {% for question in latest_question_list %}

        <li><a href="{% url 'polls:detail' question.id %}">{{ question.question_text }}</a></li>

    {% endfor %}

    </ul>

{% else %}

    <p>No polls are available.</p>

{% endif %}
detail.html
<h1>{{ question.question_text }}</h1>

{% if error_message %}<p><strong>{{ error_message }}</strong></p>{% endif %}

<form action="{% url 'polls:vote' question.id %}" method="post">

{% csrf_token %}

{% for choice in question.choice_set.all %}

    <input type="radio" name="choice" id="choice{{ forloop.counter }}" value="{{ choice.id }}" />

    <label for="choice{{ forloop.counter }}">{{ choice.choice_text }}</label><br />

{% endfor %}

<input type="submit" value="Vote" />

</form>
results.html
<h1>{{ question.question_text }}</h1>

<ul>

{% for choice in question.choice_set.all %}

    <li>{{ choice.choice_text }} -- {{ choice.votes }} vote{{ choice.votes|pluralize }}</li>

{% endfor %}

</ul>

<a href="{% url 'polls:detail' question.id %}">Vote again?</a>
7、功能展示
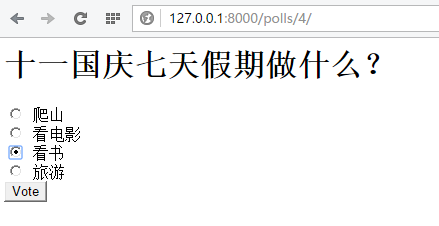
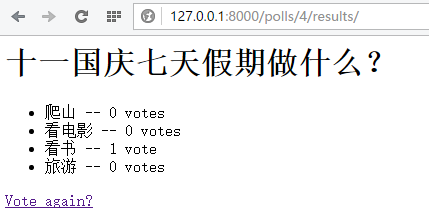
启动web容器,访问:http://127.0.0.1:8000/polls/

==========
django相关文章:
http://www.cnblogs.com/fnng/category/581256.html
Django快速开发之投票系统的更多相关文章
- Django快速开发投票系统
使用Django搭建简单的投票系统:这个是官网的教程:https://docs.djangoproject.com/en/2.0/intro/tutorial01/ 在Run manage.py Ta ...
- Django快速搭建博客系统
Django快速搭建博客系统 一.开发环境 Windows 7(64bit) python 3.6 https://www.python.org/ Django 2.0 https://www. ...
- 基于django快速开发一个网站(一)
基于django快速开发一个网站(一) * 创建虚拟环境.基于虚拟环境创建django==2.0.0和图片加载库和mysql数据库驱动 1. 创建目录并创建虚拟环境 ╰$ mkdir Cornuco ...
- 程序小白如何快速开发OA办公系统
对于企业开发oa办公系统,成本高,周期长.有些企业花高价购买,购买后受制于软件商,很多功能只能按原来设计需求走,无法升级或者升级慢.这些由于软件商的开发效率低难以及时地响应企业的需求变化,所以就有可能 ...
- Django快速开发实践:Drf框架和xadmin配置指北
步骤 既然是快速开发,那废话不多说,直接说步骤: 安装Djagno 安装Django Rest Framework 定义models 定义Rest framework的serializers 定义Re ...
- 如何快速开发Winform应用系统
在实际的业务中,往往还有很多需要使用Winform来开发应用系统的,如一些HIS.MIS.MES等系统,由于Winform开发出来的系统界面友好,响应快速,开发效率高等各方面原因,还有一些原因是独立的 ...
- Django博客开发教程,Django快速开发个人blog
学DjangoWEB框架,估计大部分的朋友都是从Blog开发开始入门的,Django中文网发布了一个Django开发教程,这个教程简单易懂,能让你快速的使用Django开发一个漂亮的个人blog,是D ...
- django 快速实现完整登录系统
django 实现完整登录系统 本操作的环境: =================== Windows 7 64 python3.5 Django 1.10 =================== 创 ...
- django 快速实现完整登录系统(cookie)
经过前面几节的练习,我们已经熟悉了django 的套路,这里来实现一个比较完整的登陆系统,其中包括注册.登陆.以及cookie的使用. 本操作的环境: =================== deep ...
随机推荐
- /proc/sysrq-trigger该文件能做些什么事情-转载
/proc/sysrq-trigger该文件能做些什么事情呢? # 立即重新启动计算机 (Reboots the kernel without first unmounting file system ...
- Sphinx : 高性能SQL全文检索引擎
Sphinx的特点 快速创建索引:3分钟左右即可创建近100万条记录的索引,并且采用了增量索引的方式,重建索引非常迅速. 闪电般的检索速度:尽管是1千万条的大数据量,查询数据的速度也在毫秒级以上,2- ...
- UILabel实现自适应高宽
UILabel是iOS开发常用的控件.UILabel的属性需要了解,UILabel的特殊显示效果也需要我们掌握.UILabel自适应高宽度是很多初学者遇到的技术性难题.比如段文字,要让他完全地分行显示 ...
- 作业三:PSP耗时
请同学们参照教材<构建之法>2.3节表2-4 PSP2.1汇报自己在完成四则运算编程时候的时间分布,发布到博客上. 个人项目耗时情况分析 PSP Personal Software Pro ...
- var与this,{}与function 小记
JavaScript var是用来定义一个变量,this常用来定义或调用一个属性或方法.但是在全局范围内,this和var定义变量是等价的. window console.log('window:', ...
- SQL SERVER--DBA 常用到的一些脚本
自己整理了一些常用到的脚本,希望对各位有用 下载地址 --================================== 妹子不能少,是吧 BTW, 妹子是我辛苦百度来的,请不要求种求介绍各种求 ...
- 论checkbox和radio的样式美化问题
如果你下定决心要改变现有的默认的checkbox和radio的样式,那么我目前有两种办法: 1.自己动手写一个,也就是自己写代码实现将input的checkbox和radio默认的样式隐藏掉,使用绝对 ...
- C#Light/Evil合体啦
决定将C#Light和C#Evil合并成一个项目,毕竟C#Evil包含C#Light所有的功能,分开两个,基本的表达式方面有什么bug还得两头改 暂时就C#Light/Evil这么叫吧,庆祝合体,画了 ...
- 分享一些Hadoop环境搭建所用到的软件
本来想用土的掉渣的语言说说hadoop配置的,因为最近总有人问我,环境搭建老出莫名其妙的问题,可是写到一半,还是决定不写了,网上教程好多好多,而大家遇到问题有很多是软件版本不对应造成的,因此我就把大家 ...
- 使用hexo+github搭建免费个人博客详细教程
[TOC] 本文目录(注意无法点击): 前言 体验更加排版请访问原文链接:http://blog.liuxianan.com/build-blog-website-by-hexo-github.htm ...