NAT, Network Address Translation,即网络地址转换。当内部网络的主机想要访问外网,但是又不想直接暴露给公网,可以通过NAT节点来访问外网。这样做有两个好处,第一是内网的主机无需拥有公网IP就可访问网络(NAT节点需要公网IP),节约了公网IP;第二是内网的主机由于没有公网IP,所以公网的电脑无法访问到它,这样就可以隐藏自己。一个很经典的示例是假如你有一台数据库服务器放置在内网中,为在同一个内网中的web服务器提供数据服务,为了安全性考虑你不会把它直接暴露在公网中。但是数据库服务器有时候自己是需要访问公网的,比如需要升级数据库服务器中的某些软件等。采用NAT方案可以很好的解决这个问题。

下图是NAT节点的功能示意图。

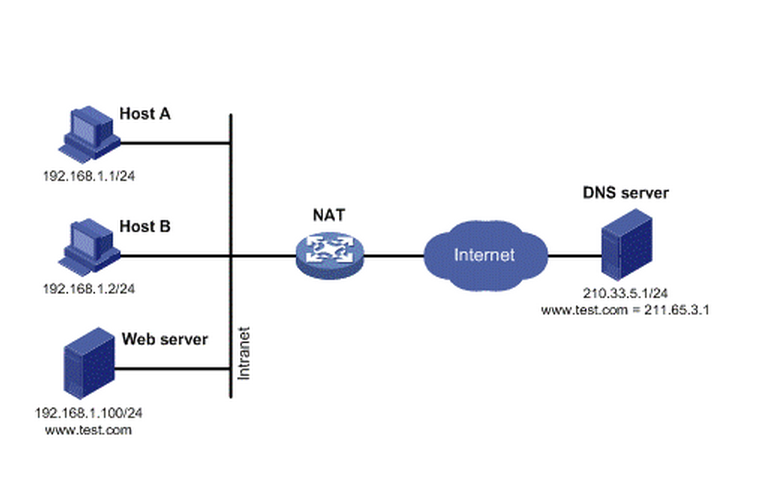
一些路由器或者装有特定软件的主机都可以作为NAT节点。在AWS中如果你想创建一个NAT节点的话那是非常的方便,因为AWS直接提供了预装了NAT软件的AMI,你只需直接使用该AMI在你的公共子网中实例化一台机器,并进行相应的配置即可。

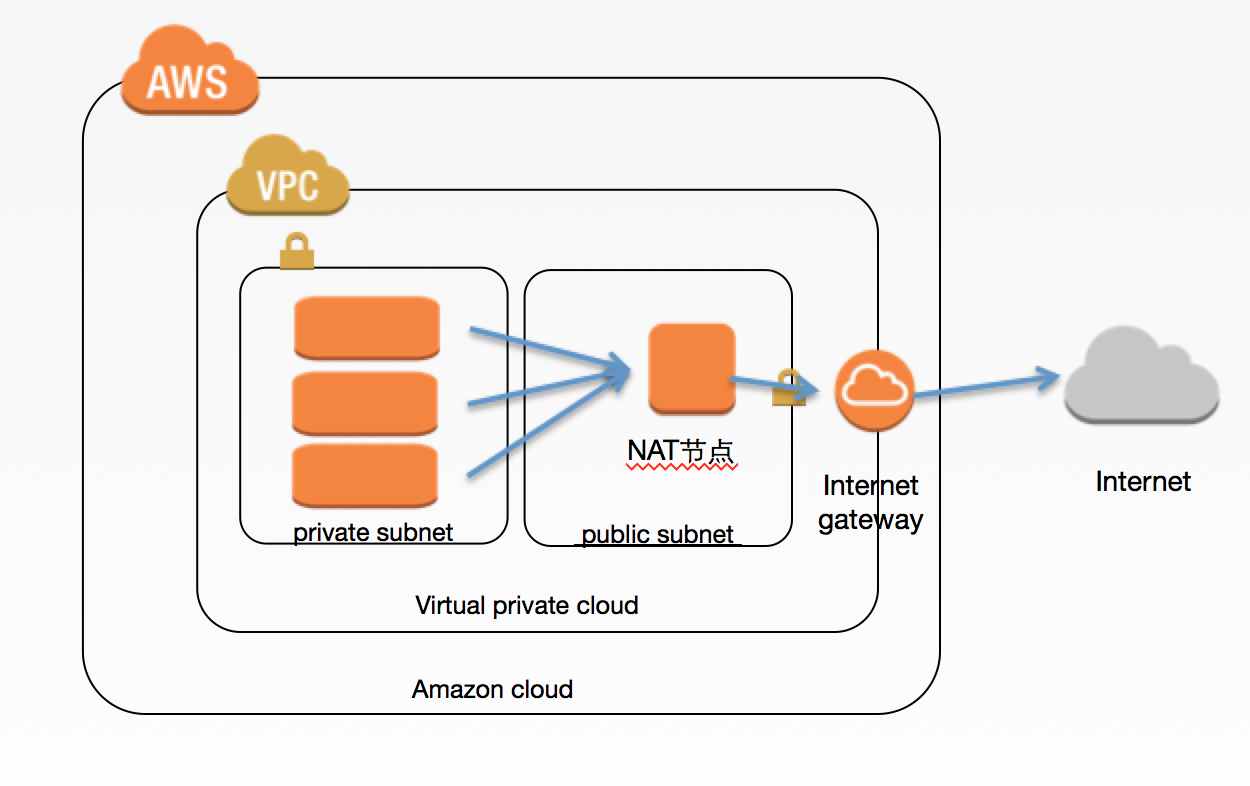
下面的图展示了在AWS中的一个经典的VPC架构。该VPC里面建立了两个子网,一个是公共子网,通过Intenet Geteway和公网连接;一个是私有子网,无法直接访问公网。然后在公共子网中建立了一个EC2机器,使用的是AWS提供的具有NAT功能的AMI,并为它分配了一个弹性IP,这样该EC2就是一个NAT节点。在私有子网的所有机器都具有了通过该NAT节点访问外网的能力。

为了创建这样一套网络及机器,最简便的方式当然是使用AWS提供的CloudFormation了。如果不了解CloudFormation,可以看我以前写过的一篇文章 《亚马逊云服务之CloudFormation》。下面展示的是创建该整个VPC的CloudFormation脚本。

1
2
3
4
5
6
7
8
9
10
11
12
13
14
15
16
17
18
19
20
21
22
23
24
25
26
27
28
29
30
31
32
33
34
35
36
37
38
39
40
41
42
43
44
45
46
47
48
49
50
51
52
53
54
55
56
57
58
59
60
61
62
63
64
65
66
67
68
69
70
71
72
73
74
75
76
77
78
79
80
81
82
83
84
85
86
87
88
89
90
91
92
93
94
95
96
97
98
99
100
101
102
103
104
105
106
107
108
109
110
111
112
113
114
115
116
117
118
119
120
121
122
123
124
125
126
127
128
129
130
131
132
133
134
135
136
137
138
139
140
141
142
143
144
145
146
147
148
149
150
151
152
153
154
155
156
157
158
159
160
161
162
163
164
165
166
167
168
169
170
171
172
173
174
175
176
177
178
179
180
181
182
183
184
185
186
187
188
189
190
191
192
193
194
195
196
197
198
199
200
201
202
203
204
205
206
207
208
209
210
211
212
213
214
215
216
217
218
219
220
221
222
223
224
225
226
227
228
229
230
231
232
233
234
235
236
237
238
239
240
241
242
243
244
245
246
247
248
249
250
251
252
253
254
255
256
257
258
259
260
261
262
263
264
265
266
267
268
269
270
271
272
273
274
275
276
277
278
279
280
281
282
283
284
285
286
287
288
289
290
291
292
293
294
295
296
297
298
299
300
301
302
303
304
305
306
307
308
309
310
311
312
313
314
315
316
317
318
319
320
321
322
323
324
{
"AWSTemplateFormatVersion": "2010-09-09",
"Description": "Setup a vpc, which contains two subnets and one NAT machine",
"Parameters": {
"KeyName": {
"Description": "Name of and existing EC2 KeyPair to enable SSH access to the instance",
"Type": "String"
},
"VpcCidr": {
"Description": "CIDR address for the VPC to be created.",
"Type": "String",
"Default": "10.2.0.0/16"
},
"AnyCidr": {
"Description": "CIDR address for Any Where.",
"Type": "String",
"Default": "0.0.0.0/0"
},
"AvailabilityZone1": {
"Description": "First AZ.",
"Type": "String",
"Default": "cn-north-1a"
},
"PublicSubnetCidr": {
"Description": "Address range for a public subnet to be created in AZ1.",
"Type": "String",
"Default": "10.2.1.0/24"
},
"PrivateSubnetCidr": {
"Description": "Address range for private subnet.",
"Type": "String",
"Default": "10.2.2.0/24"
},
"NATInstanceType": {
"Description": "Instance type for NAT",
"Type": "String",
"Default": "t1.micro"
}
},
"Mappings": {
"AWSNATAMI": {
"cn-north-1": {
"AMI": "ami-eab220d3"
}
}
},
"Resources": {
"VPC": {
"Type": "AWS::EC2::VPC",
"Properties": {
"CidrBlock": {
"Ref": "VpcCidr"
},
"Tags": [
{
"Key": "Name",
"Value": "VPC"
}
]
}
},
"InternetGateWay": {
"Type": "AWS::EC2::InternetGateway",
"Properties": {
"Tags": [
{
"Key": "Name",
"Value": "INTERNET_GATEWAY"
}
]
}
},
"GatewayToInternet": {
"Type": "AWS::EC2::VPCGatewayAttachment",
"Properties": {
"InternetGatewayId": {
"Ref": "InternetGateWay"
},
"VpcId": {
"Ref": "VPC"
}
}
},
"PublicSubnet": {
"Type": "AWS::EC2::Subnet",
"Properties": {
"CidrBlock": {
"Ref": "PublicSubnetCidr"
},
"AvailabilityZone": {
"Ref": "AvailabilityZone1"
},
"Tags": [
{
"Key": "Name",
"Value": "PUBLIC_SUBNET"
}
],
"VpcId": {
"Ref": "VPC"
}
}
},
"PrivateSubnet": {
"Type": "AWS::EC2::Subnet",
"Properties": {
"CidrBlock": {
"Ref": "PrivateSubnetCidr"
},
"AvailabilityZone": {
"Ref": "AvailabilityZone1"
},
"Tags": [
{
"Key": "Name",
"Value": "PRIVATE_SUBNET"
}
],
"VpcId": {
"Ref": "VPC"
}
}
},
"DefaultSecurityGroup": {
"Type": "AWS::EC2::SecurityGroup",
"Properties": {
"GroupDescription": "Default Instance SecurityGroup",
"SecurityGroupIngress": [
{
"IpProtocol": "-1",
"CidrIp": {
"Ref": "VpcCidr"
}
}
],
"Tags": [
{
"Key": "Name",
"Value": "DEFAULT_SECURITY_GROUP"
}
],
"VpcId": {
"Ref": "VPC"
}
}
},
"PublicRouteTable": {
"Type": "AWS::EC2::RouteTable",
"Properties": {
"VpcId": {
"Ref": "VPC"
},
"Tags": [
{
"Key": "Name",
"Value": "PUBLIC_ROUTE_TABLE"
}
]
}
},
"PublicRoute": {
"Type": "AWS::EC2::Route",
"Properties": {
"DestinationCidrBlock": {
"Ref": "AnyCidr"
},
"GatewayId": {
"Ref": "InternetGateWay"
},
"RouteTableId": {
"Ref": "PublicRouteTable"
}
}
},
"PublicSubnetRouteTableAssociation": {
"Type": "AWS::EC2::SubnetRouteTableAssociation",
"Properties": {
"RouteTableId": {
"Ref": "PublicRouteTable"
},
"SubnetId": {
"Ref": "PublicSubnet"
}
}
},
"NATEIP": {
"Type": "AWS::EC2::EIP",
"Properties": {
"InstanceId": {
"Ref": "NATInstance"
}
}
},
"NATInstance": {
"Type": "AWS::EC2::Instance",
"Properties": {
"InstanceType": {
"Ref": "NATInstanceType"
},
"KeyName": {
"Ref": "KeyName"
},
"SubnetId": {
"Ref": "PublicSubnet"
},
"SourceDestCheck": false,
"ImageId": {
"Fn::FindInMap": [
"AWSNATAMI",
{
"Ref": "AWS::Region"
},
"AMI"
]
},
"Tags": [
{
"Key": "Name",
"Value": "NAT"
}
],
"SecurityGroupIds": [
{
"Ref": "NATSecurityGroup"
}
]
}
},
"PrivateSubnetRouteTable": {
"Type": "AWS::EC2::RouteTable",
"Properties": {
"VpcId": {
"Ref": "VPC"
},
"Tags": [
{
"Key": "Name",
"Value": "PRIVATE_SUBNET_ROUTE_TABLE"
}
]
}
},
"PrivateSubnetRoute": {
"Type": "AWS::EC2::Route",
"Properties": {
"DestinationCidrBlock": {
"Ref": "AnyCidr"
},
"InstanceId": {
"Ref": "NATInstance"
},
"RouteTableId": {
"Ref": "PrivateSubnetRouteTable"
}
}
},
"PrivateSubnetRouteTableAssociation": {
"Type": "AWS::EC2::SubnetRouteTableAssociation",
"Properties": {
"RouteTableId": {
"Ref": "PrivateSubnetRouteTable"
},
"SubnetId": {
"Ref": "PrivateSubnet"
}
}
},
"NATSecurityGroup": {
"Type": "AWS::EC2::SecurityGroup",
"Properties": {
"GroupDescription": "NAT Instance SecurityGroup",
"SecurityGroupIngress": [
{
"IpProtocol": "-1",
"CidrIp": {
"Ref": "VpcCidr"
}
}
],
"Tags": [
{
"Key": "Name",
"Value": "NAT_SECURITY_GROUP"
}
],
"VpcId": {
"Ref": "VPC"
}
}
}
},
"Outputs": {
"VPCId": {
"Description": "VPC id",
"Value": {
"Ref": "VPC"
}
},
"PublicSubnetId": {
"Description": "public subnet id",
"Value": {
"Ref": "PublicSubnet"
}
},
"PrivateSubnetId": {
"Description": "private subnet id",
"Value": {
"Ref": "PrivateSubnet"
}
},
"NATSecurityGroupId": {
"Description": "NAT SG id",
"Value": {
"Ref": "NATSecurityGroup"
}
},
"NATEIP": {
"Description": "NAT Server EIP.",
"Value": {
"Ref": "NATEIP"
}
}
}
}

你可以通过AWS提供的图形化界面AWS Management Console来使用该CloudFormation脚本,也可以通过AWS CLI来使用。使用以上的CloudFormation脚本创建的VPC可以一键创建你AWS中的基础网络架构。从此再也不用为配置网络发愁了。

在AWS中创建NAT节点的更多相关文章

  1. linux中创建gpio节点

    转自:http://blog.chinaunix.net/uid-29165999-id-4296162.html #define GPIO_MAJOR 230 // major device NO. ...

  2. Labview中创建属性节点和调用节点的用法

    创建属性节点 个人感觉有点像C中的指针 创建调用节点

  3. javascript中创建新节点的方法 标签: javascript 2016-12-25 11:38 55人阅读 评论(0)

    一. var newnode=document.createElement("i"); var newnodeText=document.createTextNode(" ...

  4. platform型设备在/dev目录下自动创建设备节点的分析【转】

    转自:http://blog.csdn.net/rockrockwu/article/details/7357648 系统启动过程中platform设备.驱动注册完毕,为什么在/dev目录下就自动创建 ...

  5. js中创建html标签、加入select下默认的option的value和text、删除select元素节点下全部的OPTION节点

    <pre name="code" class="java"> jsp 中的下拉框标签: <s:select name="sjx&qu ...

  6. jQuery中的查找节点、创建节点、插入节点、删除节点、替换节点、复制节点操作方法

    jQuery操作节点我们可以分六点来讲,查找节点.创建节点.插入节点.删除节点.替换节点.复制节点. 一.查找节点 text() - 设置或返回所选元素的文本内容   ,html() - 设置或返回所 ...

  7. js动态创建style节点(js文件中添加css)

    ie6 不能 document.createElement('style') 然后append到head标签里.所以就找到这样个好文章 --------------------- 有很多提供动态创建 ...

  8. 在AWS中部署OpenShift平台

    OpenShift是RedHat出品的PAAS平台.OpenShift做为PAAS平台最大的特点是它是完全容器化的PAAS平台,底层封装了Docker和Kubernetes,上层暴露了对开发者友好的接 ...

  9. aws中的路由表

    参考官方文档: 由表中包含一系列被称为路由的规则,可用于判断网络流量的导向目的地. 在您的 VPC 中的每个子网必须与一个路由表关联:路由表控制子网的路由.一个子网一次只能与一个路由表关联,但您可以将 ...

随机推荐

  1. CSS 部件

    1.导航菜单: [荐]抽屉式菜单 jQuery.mmenu jQuery.mmenu 实现了类似手机上经常使用的抽屉式菜单,效果很好.http://mmenu.frebsite.nl/ 2.jQuer ...

  2. php嵌套数组递归搜索返回数组key

    var rewardTypes={"experience":{"\u7ecf\u9a8c\u503c":{"1":"\u660e\ ...

  3. prism4 StockTrader RI 项目分析一些体会

    StockTrader RI 代码分析也有一段时间了 刚从codeplex获取到源代码的时候,看得一头雾水,不知所云(因为之前没做过wpf的项目,看文档也静不下那心来看) 后来就想了个笨办法,模拟项目 ...

  4. 由React学习到Yeoman安装以及遇到的问题

    离职闲下来之后想着学一些新知识,本来是想从react入手,结果延伸出去的内容就像一棵树的树枝,不断增加. 学习计划是从这里开始的(6周学习计划,攻克javascript难关 https://zhuan ...

  5. Mysql 分段统计

    今天遇到个小问题觉得挺有意思,与大家分享. 需求是这样的,对数据库中的一张表做按时间的分段统计,结果只要每个区间的数量. select YEAR(create_time) as nian,MONTH( ...

  6. 易学PHP——PHP基础知识

    PHP 语言标记 因为 PHP 是兼容当时的主流语言,所以 PHP 有四种标记方式: <?php PHP 代码 ?>.这是 PHP 最为正宗的语言标记,称为标准风格标记.XML 风格标记等 ...

  7. HTML5 Web Worker的使用

    Web Workers 是 HTML5 提供的一个javascript多线程解决方案,我们可以将一些大计算量的代码交由web Worker运行而不冻结用户界面. 一:如何使用Worker Web Wo ...

  8. Ubuntu-14.04.3下SDL2测试

    最近突然蛋痛想入门Linux,想写个跨平台的游戏,各种坑,备忘,稍微记点笔记. 主要参考这个文章 buntu14.04下C++开发SDL2应用 下载与安装 到http://www.libsdl.org ...

  9. VS2013 密钥 – 所有版本(Visual Studio Ultimate,Premium,Professional,TFS)

    Visual Studio Ultimate 2013 KEY(密钥):BWG7X-J98B3-W34RT-33B3R-JVYW9 Visual Studio Premium 2013 KEY(密钥) ...

  10. Microsoft.Office.Interop.Excel 程序集引用 ,Microsoft.Office.Interop.Excel.ApplicationClass 无法嵌入互操作类型

    using Microsoft.Office.Interop.Excel   添加程序集引用 方法:在引用--程序集--扩展中,添加引用Microsoft.Office.Interop.Excel,此 ...