
AngularJs的UI组件ui-Bootstrap分享(十)——Model
Model是用来创建模态窗口的,但是实际上,并没有Model指令,而只有$uibModal服务,创建模态窗口是使用$uibModal.open()方法。
创建模态窗口时,要有一个模态窗口的模板和对应的控制器,然后在open()方法的参数中指定它们。来看一个例子:
 <!DOCTYPE html>

 <html ng-app="ui.bootstrap.demo" xmlns="http://www.w3.org/1999/xhtml">

 <head>

     <meta http-equiv="Content-Type" content="text/html; charset=utf-8" />

     <link href="/Content/bootstrap.css" rel="stylesheet" />

     <title></title>

     <script src="/Scripts/angular.js"></script>

     <script src="/Scripts/ui-bootstrap-tpls-1.3.2.js"></script>

     <script>

         angular.module('ui.bootstrap.demo', ['ui.bootstrap']).controller('ModalDemoCtrl', function ($scope, $uibModal, $log) {

             $scope.items = ['item1', 'item2', 'item3'];

             $scope.open = function (size) {

                 var modalInstance = $uibModal.open({

                     templateUrl: 'myModalContent.html',

                     controller: 'ModalInstanceCtrl',

                     backdrop: "static",

                     size: size,

                     resolve: {

                         items1: function () {

                             return $scope.items;

                         }

                     }

                 });

                 modalInstance.result.then(function (selectedItem) {

                     $scope.selected = selectedItem;

                 }, function () {

                     $log.info('Modal dismissed at: ' + new Date());

                 });

             };

             $scope.toggleAnimation = function () {

                 $scope.animationsEnabled = !$scope.animationsEnabled;

             };

         });

 //$uibModalInstance是模态窗口的实例

 angular.module('ui.bootstrap.demo').controller('ModalInstanceCtrl', function ($scope, $uibModalInstance, items1) {

             $scope.items = items1;

             $scope.selected = {

                 item: $scope.items[0]

             };

             $scope.ok = function () {

                 $uibModalInstance.close($scope.selected.item);

             };

             $scope.cancel = function () {

                 $uibModalInstance.dismiss('cancel');

             };

         });

     </script>

 </head>

 <body>

     <div ng-controller="ModalDemoCtrl">

         <script type="text/ng-template" id="myModalContent.html">

             <div class="modal-header">

                 <h3 class="modal-title">I'm a modal!</h3>

             </div>

             <div class="modal-body">

                 <ul>

                     <li ng-repeat="item in items">

                         <a href="#" ng-click="$event.preventDefault(); selected.item = item">{{ item }}</a>

                     </li>

                 </ul>

                 Selected: <b>{{ selected.item }}</b>

             </div>

             <div class="modal-footer">

                 <button class="btn btn-primary" type="button" ng-click="ok()">OK</button>

                 <button class="btn btn-warning" type="button" ng-click="cancel()">Cancel</button>

             </div>

         </script>

         <button type="button" class="btn btn-default" ng-click="open()">Open me!</button>

         <button type="button" class="btn btn-default" ng-click="open('lg')">Large modal</button>

         <button type="button" class="btn btn-default" ng-click="open('sm')">Small modal</button>

         <div ng-show="selected">Selection from a modal: {{ selected }}</div>

     </div>

 </body>

 </html>
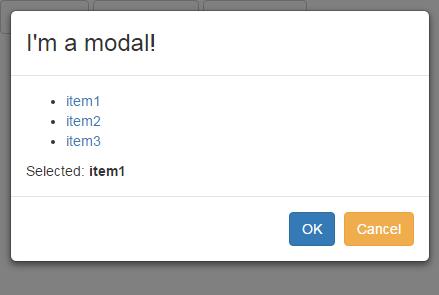
背景为灰色,不可操作。效果是这样:
open()中可以使用的参数有:
| 参数名 | 默认值 | 备注 |
| animation | true | 是否启用动画 |
| appendTo | body | 把模态窗口放在指定的dom元素中。例如$document.find('aside').eq(0) |
| backdrop | true |
打开模态窗口时的背景设置。可设置的值有:true(显示灰色背景,在模态窗口之外单击会关闭模态窗口),false (不显示灰色背景),"static"(显示灰色背景,在模态窗口关闭之前背景元素不可用) |
| backdropClass | 为背景添加的类名 | |
| bindToController | false | 设置为true并且使用controllerAs参数时,$scope的属性会传递给模态窗口所使用的controller |
| controller |
可以设置为一个表示controller的字符串,或者一个函数,或者一个数组(使用数组标记的方式为控制器注入依赖)。 控制器中可使用$uibModalInstance来表示模态窗口的实例。 |
|
| controllerAs | controller-as语法的替代写法 | |
| keyboard | true | 是否允许用ESC键关闭模态窗口 |
| openedClass | modal-open | 打开模态窗口时为body元素增加的类名 |
| resolve | 传递到模态窗口中的对象 | |
| scope | $rootScope | 模态窗口的父作用域对象 |
| size | 一个字符串,和前缀“model-”组合成类名添加到模态窗口上 | |
| template | 表示模态窗口内容的文本 | |
| templateUrl | 模态窗口内容的模板url | |
| windowClass | 添加到模态窗口模板的类名(不是模态窗口内容模板) | |
| windowTemplateUrl | uib/template/modal/window.html | |
| windowTopClass | 添加到顶层模态窗口的类名 |
全局的设置可以通过$uibModalProvider.options来配置。
使用controller-as语法时,可以为controller注册一个别名,并且将这个controller当作一个普通的Javascript对象,不需要注入$scope,也不需要将视图模型的内容绑定到$scope上。
有两种方式使用controller-as语法:
1 在controller中指定controller:"ModalInstanceCtrl as vm"(不使用controllerAs属性)
2 在controllerAs属性中指定controllerAs:"vm"
这两种方式的效果是一样的。来看这个例子:
 <!DOCTYPE html>

 <html ng-app="ui.bootstrap.demo" xmlns="http://www.w3.org/1999/xhtml">

 <head>

     <meta http-equiv="Content-Type" content="text/html; charset=utf-8" />

     <link href="/Content/bootstrap.css" rel="stylesheet" />

     <title></title>

     <script src="/Scripts/angular.js"></script>

     <script src="/Scripts/ui-bootstrap-tpls-1.3.2.js"></script>

     <script>

         angular.module('ui.bootstrap.demo', ['ui.bootstrap']).controller('ModalDemoCtrl', function ($scope, $uibModal, $log) {

             $scope.items = ['item1', 'item2', 'item3'];

             $scope.open = function (size) {

                 var modalInstance = $uibModal.open({

                     animation: $scope.animationsEnabled,

                     templateUrl: 'myModalContent.html',

                     controller: 'ModalInstanceCtrl',

                     controllerAs: 'vm',

                     backdrop: "static",

                     size: size,

                     resolve: {

                         items1: function () {

                             return $scope.items;

                         }

                     }

                 });

                 modalInstance.result.then(function (selectedItem) {

                     $scope.selected = selectedItem;

                 }, function () {

                     $log.info('Modal dismissed at: ' + new Date());

                 });

             };

             $scope.toggleAnimation = function () {

                 $scope.animationsEnabled = !$scope.animationsEnabled;

             };

         });

         //$uibModalInstance是模态窗口的实例

  angular.module('ui.bootstrap.demo').controller('ModalInstanceCtrl', function ($uibModalInstance, items1) {

             this.items = items1;

             this.selected = {

                 item: this.items[0]

             };

             this.ok = function () {

                 $uibModalInstance.close(this.selected.item);

             };

             this.cancel = function () {

                 $uibModalInstance.dismiss('cancel');

             };

         });

     </script>

 </head>

 <body>

     <div ng-controller="ModalDemoCtrl">

         <script type="text/ng-template" id="myModalContent.html">

             <div class="modal-header">

                 <h3 class="modal-title">I'm a modal!</h3>

             </div>

             <div class="modal-body">

                 <ul>

                     <li ng-repeat="item in vm.items">

                         <a href="#" ng-click="$event.preventDefault(); vm.selected.item = item">{{ item }}</a>

                     </li>

                 </ul>

                 Selected: <b>{{ vm.selected.item }}</b>

             </div>

             <div class="modal-footer">

                 <button class="btn btn-primary" type="button" ng-click="vm.ok()">OK</button>

                 <button class="btn btn-warning" type="button" ng-click="vm.cancel()">Cancel</button>

             </div>

         </script>

         <button type="button" class="btn btn-default" ng-click="open()">Open me!</button>

         <button type="button" class="btn btn-default" ng-click="open('lg')">Large modal</button>

         <button type="button" class="btn btn-default" ng-click="open('sm')">Small modal</button>

         <div ng-show="selected">Selection from a modal: {{ selected }}</div>

     </div>

 </body>

 </html>
这个例子中,ModalInstanceCtrl的别名是vm,ModalInstanceCtrl没有注入$scope,所有的属性都使用this绑定到controller对象本身,在视图中使用vm.Items或者vm.ok()来调用controller的对象
$uibModal.open()方法返回一个模态窗口实例,这个实例有几个属性:
| 属性名 | 类型 | 说明 |
| close(result) | function | 关闭模态窗口,传递一个结果 |
| dismiss(reason) | function | 取消模态窗口,传递一个原因 |
| result | promise | 一个promise,窗口关闭时为resolved,窗口取消时为rejected |
| opened | promise | 一个promise,窗口打开并下载完内容解析了所有变量后,promise为resolved |
| closed | promise | 一个promise,窗口关闭并且动画结束后为resolved |
| rendered | promise | 一个promise,窗口呈现出来后为resolved |
除了可以使用模态窗口的实例来关闭和取消窗口(上面例子中的$uibModalInstance.close($scope.selected.item);),和模态窗口关联的scope也可以关闭和取消窗口。如:
 angular.module('ui.bootstrap.demo').controller('ModalInstanceCtrl', function ($scope, $uibModalInstance, items1) {

             $scope.items = items1;

             $scope.selected = {

                 item: $scope.items[0]

             };

             $scope.ok = function () {

                 $scope.$close("aa");

             };

             $scope.cancel = function () {

                 $scope.$dismiss("cancel");

             };

         });
目录:
AngularJs的UI组件ui-Bootstrap分享(一)
AngularJs的UI组件ui-Bootstrap分享(二)——Collapse
AngularJs的UI组件ui-Bootstrap分享(三)——Accordion
AngularJs的UI组件ui-Bootstrap分享(四)——Datepicker Popup
AngularJs的UI组件ui-Bootstrap分享(五)——Pager和Pagination
AngularJs的UI组件ui-Bootstrap分享(六)——Tabs
AngularJs的UI组件ui-Bootstrap分享(七)——Buttons和Dropdown
AngularJs的UI组件ui-Bootstrap分享(八)——Tooltip和Popover
AngularJs的UI组件ui-Bootstrap分享(九)——Alert
AngularJs的UI组件ui-Bootstrap分享(十)——Model
AngularJs的UI组件ui-Bootstrap分享(十一)——Typeahead
AngularJs的UI组件ui-Bootstrap分享(十二)——Rating
AngularJs的UI组件ui-Bootstrap分享(十三)——Progressbar
AngularJs的UI组件ui-Bootstrap分享(十四)——Carousel
AngularJs的UI组件ui-Bootstrap分享(十)——Model的更多相关文章
- Ionic4.x 中的 UI 组件(UI Components) 侧边栏ion-menu组件以及底部tabs结合 侧边栏 ion-menu
1.侧边栏 ion-menu 组件的基本使用 1.创建项目 ionic start myApp sidemenu 2.配置项目 属性 作用 可选值 side 配置侧边栏的位置 start end me ...
- Ionic4.x 中的 UI 组件(UI Components) 日期组件
1.日期组件的基本使用 官方文档:https://ionicframework.com/docs/api/datetime 模板中: <ion-datetime display-format=& ...
- Ionic4.x 中的 UI 组件(UI Components) Slides 轮播图组件、Searchbar 组件、 Segment 组件
Slides 轮播图组件 Ionic4.x 中的轮播图组件是基于 swiper 插件,所以配置 slides 的属性需要在 swiper 的 api 中 找 Swiper Api:http://ida ...
- Ionic4.x 中的 UI 组件(UI Components)表单相关组件
1.ion-input 单行文本框 2.ion-toggle 开关 3.ion-radio-group.ion-radio 单选按钮组 4.ion-checkbox 多选按钮组 5.ion-selec ...
- 挂号平台首页开发(UI组件部分)
JQ插件模式开发UI组件 JQ插件开发方法: 1.$.extend() 扩展JQ(比较简单,功能略显不足) $.extend({ sayHello:function(){ console.log(&q ...
- AngularJs的UI组件ui-Bootstrap分享(十四)——Carousel
Carousel指令是用于图片轮播的控件,引入ngTouch模块后可以在移动端使用滑动的方式使用轮播控件. <!DOCTYPE html> <html ng-app="ui ...
- AngularJs的UI组件ui-Bootstrap分享(十二)——Rating
Rating是一个用于打分或排名的控件.看一个最简单的例子: <!DOCTYPE html> <html ng-app="ui.bootstrap.demo" x ...
- AngularJs的UI组件ui-Bootstrap分享(一)
最近几个月学习了AngularJs和扩展的UI组件,并在公司小组内做了一次分享交流,感觉很有收获,在此记录下个人的学习心得. 目录: AngularJs的UI组件ui-Bootstrap分享(一) A ...
- AngularJs的UI组件ui-Bootstrap分享(十三)——Progressbar
进度条控件有两种指令,第一种是uib-progressbar指令,表示单一颜色和进度的一个进度条.第二种是uib-bar和uib-progress指令,表示多种颜色和多个进度组合而成的一个进度条. 这 ...
随机推荐
- mysql 命令(二)
1.创建数据库,并制定默认的字符集是utf8. CREATE DATABASE IF NOT EXISTS yourdbname DEFAULT CHARSET utf8 COLLATE utf8_g ...
- 【java基础】成员变量和局部变量
成员变量和局部变量 根据定义变量位置的不同,可以将变量分为成员变量和局部变量 成员变量是在类范围内定义的变量 局部变量是在一个方法内定义的变量 成员变量可以分为: ...
- [SoapUI] 在SoapUI里获取Excel中多行数据并存入List
ArrayList<ArrayList<String>> getCellValuesH( String filePath, String sheetName,int tr1,i ...
- .net(C#)在vs2010版本下的MVC如何配置才能切换静态页面(html)
由于vs2010用的人比较多,虽然建mvc项目vs2010可能还不成熟,但鉴于每个人的成长有限,每个地方的资源有限,最主要的是为了解决问题,所以先不管那么多了. 用vs2010为公司网站建站,要求js ...
- vCSA加域&vcenter关联域&设置管理员权限
vCSA 与 Windows vCenter对比 1.部署起来更简单快捷. 2.vCSA基于Linux授权费用节省. 3.功能在6.0之后达到与Windows vCenter一样的功能,之后可能会反超 ...
- zookeeper能做什么?
Zookeeper是Hadoop的一个子项目,虽然源自hadoop,但是我发现zookeeper脱离hadoop的范畴开发分布式框架的运用越来越多.今天我想谈谈zookeeper,本文不谈如何使用zo ...
- pm2.5检测统计
SELECT AVG(pm25_h),AVG(pm10_h),AVG(temp_h),AVG(humi_h),AVG(co2_h),AVG(tvoc_h),perf_time FROM( SELECT ...
- db2命令
把远程的数据库信息加载到本地 第一步,catalog server端的node ,命令如下: db2 catalog tcpip node db2node remote hostname server ...
- OptionsMenu
菜单是用户界面中最常见的元素之一,使用非常频繁,在Android中,菜单被分为如下三种,选项菜单(OptionsMenu).上下文菜单(ContextMenu)和子菜单(SubMenu),今天这讲是O ...
- spring beans
所 有 使 用 XML 文 件 进 行 配 置 信 息 加 载 的 Spring IoC 容 器 , 包 括 BeanFactory 和ApplicationContext的所有XML相应实现,都使用 ...