React入门--------组件的生命周期
- Mounting/组件挂载相关:
componentWillMount
componentDidMount
- Updating/组件更新相关:
componentWillReceiveProps
shouldComponentUpdate
componentWillUpdate
componentDidUpdate
- Unmounting/组件移除相关:
componentWillUnmount
一、Mounting/组件挂载相关
componentWillMount
在组件挂载之前执行,但仅执行一次,即使多次重复渲染改组件,或者改变了组件的state。若希望该回到能执行多次,可以使用ReactDOM.unmountComponentAtNode移除掉已有的组件,然后再重新render。
    var diva = document.getElementById('a');

    var divb = document.getElementById('b');

    var i=;

    var Component1 = React.createClass({

        componentWillMount:function(){

            console.log(++i)

        },

        render: function() {

            console.log(Date.now());

            return <div name={this.props.name}>我只是一个安静的div</div>

        }

    });


  //触发componentWillMount,render

    ReactDOM.render(

            <Component1 />, diva

    );

  //未触发componentWillMount,触发render

    ReactDOM.render(

            <Component1 />, diva

    );


  //触发componentWillMount,render

    ReactDOM.render(

            <Component1 />, divb

    );
  //未触发componentWillMount,未触发render

   ReactDOM.render(

            <Component1 />, divb

    );
componentDidMount
在组件挂载之后执行,同componentWillMount一样,同一个组件重复渲染只执行一次,卸载组件后重新渲染可以重新触发一次。
二、Updating/组件更新相关
componentWillReceiveProps
在组件接收到props的时间点之前调用,注意组件初始化渲染时不会调用。
    var i = 0;

    var div = document.getElementById('a'),

    var div2 = document.getElementById('b');

    var Component1 = React.createClass({

        componentWillReceiveProps: function(){

            console.log(i++)

        },

        clickCb: function() {

            React.render(

                <Component1 />, div2

            );

        },

        render: function() {

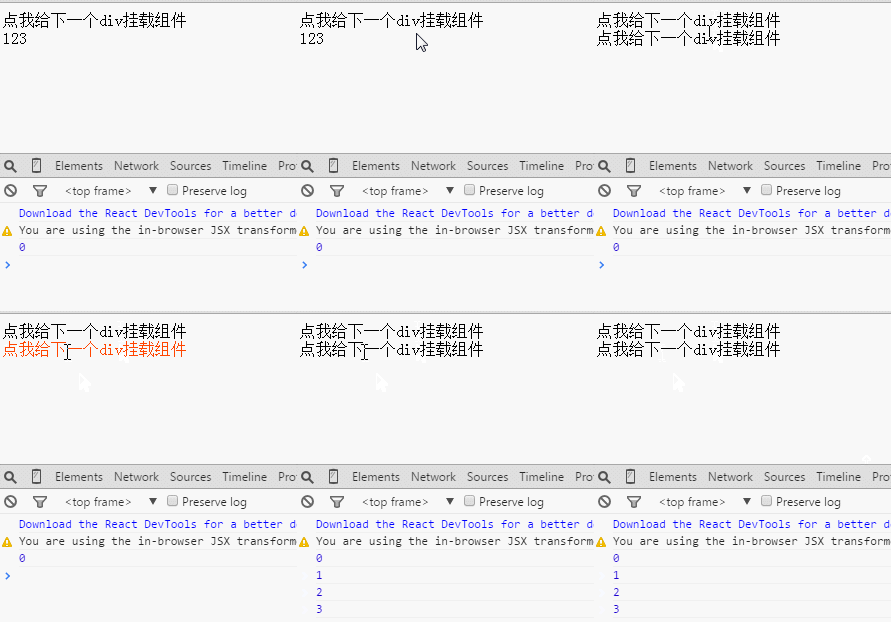
            return <div onClick={this.clickCb}>点我给下一个div挂载组件</div>

        }

    });

    React.render(

        <Component1 />, div  //初始化不会触发componentWillReceiveProps

    );

    React.render(

            <Component1 />, div   //重复渲染会触发componentWillReceiveProps

    );

    React.unmountComponentAtNode(div);  //移除掉已有组件

    React.render(

        <Component1 />, div  //初始化不会触发componentWillReceiveProps

    );
运行结果如下:
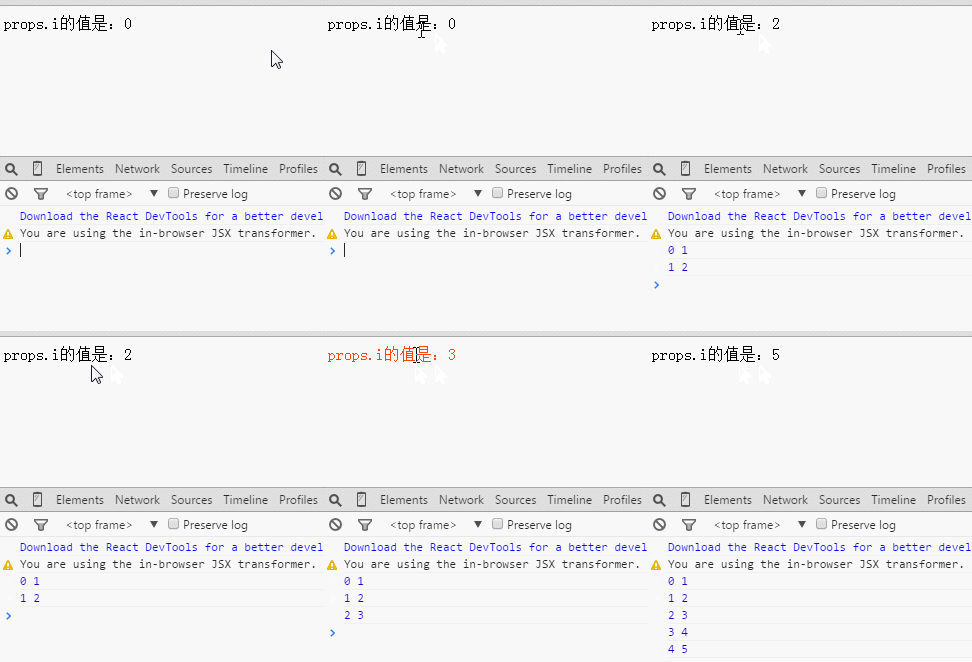
该接口带有一个参数nextProps,可以利用它来获取新的props的值(this.props获取到的是当前的,也就是旧的props)
  var i = 0;

  var div = document.getElementById('a');

  var render = function(){

            React.render(

                    <Component1 i={i++} />, div

            );

        };

    var Component1 = React.createClass({

        componentWillReceiveProps: function(nextProps){

            console.log(this.props.i, nextProps.i)

        },

        render: function() {

            return <div onClick={render}>props.i的值是:{this.props.i}</div>

        }

    });

    render();
运行结果如下
shouldComponentUpdate
该接口实际是在组件接收到了新的props或者新的state的时候会立即调用,然后通过返回值来决定是否要重新渲染当前的组件。
接口带两个参数,第一个参数表示新的props,第二个参数表示新的state。
  var div = document.getElementById('a');

  var Component1 = React.createClass({

        getInitialState: function(){

            return { i :  }

        },

        shouldComponentUpdate: function(nextProps, nextState){

            console.log( this.state.i, nextState.i );

            return nextState.i >  ? true : false; //返回true才会渲染组件

        },

        clickCb: function(){

            this.setState({

                i : this.state.i +

            })

        },

        render: function() {

            return <div onClick={this.clickCb}>state.i的值是:{this.state.i}</div>

        }

    });

    ReactDOM.render(

            <Component1 />, div

    );
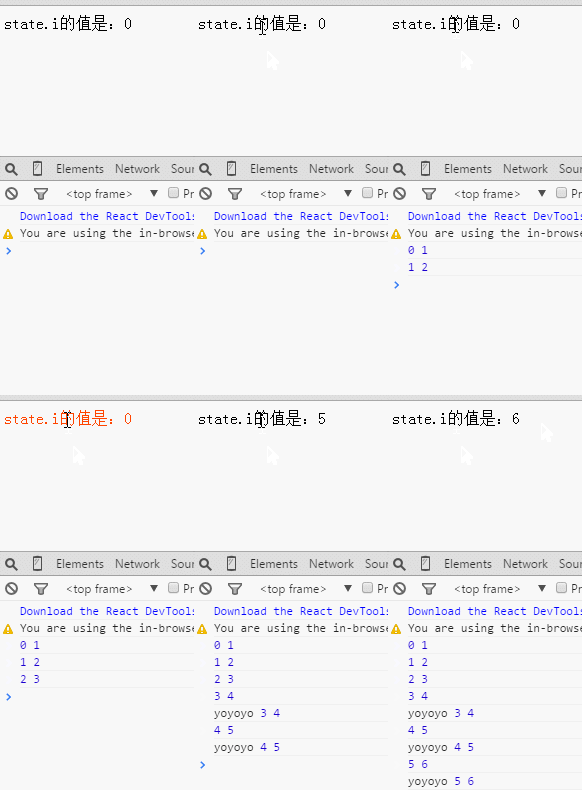
点击第四次之后才会渲染组件,在div里显示正确的新state.i

componentWillUpdate
同shouldComponentUpdate一样,在组件收到新的props或者state的时候会调用,而且也有着两个参数来获取新的props和state。
不过本接口仅在shouldComponentUpdate执行并返回了true的时候才会被调用。
在上一个代码实例中做点改动
 componentWillUpdate: function(nextProps, nextState){

            console.log( 'yoyoyo', this.state.i, nextState.i );

        },
componentDidUpdate
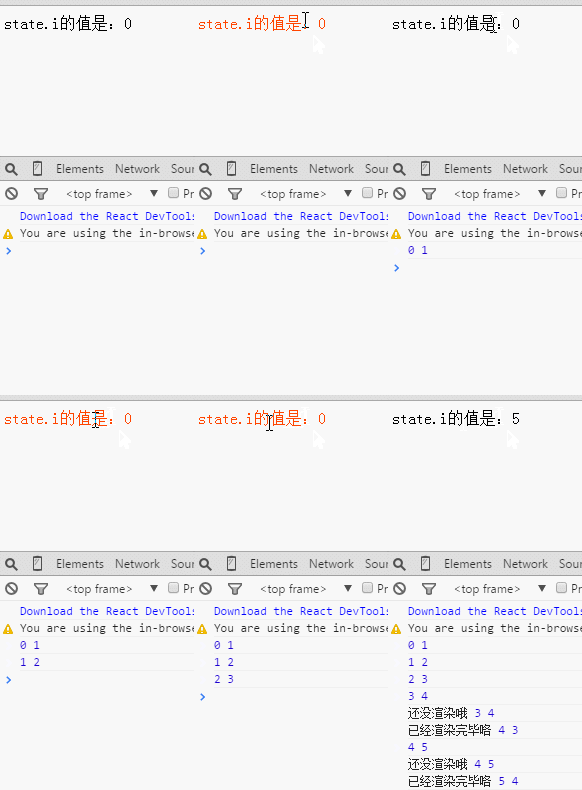
在组件更新,重新渲染完毕之后调用,它和componentWillUpdate一样有着两个参数来获取新的props和state
 var div = document.getElementById('a');

    var Component1 = React.createClass({

        getInitialState: function(){

            return { i :  }

        },

        shouldComponentUpdate: function(nextProps, nextState){

            console.log( this.state.i, nextState.i );

            return nextState.i >  ? true : false; //返回true才会执行componentWillUpdate并重新渲染组件

        },

        componentDidUpdate: function(nextProps, nextState){

            console.log( '已经渲染完毕咯', this.state.i, nextState.i );

        },

        componentWillUpdate: function(nextProps, nextState){

            console.log( '还没渲染哦', this.state.i, nextState.i );

        },

        clickCb: function(){

            this.setState({

                i : this.state.i +

            })

        },

        render: function() {

            return <div onClick={this.clickCb}>state.i的值是:{this.state.i}</div>

        }

    });

    ReactDOM.render(

            <Component1 />, div

    );
运行结果如下:
三、Unmounting/组件移除相关:
 var div = document.getElementById('a');

 var div2 = document.getElementById('b');

 var Component1 = React.createClass({

    DOMArr : [],

    getInitialState: function(){

      return { i :  }

    },

    componentDidUpdate: function(nextProps, nextState){

      var dom = document.createElement('p');

      dom.innerText = this.state.i;

      div2.appendChild(dom);

      this.DOMArr.push(dom);

        },

    componentWillUnmount: function(){

      if(!this.DOMArr.length) return;

      var i = ;

      while(i < this.DOMArr.length){console.log(i);

        div2.removeChild(this.DOMArr[i++]); //移除componentDidUpdate里添加过的DOM

      }

    },

    clickCb: function(){

      this.setState({

        i : this.state.i +

      })

    },

    render: function() {

      return <div onClick={this.clickCb}>state.i的值是:{this.state.i}</div>

    }

});

ReactDOM.render(

  <Component1 />, div

);

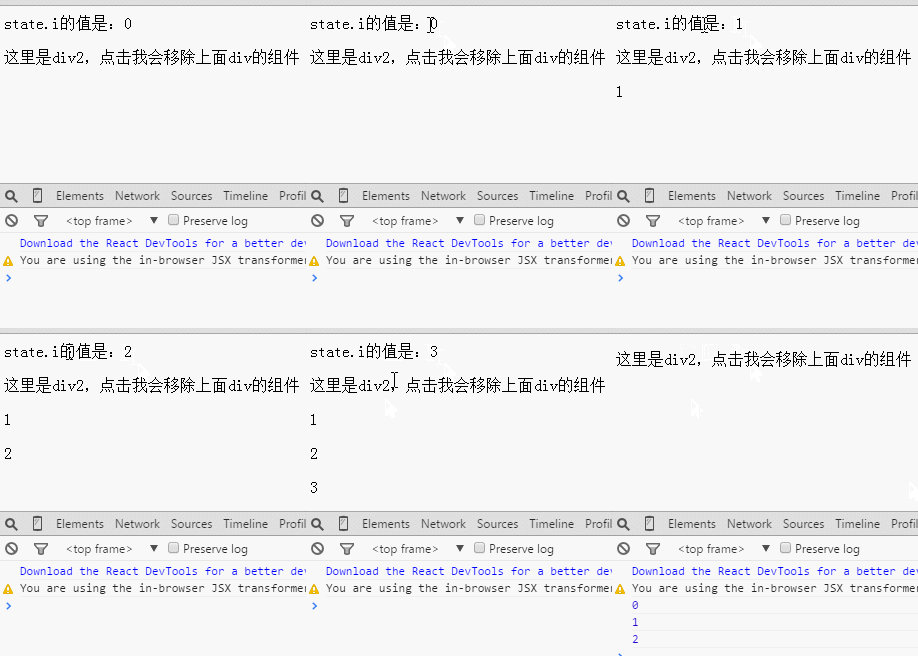
div2.addEventListener('click',function(){

  ReactDOM.unmountComponentAtNode(div) //点击div2则卸载掉第一个div里的组件

}, false)
运行结果如下:
四、getDefaultProps和getInitialState
getDefaultProps
该方法是所有我们提及的方法中最先触发的,可以在该方法里return 一个对象来作为组件默认的props值(如果父组件传进来了props,以父组件为主),它只在组件初次挂载到页面上时触发,即使你重新挂载了组件。
getInitialState
用于给组件初始化state的值,调用该方法要求必须return 一个对象或者null,否则报错。该方法在组件每次实例化的时候都会触发。
var diva = document.getElementsByTagName('div')[],

            divb = document.getElementsByTagName('div')[];

    var Component1 = React.createClass({

        getDefaultProps: function(){

            console.log('getDefaultProps');

            return { name : Date.now() }

        },

        getInitialState: function(){

            console.log('getInitialState');

            return null; //必须返回一个null或对象,否则会报错

        },

        render: function() {

            console.log(Date.now());

            return <div name={this.props.name}>我只是一个安静的div</div>

        }

    });

    ReactDOM.render(

            {/* 触发一次 getDefaultProps 和 getInitialState */}

            <Component1 />, diva

    );

    ReactDOM.render(

            {/* getDefaultProps 和 getInitialState都不触发 */}

            <Component1 />, diva

    );

    ReactDOM.unmountComponentAtNode(diva);

    ReactDOM.render(

            {/* 触发一次getInitialState */}

            <Component1 name="a"/>, diva

    );

    ReactDOM.render(

            {/* 触发一次getInitialState */}

            <Component1/>, divb

    );
五、总结
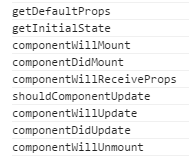
上面是9个周期接口,它们被触发的顺序?
 var Component1 = React.createClass({

        getDefaultProps: function(){

            console.log('getDefaultProps')

        },

        getInitialState: function(){

            console.log('getInitialState');

            return null

        },

        componentWillMount: function(){

            console.log('componentWillMount')

        },

        componentDidMount: function(){

            console.log('componentDidMount')

        },

        componentWillReceiveProps: function(){

            console.log('componentWillReceiveProps')

        },

        shouldComponentUpdate: function(){

            console.log('shouldComponentUpdate');

            return true;

        },

        componentWillUpdate: function(){

            console.log('componentWillUpdate')

        },

        componentDidUpdate: function(){

            console.log('componentDidUpdate')

        },

        componentWillUnmount: function(){

            console.log('componentWillUnmount')

        },

        render: function() {

            return <div>我只是一个安静的div</div>

        }

    });

    ReactDOM.render(

            <Component1 />, document.body

    );

    ReactDOM.render(

            <Component1 />, document.body

    );

    ReactDOM.unmountComponentAtNode(document.body)
结果如下:
React入门--------组件的生命周期的更多相关文章
- reactjs入门到实战(七)---- React的组件的生命周期
React的组件的生命周期有三个状态分别是:挂载(生产组件示例化.准备挂载到页面.挂载到页面).更新(更新值.更新DOM).和卸载(卸载后). >>>其他 getInitia ...
- react native组件的生命周期
react native组件的生命周期 一.当页面第一次加载时,会依次调用: constructor() componentWillMount(): 这个函数调用时机是在组件创建,并初始化了状态之后, ...
- Android React Native组件的生命周期及回调函数
熟悉android的童鞋应该都清楚,android是有生命周期的,其很多组件也是有生命周期.今天小编和大家分享的React Native组件的生命周期,还不了解的童鞋,赶紧来围观吧 在android开 ...
- 【RN - 基础】之React Native组件的生命周期
下图描述了React Native中组件的生命周期: 从上图中可以看到,React Native组件的生命周期可以分为初始化阶段.存在阶段和销毁阶段. 实例化阶段 实例化阶段是React Native ...
- React Native组件、生命周期及属性传值props详解
创建组件的三种方式 第一种:通过ES6的方式创建 /** * 方式一 :ES6 */ export default class HelloComponent extends Component { r ...
- React:组件的生命周期
在组件的整个生命周期中,随着该组件的props或者state发生改变,其DOM表现也会有相应的变化.一个组件就是一个状态机,对于特定地输入,它总返回一致的输出. 一个React组件的生命周期分为三个部 ...
- react教程 — 组件的生命周期 和 执行顺序
一.组件执行的生命周期: 参考 https://www.cnblogs.com/soyxiaobi/p/9559117.html 或 https://www.c ...
- React Native——组件的生命周期
组件生命周期 上流程图描述了组件从创建.运行到销毁的整个过程,可以看到如果一个组件在被创建,从开始一直到运行会依次调用getDefaultProps到render这五个函数:在运行过程中,如果有属性和 ...
- React(三)组件的生命周期
Component Specs and LifeCycle <div id="app"></div> <script src="bower_ ...
随机推荐
- jQuery插件之ajaxFileUpload
原文:http://www.cnblogs.com/kissdodog/archive/2012/12/15/2819025.html ajaxFileUpload是一个异步上传文件的jQuery插件 ...
- Android属性动画之ValueAnimation
ValueAnimation是ObjectAnimation类的父类,经过前几天的介绍,相信大家对ObjectAnimation有了 一定的认识,今天就为大家最后介绍一下ValueAnimation, ...
- NYOJ 1023 还是回文(DP,花最少费用形成回文串)
/* 题意:给出一串字符(全部是小写字母),添加或删除一个字符,都会产生一定的花费. 那么,将字符串变成回文串的最小花费是多少呢? 思路:如果一个字符串增加一个字符 x可以形成一个回文串,那么从这个字 ...
- office2010里怎么设置页码为第几页共几页
在office2010里设置页眉,页脚,页码是很方便的,页眉页脚可以方便的添加信息,统一文本格式,页码的添加可以让读者清楚的知道阅读的进度,也可以方便下次阅读时从相应的页码开始阅读,就像软件中的进度条 ...
- 使用office生成PDF文件
网络上有很多word转pdf的软件,功能效果不尽相同,对于想要把word转换成pdf格式的网友来说,一款实用强大的工具是必不可少的,踏破铁鞋无觅处,原来office2010就有符合你要求的功能.PDF ...
- unity3d中 刚体(Rigidbody) 碰撞体(Collider) 触发器(Is Trigger)
刚体(Rigidbody)的官方(摘自Unity3d的官方指导书<Unity4.x从入门到精通>)解释如下: Rigidbody(刚体)组件可使游戏对象在物理系统的控制下来运动,刚体可 ...
- 微信开发之.Net
撸主是一个新手,最近几天在研究微信服务号交互,上网搜了搜C#的代码,再结合自己的习惯,下面把代码解析一下,其中有些代码非本人原创. 首先,你要有个公众服务号,只有服务号才可以自定义菜单,没有条件的可以 ...
- SQL Server如何在变长列上存储索引
这篇文章我想谈下SQL Server如何在变长列上存储索引.首先我们创建一个包含变长列的表,在上面定义主键,即在上面定义了聚集索引,然后往里面插入80000条记录: -- Create a new t ...
- CSS魔法堂:不得不说的Containing Block
前言 <CSS魔法堂:重新认识Box Model.IFC.BFC和Collapsing margins>中提到在没有floated兄弟盒子时,line box的左右边框会与所属的cont ...
- JavaScript DOM学习总结(一)
DOM 什么是DOM?简单地说DOM是一套对文档内容进行抽象和概念化的方法. W3C给出的DOM定义是这样的:"一个与系统平台和编程语言无关的接口,程序和脚本以通过这个接口动态的访问和修 ...
