LNMP架构三
Nginx代理(正向代理)
正向代理:让局域网内的用户 访问外网,外网不能访问局域网,
场景:如果要从国内访问美国的服务器会很慢,这时候就可以找个香港服务器做代理,香港访问美国是很快的。
代理服务器作为用户和web服务器的代理者。
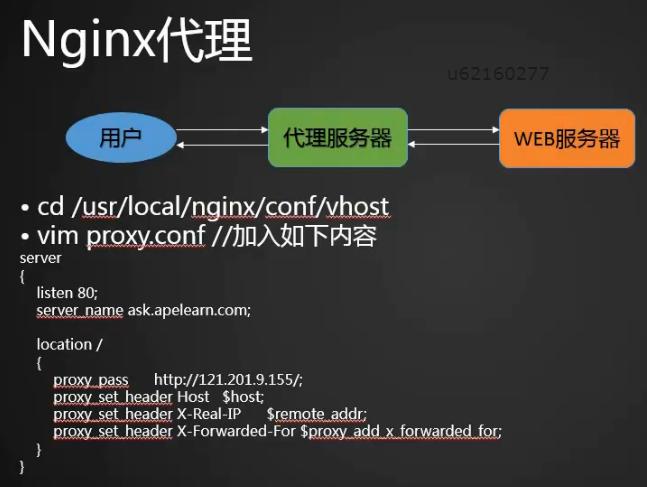
1.新建代理服务器配置文件
[root@bogon /]# cd /usr/local/nginx/conf/vhost

[root@bogon vhost]# vim proxy.conf
配置:(因为是代理服务器,不用访问本机的配置文件)
server

{

    listen 80;

    server_name ask.apelearn.com;                定义域名

    location /

    {

        proxy_pass      http://121.201.9.155/;          告诉nginx真正的web服务器地址

        proxy_set_header Host   $host;                 (访问的域名是server_name)

        proxy_set_header X-Real-IP      $remote_addr;           (定义公网ip)

        proxy_set_header X-Forwarded-For $proxy_add_x_forwarded_for;   (定义代理服务器ip)

    }

}
[root@bogon vhost]# /usr/local/nginx/sbin/nginx -t

nginx: the configuration file /usr/local/nginx/conf/nginx.conf syntax is ok

nginx: configuration file /usr/local/nginx/conf/nginx.conf test is successful

[root@bogon vhost]# /usr/local/nginx/sbin/nginx -s reload

[root@bogon vhost]# curl -x127.0.0.1:80 ask.apelearn.com/robots.txt (检查:(从本机访问到了远程站点,说明代理成功))

#

# robots.txt for MiWen

#

User-agent: *

Disallow: /?/admin/

Disallow: /?/people/

Disallow: /?/question/

Disallow: /account/

Disallow: /app/

Disallow: /cache/

Disallow: /install/

Disallow: /models/

Disallow: /crond/run/

Disallow: /search/

Disallow: /static/

Disallow: /setting/

Disallow: /system/

Disallow: /tmp/

Disallow: /themes/

Disallow: /uploads/

Disallow: /url-*

Disallow: /views/

Disallow: /*/ajax/[root@bogon vhost]#
常见502的问题
1.配置错误
因为nginx找不到php-fpm了,所以报错,一般是fastcgi_pass后面的路径配置错误了,后面可以是socket或者是ip:port
2.资源耗尽
lnmp架构在处理php时,nginx直接调取后端的php-fpm服务,如果nginx的请求量偏高,我们又没有给php-fpm配置足够的子进程,那么php-fpm就会资源耗尽,一旦资源耗尽nginx找不到php-fpm就会出现502错误,
解决方案
去调整php-fpm.conf中的pm.max_children数值,使其增加,但是也不能无限增加,毕竟资源有限,一般4G内存机器如果跑php-fpm和nginx,不跑mysql可以设置为150,8G为300以此类推
3.除了上面的两种错误还有其他的原因,很少有,我们可以借助nginx的错误日志来进行排查vim /usr/local/nginx/logs/nginx_error.log 我们也可以给日志定义级别vim/usr/local/nginx/conf/nginx.conf 找到error_log,默认是crit最严谨的就行,也可以改成debug显示的信息最全面,但是很容易撑爆我们的磁盘。
[root@localhost ~]# vim/usr/local/php/etc/php-fpm.conf

[global]

pid = /usr/local/php/var/run/php-fpm.pid

error_log =/usr/local/php/var/log/php-fpm.log

[www]

listen = /tmp/www.sock

user = php-fpm

group = php-fpm

listen.owner = nobody    //定义属主

listen.group = nobody    //定义属组

pm = dynamic

pm.max_children = 50

pm.start_servers = 20

pm.min_spare_servers = 5

pm.max_spare_servers = 35

pm.max_requests = 500

rlimit_files = 1024
配置完之后重启php-fpm
[root@wqslinux ~]# /etc/init.d/php-fpm restart
ps: 再补充一个,是近期很多人遇到的问题
这种情况下,使用的是socket,版本高于5.4(含5.4) 默认监听的socket文件权限是所有者只读,属组和其他用户没有任何权限。所以,nginx的启动用户(咱们配置的是nobody)就没有办法去读这个socket文件,最终导致502,这个问题可以在nginx的错误日志中发现。解决办法很简单,上面给出的配置文件中就有避免这个问题的配置。
listen.owner = nobody //定义属主
listen.group = nobody //定义属组
这两个配置就是定义socket的属主和属组是谁。除了这个还有一种方法
listen.mode = 777
这样nobody也可以有读取权限了。
Nginx负载均衡
负载均衡:单从字面上的意思来理解就可以解释N台服务器平均分担负载,不会因为某台服务器负载高宕机而某台服务器闲置的情况。那么负载均衡的前提就是要有多台服务器才能实现,也就是两台以上即可。
1.在开始部署负载均衡之前,我们先来介绍一个命令,dig命令需要yum安装一下
[root@bogon ~]# yum install -y bind-utils
2.dig后加域名,他可以返回2个ip.实则域名解析,我们就用这两个ip测试负载均衡
[root@bogon ~]# dig qq.com
[root@bogon ~]# dig qq.com

; <<>> DiG 9.9.4-RedHat-9.9.4-29.el7 <<>> qq.com

;; global options: +cmd

;; Got answer:

;; ->>HEADER<<- opcode: QUERY, status: NOERROR, id: 37483

;; flags: qr rd ra; QUERY: 1, ANSWER: 2, AUTHORITY: 0, ADDITIONAL: 1

;; OPT PSEUDOSECTION:

; EDNS: version: 0, flags:; udp: 1280

;; QUESTION SECTION:

;qq.com.                                IN      A

;; ANSWER SECTION:

qq.com.                 33      IN      A       125.39.240.113

qq.com.                 33      IN      A       61.135.157.156

;; Query time: 20 msec

;; SERVER: 10.21.9.12#53(10.21.9.12)

;; WHEN: 一 2月 12 19:09:33 CST 2018

;; MSG SIZE  rcvd: 67
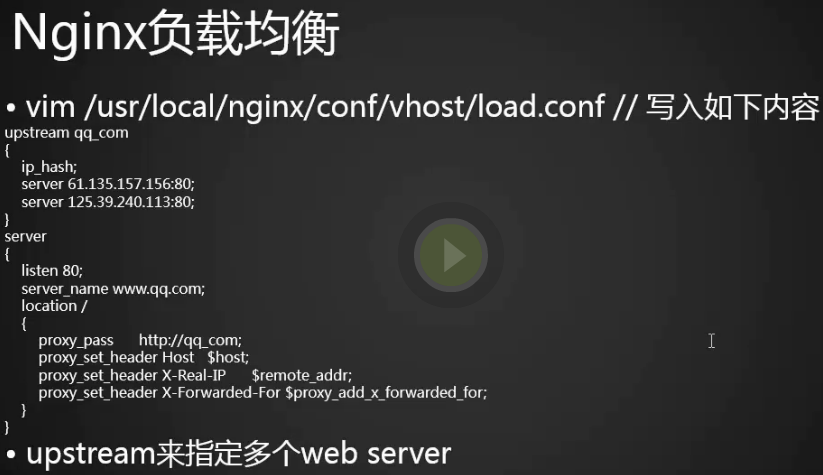
3.再来编写一个配置文件,需要用到upstream模块,upstream:数据转发功能,为nginx提供了跨越单机的横向处理能力,使nginx摆脱只能为终端节点提供单一功能的限制,而使它具备了网路应用级别的拆分、封装和整合的战略功能。
upstream qq

{

    ip_hash;           (负载均衡有多个web服务器,我们需要一个长连接来保持于一个服务器的链接,这里需要用到hash)

    server 61.135.157.156:80;

    server 125.39.240.113:80;

}

server

{

    listen 80;

    server_name www.qq.com;

    location /

    {

        proxy_pass      http://qq;   (这里写的要与upstream一致,因为域名是虚拟的,下面的2个ip才是重要的)

        proxy_set_header Host   $host;

        proxy_set_header X-Real-IP      $remote_addr;

        proxy_set_header X-Forwarded-For $proxy_add_x_forwarded_for;

    }

}
4.检查语法错误并且重新加载配置文件,返回的是qq页面的源代码
[root@bogon ~]# vim /usr/local/nginx/conf/vhost/load.conf

[root@bogon ~]# /usr/local/nginx/sbin/nginx -t

nginx: the configuration file /usr/local/nginx/conf/nginx.conf syntax is ok

nginx: configuration file /usr/local/nginx/conf/nginx.conf test is successful

[root@bogon ~]# /usr/local/nginx/sbin/nginx -s reload

[root@bogon ~]# curl -x127.0.0.1:80 www.qq.com
5.nginx不支持代理Https服务。也就是说不支持访问web服务器的443端口。
ssl原理
1.https和http相比,https的通信是加密的。如果不加密,比如你访问一个很重要的网站,数据包还是会到达,但是可能会用人从中间复制一份。https会把数据包加密,就算从中间复制也无法解码。
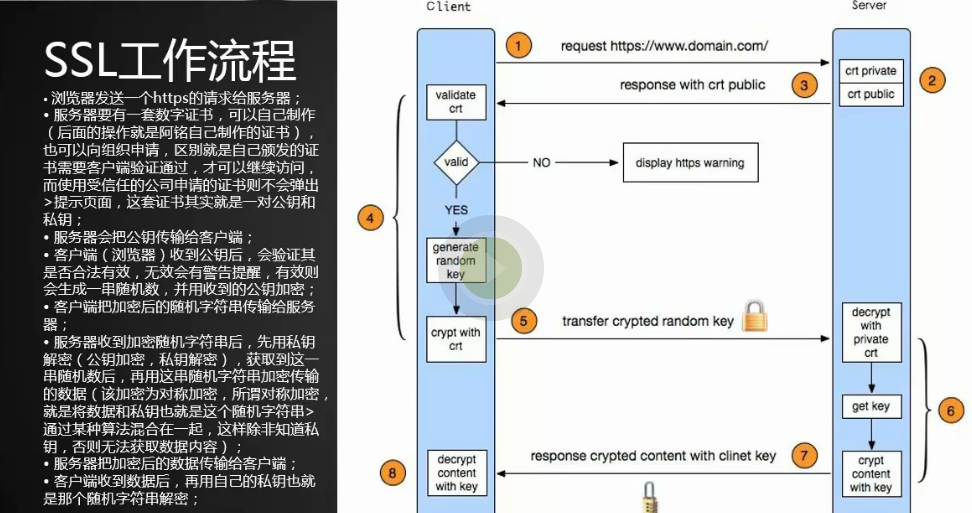
2.https的工作流程:
1.浏览器发送一个https的请求给服务器。
2.服务器有一套加解密的证书private私钥解密,public公钥
3.服务器会把公钥传输给客户端
4.客户端(浏览器)收到公钥后,会验证其是否合法有效,无效会有警告提醒,有效则会生成一串随机字符串,并用收到的公钥加密。
5.客户端把加密的随机字符串传输给服务器
6.服务器收到加密随机字符串后,先用私钥解密,获取到这一串随机数后,再用这串随机字符串加密传输的数据(该加密为对称加密,也就是将数据和这个随机字符串通过某种算法混合一起,这一除非知道私钥,否则无法获7.取数据内容)
7.服务器把加密后的数据传输给客户端。
8.客户端收到数据后,在用自己的私钥也就是那个随机字符串解密。
生产ssl密钥对

1.将秘钥对放到conf目录下,查看是否安装了openssl工具,没有安装需要安装。
[root@bogon ~]# cd /usr/local/nginx/conf/

[root@bogon conf]# rpm -qf `which openssl`

openssl-1.0.2k-8.el7.x86_64

[root@bogon conf]#
2.使用openssl生成名字为tmp.key,rsa格式的秘钥,长度为2048
[root@bogon conf]# openssl genrsa -des3 -out tmp.key 2048

Generating RSA private key, 2048 bit long modulus

.....+++

......................................................................................+++

e is 65537 (0x10001)

Enter pass phrase for tmp.key:

Verifying - Enter pass phrase for tmp.key:

[root@bogon conf]# ls

fastcgi.conf            koi-utf             nginx.conf.bak       uwsgi_params

fastcgi.conf.default    koi-win             nginx.conf.default   uwsgi_params.default

fastcgi_params          mime.types          scgi_params          vhost

fastcgi_params.default  mime.types.default  scgi_params.default  win-utf

htpasswd                nginx.conf          tmp.key

[root@bogon conf]#
3.去掉私钥密码并命名为linux.key,删除tmp.key
[root@bogon conf]# openssl rsa -in tmp.key -out linux.key

Enter pass phrase for tmp.key:

writing RSA key

[root@bogon conf]# rm -f tmp.key

[root@bogon conf]#
4.生成证书请求文件(用这个文件和私钥一起生成一个公钥)
[root@bogon conf]# openssl  req -new -key linux.key -out linux.csr

You are about to be asked to enter information that will be incorporated

into your certificate request.

What you are about to enter is what is called a Distinguished Name or a DN.

There are quite a few fields but you can leave some blank

For some fields there will be a default value,

If you enter '.', the field will be left blank.

-----

Country Name (2 letter code) [XX]:china

string is too long, it needs to be less than  2 bytes long

Country Name (2 letter code) [XX]:11

State or Province Name (full name) []:BeiJing

Locality Name (eg, city) [Default City]:BeiJing

Organization Name (eg, company) [Default Company Ltd]:linux

Organizational Unit Name (eg, section) []:linux

Common Name (eg, your name or your server's hostname) []:linux

Email Address []:linux@qq.com

Please enter the following 'extra' attributes

to be sent with your certificate request

A challenge password []:root

An optional company name []:linux

[root@bogon conf]#
5.生成公钥
[root@bogon conf]# openssl x509 -req -days 365 -in linux.csr -signkey linux.key -out linux.crt

Signature ok

subject=/C=11/ST=BeiJing/L=BeiJing/O=linux/OU=linux/CN=linux/emailAddress=linux@qq.com

Getting Private key

[root@bogon conf]#
Nginx配置ssl
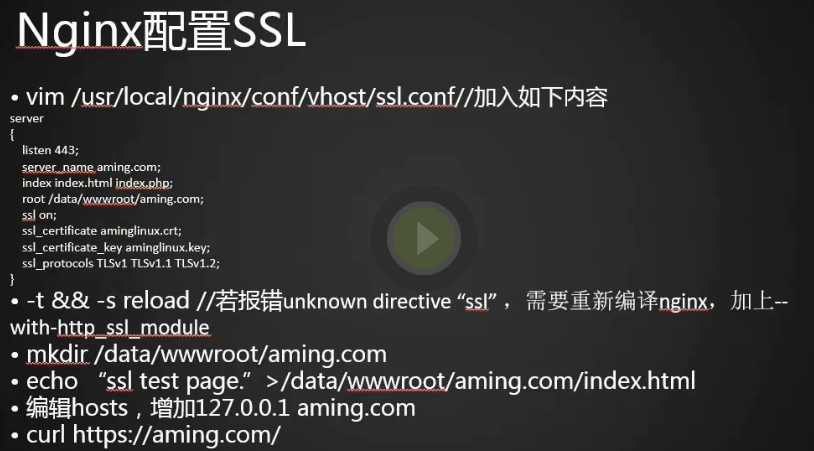
1.添加配置文件
[root@bogon conf]# cd vhost/

[root@bogon vhost]# vim ssl.conf

[root@bogon vhost]#
server

{

    listen 443;                                        (监听443端口)

    server_name linux.com;                                 (编写server_name)

    index index.html index.php;

    root /data/wwwroot/linux.com;

    ssl on;                                       (开启ssl服务)

    ssl_certificate linux.crt;                           (指定公钥)

    ssl_certificate_key linux.key;                         (指定私钥)

    ssl_protocols TLSv1 TLSv1.1 TLSv1.2;                   (指定三种模式)

}
2.创建linux.com目录
[root@bogon vhost]# mkdir /data/wwwroot/linux.com

[root@bogon vhost]# /usr/local/nginx/sbin/nginx -t(如果nginx编译的时候没有加上ssl,这里会报错需要重新编译)

nginx: [emerg] unknown directive "ssl" in /usr/local/nginx/conf/vhost/ssl.conf:7

nginx: configuration file /usr/local/nginx/conf/nginx.conf test failed

[root@bogon vhost]#
[root@bogon vhost]# /usr/local/nginx/sbin/nginx -V

nginx version: nginx/1.12.2

built by gcc 4.8.5 20150623 (Red Hat 4.8.5-16) (GCC)

configure arguments: --prefix=/usr/local/nginx

[root@bogon vhost]#
3.编译
[root@bogon vhost]# cd /usr/local/src/nginx-1.12.2/

[root@bogon nginx-1.12.2]# ./configure --help |grep -i ssl

  --with-http_ssl_module             enable ngx_http_ssl_module

  --with-mail_ssl_module             enable ngx_mail_ssl_module

  --with-stream_ssl_module           enable ngx_stream_ssl_module

  --with-stream_ssl_preread_module   enable ngx_stream_ssl_preread_module

  --with-openssl=DIR                 set path to OpenSSL library sources

  --with-openssl-opt=OPTIONS         set additional build options for OpenSSL

[root@bogon nginx-1.12.2]#  ./configure --prefix=/usr/local/nginx/ --with-http_ssl_module
make && make install
4.重启服务
[root@bogon nginx-1.12.2]# /usr/local/nginx/sbin/nginx -V

nginx version: nginx/1.12.2

built by gcc 4.8.5 20150623 (Red Hat 4.8.5-16) (GCC)

built with OpenSSL 1.0.2k-fips  26 Jan 2017

TLS SNI support enabled

configure arguments: --prefix=/usr/local/nginx/ --with-http_ssl_module

[root@bogon nginx-1.12.2]# /usr/local/nginx/sbin/nginx -t

nginx: the configuration file /usr/local/nginx//conf/nginx.conf syntax is ok

nginx: configuration file /usr/local/nginx//conf/nginx.conf test is successful

[root@bogon nginx-1.12.2]# /etc/init.d/nginx restart

Restarting nginx (via systemctl):                          [  确定  ]

[root@bogon nginx-1.12.2]# netstat -lntp

Active Internet connections (only servers)

Proto Recv-Q Send-Q Local Address           Foreign Address         State       PID/Program name

tcp        0      0 0.0.0.0:80              0.0.0.0:*               LISTEN      92257/nginx: master

tcp        0      0 192.168.122.1:53        0.0.0.0:*               LISTEN      4161/dnsmasq

tcp        0      0 0.0.0.0:22              0.0.0.0:*               LISTEN      1475/sshd

tcp        0      0 127.0.0.1:631           0.0.0.0:*               LISTEN      1477/cupsd

tcp        0      0 127.0.0.1:25            0.0.0.0:*               LISTEN      2778/master

tcp        0      0 0.0.0.0:443             0.0.0.0:*               LISTEN      92257/nginx: master

tcp6       0      0 :::3306                 :::*                    LISTEN      2410/mysqld

tcp6       0      0 :::22                   :::*                    LISTEN      1475/sshd

tcp6       0      0 ::1:631                 :::*                    LISTEN      1477/cupsd

tcp6       0      0 ::1:25                  :::*                    LISTEN      2778/master

[root@bogon nginx-1.12.2]#
5.创建测试文件
[root@bogon nginx-1.12.2]# cd /data/wwwroot/linux.com/

[root@bogon linux.com]# ls

[root@bogon linux.com]# vim index.html (写入ssl)
6.编辑hosts文件,添加127.0.0.1 linux.com
[root@bogon linux.com]# vim /etc/hosts

[root@bogon linux.com]#
7.访问报错,因为是我们自己办法的证书,直接修改/etc/hosts,用Curl测试并看不出效果,提示证书已经失去信任(原因是,这是我们自己办法的浏览器是不信任的,只用权威的)。
[root@bogon linux.com]# curl https://linux.com

curl: (60) Peer's certificate issuer has been marked as not trusted by the user.

More details here: http://curl.haxx.se/docs/sslcerts.html

curl performs SSL certificate verification by default, using a "bundle"

 of Certificate Authority (CA) public keys (CA certs). If the default

 bundle file isn't adequate, you can specify an alternate file

 using the --cacert option.

If this HTTPS server uses a certificate signed by a CA represented in

 the bundle, the certificate verification probably failed due to a

 problem with the certificate (it might be expired, or the name might

 not match the domain name in the URL).

If you'd like to turn off curl's verification of the certificate, use

 the -k (or --insecure) option.

[root@bogon linux.com]#
8.编辑windown配置文件添加10.21.95.122 linux.com,访问,访问不通,查看是否有防火墙,关闭防火墙:简单的办法直接iptables -F或者添加443的规则
[root@bogon linux.com]# iptables -nvL
9.访问linux.com成功

10.12306网站是自己颁发的证书:(在中国的政府有些网站,认为只有自己的颁发的安全,所以用自己颁发的证书)
如果想要买证书,可以搜索 沃通,
LNMP架构三的更多相关文章
- LNMP架构部署
第1章 部署LNMP架构步骤 1.1 ①部署Linux系统(OK) 基本优化完成(ip地址设置 yum源更新 字符集设置) 安全优化完成(iptables关闭 selinux关闭 /tmp/ 1777 ...
- nginx详解反向代理、负载均衡、LNMP架构上线动态网站(week4_day1_part1)-技术流ken
nginx介绍 Nginx是俄罗斯人编写的十分轻量级的HTTP服务器,Nginx,它的发音为“engine X”,是一个高性能的HTTP和反向代理服务器,同时也是一个IMAP/POP3/SMTP 代理 ...
- 高性能Web服务之lnmp架构应用
传统上基于进程或线程模型架构的web服务通过每进程或每线程处理并发连接请求,这势必会在网络和I/O操作时产生阻塞,其另一个必然结果则是对内存或CPU的利用率低下.生成一个新的进程/线程需要事先备好其运 ...
- LNMP架构下Discuz论坛的搭建
在上一节中,我们对lnmp架构下的mysql.php.nginx进行源码的安装,并设置了相关的安装参数.现在我们将在上一节的基础上,把三者联系起来进行一个论坛的部署. 一.首先进行Discuz(社区论 ...
- 部署LNMP架构及其应用
部署企业LNMP架构 (一)首先安装nginx服务,具体请见另一篇关于nginx的博文. (二)安装MySQL数据库 .安装前准备 [root@localhost ~]# rpm -e mysql-s ...
- Linux(12):期中架构(4)--- 前端部分:HTTP & Nginx & LNMP架构
HTTP协议概念原理说明 1. 当用户访问一个网站时经历的过程 # ①. 利用DNS服务,将输入的域名解析为相应的IP地址 a 本地主机输入域名后,会查询本地缓存信息和本地hosts b 本地主机会向 ...
- LNMP架构的搭建
第9章 LNMP架构的搭建 9.1 什么是LNMP 9.1.1 LNMP的组成 L linux N nginx:实现静态的服务处理 M ...
- linux运维、架构之路-Lnmp架构部署
一.Lnmp架构原理 二. Lnmp架构软件安装 1.Nginx安装脚本 #!/bin/bash useradd -s /sbin/nologin -M www mkdir -p /server/to ...
- nginx详解反向代理,负载均衡,LNMP架构上线动态网站
1.nginx介绍 nginx.org Nginx是俄罗斯人编写的十分轻量级的HTTP服务器,Nginx,它的发音为“engine X”,是一个高性能的HTTP和反向代理服务器,同时也是一个IMAP/ ...
随机推荐
- (转)JS中的对象
1.对象 要有对象, 就先要有创建对象的方法. 在C++/Java等语言, 这个方法就是实例化XXX类的一个实例xxx.而在JavaScript的世界里实际没有类的东西, 当然仍然可以用"类 ...
- APK Develop——SMS Timer
SMS Timer APK 描述: 在设定时间后向设定手机号码发送设定的内容的短信. 权限获取: <manifest xmlns:android="http://schemas.and ...
- 添加HP消息队列
Date: 20140210 Auth: Jin 两台服务器 120 HTTPSQS 236 HTTPPROXY 1.add host $ jump 120 #vim /etc/hosts 192.1 ...
- CentOS 6.9下KVM虚拟机通过virt-clone克隆虚拟机(转)
一.virt-clone概述 1.virt-clone作用简介 virt-clone主要是用来克隆kvm虚拟机,并且通过Options.General Option.Storage Configura ...
- Linux关于终端的基本概念汇总(tty/pty)(转)
在Linux系统的设备特殊文件目录/dev/下,终端特殊设备文件一般有以下几种: 1.串行端口终端(/dev/ttySn) 串行端口终端(Serial Port Terminal)是使用计算机串行端口 ...
- Android Context作为参数传递this
来自:http://blog.csdn.net/sswmjoy/article/details/46119285将弹出框作为函数封装后参数为Context,供其他的类调用时,将this作为参数传入,总 ...
- Git 学习(一)简介及安装
Git 简介及安装 Git是目前世界上最先进的分布式版本控制系统(没有之一).它的诞生也颇具传奇,Linux创始人Linus花了两周时间自己用C写了一个分布式版本控制系统,这就是Git!有兴趣的话,可 ...
- iOS: 设置App的国际化和本地化
原文链接:http://www.cocoachina.com/appstore/20160310/15632.html 前言 App的名字设置方式有很多种,如果在App打包上线时不做修改,最终App的 ...
- http://my.oschina.net/u/1177710/blog/284608
http://my.oschina.net/u/1177710/blog/284608 http://chuhanzhi.com/?p=45 http://www.2cto.com/kf/201501 ...
- scala sbt 添加国内镜像
FROM: http://www.4wei.cn/archives/1002417 sbt运行时经常需要下载大量的jar包,默认连接到maven官网,速度通常比较慢.在`~/.sbt/`下添加一个`r ...