tensorflow入门(二)
import numpy as np
import tensorflow as tf
import matplotlib.pyplot as plt #使用numpy生成200个随机点
x_data = np.linspace(-0.5,0.5,200)[:,np.newaxis]
noise = np.random.normal(0,0.02,x_data.shape)
y_data = np.square(x_data) + noise #定义两个placeholder
x = tf.placeholder(tf.float32,[None,1])
y = tf.placeholder(tf.float32,[None,1]) #定义神经网络中间层
Weights_L1 = tf.Variable(tf.random_normal([1,10]))
biases_L1 = tf.Variable(tf.zeros([1,10]))
Wx_plus_b_L1 = tf.matmul(x,Weights_L1) + biases_L1
L1 = tf.nn.tanh(Wx_plus_b_L1) #定义神经网络输出层
Weights_L2 = tf.Variable(tf.random_normal([10,1]))
biases_L2 = tf.Variable(tf.zeros([1,1]))
Wx_plus_b_L2 = tf.matmul(L1,Weights_L2) + biases_L2
prediction = tf.nn.tanh(Wx_plus_b_L2) #二次代价函数
loss = tf.reduce_mean(tf.square(y - prediction))
#使用梯度下降法
train_step = tf.train.GradientDescentOptimizer(0.1).minimize(loss) with tf.Session() as sess:
#变量初始化
sess.run(tf.global_variables_initializer())
for _ in range(2000):
sess.run(train_step,feed_dict={x:x_data,y:y_data}) #获得预测值
prediction_value = sess.run(prediction,feed_dict={x:x_data})
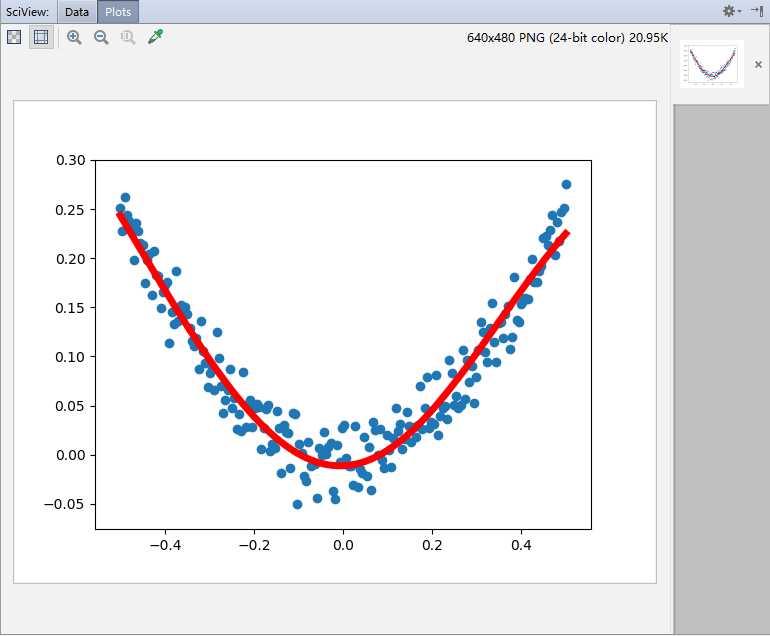
#画图
plt.figure()
plt.scatter(x_data,y_data)
plt.plot(x_data,prediction_value,'r-',lw = 5)
plt.show()
得到结果:
——
import tensorflow as tf

from tensorflow.examples.tutorials.mnist import input_data

#载入数据集

mnist = input_data.read_data_sets("MNIST_data",one_hot=True)

#每个批次的大小

batch_size = 100

#计算一共有多少个批次

n_batch = mnist.train.num_examples // batch_size

#定义两个placeholder

x = tf.placeholder(tf.float32,[None,784]) #图片

y = tf.placeholder(tf.float32,[None,10]) #标签

#创建一个简单的神经网络

w = tf.Variable(tf.zeros([784,10]))

b = tf.Variable(tf.zeros([10]))

prediction = tf.nn.softmax(tf.matmul(x,w)+b)

#二次代价函数

loss = tf.reduce_mean(tf.square(y-prediction))

#梯度下降算法

train_step = tf.train.GradientDescentOptimizer(0.2).minimize(loss)

#初始化变量

init = tf.global_variables_initializer()

#结果存放在一个bool类型的列表中,argmax()返回一维张量中最大值所在的位置,equal函数判断两者是否相等

correct_prediction = tf.equal(tf.argmax(y,1),tf.argmax(prediction,1))

#求准确率,cast:将bool型转换为0,1然后求平均正好算到是准确率

accuracy = tf.reduce_mean(tf.cast(correct_prediction,tf.float32))

with tf.Session() as sess:

    sess.run(init)

    for epoch in range(21):

        for batch in range(batch_size):#next_batch:不断获取下一组数据

            batch_xs,batch_ys = mnist.train.next_batch(batch_size)

            sess.run(train_step,feed_dict={x:batch_xs,y:batch_ys})

        acc = sess.run(accuracy,feed_dict={x:mnist.test.images,y:mnist.test.labels})

        print("Iter "+str(epoch)+",Testing Accuracy "+str(acc))
训练结果:
Iter 0,Testing Accuracy 0.657

Iter 1,Testing Accuracy 0.7063

Iter 2,Testing Accuracy 0.7458

Iter 3,Testing Accuracy 0.7876

Iter 4,Testing Accuracy 0.8203

Iter 5,Testing Accuracy 0.8406

Iter 6,Testing Accuracy 0.8492

Iter 7,Testing Accuracy 0.8586

Iter 8,Testing Accuracy 0.8642

Iter 9,Testing Accuracy 0.8678

Iter 10,Testing Accuracy 0.8709

Iter 11,Testing Accuracy 0.8736

Iter 12,Testing Accuracy 0.8751

Iter 13,Testing Accuracy 0.8784

Iter 14,Testing Accuracy 0.88

Iter 15,Testing Accuracy 0.8816

Iter 16,Testing Accuracy 0.883

Iter 17,Testing Accuracy 0.8841

Iter 18,Testing Accuracy 0.8847

Iter 19,Testing Accuracy 0.8855

Iter 20,Testing Accuracy 0.8878
可见,通过多次的训练,识别的准确值不断提高
——
tensorflow入门(二)的更多相关文章
- 48、tensorflow入门二,线性模型的拟合
import tensorflow as tf import numpy as np#生成2维的100个0-1的随机数 x_data = np.float32(np.random.rand(2,100 ...
- TensorFlow 入门之手写识别(MNIST) softmax算法 二
TensorFlow 入门之手写识别(MNIST) softmax算法 二 MNIST Fly softmax回归 softmax回归算法 TensorFlow实现softmax softmax回归算 ...
- #tensorflow入门(1)
tensorflow入门(1) 关于 TensorFlow TensorFlow™ 是一个采用数据流图(data flow graphs),用于数值计算的开源软件库.节点(Nodes)在图中表示数学操 ...
- TensorFlow入门(五)多层 LSTM 通俗易懂版
欢迎转载,但请务必注明原文出处及作者信息. @author: huangyongye @creat_date: 2017-03-09 前言: 根据我本人学习 TensorFlow 实现 LSTM 的经 ...
- 1 TensorFlow入门笔记之基础架构
------------------------------------ 写在开头:此文参照莫烦python教程(墙裂推荐!!!) ---------------------------------- ...
- TensorFlow 入门之手写识别(MNIST) 数据处理 一
TensorFlow 入门之手写识别(MNIST) 数据处理 一 MNIST Fly softmax回归 准备数据 解压 与 重构 手写识别入门 MNIST手写数据集 图片以及标签的数据格式处理 准备 ...
- TensorFlow 入门 | iBooker·ApacheCN
原文:Getting Started with TensorFlow 协议:CC BY-NC-SA 4.0 自豪地采用谷歌翻译 不要担心自己的形象,只关心如何实现目标.--<原则>,生活原 ...
- 【原创】NIO框架入门(二):服务端基于MINA2的UDP双向通信Demo演示
前言 NIO框架的流行,使得开发大并发.高性能的互联网服务端成为可能.这其中最流行的无非就是MINA和Netty了,MINA目前的主要版本是MINA2.而Netty的主要版本是Netty3和Netty ...
- (转)TensorFlow 入门
TensorFlow 入门 本文转自:http://www.jianshu.com/p/6766fbcd43b9 字数3303 阅读904 评论3 喜欢5 CS224d-Day 2: 在 Da ...
- Swift语法基础入门二(数组, 字典, 字符串)
Swift语法基础入门二(数组, 字典, 字符串) 数组(有序数据的集) *格式 : [] / Int / Array() let 不可变数组 var 可变数组 注意: 不需要改变集合的时候创建不可变 ...
随机推荐
- HTML5笔记——formData
注:formData中的数据在控制台上的console里面是打印不出来的,只能在控制台的network里面查看到具体的发送数据和发送选项 文章出处:梦想天空 XMLHttpRequest Level ...
- python中变量的交换
a=4 b=5 #第一种 c=0 c=a a=b b=c print('a=%d,b=%d'%(a,b)) #第二种 a=a+b b=a-b a=a-b print('a=%d,b=%d'%(a,b) ...
- org.springframework.beans.factory.CannotLoadBeanClassException: Cannot find class [com.my.service.ProductService] for bean with name 'productService' defi报错解决方法
原 javaweb项目报错org.springframework.beans.factory.CannotLoadBeanClassException: Cannot find class [XXX] ...
- C++之map使用
解析文件或者字符串,一key跟keyvalue来存在map中,如下代码: test.h: #include <map>#include <vector> Class test ...
- python3 使用opencv 画基本图形
在Python3 环境下安装opencv-python 后练习画基本图形: import numpy as np import cv2 # BGR format GREEN = (0, 255, 0) ...
- PHP秒杀系统全方位设计分析(一)
秒杀系统特点人多商品少时间短流量高外挂机器[黄牛和非黄牛] 技术分析瞬间高并发的处理能力多层次的分布式处理能力人机交互与对抗[12306验证码图片] 技术选型分析Linux+Nginx+PHP+Mys ...
- XML常用标签的介绍
1.引言 在使用Java时经常遇到使用XML的情况,而因为对XML不太了解,经常配置时粘贴复制,现在对它进行总结,以备以后使用. 2.XML常见的定义 (1)XML(Extensible Markup ...
- Scrapy 分布式数据采集方案
运行环境 CentOS7. + Python2. + Scrapy1. + MongoDB3. + BeautifulSoup4. 编程工具 PyCharm + Robomongo + Xshell ...
- SaltStack部署配置Tomcat-第三篇
实验目标 简单部署tomcat及安装java环境 实现步骤 编写salt的状态模块 [root@linux-node1 web]# pwd /srv/salt/base/web [root@linux ...
- Azure Active Directory配置java应用的单点登录
下载应用:https://github.com/Azure-Samples/active-directory-java-webapp-openidconnect(普通项目,集成了特殊配置接入微软的注册 ...