Camel多智能体框架初探
Camel介绍
CAMEL 是一个开源社区,致力于探索代理的扩展规律。我们相信,在大规模研究这些代理可以提供对其行为、能力和潜在风险的宝贵见解。为了促进该领域的研究,我们实现了并支持各种类型的代理、任务、提示、模型和模拟环境。
CAMEL :找到智能体的扩展规律。第一个也是最好的多智能体框架。
CAMEL 框架设计原则
可演化性
该框架通过生成数据并与环境交互,使多智能体系统能够持续进化。这种进化可以由可验证奖励驱动的强化学习或监督学习驱动。
规模性
该框架旨在支持百万级代理的系统,确保在大规模情况下实现高效的协调、通信和资源管理。
有状态性
代理保持状态记忆,使它们能够进行多步与环境的交互,并高效地应对复杂的任务。
代码即提示
每一行代码和注释都作为代理的提示。代码应编写得清晰易读,确保人类和代理都能有效解读。
GitHub地址:https://github.com/camel-ai/camel。
Camel初探
我使用从源代码中使用 uv 这种方式进行安装。
git clone https://github.com/camel-ai/camel.git
cd camel
如果没安装uv需要安装。
pip install uv
创建一个虚拟环境。
uv venv .venv --python=3.10
激活虚拟环境。
.venv\Scripts\activate
安装CAMEL及其依赖。
uv pip install -e ".[all, dev, docs]"
开发者可以安装pre-commit hooks 与 mypy。
uv pip install pre-commit mypy
pre-commit install
现在先随便跑个例子看看。
我想要使用硅基流动的模型,就可以在.env文件中这样写:
Silicon_Model_ID="Qwen/Qwen2.5-72B-Instruct"

SiliconCloud_API_KEY="你的api_key"

SiliconCloud_Base_URL="https://api.siliconflow.cn/v1"
我跑的例子是这个:camel\examples\ai_society\role_playing_multi_lingual.py
将代码修改为如下的形式即可:
# ========= Copyright 2023-2024 @ CAMEL-AI.org. All Rights Reserved. =========

# Licensed under the Apache License, Version 2.0 (the "License");

# you may not use this file except in compliance with the License.

# You may obtain a copy of the License at

#

#     http://www.apache.org/licenses/LICENSE-2.0

#

# Unless required by applicable law or agreed to in writing, software

# distributed under the License is distributed on an "AS IS" BASIS,

# WITHOUT WARRANTIES OR CONDITIONS OF ANY KIND, either express or implied.

# See the License for the specific language governing permissions and

# limitations under the License.

# ========= Copyright 2023-2024 @ CAMEL-AI.org. All Rights Reserved. =========

from colorama import Fore

from camel.societies import RolePlaying

from camel.utils import print_text_animated

def main(model=None) -> None:

    task_prompt = "Develop a trading bot for the stock market"

    role_play_session = RolePlaying(

        assistant_role_name="Python Programmer",

        assistant_agent_kwargs=dict(model=model),

        user_role_name="Stock Trader",

        user_agent_kwargs=dict(model=model),

        task_prompt=task_prompt,

        with_task_specify=True,

        task_specify_agent_kwargs=dict(model=model),

        output_language="Chinese",  # Arabic, French, Spanish, ...

    )

    print(

        Fore.GREEN

        + f"AI Assistant sys message:\n{role_play_session.assistant_sys_msg}\n"

    )

    print(

        Fore.BLUE + f"AI User sys message:\n{role_play_session.user_sys_msg}\n"

    )

    print(Fore.YELLOW + f"Original task prompt:\n{task_prompt}\n")

    print(

        Fore.CYAN

        + "Specified task prompt:"

        + f"\n{role_play_session.specified_task_prompt}\n"

    )

    print(Fore.RED + f"Final task prompt:\n{role_play_session.task_prompt}\n")

    chat_turn_limit, n = 50, 0

    input_msg = role_play_session.init_chat()

    while n < chat_turn_limit:

        n += 1

        assistant_response, user_response = role_play_session.step(input_msg)

        if assistant_response.terminated:

            print(

                Fore.GREEN

                + (

                    "AI Assistant terminated. Reason: "

                    f"{assistant_response.info['termination_reasons']}."

                )

            )

            break

        if user_response.terminated:

            print(

                Fore.GREEN

                + (

                    "AI User terminated. "

                    f"Reason: {user_response.info['termination_reasons']}."

                )

            )

            break

        print_text_animated(

            Fore.BLUE + f"AI User:\n\n{user_response.msg.content}\n"

        )

        print_text_animated(

            Fore.GREEN + "AI Assistant:\n\n"

            f"{assistant_response.msg.content}\n"

        )

        if "CAMEL_TASK_DONE" in user_response.msg.content:

            break

        input_msg = assistant_response.msg

if __name__ == "__main__":

    from camel.models import ModelFactory

    from camel.types import ModelPlatformType, ModelType

    import pathlib

    import os

    from dotenv import load_dotenv

    base_dir = pathlib.Path(__file__).parent.parent.parent

    env_path = base_dir / ".env"

    load_dotenv(dotenv_path=str(env_path))

    modeltype = os.getenv("Silicon_Model_ID")

    api_key = os.getenv("SiliconCloud_API_KEY")

    base_url = os.getenv("SiliconCloud_Base_URL")

    siliconcloud_model = ModelFactory.create(

        model_platform=ModelPlatformType.OPENAI_COMPATIBLE_MODEL,

                model_type=modeltype,

                api_key=api_key,

                url=base_url,

                model_config_dict={"temperature": 0.4, "max_tokens": 4096},

    )

    main(siliconcloud_model)
运行效果:
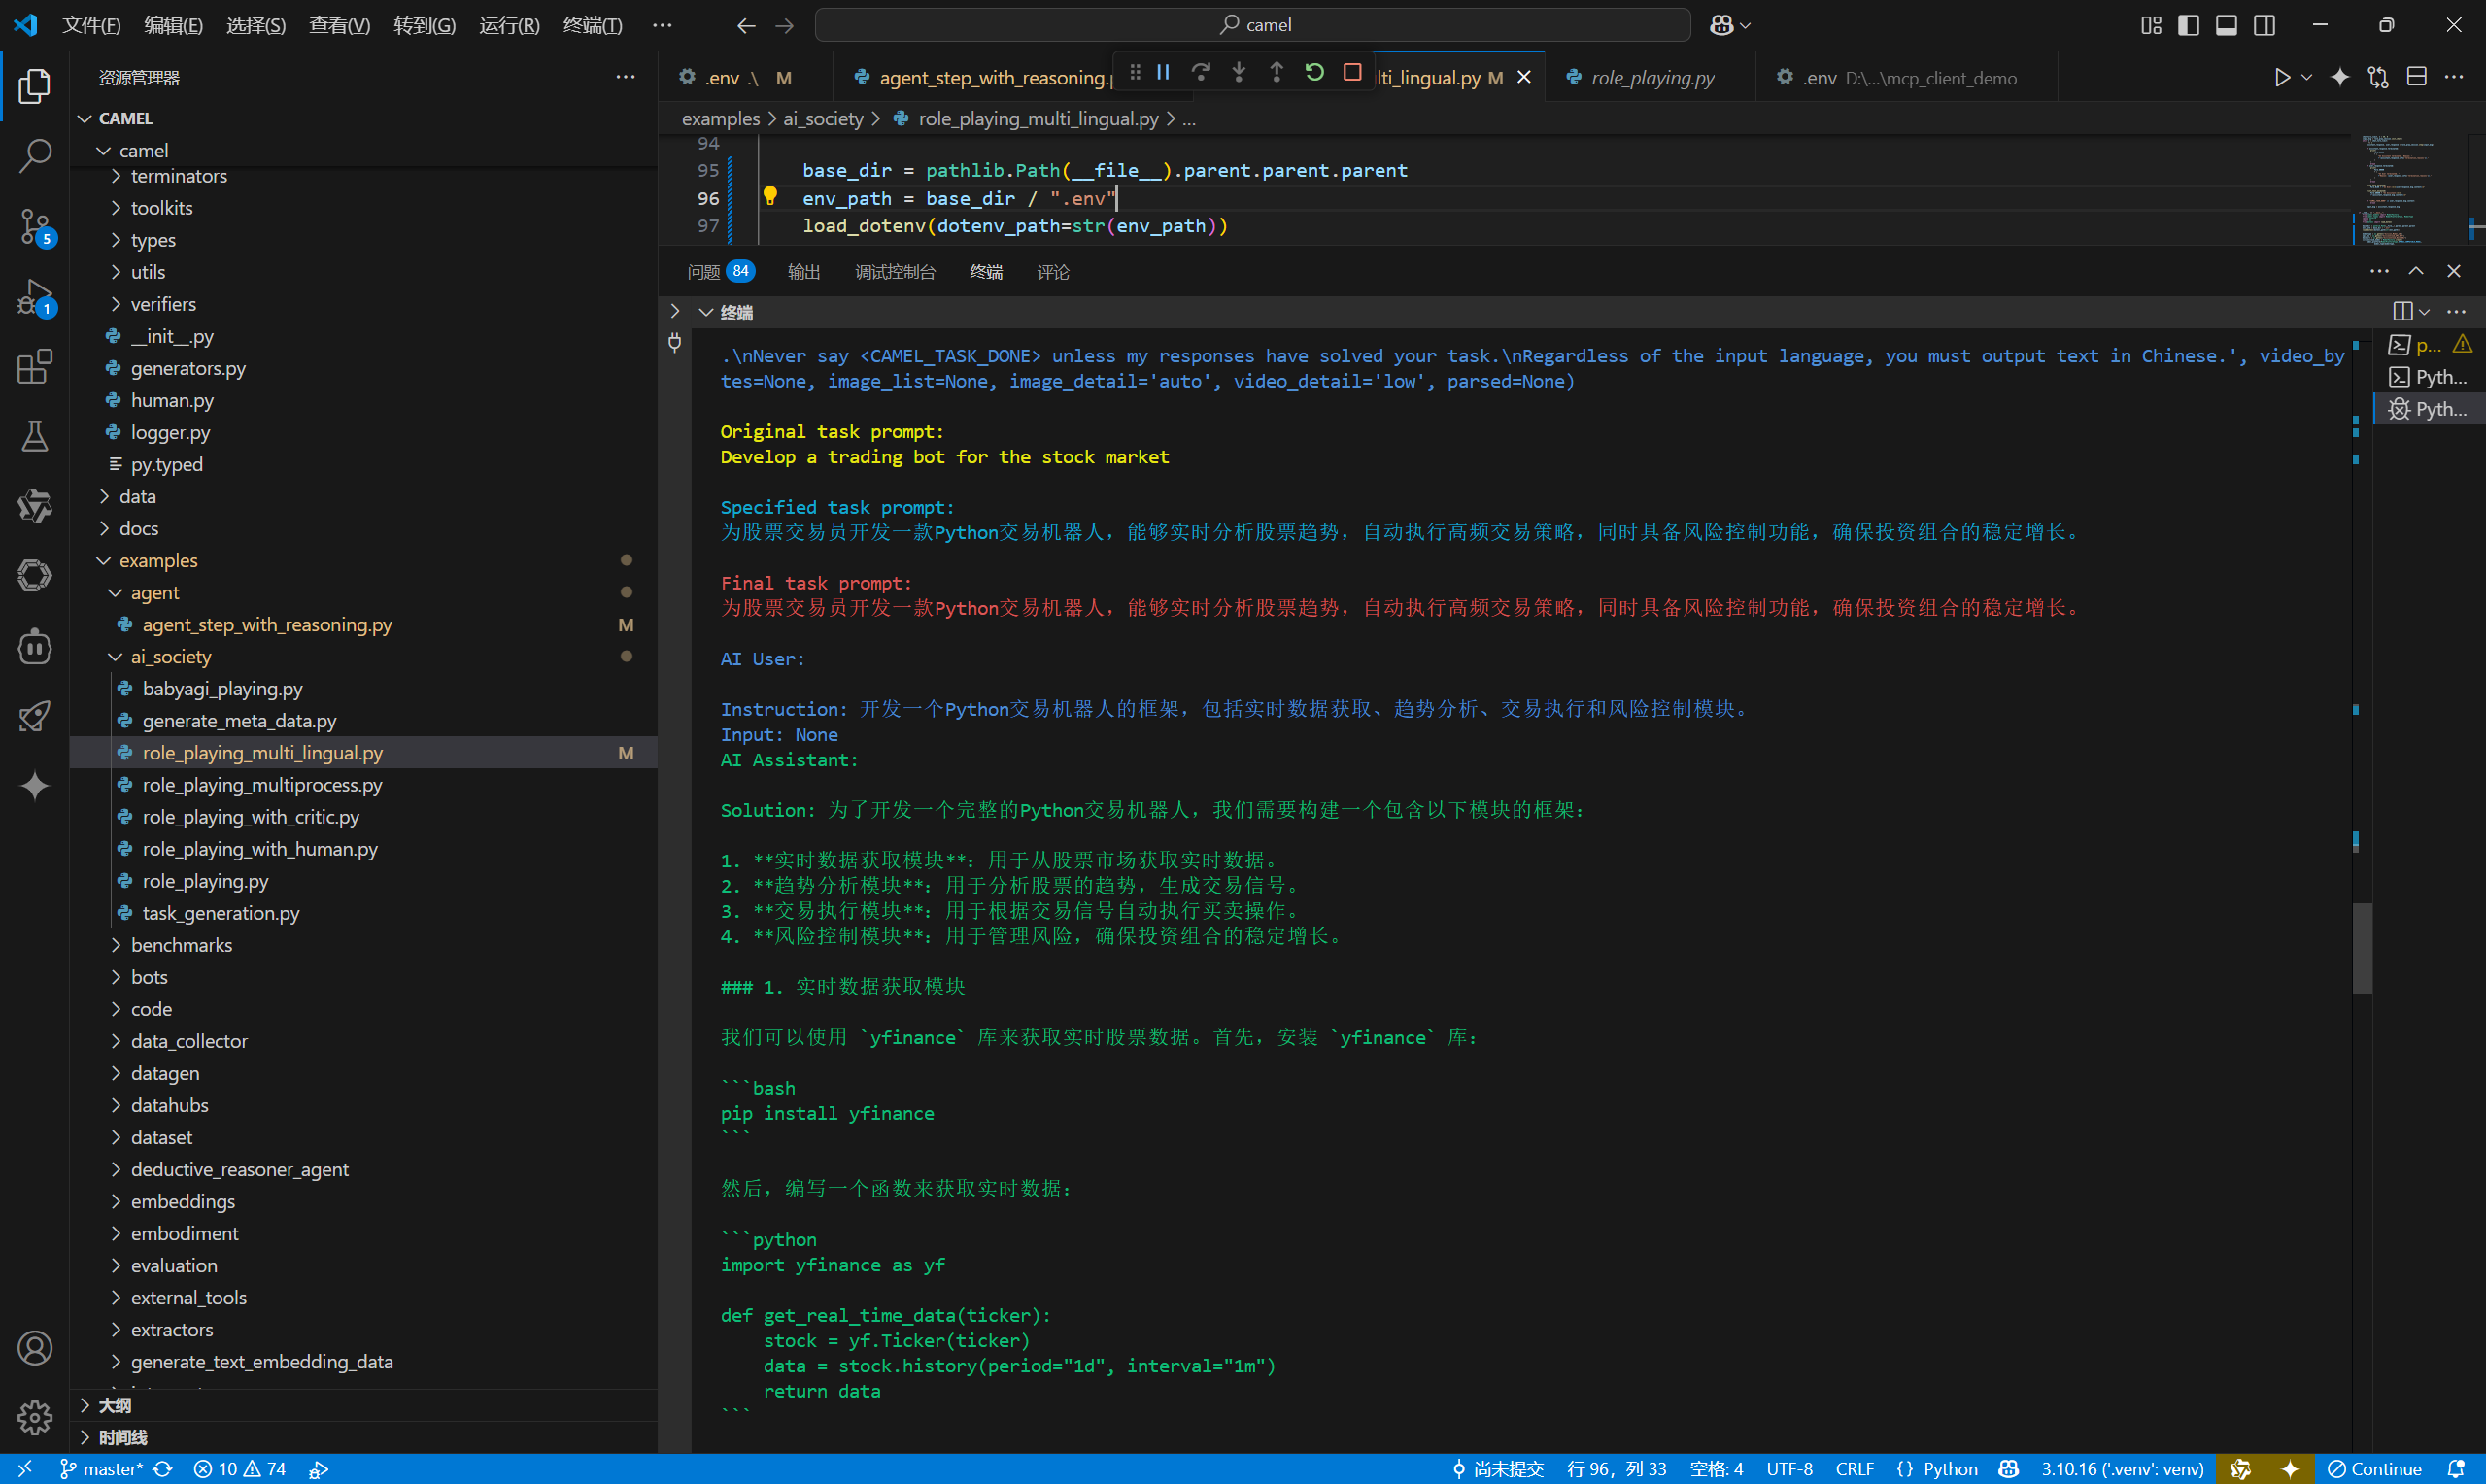
算是把环境搭建好了。
现在就可以开始学习Camel这个多智能体框架了。
Camel多智能体框架初探的更多相关文章
- TensorFlow利用A3C算法训练智能体玩CartPole游戏
本教程讲解如何使用深度强化学习训练一个可以在 CartPole 游戏中获胜的模型.研究人员使用 tf.keras.OpenAI 训练了一个使用「异步优势动作评价」(Asynchronous Advan ...
- 伯克利推出「看视频学动作」的AI智能体
伯克利曾经提出 DeepMimic框架,让智能体模仿参考动作片段来学习高难度技能.但这些参考片段都是经过动作捕捉合成的高度结构化数据,数据本身的获取需要很高的成本.而近日,他们又更进一步,提出了可以直 ...
- DRL 教程 | 如何保持运动小车上的旗杆屹立不倒?TensorFlow利用A3C算法训练智能体玩CartPole游戏
本教程讲解如何使用深度强化学习训练一个可以在 CartPole 游戏中获胜的模型.研究人员使用 tf.keras.OpenAI 训练了一个使用「异步优势动作评价」(Asynchronous Advan ...
- 多智能体系统(MAS)简介
1.背景 自然界中大量个体聚集时往往能够形成协调.有序,甚至令人感到震撼的运动场景,比如天空中集体翱翔的庞大的鸟群.海洋中成群游动的鱼群,陆地上合作捕猎的狼群.这些群体现象所表现出的分布.协调.自 ...
- 【SerpentAI:Python开源游戏智能体开发框架——相比OpenAI Universe可导入自己的游戏、可脱离Docker/VNC运行】
https://weibo.com/fly51fly?from=myfollow_all&is_all=1#1514439335614 [SerpentAI:Python开源游戏智能体开发框架 ...
- STM32W108无线传感器网络节点自组织与移动智能体导航技术
使用STM32W108无线开发板及节点完毕大规模网络的自组建,网络模型选择树型,网络组建完毕之后,使用基于接收信号强度指示RSSI(ReceivedSignal Strength Indication ...
- 开发指南专题二:JEECG微云高速开发平台JEECG框架初探
开发指南专题二:JEECG微云高速开发平台JEECG框架初探 2.JEECG框架初探 2.1演示系统 打开浏览器输入JEECG演示环境界址:http://demo.jeecg.org:8090/能够看 ...
- django框架初探
django框架初探 1.web框架介绍 web框架本质是一个socket服务端.每一个端口只能被一个程序监听. web程序分为两个部分: 服务器程序:对socket服务器封装,解析http请求,发送 ...
- RNN及其变体框架
RNN及其变体框架 含RNN推导 LSTM理解 理解LSTM网络 算法细节理解及参考文献
- 基于ROBO-MAS多智能体自主协同 高频投影定位系统
随机推荐
- Qt 中实现系统主题感知
[写在前面] 在现代桌面应用程序开发中,系统主题感知是一项重要的功能,它使得应用程序能够根据用户的系统主题设置(如深色模式或浅色模式)自动调整其外观. Qt 作为一个跨平台的C++图形用户界面应用程序 ...
- Intellij IDEA开发环境中Springboot项目无Run ****main()的菜单
问题描述: Intellij IDEA开发环境中Springboot项目无Run ****main()的菜单. 解决办法有以下几种: 方法1:Idea无右键run选项, 无法通过main方法启动sp ...
- Python设计模式(第2版)中文的pdf电子书
Python设计模式(第2版)中文的pdf电子书下载地址:百度云盘,提取码:dmem
- spark (六) RDD算子(operator)
目录 1 转换算子(transformer)(将旧的RDD包装成新RDD) 1.1 单值类型 1.1.1 map 1.1.2 mapPartition 1.1.3 mapPartitionsWithI ...
- C# WinForm 托盘程序
实现步骤 创建 NotifyIcon 控件并设置属性: 编写 NotifyIcon 响应控制事件: 在主窗体的Load事件中将 NotifyIcon 添加到系统托盘: 程序退出时,移除系统托盘的 No ...
- 【TCP协议】---协议详解
TCP协议 本文内容如下: 1)TCP协议概念 2)TCP头部结构和字段介绍 3)TCP流量控制 滑动窗口 4)TCP拥塞控制 ...
- RocketMQ原理—3.源码设计简单分析下
大纲 1.Producer作为生产者是如何创建出来的 2.Producer启动时是如何准备好相关资源的 3.Producer是如何从拉取Topic元数据的 4.Producer是如何选择Message ...
- flutter-原生路由传自定义对象
自定义对象 1 class Dk { 2 int id; 3 String title; 4 String address; 5 String ww; 6 String account; 7 } 传值 ...
- Jupyter 使用安装的虚拟环境(tensorflow)
1. 在 anaconda 中使用 conda create -n tensorflow python=3.6 创建 tensorflow 虚拟环境: 2. 安装交互环境(ipykernel) co ...
- MarkDown学习使用图片
学习MarkDown使用