
荐 android 如何打包自定义控件(转)
荐 android 如何打包自定义控件(转)
设计自定义的控件对android开发人员来说,是家常便饭了,但是多次做项目的经验证明了一个道理,自定义的控件,可以在其他项目中,多次使用,所以接下来我们来介绍2种常用的打包方式,并讨论他们的利于病。
我们可以假设想要自定义一个改变文字显示的button(纯属假设,这样简单的功能其实也用不着自定义)
首先写好布局文件mybutton.xml
|
1
2
3
4
5
6
7
8
9
10
11
12
13
14
15
16
17
18
19
20
21
22
23
24
25
26
|
<RelativeLayout xmlns:android="http://schemas.android.com/apk/res/android" xmlns:tools="http://schemas.android.com/tools" android:layout_width="match_parent" android:layout_height="match_parent"> <ImageView android:id="@+id/imageView1" android:layout_width="100dp" android:layout_height="100dp" android:paddingBottom="5dip" android:paddingLeft="40dip" android:layout_centerVertical="true" android:paddingTop="5dip" android:src="@drawable/button" /> <TextView android:id="@+id/textView1" android:layout_width="wrap_content" android:layout_height="wrap_content" android:layout_marginLeft="8dip" android:layout_centerVertical="true" android:text="确定" android:layout_toRightOf="@id/imageView1" android:textColor="#000000" /></RelativeLayout> |
再完成控制类MyProgressBar.java
|
1
2
3
4
5
6
7
8
9
10
11
12
13
14
15
16
17
18
19
20
21
22
23
24
25
26
27
28
29
30
31
32
33
34
35
36
37
38
39
40
41
42
43
44
45
46
47
48
49
50
51
52
53
54
55
56
57
58
59
|
package com.swastika.mywidget;import android.content.Context;import android.util.AttributeSet;import android.view.LayoutInflater;import android.view.View;import android.widget.ImageView;import android.widget.LinearLayout;import android.widget.TextView;public class MyProgressBar extends LinearLayout { private ImageView imageView; private TextView textView; boolean flag = true; public MyProgressBar(Context context) { super(context); // TODO Auto-generated constructor stub } public MyProgressBar(Context context, AttributeSet attrs) { super(context, attrs); // TODO Auto-generated constructor stub LayoutInflater inflater=(LayoutInflater) context.getSystemService(Context.LAYOUT_INFLATER_SERVICE); inflater.inflate(R.layout.mybutton, this); imageView=(ImageView) findViewById(R.id.imageView1); textView=(TextView)findViewById(R.id.textView1); textView.setOnClickListener(new OnClickListener() { @Override public void onClick(View v) { // TODO Auto-generated method stub if(flag){ textView.setText("取消"); flag = false; } else { textView.setText("确定"); flag = true; } } }); } /** * 设置图片资源 */ public void setImageResource(int resId) { imageView.setImageResource(resId); } /** * 设置显示的文字 */ public void setTextViewText(String text) { textView.setText(text); } } |
这样只要引入控件com.swastika.mywidget.MyProgressBar,便可以实现功能了。下面就要介绍打包方式了。
方式一:将项目打包成jar包
1右击项目,选择export,选择java中的jar如图
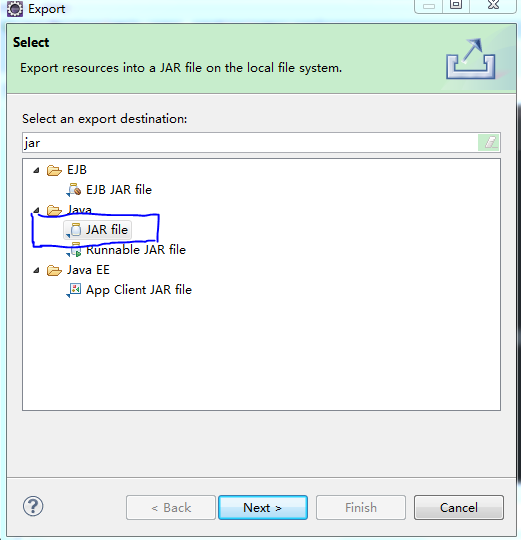
图 01
勾选出自定义控件相关文件,如图02

图02
选好后选择finish就完成了导出,
在使用的时候,将要jar包放到新的项目中的libs文件中(一般会自动引入,如果没有自动引入可以右击该包然后选择Build path,再选择add to build path就可以了),

图 03
在新项目布局文件中加入自定义控件;
布局文件main.xml
|
1
2
3
4
5
6
7
8
9
10
11
12
13
14
15
16
17
18
19
20
21
22
|
<RelativeLayout xmlns:android="http://schemas.android.com/apk/res/android" xmlns:tools="http://schemas.android.com/tools" android:layout_width="match_parent" android:layout_height="match_parent" android:paddingBottom="@dimen/activity_vertical_margin" android:paddingLeft="@dimen/activity_horizontal_margin" android:paddingRight="@dimen/activity_horizontal_margin" android:paddingTop="@dimen/activity_vertical_margin" tools:context=".MainActivity" > <TextView android:layout_width="wrap_content" android:layout_height="wrap_content" android:text="@string/hello_world" /> <com.swastika.mywidget.MyProgressBar android:id="@+id/imgBtn0" android:layout_width="wrap_content" android:layout_height="wrap_content" /></RelativeLayout> |
不过运行的时候会发生错误java.lang.RuntimeException: Unable to start activity ComponentInfo{com.example.androidtest/com.example.androidtest.MainActivity}: android.view.InflateException: Binary XML file line #16: Error inflating class com.swastika.mywidget.MyProgressBar,
原因是jar打包后放在drawable中的图片资源无法找到了,,,解决的方式就是将图片等资源文件放在assets文件夹中,再在java代码中映射出来找到资源,这就增加的工作负担,所以通常在使用自定义控件的时候不用这种方式,而是采用下面将要介绍的第二种方式,
优势:jar打包方式,可以用在不使用图片资源的项目中,封装算法等特别方便,便于其他人使用,
劣势:失去了索引,无法使用drawable中的图片资源,封装后的代码修改起来麻烦
方式二:项目作为一个library
在设计自定义控件的时候,在新建时可以选择将项目作为library(如图04),也可以之后进行设置

图 04
右击项目。选择android,再勾选出Is Library即可(如图05);

图 05
这样便可以使用drawable中的图片资源了,不过需要特别注意的是,自定义控件中的图片名称与新项目中的图片资源不能重名,需要自己检查一下(自定义控件中的默认图标ic_launcher.png需要删除掉,不然会报错,经试验xml文件可以重名)
优势:可以使用drawable中的图片资源了,现在google官网上介绍的就是这种方式,简单方便。
荐 android 如何打包自定义控件(转)的更多相关文章
- 更便捷的Android多渠道打包方式
本文先回顾了以往流行的多渠道打包方式,随后引入的mcxiaoke的packer-ng-plugin项目,介绍该项目在实际应用(配合友盟统计)中如何解决更方便的Android多渠道打包问题 多渠道打包方 ...
- eclipse 和 android studio 打包签名apk问题
首先,我使用eclipse打包了一个签名apk 然后,我使用同一个签名文件在android studio 打包同一个项目 接下来,首先安装eclipse 打包的apk,然后安装android stud ...
- Android Studio打包未签名包
Android Studio打包未签名包 好久没有写技术博客了,真有点懈怠了,作为35岁的程序员,转行重新捡起这些知识,还是挺犹豫纠结的,不过没啥其它办法,一点一滴开始吧,今天这开篇就小结点前几天工作 ...
- Android 类库打包、发布方法
开发Android应用的时候,对于可用于多个应用的公用的部分,或是打算发布给第三方进行应用集成的部分,要把这部分打包成类库怎么做呢? Android应用使用ADT打包成apk,apk中包含了运行程序所 ...
- android studio开发工具的android library打包文件(.aar)本地引用
by 蔡建良 2014-5-13 关键点: 利用Gradle发布本地maven库支持android library 打包文件(*.aar) 的本地引用 开发环境: windows7 64位操作系统 a ...
- 【转】android Apk打包过程概述_android是如何打包apk的
最近看了老罗分析android资源管理和apk打包流程的博客,参考其他一些资料,做了一下整理,脱离繁琐的打包细节和数据结构,从整体上概述了apk打包的整个流程. 流程概述: 1.打包资源文件,生成 ...
- Android混淆打包配置总结
Android打包失败出现Proguard returned with error code 1. See console的错误 这个问题是由于代码混淆引起的,找不到引用包. 只需在你的proguar ...
- Android Studio 打包及引用 aar
Android Studio 打包及引用 aar 1. 简述 在比较大的 Android 项目的开发中,我们经常会遇到工程.jar 包等等之间相互引用的方式.一般我们通过在 gradle 文件中配置依 ...
- Android应用打包安装过程具体解释
Android应用打包安装过程(Run as Android Application ): 1,过程:Android Project --> Compilation and Packaging ...
随机推荐
- 把excel数据导入mysql中
适用:每列的数据都不是以逗号分隔. 1.在mysql建表,全部字段与表头相同且顺序一致 2.将excel另存为csv格式,用Editplus把CSV文件另存为UTF-8编码格式 3.执行load da ...
- Windows线程同步(下)
线程同步三:事件 CreateEvent:Creates or opens a named or unnamed event object. HANDLE WINAPI CreateEvent( _I ...
- VBS中解决路径带空格的三种方法
vbs中,如果需要运行的程序中带有空格,按照通常的方式往往会提示错误,其实有两种形式不同的解决方法: 在应用程序前后分别加三个双引号,代码如下: Set wshell=CreateObject(&qu ...
- log4j.xml(信息打印)
<?xml version="1.0" encoding="UTF-8"?> <!DOCTYPE log4j:configuration SY ...
- 使用CodeFirst实现动态建库
一.业务分析 以我们平时注册今目标为例,我们在注册今目标的过程中,具体步骤是这样的: 图1 今目标登陆流程 详细解释一下: 第一步:注册界面.输入手机号或者邮箱,点击确定进入基本信息界面. 第二步:基 ...
- Mac Git 学习笔记
lapommedeMacBook-Pro:~ lapomme$ cd GitHub lapommedeMacBook-Pro:GitHub lapomme$ cd lapommedeMacBook-P ...
- div style设置隐藏多余字, title设置鼠标放上显示出来全部
<div style='overflow: hidden; white-space: nowrap; text-overflow: ellipsis;' title='"+data[j ...
- git 提交到github时不用每次都输入用户名,密码
Permanently authenticating with Git repositories, Run following command to enable credential caching ...
- WNDCLASS 窗口类结构
Windows 的窗口总是基于窗口类来创建的,窗口类同时确定了处理窗口消息的窗口过程(回调函数). 在创建应用程序窗口之前,必须调用 RegisterClass 函数来注册窗口类.该函数只需要一个参数 ...
- 689D Magic Odd Square 奇数幻方
1 奇数阶幻方构造法 (1) 将1放在第一行中间一列; (2) 从2开始直到n×n止各数依次按下列规则存放:按 45°方向行走,向右上,即每一个数存放的行比前一个数的行数减1,列数加1 (3) 如果行 ...