uploadify.js
基于uploadify.js实现多文件上传和上传进度条的显示
uploadify是JQuery的一个插件,主要实现文件的异步上传功能,可以自定义文件大小限制、文件类型、是否自动上传等属性,可以显示上传的进度条。官网地址是http://www.uploadify.com/,进入官网首页(不截图了,其实也没啥看的),可以看到uploadify的标语"Upload files like magic",意思是说使用uploadify上传文件如魔法一般。目前一共分为两个版本,Flash版和HTML5版,不过HTML5版是收费的,如图:

这里我们下载Flash版~~
下载完成后,解压到当前目录,可以看到如下目录:
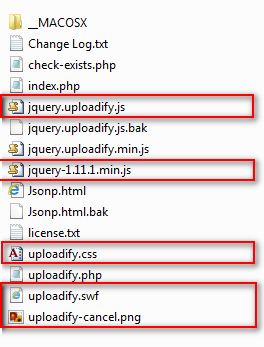
uploadify.js是基于JQuery的,所以我们也要引入JQuery,红色圈住的使我们要使用的文件,额!JQuery是我下载放进去的,大家自己下载一个吧。
新建一个Web项目,然后把上面的文件都放到项目根目录下(这样做不好,大家自己规划目录,我就不废话了),然后新建页面,引入JQuery、uploadify.js和uploadify.css,接下来该干些什么呢?没有头绪啊,打开刚刚的下载目录看看,有个index.php,打开看到是一个官方的Demo,那么就从这个Demo说起吧,下来看看问什么包里面没有JQuery,看图:

我们可以看到Demo中加载的是googleapis的JQuery,版本是1.7.1,然后看下面的代码:

一个form表单,里面有个input,type是file,下面来看看JS代码:
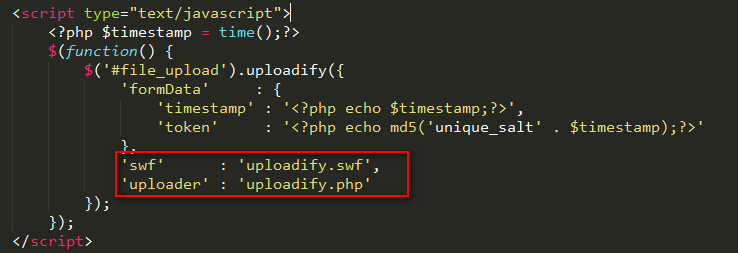
很简单,用JQuery调用了uploadify方法。其中swf和uploader指的是flash文件的地址和上传的处理程序。好,下面亲自动手来写一个试试。
既然是文件上传,我们要先有一个文件上传方法吧,新建FileUpload.ashx文件,写入以下代码:

 context.Response.ContentType = "text/plain";

        if (context.Request.Files.Count > 0)

        {

            HttpPostedFile file = context.Request.Files[0];

            string ext = System.IO.Path.GetExtension(file.FileName);

            string fileName = DateTime.Now.Ticks + ext;

            string p = "/upload/" + fileName;

            string path = context.Server.MapPath("~/upload/" + fileName);

            file.SaveAs(path);

            context.Response.Write("1");

        }
一个简单的文件上传,有人会问文件上传成功问什么返回“1”呢?我们来看看Uploadify.php,如图:
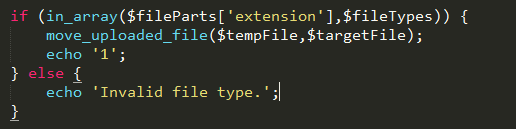
这下清楚了吧~还有要记得我们上传的目录是upload目录,记得在项目中添加则个目录。接下来我们开始写JS,实现文件的上传,模仿官方的Demo,代码如下:
<%@ Page Language="C#" AutoEventWireup="true" CodeBehind="WebForm1.aspx.cs" Inherits="Jsonp.WebForm1" %>

<!DOCTYPE html PUBLIC "-//W3C//DTD XHTML 1.0 Transitional//EN" "http://www.w3.org/TR/xhtml1/DTD/xhtml1-transitional.dtd">

<html xmlns="http://www.w3.org/1999/xhtml">

<head runat="server">

   <title></title>

   <script src="jquery-1.11.1.min.js"></script>

    <script src="jquery.uploadify.js"></script>

    <link href="uploadify.css" rel="stylesheet" type="text/css" />

</head>

<body>

   <input id="file_upload" name="file_upload" type="file" multiple="true">

</body>

</html>

<script type="text/javascript">

   $(function () {

      $("#file_upload").uploadify({

         height: 30,

         swf: 'uploadify.swf',

         uploader: 'UploadFile.ashx',

         width: 120

      });

   });

</script>
我们就是修改了uploader为我们自己的上传处理程序,然后F5运行,看看效果:

我们可以看到页面上面出现了一个按钮,点击可以打开对话框选中文件,选择一个文件,点击确定,看到文件上传成功了:

真的上传成功了吗?我们进入upload目录看看,确实上传成功了。是不是感觉很神奇?当然,我们也可以同时选则多张图片,批量上传,上传成功后,那个进度条过一段时间会一个一个自动消失。是不是突然发现文件上传竟然可以这么简单~~
文件上传是实现了,但是按钮样式和文字都不是我们想要的?下面我们来看一下如何自定义Uploadify插件,我们打开jquery.uploadify.js来看一下他的源代码:
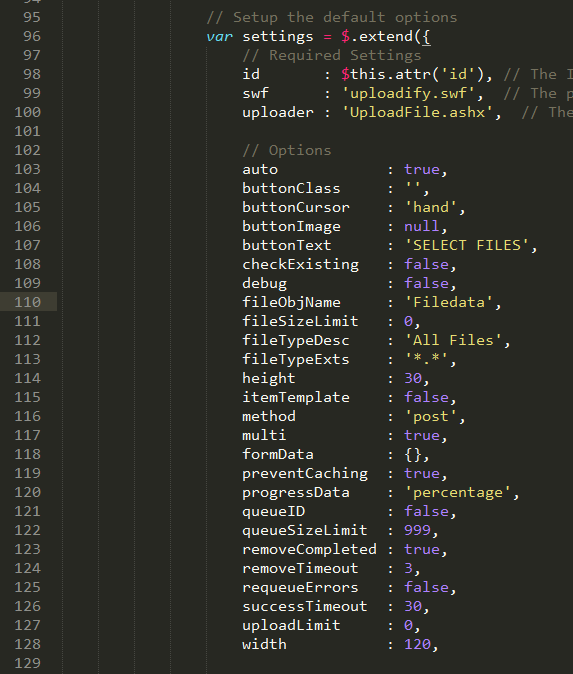
开头的一段密密麻麻的代码是用来显示flash的,不用管她。向下走,我们看到如上图的代码,width、height、swf、uploader,没错这个就是他的自定义选项,下面是我总结的这些自定义选项的含义:
    id       : $this.attr('id'), // The ID of the DOM object

    swf      : 'uploadify.swf',  // uploadify flash文件的路径

    uploader : 'UploadFile.ashx',  // 上传文件的提交地址

    // Options

    auto            : true,               // 是否自动上传文件

    buttonClass     : '',                 // 按钮的样式,这里可以自定css样式

    buttonCursor    : 'hand',             // 按钮鼠标样式

    buttonImage     : null,               // 按钮图片

    buttonText      : 'SELECT FILES',     // 按钮显示的文字

    checkExisting   : false,              // 上传前是否先检查文件是否存在

    debug           : false,              // 是否启动调试

    fileObjName     : 'Filedata',         // The name of the file object to use in your server-side script

    fileSizeLimit   : 0,                  // 文件大小限制,格式为1KB或1MB

    fileTypeDesc    : 'All Files',        // 文件类型描述

    fileTypeExts    : '*.*',              // 文件扩展名过滤

    height          : 30,                 // 按钮高度

    itemTemplate    : false,              // The template for the file item in the queue

    method          : 'post',             // 提交方式

    multi           : true,               // 是否允许多文件上传

    formData        : {},                 // An object with additional data to send to the server-side upload script with every file upload

    preventCaching  : true,               // Adds a random value to the Flash URL to prevent caching of it (conflicts with existing parameters)

    progressData    : 'percentage',       // 进度条显示,百分比

    queueID         : false,              // The ID of the DOM object to use as a file queue (without the #)

    queueSizeLimit  : 999,                // 文件上传队列的大小限制

    removeCompleted : true,               // 上传成功后移除进度条

    removeTimeout   : 3,                  // The delay in seconds before removing a queue item if removeCompleted is set to true

    requeueErrors   : false,              // Keep errored files in the queue and keep trying to upload them

    successTimeout  : 30,                 // The number of seconds to wait for Flash to detect the server's response after the file has finished uploading

    uploadLimit     : 0,                  // 可以上传文件的最大数量

    width           : 120,                // 按钮宽度

    // 这里是一些扩展的事件

    overrideEvents  : []             // (Array) A list of default event handlers to skip

    /*

    onCancel         // Triggered when a file is cancelled from the queue

    onClearQueue     // Triggered during the 'clear queue' method

    onDestroy        // Triggered when the uploadify object is destroyed

    onDialogClose    // Triggered when the browse dialog is closed

    onDialogOpen     // Triggered when the browse dialog is opened

    onDisable        // Triggered when the browse button gets disabled

    onEnable         // Triggered when the browse button gets enabled

    onFallback       // Triggered is Flash is not detected

    onInit           // Triggered when Uploadify is initialized

    onQueueComplete  // Triggered when all files in the queue have been uploaded

    onSelectError    // Triggered when an error occurs while selecting a file (file size, queue size limit, etc.)

    onSelect         // Triggered for each file that is selected

    onSWFReady       // Triggered when the SWF button is loaded

    onUploadComplete // Triggered when a file upload completes (success or error)

    onUploadError    // Triggered when a file upload returns an error

    onUploadSuccess  // Triggered when a file is uploaded successfully

    onUploadProgress // Triggered every time a file progress is updated

    onUploadStart    // Triggered immediately before a file upload starts
下面我们来写一个总和示例:
<%@ Page Language="C#" AutoEventWireup="true" CodeBehind="WebForm1.aspx.cs" Inherits="Jsonp.WebForm1" %>

<!DOCTYPE html PUBLIC "-//W3C//DTD XHTML 1.0 Transitional//EN" "http://www.w3.org/TR/xhtml1/DTD/xhtml1-transitional.dtd">

<html xmlns="http://www.w3.org/1999/xhtml">

<head runat="server">

   <title></title>

   <script src="jquery-1.11.1.min.js"></script>

    <script src="jquery.uploadify.min.js"></script>

    <link href="uploadify.css" rel="stylesheet" type="text/css" />

</head>

<body>

   <input id="file_upload" name="file_upload" type="file" multiple="true">

   <input type="button" value="上传" onclick="javascript:$('#file_upload').uploadify('upload','*')" />

   <div id="imgBox" style=" overflow:hidden; width:200px; height:200px; "></div>

</body>

</html>

<script type="text/javascript">

   $(function () {

      $("#file_upload").uploadify({

         auto: false,

         fileTypeDesc: 'Image Files',

         fileTypeExts: '*.jpg; *.png;*.gif;*.*',

         height: 30,

         buttonText: '请选择图片...',

         swf: 'uploadify.swf',

         uploader: 'UploadFile.ashx',

         width: 120,

         fileSizeLimit: '4MB',

         onUploadSuccess: function (file, data, response) {

            $("#imgBox").html(data);

         },

         onUploadError: function (file, errorCode, errorMsg, errorString) {

            alert('The file ' + file.name + ' could not be uploaded: ' + errorString);

         }

      });

   });

</script>
功能就是上传图片,上传成功后,显示上传的图片。注意这里自动上传为false,也就是说不自动上传图片,我们给按钮添加了click事件,来实现手动上传,代码如下:
$('#file_upload').uploadify('upload','*')
注意uploadify后面的参数,'*',这个参数代表上传所有文件,如果没有这个参数的话,只会上传第一张图片。
这个时候,上传文件的处理方法如下:
context.Response.ContentType = "text/plain";

        if (context.Request.Files.Count > 0)

        {

            HttpPostedFile file = context.Request.Files[0];

            string ext = System.IO.Path.GetExtension(file.FileName);

            string fileName = DateTime.Now.Ticks + ext;

            string p = "/upload/" + fileName;

            string path = context.Server.MapPath("~/upload/" + fileName);

            file.SaveAs(path);

            context.Response.Write("<img width=\"100px\" height=\"100px\" src=\"" + p + "\" />");

        }

        else

        {

            context.Response.Write("上传错误!");

        }
随笔分类 - Javascript
作者:雲霏霏
QQ交流群:243633526
博客地址:http://www.cnblogs.com/yunfeifei/
声明:本博客原创文字只代表本人工作中在某一时间内总结的观点或结论,与本人所在单位没有直接利益关系。非商业,未授权,贴子请以现状保留,转载时必须保留此段声明,且在文章页面明显位置给出原文连接。
如果大家感觉我的博文对大家有帮助,请推荐支持一把,给我写作的动力。
uploadify.js的更多相关文章
- 基于uploadify.js实现多文件上传和上传进度条的显示
uploadify是JQuery的一个插件,主要实现文件的异步上传功能,可以自定义文件大小限制.文件类型.是否自动上传等属性,可以显示上传的进度条.官网地址是http://www.uploadify. ...
- Uploadify.js引用导致浏览器宽度计算错误,布局混乱
首先,本人新手,高手勿喷,请忽略.谢谢. 今天在写代码的时候遇到一个奇葩问题,我再在页面加载完成以后,动态计算DIV宽度,将整个层铺满浏览器.一切正常.单当我引入jquery.uploadify.js ...
- 文件上传-jquery.uploadify.js
<script type="text/javascript" src="../jquery_uploadify/jquery.uploadify-3.1.min.j ...
- uploadify.js参数说明(转)
一.属性 属性名称 默认值 说明 auto true 设置为true当选择文件后就直接上传了,为false需要点击上传按钮才上传 . buttonClass ” 按钮样式 buttonCursor ‘ ...
- [js]uploadify结合jqueryUI弹出框上传,js中的冒出的bug,又被ie坑了
引言 最近在一个项目中,在用户列表中需要对给没有签名样本的个别用户上传签名的样本,就想到博客园中上传图片使用弹出框方式,博客园具体怎么实现的不知道,只是如果自己来弄,想到两个插件的结合使用,在弹出框中 ...
- jquery.uploadify文件上传组件
1.jquery.uploadify简介 在ASP.NET中上传的控件有很多,比如.NET自带的FileUpload,以及SWFUpload,Uploadify等等,尤其后面两个控件的用户体验比较好, ...
- 带进度条的文件批量上传插件uploadify
有时项目中需要一个文件批量上传功能时,个人认为uploadify是快速简便的解决方案. 先上效果图: 一. 下载uploadify 从官网下载uploadify的Flash版本(Flash版本免费,另 ...
- 谷歌浏览器对uploadify(swf)上传控件 崩溃问题
页面加上 <script type="text/javascript" src=@Url.Content("~/Content/js/jquery.uploadif ...
- jquery.uploadify上传文件配置详解(asp.net mvc)
页面源码: <!DOCTYPE html> <html> <head> <meta http-equiv="Content-Type" c ...
随机推荐
- mac系统连接android电话
mac该系统不能连接android手机问题解决: 1.将电话 2.到场android手机vendor ID: 终端业务CMD: system_profiler SPUSBDataType 在列出的u ...
- ubuntu 下安装 matplotlib
直接使用sudo easy_install matplotlib 报错 ================================================================ ...
- Flux是一个Facebook团队的前端开发架构
Flux是一个Facebook团队的前端开发架构 Flux introduction 本文组成: React 官方文档翻译 相关实践心得. 内容上是Flux的介绍,例子将会在以后写出.一旦稍微多了解一 ...
- 十天学Linux内核之第十天---总结篇(kconfig和Makefile & 讲不出再见)
原文:十天学Linux内核之第十天---总结篇(kconfig和Makefile & 讲不出再见) 非常开心能够和大家一起分享这些,让我受益匪浅,感激之情也溢于言表,,code monkey的 ...
- 网络资源(2) - Maven视频
2014_08_23 http://v.youku.com/v_show/id_XNDE2NzM0Nzk2.html Maven最佳实践,公司真实环境实践-私服最佳实践 2014_08_24 http ...
- SPOJ104 Highways,跨越数
高速公路(SPOJ104 Highways) 一个有n座城市的组成国家,城市1至n编号,当中一些城市之间能够修建快速公路.如今,须要有选择的修建一些快速公路.从而组成一个交通网络.你的任务是计算有多少 ...
- HDU Today (图论)
经过锦囊相助,海东集团终于度过了危机,从此,HDU的发展就一直顺风顺水,到了2050年,集团已经相当规模了,据说进入了钱江肉丝经济开发区500强.这时候,XHD夫妇也退居了二线,并在风景秀美的诸暨市浬 ...
- ftp server来源分析20140602
ftp server学习位和源代码分析片 记录自己的第一个开源的分析过程: 从源代码:野狐灯(我接下来的几篇文章是从源头:野狐灯,每个以下哪项不是他们设置.) 20140602 Ftp的源码目录例如 ...
- Android 内存管理 &Memory Leak & OOM 分析
1.Android 流程管理&内存 Android主要应用在嵌入式设备其中.而嵌入式设备因为一些众所周知的条件限制,通常都不会有非常高的配置,特别是内存是比較有限的. 假设我们编写的代 码其中 ...
- C语言中符号格式说明
scanf 语法: #include <stdio.h>int scanf( const char *format, ... ); scanf()函数根据由format(格式)指定的格式从 ...