C#编写Windows服务程序图文教程
安装服务程序
C:\WINDOWS\Microsoft.NET\Framework\v4.0.30319\InstallUtil.exe 要安装的服务程序路径(如F:\***.exe)
卸载服务程序
C:\WINDOWS\Microsoft.NET\Framework\v4.0.30319\InstallUtil.exe /u 要安装的服务程序路径(如F:\***.exe)
Windows Service这一块并不复杂,但是注意事项太多了,网上资料也很凌乱,偶尔自己写也会丢三落四的。所以本文也就产生了,本文不会写复杂的东西,完全以基础应用的需求来写,所以不会对Windows Service写很深入。
本文介绍了如何用C#创建、安装、启动、监控、卸载简单的Windows Service 的内容步骤和注意事项。
一、创建一个Windows Service
1)创建Windows Service项目
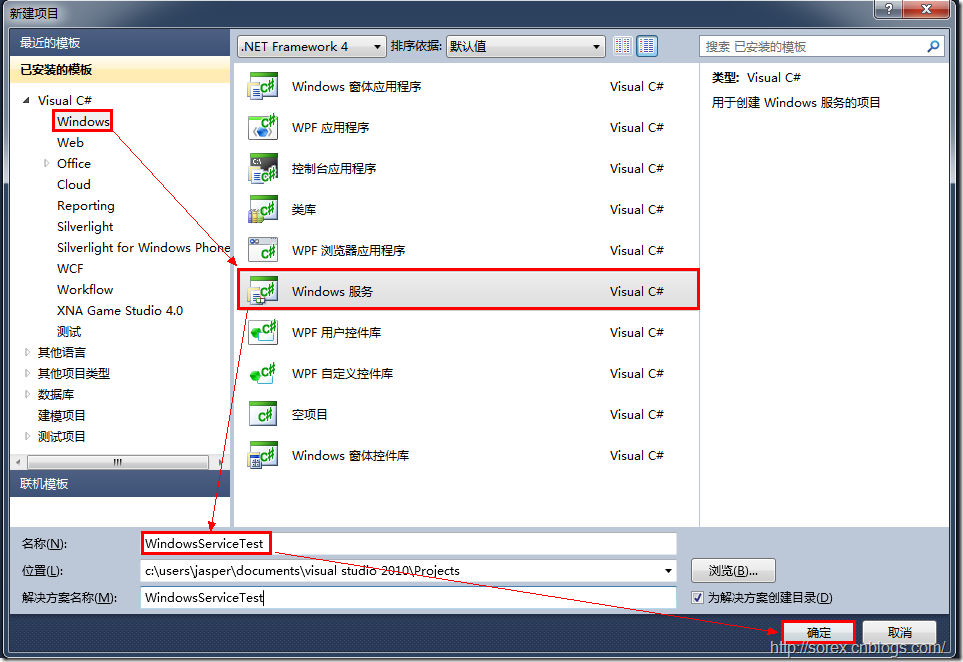
2)对Service重命名
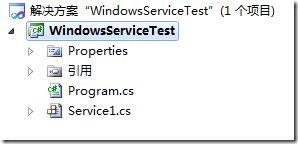
将Service1重命名为你服务名称,这里我们命名为ServiceTest。
二、创建服务安装程序
1)添加安装程序
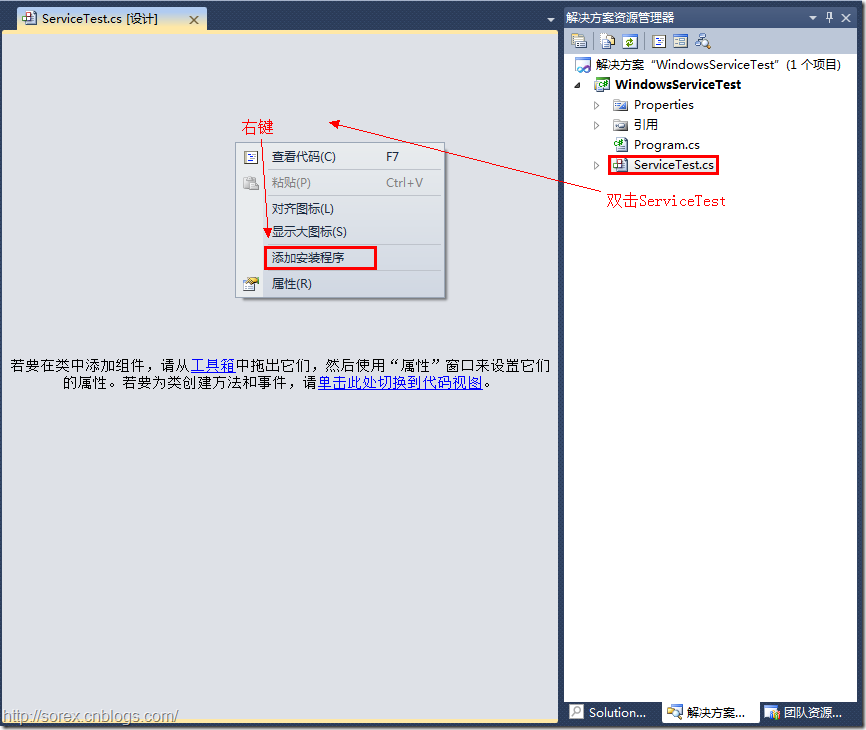
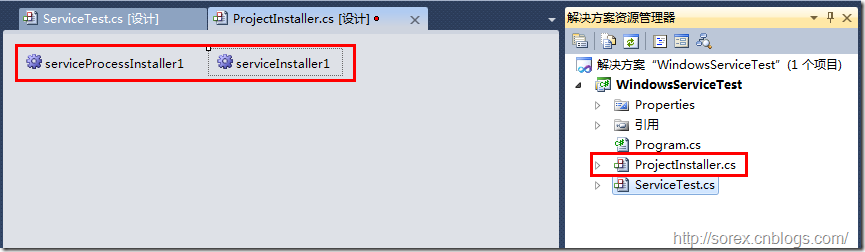
之后我们可以看到上图,自动为我们创建了ProjectInstaller.cs以及2个安装的组件。
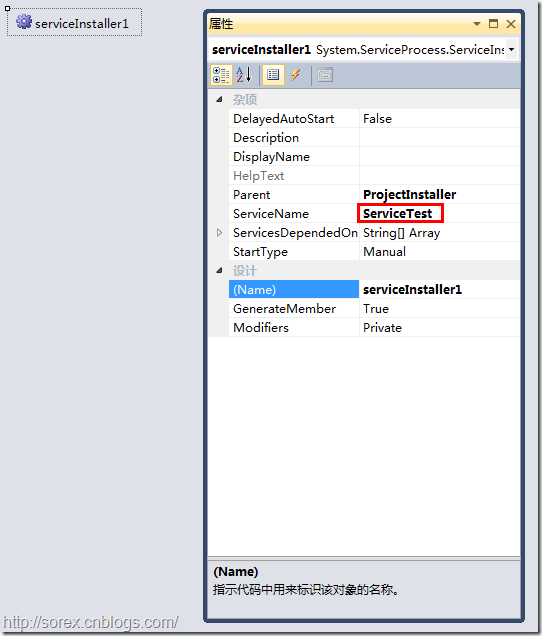
2)修改安装服务名
右键serviceInsraller1,选择属性,将ServiceName的值改为ServiceTest。
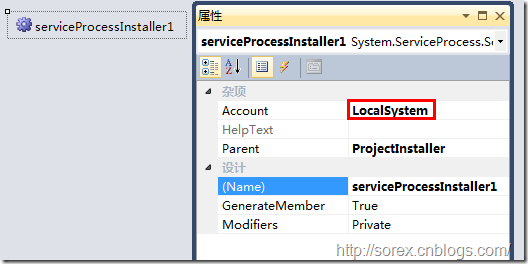
3)修改安装权限
右键serviceProcessInsraller1,选择属性,将Account的值改为LocalSystem。
三、写入服务代码
1)打开ServiceTest代码
右键ServiceTest,选择查看代码。
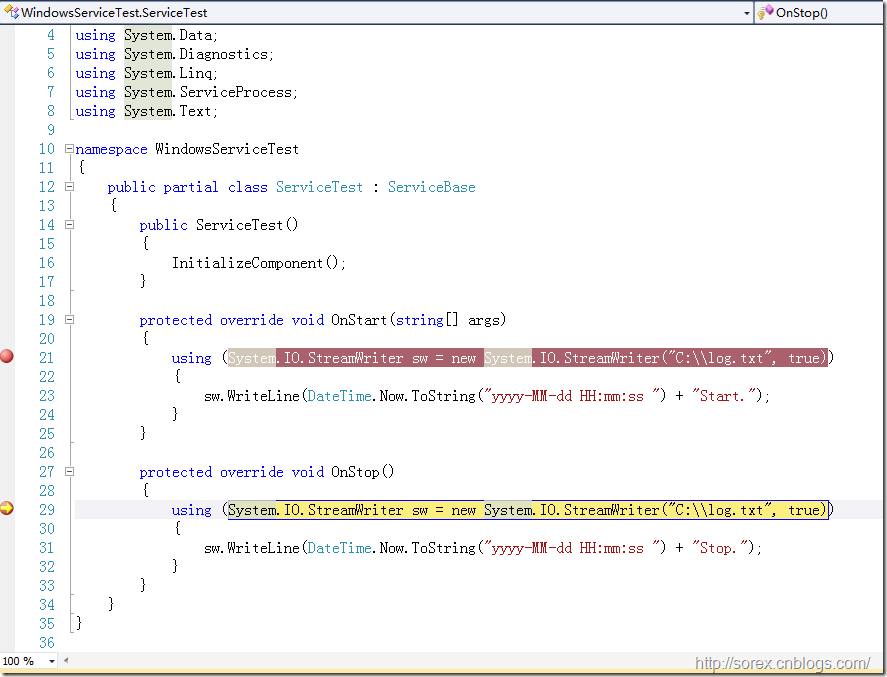
2)写入Service逻辑
添加如下代码:
using System;

using System.Collections.Generic;

using System.ComponentModel;

using System.Data;

using System.Diagnostics;

using System.Linq;

using System.ServiceProcess;

using System.Text;

namespace WindowsServiceTest

{

	public partial class ServiceTest : ServiceBase

	{

		public ServiceTest()

		{

			InitializeComponent();

		}

		protected override void OnStart(string[] args)

		{

			using (System.IO.StreamWriter sw = new System.IO.StreamWriter("C:\\log.txt", true))

			{

				sw.WriteLine(DateTime.Now.ToString("yyyy-MM-dd HH:mm:ss ") + "Start.");

			}

		}

		protected override void OnStop()

		{

			using (System.IO.StreamWriter sw = new System.IO.StreamWriter("C:\\log.txt", true))

			{

				sw.WriteLine(DateTime.Now.ToString("yyyy-MM-dd HH:mm:ss ") + "Stop.");

			}

		}

	}

}
这里我们的逻辑很简单,启动服务的时候写个日志,关闭的时候再写个日志。
四、创建安装脚本
在项目中添加2个文件如下(必须是ANSI或者UTF-8无BOM格式):
1)安装脚本Install.bat
%SystemRoot%\Microsoft.NET\Framework\v4.0.30319\installutil.exe WindowsServiceTest.exe

Net Start ServiceTest

sc config ServiceTest start= auto
2)卸载脚本Uninstall.bat
%SystemRoot%\Microsoft.NET\Framework\v4.0.30319\installutil.exe /u WindowsServiceTest.exe
3)安装脚本说明
第二行为启动服务。
第三行为设置服务为自动运行。
这2行视服务形式自行选择。
4)脚本调试
如果需要查看脚本运行状况,在脚本最后一行加入pause
五、在C#中对服务进行控制
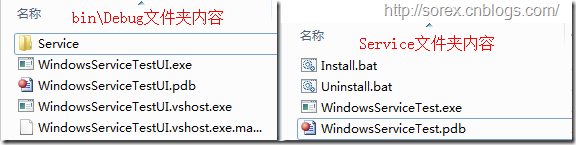
0)配置目录结构
简历一个新WPF项目,叫WindowsServiceTestUI,添加对System.ServiceProcess的引用。
在WindowsServiceTestUI的bin\Debug目录下建立Service目录。
将WindowsServiceTest的生成目录设置为上面创建的Service目录。
生成后目录结构如下图
1)安装
安装时会产生目录问题,所以安装代码如下:
string CurrentDirectory = System.Environment.CurrentDirectory;

System.Environment.CurrentDirectory = CurrentDirectory + "\\Service";

Process process = new Process();

process.StartInfo.UseShellExecute = false;

process.StartInfo.FileName = "Install.bat";

process.StartInfo.CreateNoWindow = true;

process.Start();

System.Environment.CurrentDirectory = CurrentDirectory;
2)卸载
卸载时也会产生目录问题,所以卸载代码如下:
string CurrentDirectory = System.Environment.CurrentDirectory;

System.Environment.CurrentDirectory = CurrentDirectory + "\\Service";

Process process = new Process();

process.StartInfo.UseShellExecute = false;

process.StartInfo.FileName = "Uninstall.bat";

process.StartInfo.CreateNoWindow = true;

process.Start();

System.Environment.CurrentDirectory = CurrentDirectory;
3)启动
代码如下:
using System.ServiceProcess;

ServiceController serviceController = new ServiceController("ServiceTest");

serviceController.Start();
4)停止
ServiceController serviceController = new ServiceController("ServiceTest");

if (serviceController.CanStop)

	serviceController.Stop();
5)暂停/继续
ServiceController serviceController = new ServiceController("ServiceTest");

if (serviceController.CanPauseAndContinue)

{

	if (serviceController.Status == ServiceControllerStatus.Running)

		serviceController.Pause();

	else if (serviceController.Status == ServiceControllerStatus.Paused)

		serviceController.Continue();

}
6)检查状态
ServiceController serviceController = new ServiceController("ServiceTest");

string Status = serviceController.Status.ToString();
六、调试Windows Service
1)安装并运行服务
2)附加进程
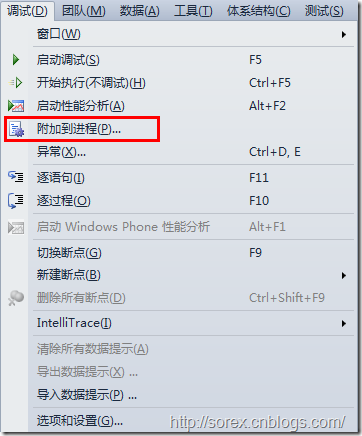
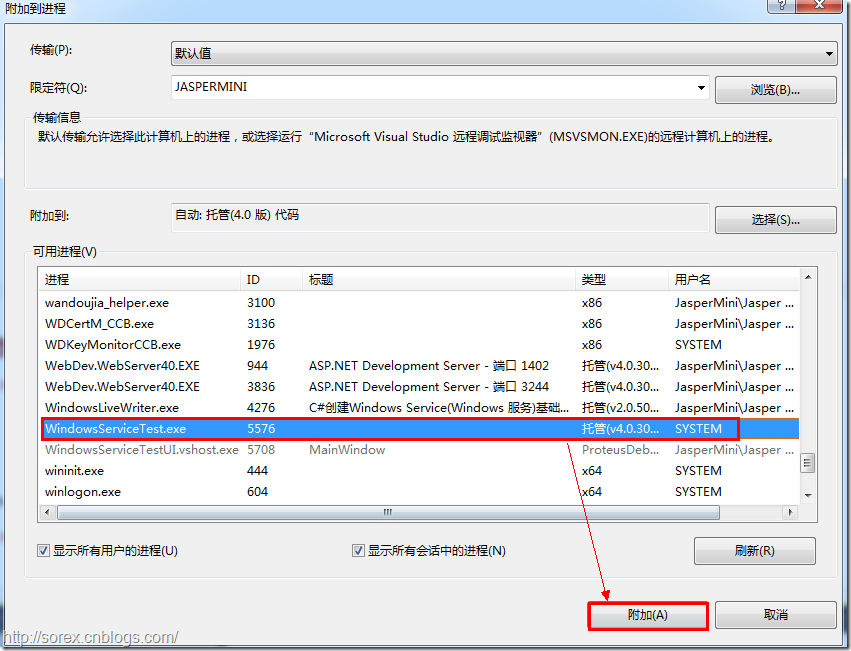
3)在代码中加入断点进行调试
七、总结
本文对Windows service的上述配置都未做详细解释,但是按上述步骤就可以制作可运行的Windows Service,从而达到了工作的需求。
C#编写Windows服务程序图文教程的更多相关文章
- C#编写Windows服务程序图文教程(转载)
Windows Service这一块并不复杂,但是注意事项太多了,网上资料也很凌乱,偶尔自己写也会丢三落四的.所以本文也就产生了,本文不会写复杂的东西,完全以基础应用的需求来写,所以不会对Window ...
- C语言编写Windows服务程序
原文:C语言编写Windows服务程序 #include <Windows.h> #include <stdio.h> #define SLEEP_TIME 5000 // 间 ...
- Github for Windows使用图文教程_西西软件资讯
body{ font-family: "Microsoft YaHei UI","Microsoft YaHei",SimSun,"Segoe UI& ...
- 编写windows服务程序
2012-11-02 08:54 (分类:计算机程序) windows服务是一个运行在后台并实现勿需用户交互的任务的控制台程序,对于隐藏程序有很大帮助. 用了几天时间概括了编写windows服务程序的 ...
- 用 C 语言编写 Windows 服务程序的五个步骤
Windows 服务被设计用于需要在后台运行的应用程序以及实现没有用户交互的任务.为了学习这种控制台应用程序的基础知识,C(不是C++)是最佳选择.本文将建立并实现一个简单的服务程序,其功能是查询系统 ...
- 用C语言编写Windows服务程序的五个步骤
Windows 服务被设计用于需要在后台运行的应用程序以及实现没有用户交互的任务.为了学习这种控制台应用程序的基础知识,C(不是C++)是最佳选择.本文将建立并实现一个简单的服务程序,其功能是查询系统 ...
- Python3编写Windows服务程序
最近做了公司签到的小工具,有同事要求做成Windows服务,开机自启.先说下怎么用Python写Windows服务程序. #encoding=utf-8 import win32serviceutil ...
- C#编写Windows服务程序 (服务端),client使用 消息队列 实现淘宝 订单全链路效果
需求: 针对 淘宝提出的 订单全链路 产品接入 .http://open.taobao.com/doc/detail.htm?id=102423&qq-pf-to=pcqq.group oms ...
- Github for Windows使用图文教程
原文:http://www.cr173.com/html/15618_1.html Git已经变得非常流行,连Codeplex现在也已经主推Git.Github上更是充斥着各种高质量的开源项目,比如r ...
随机推荐
- Struts2之checkboxlist 设置默认值和结果回显
<s:checkboxlist list="#{'篮球':'篮球','足球':'足球','排球':'排球'}"></s:checkboxlist> 这么定义 ...
- php模拟post 提交表单
<?php header('Content-type: text/html;charset=UTF-8'); $action=$_REQUEST['action']; //获取验证码 if($a ...
- 学习笔记——责任链模式ChainOfResponsibility
责任链模式,主要是通过自己记录一个后继者来判断当前的处理情况.Handler中,再增加一个方法用于设置后继对象,如SetHandler(Handler obj). 然后Handler类以其子类的处理方 ...
- 框架基础:ajax设计方案(二)---集成轮询技术
上一篇文章介绍了ajax技术核心方法,和跨域的问题(只要后台支持跨域默认post就可以),这篇文章讲解一下使用ajax实现的轮询技术,至于iframe,SSE服务器单向推送,以及webSocket ...
- 《JS权威指南学习总结--第四章4.9.1相等和严格相等》
内容要点: 一. 严格相等运算符"===" 首先计算其操作数的值,然后比较这两个值,比较过程没有任何类型转换: 1.如果两个值类型不同,则它们不 ...
- hdu_5783_Divide the Sequence(贪心)
题目链接:hdu_5783_Divide the Sequence 题意: 给你一个数列,让你分尽可能多的段,并且保证每一段的前缀和都不小于0 题解: 从后往前xjb贪心就行了 #include< ...
- Codeforces Round #364 (Div. 2) E. Connecting Universities
E. Connecting Universities time limit per test 3 seconds memory limit per test 256 megabytes input s ...
- Ubuntu服务器断网问题解决
原因:dns服务器没有了配置信息. 配置dns服务器 ubuntu 的dns服务器信息,放在 /etc/resolv.conf中, 添加dns服务器地址,如192. ...
- 修改NavigationBar样式
iOS Tip: Change Status Bar Icon & Text Colors When iOS 7 was introduced Apple allowed your appli ...
- 有了SSL证书,如何在IIS环境下部署https?【转载】
昨天各位小伙伴都很开心的领取了自己的SSL证书,但是大部分小伙伴却不知道如何部署,也许是因为第一次接触SSL这种高端的东西吧,不过个人觉得就是懒懒懒...本来小编也挺懒的,但是答应了各位小伙伴的,那么 ...