C#编写Windows服务程序图文教程
安装服务程序
C:\WINDOWS\Microsoft.NET\Framework\v4.0.30319\InstallUtil.exe 要安装的服务程序路径(如F:\***.exe)
卸载服务程序
C:\WINDOWS\Microsoft.NET\Framework\v4.0.30319\InstallUtil.exe /u 要安装的服务程序路径(如F:\***.exe)
Windows Service这一块并不复杂,但是注意事项太多了,网上资料也很凌乱,偶尔自己写也会丢三落四的。所以本文也就产生了,本文不会写复杂的东西,完全以基础应用的需求来写,所以不会对Windows Service写很深入。
本文介绍了如何用C#创建、安装、启动、监控、卸载简单的Windows Service 的内容步骤和注意事项。
一、创建一个Windows Service
1)创建Windows Service项目
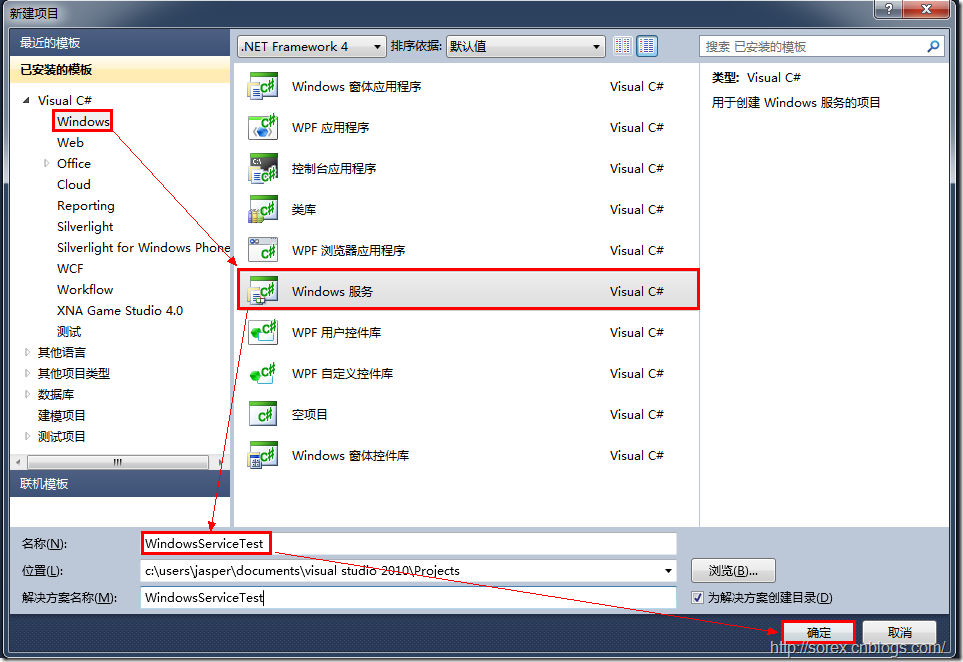
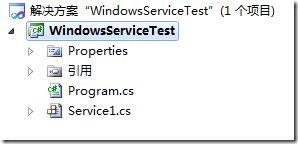
2)对Service重命名
将Service1重命名为你服务名称,这里我们命名为ServiceTest。
二、创建服务安装程序
1)添加安装程序
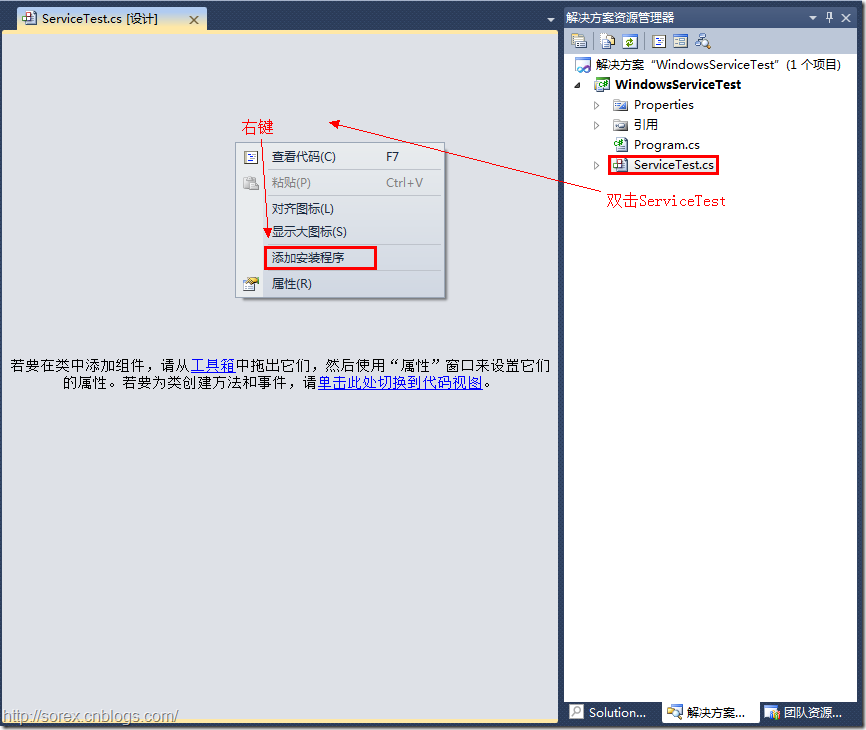
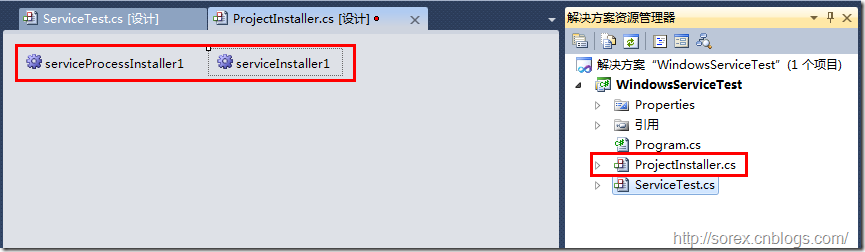
之后我们可以看到上图,自动为我们创建了ProjectInstaller.cs以及2个安装的组件。
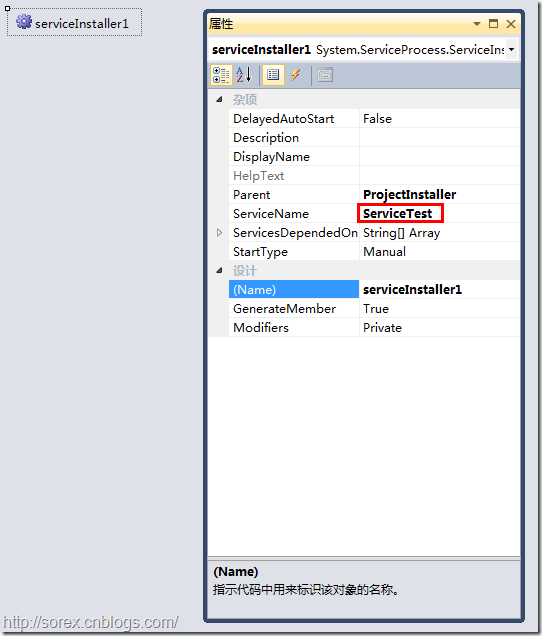
2)修改安装服务名
右键serviceInsraller1,选择属性,将ServiceName的值改为ServiceTest。
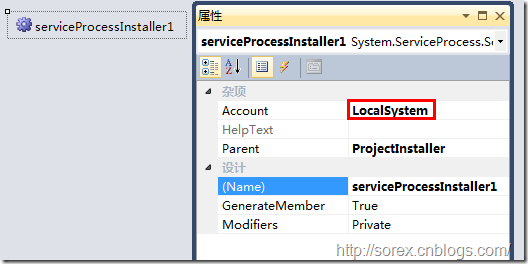
3)修改安装权限
右键serviceProcessInsraller1,选择属性,将Account的值改为LocalSystem。
三、写入服务代码
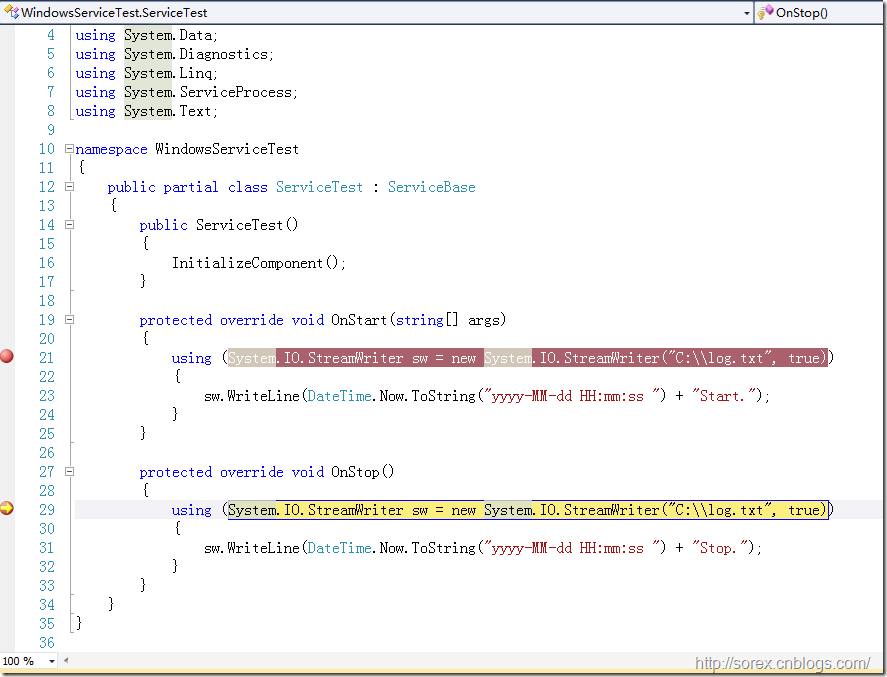
1)打开ServiceTest代码
右键ServiceTest,选择查看代码。
2)写入Service逻辑
添加如下代码:
using System;

using System.Collections.Generic;

using System.ComponentModel;

using System.Data;

using System.Diagnostics;

using System.Linq;

using System.ServiceProcess;

using System.Text;

namespace WindowsServiceTest

{

	public partial class ServiceTest : ServiceBase

	{

		public ServiceTest()

		{

			InitializeComponent();

		}

		protected override void OnStart(string[] args)

		{

			using (System.IO.StreamWriter sw = new System.IO.StreamWriter("C:\\log.txt", true))

			{

				sw.WriteLine(DateTime.Now.ToString("yyyy-MM-dd HH:mm:ss ") + "Start.");

			}

		}

		protected override void OnStop()

		{

			using (System.IO.StreamWriter sw = new System.IO.StreamWriter("C:\\log.txt", true))

			{

				sw.WriteLine(DateTime.Now.ToString("yyyy-MM-dd HH:mm:ss ") + "Stop.");

			}

		}

	}

}
这里我们的逻辑很简单,启动服务的时候写个日志,关闭的时候再写个日志。
四、创建安装脚本
在项目中添加2个文件如下(必须是ANSI或者UTF-8无BOM格式):
1)安装脚本Install.bat
%SystemRoot%\Microsoft.NET\Framework\v4.0.30319\installutil.exe WindowsServiceTest.exe

Net Start ServiceTest

sc config ServiceTest start= auto
2)卸载脚本Uninstall.bat
%SystemRoot%\Microsoft.NET\Framework\v4.0.30319\installutil.exe /u WindowsServiceTest.exe
3)安装脚本说明
第二行为启动服务。
第三行为设置服务为自动运行。
这2行视服务形式自行选择。
4)脚本调试
如果需要查看脚本运行状况,在脚本最后一行加入pause
五、在C#中对服务进行控制
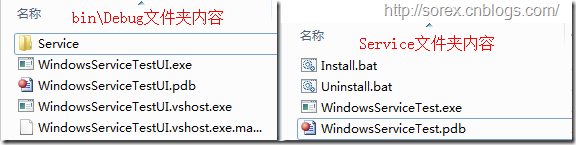
0)配置目录结构
简历一个新WPF项目,叫WindowsServiceTestUI,添加对System.ServiceProcess的引用。
在WindowsServiceTestUI的bin\Debug目录下建立Service目录。
将WindowsServiceTest的生成目录设置为上面创建的Service目录。
生成后目录结构如下图
1)安装
安装时会产生目录问题,所以安装代码如下:
string CurrentDirectory = System.Environment.CurrentDirectory;

System.Environment.CurrentDirectory = CurrentDirectory + "\\Service";

Process process = new Process();

process.StartInfo.UseShellExecute = false;

process.StartInfo.FileName = "Install.bat";

process.StartInfo.CreateNoWindow = true;

process.Start();

System.Environment.CurrentDirectory = CurrentDirectory;
2)卸载
卸载时也会产生目录问题,所以卸载代码如下:
string CurrentDirectory = System.Environment.CurrentDirectory;

System.Environment.CurrentDirectory = CurrentDirectory + "\\Service";

Process process = new Process();

process.StartInfo.UseShellExecute = false;

process.StartInfo.FileName = "Uninstall.bat";

process.StartInfo.CreateNoWindow = true;

process.Start();

System.Environment.CurrentDirectory = CurrentDirectory;
3)启动
代码如下:
using System.ServiceProcess;

ServiceController serviceController = new ServiceController("ServiceTest");

serviceController.Start();
4)停止
ServiceController serviceController = new ServiceController("ServiceTest");

if (serviceController.CanStop)

	serviceController.Stop();
5)暂停/继续
ServiceController serviceController = new ServiceController("ServiceTest");

if (serviceController.CanPauseAndContinue)

{

	if (serviceController.Status == ServiceControllerStatus.Running)

		serviceController.Pause();

	else if (serviceController.Status == ServiceControllerStatus.Paused)

		serviceController.Continue();

}
6)检查状态
ServiceController serviceController = new ServiceController("ServiceTest");

string Status = serviceController.Status.ToString();
六、调试Windows Service
1)安装并运行服务
2)附加进程
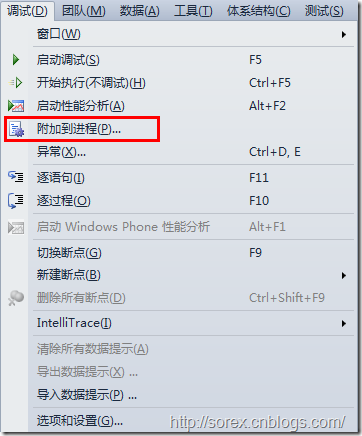
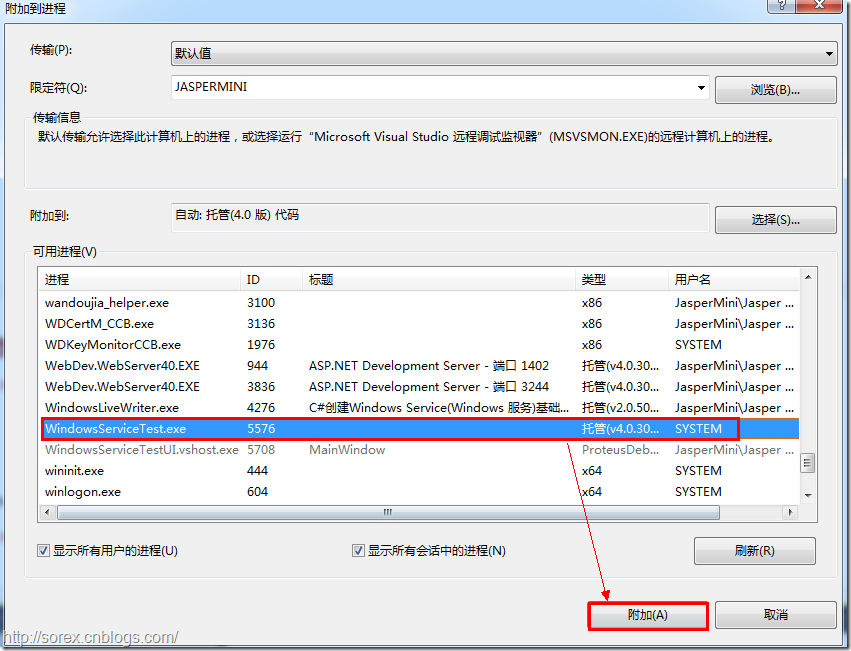
3)在代码中加入断点进行调试
七、总结
本文对Windows service的上述配置都未做详细解释,但是按上述步骤就可以制作可运行的Windows Service,从而达到了工作的需求。
C#编写Windows服务程序图文教程的更多相关文章
- C#编写Windows服务程序图文教程(转载)
Windows Service这一块并不复杂,但是注意事项太多了,网上资料也很凌乱,偶尔自己写也会丢三落四的.所以本文也就产生了,本文不会写复杂的东西,完全以基础应用的需求来写,所以不会对Window ...
- C语言编写Windows服务程序
原文:C语言编写Windows服务程序 #include <Windows.h> #include <stdio.h> #define SLEEP_TIME 5000 // 间 ...
- Github for Windows使用图文教程_西西软件资讯
body{ font-family: "Microsoft YaHei UI","Microsoft YaHei",SimSun,"Segoe UI& ...
- 编写windows服务程序
2012-11-02 08:54 (分类:计算机程序) windows服务是一个运行在后台并实现勿需用户交互的任务的控制台程序,对于隐藏程序有很大帮助. 用了几天时间概括了编写windows服务程序的 ...
- 用 C 语言编写 Windows 服务程序的五个步骤
Windows 服务被设计用于需要在后台运行的应用程序以及实现没有用户交互的任务.为了学习这种控制台应用程序的基础知识,C(不是C++)是最佳选择.本文将建立并实现一个简单的服务程序,其功能是查询系统 ...
- 用C语言编写Windows服务程序的五个步骤
Windows 服务被设计用于需要在后台运行的应用程序以及实现没有用户交互的任务.为了学习这种控制台应用程序的基础知识,C(不是C++)是最佳选择.本文将建立并实现一个简单的服务程序,其功能是查询系统 ...
- Python3编写Windows服务程序
最近做了公司签到的小工具,有同事要求做成Windows服务,开机自启.先说下怎么用Python写Windows服务程序. #encoding=utf-8 import win32serviceutil ...
- C#编写Windows服务程序 (服务端),client使用 消息队列 实现淘宝 订单全链路效果
需求: 针对 淘宝提出的 订单全链路 产品接入 .http://open.taobao.com/doc/detail.htm?id=102423&qq-pf-to=pcqq.group oms ...
- Github for Windows使用图文教程
原文:http://www.cr173.com/html/15618_1.html Git已经变得非常流行,连Codeplex现在也已经主推Git.Github上更是充斥着各种高质量的开源项目,比如r ...
随机推荐
- sfs - django start from scratch
[TOC] Launch with code git spreading is obsolte lwc Installation Path D:\PythonWebSW\Django-1.5.5 ad ...
- 模仿QQ客户端和服务器(支持window和linux)
界面部分我还没有想好,到底是用MFC还是duilib呢? 好吧我先发一个demo版本,功能都有,以下为功能展示. 先说服务器(这个有俩个版本,支持win和linux):用的数据库为MYsql(因为是便 ...
- 自定义控件之--继承控件(圆形TextView)
师从郭大,自学于心,继承控件无疑就是继承自现有控件,保持继承的控件的属性并进行必要的扩展. 比如下面这个自定义控件,它就保持了TextView的属性,并对TextView的外观进行必要的修改该来适 ...
- js 交换表单中值
<html> <head> <meta charset="utf-8" /> <script type="text/javasc ...
- hdu_2838_Cow Sorting(树状数组求逆序对)
题目连接:http://acm.hdu.edu.cn/showproblem.php?pid=2838 题意:给你一串数,让你排序,只能交换相邻的数,每次交换花费交换的两个树的和,问最小交换的价值 题 ...
- ASP.NET MVC 使用TempData
ASP.NET MVC的TempData用于传输一些临时的数据,例如在各个控制器Action间传递临时的数据或者给View传递一些临时的数据,相信大家都看过"在ASP.NET页面间传值的方法 ...
- WCF:调用方未由服务器进行身份验证
错误描述: 1. WCF:调用方未由服务器进行身份验证 2. 无法处理消息.这很可能是因为操作“http://tempuri.org/ISCCLSvc/GetCarriersByWareHouse”不 ...
- Centos7下安装pip
Linux 通过 pip 安装使用 Shadowsocks - CentOS 7 (06) Pip是安装Python包的工具,提供了安装.列举已安装包.升级以及卸载包的功能.Pip 是对easy_in ...
- sql server 2000/2005递归
/* 递归查询 塗聚文---SQL Server 2005环境下的实现: */--生成测试数据 create table Dept(ID int,ParentID int,msg varchar(20 ...
- sql数据库删除表的外键约束(INSERT 语句与 FOREIGN KEY 约束"XXX"冲突。该冲突发生于数据库"XXX",表"XXX", column 'XXX)
使用如下SQL语句查询出表中外键约束名称: 1 select name 2 from sys.foreign_key_columns f join sys.objects o on f.constra ...