
超详细!Vuex手把手教程
1,前言
最近在重温vue全家桶,再看一遍感觉记忆更深刻,所以专门记录一下。
2,Vuex 是什么
Vuex是专为Vue.js开发的状态管理模式。它采用集中式存储,管理所有组件的状态,并以相应的规则保证状态以一种可预测的方式发生变化(我的理解就是全局变量)。
3,5大属性说明
state
对象类型,类似于实例的 data属性,存放数据
getters
对象类型,类似于实例的计算属性 computed
mutations
对象类型,类似于实例的 methods,但是不能处理异步方法
actions
对象类型,类似于实例的 methods,可以处理异步方法
modules
对象类型,当state内容比较多时,通过该属性分割成小模块,每个模块都拥有自己的 state、mutation、action、getter
4,state
存储在state中的数据和Vue实例中的data遵循相同的规则,必须是纯粹的对象。
4.1 直接访问
this.$store.state.xxx
4.1 使用mapState映射
<template>

	<div id="communication">

		<p>计数:{{ getCount }}</p>

		<p>学校:{{ getSchool('我是参数') }}</p>

	</div>

</template>

<script>

import { mapState } from 'vuex'

export default {

	name: 'Vuex',

	data() {

		return {

			date: 1998

		}

	},

	computed: {

		...mapState({

			// mapState默认会把state当第一个参数传进来

			getCount: state => state.count,

			getSchool(state) {

				return (val) => {

					return state.school + val + this.date

				}

			}

		})

	},

	mounted() {

		// 直接取值

		console.log(this.$store.state.count)

	}

}

</script>
5,getters
getter的返回值会根据它的依赖被缓存起来,且只有当它的依赖值发生了改变才会被重新计算,并且默认接受state作为其第一个参数,也可以接受其他getter作为第二个参数(如下例)
5.1 先在vuex中定义getters
export default new Vuex.Store({

	state: {

		count: 0,

		school: '清华大学'

	},

	getters: {

		// 返回处理后的state值

		getValue(state) {

			return state.count + '!'

		},

		// 返回调用自身getters处理后的state值

		getGetters(state, getters) {

			return state.school + getters.getValue

		},

		// 接受外部传参后处理的值(在通过方法访问时,每次都会去进行调用,而不会缓存结果)

		getParam(state) {

			return (param) => {

				return state.school + param

			}

		}

	},

	mutations: {},

	actions: {},

	modules: {}

})
5.2 直接获取值
// 取值

console.log(this.$store.getters.getGetters)

// 传参取值

console.log(this.$store.getters.getParam('param'))
5.3 使用mapGetters映射
<template>

	<div id="communication">

		<p>计数:{{ getGetters }}</p>

		<p>学校:{{ getParam(date) }}</p>

	</div>

</template>

<script>

import { mapGetters } from 'vuex'

export default {

	name: 'Vuex',

	data() {

		return {

			date: 1998

		}

	},

	computed: {

		...mapGetters([

			'getGetters',

			'getParam'

		])

	},

	mounted() {

		// 直接取值

		console.log(this.$store.getters.getGetters)

		console.log(this.getParam(this.date))

	}

}

</script>
6,Mutation
通过调用this.$store.commit('xxx'),调用mutation中的方法,更改store中的值
6.1,先在mutations中注册事件
export default new Vuex.Store({

	state: {

		count: 0,

		school: '清华大学'

	},

	getters: {},

	mutations: {

		// 默认state作为第一个参数

		handleAdd(state) {

			state.count++

		},

		// 接受传参

		handleChange(state, value) {

			state.school = value

		}

	},

	actions: {},

	modules: {}

})
6.2,在组件中调用方法commit修改值
<template>

	<div id="communication">

		<p>计数:{{ count }}</p>

		<el-button @click="handleStoreAdd">增加</el-button>

		<el-button @click="handleStoreChange">传参</el-button>

	</div>

</template>

<script>

import { mapState } from 'vuex'

export default {

	name: 'Vuex',

	data() {

		return {

			school: '武汉大学'

		}

	},

	computed: {

		...mapState([

			'count'

		])

	},

	methods: {

		// 调用修改

		handleStoreAdd() {

			this.$store.commit('handleAdd')

		},

		// 传递参数修改

		handleStoreChange() {

			this.$store.commit('handleChange', this.school)

		}

	}

}

</script>
6.3,使用常量定义方法名
新建文件mutation-types.js,定义方法名的常量,并导出
export const ADD_COUNT = 'ADD_COUNT'

export const CHANGE = 'CHANGE'
在store中
import Vue from 'vue'

import Vuex from 'vuex'

import * as MT from './mutation-types'

Vue.use(Vuex)

export default new Vuex.Store({

	state: {

		count: 0,

		school: '清华大学'

	},

	getters: {},

	mutations: {

		// 默认state作为第一个参数

		[MT.ADD_COUNT](state) {

			state.count++

		},

		// 接受传参

		[MT.CHANGE](state, value) {

			state.school = value

		}

	},

	actions: {},

	modules: {}

})
在组件中
<template>

	<div id="communication">

		<p>计数:{{ count }}</p>

		<el-button @click="handleStoreAdd">增加</el-button>

		<el-button @click="handleStoreChange">传参</el-button>

	</div>

</template>

<script>

import { mapState } from 'vuex'

import * as MT from '../../store/mutation-types'

export default {

	name: 'Vuex',

	data() {

		return {

			school: '武汉大学'

		}

	},

	computed: {

		...mapState([

			'count'

		])

	},

	methods: {

		// 调用修改

		handleStoreAdd() {

			this.$store.commit(MT.ADD_COUNT)

		},

		// 传递参数修改

		handleStoreChange() {

			this.$store.commit(MT.CHANGE, this.school)

		}

	}

}

</script>
6.4,使用mapMutations映射
<template>

	<div id="communication">

		<p>计数:{{ count }}</p>

		<p>计数:{{ school }}</p>

		<el-button @click="handleStoreAdd">增加</el-button>

		<el-button @click="handleStoreChange(schools)">传参</el-button>

	</div>

</template>

<script>

import { mapState, mapMutations } from 'vuex'

import * as MT from '../../store/mutation-types'

export default {

	name: 'Vuex',

	data() {

		return {

			schools: '武汉大学'

		}

	},

	computed: {

		...mapState([

			'count',

			'school'

		])

	},

	methods: {

		...mapMutations({

			handleStoreAdd: MT.ADD_COUNT,

			handleStoreChange: MT.CHANGE

		})

	}

}

</script>
7,Action
注意,Action提交的是mutation,而不是直接变更状态,并且可以包含任意异步操作
7.1,在store中定义
import Vue from 'vue'

import Vuex from 'vuex'

import * as MT from './mutation-types'

Vue.use(Vuex)

export default new Vuex.Store({

	state: {

		count: 0,

		school: '清华大学'

	},

	getters: {},

	mutations: {

		// 默认state作为第一个参数

		[MT.ADD_COUNT](state) {

			state.count++

		},

		// 接受传参

		[MT.CHANGE](state, value) {

			state.school = value

		}

	},

	actions: {

		add(context) {

			context.commit(MT.ADD_COUNT)

		}

	},

	modules: {}

})
7.2,在组件中使用
<template>

	<div id="communication">

		<p>计数:{{ count }}</p>

		<el-button @click="actionAdd">增加</el-button>

	</div>

</template>

<script>

import { mapState, mapMutations } from 'vuex'

import * as MT from '../../store/mutation-types'

export default {

	name: 'Vuex',

	data() {

		return {

			schools: '武汉大学'

		}

	},

	computed: {

		...mapState([

			'count',

			'school'

		])

	},

	methods: {

		...mapMutations({

			handleStoreAdd: MT.ADD_COUNT,

			handleStoreChange: MT.CHANGE

		}),

		// 调用action的方法,需要使用$store.dispatch

		actionAdd() {

			this.$store.dispatch('add')

		}

	}

}

</script>
7.3,使用mapActions映射
import { mapActions } from 'vuex'

methods: {

	...mapActions([

		'moduleFn'

	])

}
或者
import { mapActions } from 'vuex'

methods: {

	...mapActions([

		fn: 'moduleFn'

	])

}
7.4,简化写法
Action接受一个与store实例具有相同方法和属性的context参数对象,因此你可以调用context.commit提交一个mutation,或者通过context.state和context.getters来获取state和getters,利用ES6的解构,可以简化写法。
actions: {

  add({ commit, state }) {

    commit(MT.CHANGE, state.school)

  }

}
7.5,执行异步操作
在vuex中
import Vue from 'vue'

import Vuex from 'vuex'

import * as MT from './mutation-types'

Vue.use(Vuex)

export default new Vuex.Store({

	state: {

		count: 0

	},

	getters: {},

	mutations: {

		// 默认state作为第一个参数

		[MT.ADD_COUNT](state) {

			state.count++

		}

	},

	actions: {

		add({ commit }) {

			return new Promise((resolve, reject) => {

				setTimeout(() => {

					commit(MT.ADD_COUNT)

					resolve()

				}, 1000)

			})

		}

	},

	modules: {}

})
在组件中使用async / await或者then / catch处理异步
<template>

	<div id="communication">

		<p>计数:{{ count }}</p>

		<el-button @click="actionAdd">增加</el-button>

	</div>

</template>

<script>

import { mapState, mapMutations } from 'vuex'

import * as MT from '../../store/mutation-types'

export default {

	name: 'Vuex',

	data() {

		return {

			schools: '武汉大学'

		}

	},

	computed: {

		...mapState([

			'count',

			'school'

		])

	},

	methods: {

		...mapMutations({

			handleStoreAdd: MT.ADD_COUNT,

			handleStoreChange: MT.CHANGE

		}),

		// 调用action的方法,需要使用$store.dispatch

		async actionAdd() {

			await this.$store.dispatch('add')

			console.log(1998)

		}

	}

}

</script>
8,Modules
当应用变得非常复杂时,store对象就可能变得相当臃肿。这时候可以将store分割成模块,每个模块拥有自己的state、mutation、action、getter、甚至是嵌套子模块,从上至下进行同样方式的分割。
8.1,准备工作
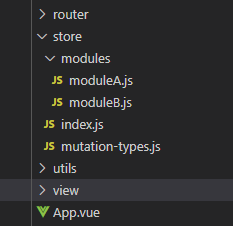
在store目录下新建Modules文件夹,在Modules文件夹中新建modulesA.js,modulesB.js,如下图
在modulesA.js中写上局部模块的state、mutation、action、getter,并导出
const moduleA = {

	state: () => ({

		a: '我是moduleA'

	}),

	getters: {},

	mutations: {},

	actions: {}

}

export default moduleA
然后在store的index.js中引入,并丢进modules对象里
import Vue from 'vue'

import Vuex from 'vuex'

import * as MT from './mutation-types'

import moduleA from './modules/moduleA'

import moduleB from './modules/moduleB'

Vue.use(Vuex)

export default new Vuex.Store({

	state: {

		count: 0

	},

	getters: {},

	mutations: {},

	actions: {},

	modules: {

		moduleA,

		moduleB

	}

})
8.2,使用modules中注入的模块的state
在组件中直接使用
this.$store.state.moduleA.xxx
在组件中使用mapState映射
<span>{{ moduleA.xxx }}</span>

import { mapState } from 'vuex'

computed: {

	...mapState([

		'moduleA'

	])

}
8.3,使用modules中注入模块的getters
在组件中直接使用
this.$store.getters.getModuleA
在组件中使用mapState映射
<p>{{ getModuleA }}</p>

import { mapGetters } from 'vuex'

computed: {

	...mapGetters([

		'getModuleA'

	])

}
模块内部的getter,接受的参数state和getters是模块的局部状态对象,而根节点的状态会作为第三个参数rootState暴露出来
const moduleA = {

	getters: {

		getModuleA(state, getters, rootState) {

			return state.xxx + '---' + rootState.xxx

		}

	}

}
如果需要带参数
const moduleA = {

	getters: {

		getModuleA(state, getters, rootState) {

			return (value) => {

				return state.a + '---' + value

			}

		}

	}

}
8.4,使用modules中注入模块的mutations
在组件中直接使用
this.$store.commit('setModuleA') || this.$store.commit('setModuleA', '参数')
在组件中使用mapMutations映射
import { mapMutations } from 'vuex'

methods: {

	...mapMutations([

		openFn: 'setModuleA'

	])

}
模块内部的mutations,默认接受的第一个参数state是模块的局部状态对象
const moduleA = {

	mutations: {

		setModuleA(state) {

			state.xxx += 'xxx'

		}

	}

}
如果需要带参数
const moduleA = {

	mutations: {

		setModuleA(state, value) {

			state.xxx += value

		}

	}

}
8.5,使用modules中注入模块的actions
在组件中直接使用
this.$store.dispatch('xxx')
在组件中使用mapActions映射
import { mapActions } from 'vuex'

methods: {

	...mapActions([

		'moduleA'

	])

}
或者重命名
import { mapActions } from 'vuex'

methods: {

	...mapActions({

		fn: 'moduleA'

	})

}
对于模块内部的action,局部状态通过context.state暴露出来,根节点状态则为context.rootState
const moduleA = {

  // ...

  actions: {

    fn ({ state, commit, rootState }) {

      if ((state.count + rootState.count) % 2 === 1) {

        commit('increment')

      }

    }

  }

}
8.6,命名空间
默认情况下,模块内部的action、mutation和getter是注册在全局命名空间的,这样使得多个模块能够对同一mutation或action作出响应。如果希望模块具有更高的封装度和复用性,可以通过给模块添加namespaced: true的方式使其成为带命名空间的模块。当模块被注册后,它的所有getter、action及mutation都会自动根据模块注册的路径调整命名。
8.6.1,使用
先在模块moduleB.js中添加namespaced: true
const moduleB = {

	namespaced: true,

	state: () => ({

		b: '我是moduleB'

	}),

	mutations: {},

	actions: {},

	getters: {}

}

export default moduleB
在store的index.js中
import moduleA from './modules/moduleA'

import moduleB from './modules/moduleB'

export default new Vuex.Store({

	state: {},

	getters: {},

	mutations: {},

	actions: {},

	modules: {

		moduleA,

		moduleB

	}

})
如果在组件中使用命名空间,需要带上空间名称,mapState, mapGetters, mapMutations,mapActions用法一样。
<script>

import { mapState, mapGetters, mapMutations } from 'vuex'

export default {

	name: 'Vuex',

	data() {

		return {}

	},

	computed: {

		// 此处注入的是moduleA模块的数据

		...mapState('moduleA', [

			'a'

		]),

		// 需要注入moduleB模块,就再写一个

		...mapState('moduleB', [

			'b'

		])

	},

	mounted() {

		// 直接使用

		console.log(this.$store.state.moduleA.a)

		console.log(this.$store.state.moduleB.b)

	},

	methods: {}

}

</script>
8.6.2 ,在带命名空间的模块中内访问全局内容
如果你希望使用全局的state和getter,rootState和rootGetters会作为第三和第四参数传入getter,也会通过context对象的属性传入action。若需要在全局命名空间内分发action或提交mutation,将{ root: true }作为第三参数传给dispatch或commit即可
const moduleA = {

	namespaced: true,

	state: () => ({

		a: '我是moduleA'

	}),

	getters: {

		getModuleA(state, getters, rootState, rootGetters) {

			// 使用全局命名空间的state或getters

			return state.a + rootState.count

		}

	},

	mutations: {

		setModuleA(state) {

			console.log(state.a)

		}

	},

	actions: {

		addM({ state, commit, dispatch, rootState, rootGetters }) {

			console.log(rootState)

			console.log(rootGetters)

			// 调用全局命名空间的方法

			dispatch('rootFunction', null, { root: true })

		}

	}

}

export default moduleA
8.6.3,在带命名空间的模块注册全局action
在带命名空间的模块注册全局action,需要添加root: true,并将这个action的定义放在函数handler中,其中,handler的第一个参数namespacedContext就是action中的Context参数
const moduleA = {

	namespaced: true,

	state: () => ({

		a: '我是moduleA'

	}),

	getters: {},

	mutations: {},

	actions: {

		rootFn: {

			root: true,

			handler(namespacedContext, param) {

				console.log(namespacedContext.state)

			}

		}

	}

}

export default moduleA
如果看了觉得有帮助的,我是@鹏多多,欢迎 点赞 关注 评论;END

公众号
往期文章
个人主页
超详细!Vuex手把手教程的更多相关文章
- 超强、超详细Redis入门教程【转】
这篇文章主要介绍了超强.超详细Redis入门教程,本文详细介绍了Redis数据库各个方面的知识,需要的朋友可以参考下 [本教程目录] 1.redis是什么2.redis的作者何许人也3.谁在使用red ...
- 超详细Redis入门教程【转】
这篇文章主要介绍了超强.超详细Redis入门教程,本文详细介绍了Redis数据库各个方面的知识,需要的朋友可以参考下 [本教程目录] 1.redis是什么 2.redis的作者何许人也 3.谁在使 ...
- 梦幻西游H5游戏超详细图文架设教程
前言 想体验经典Q版西游霸服快乐吗?想体验满级VIP的尊贵吗?想体验一招秒杀的爽快吗?各种极品装备.翅膀.宠物通通给你,就在梦幻西游! 本文讲解梦幻西游H5游戏的架设教程,想研究H5游戏如何实现,体验 ...
- SCIP | 数学规划求解器SCIP超详细的使用教程
前言 小伙伴们大家好呀!继上次lp_solve规划求解器的推文出来以后,大家都期待着更多求解器的具体介绍和用法.小编哪敢偷懒,这不,赶在考试周之际,又在忙里偷闲中给大家送上一篇SCIP规划求解的推文教 ...
- Mysql学习总结(2)——Mysql超详细Window安装教程
目录 一.安装包准备 二.开始安装 三.验证安装 四.客户端工具 一.安装包准备 1.下载MySql5.6 http://www.mysql.com/ 下载如下教程,这时要选MySql On Wind ...
- iphone 3G\3GS 超详细拆机教程
更为直观的iphone视频拆机教程: http://bbs.app111.com/thread-243147-1-1.html 第一步: 准备好所需工具 iphone一台....吸盘一个..屏幕布一块 ...
- MySQL基础知识(一)-超详细MySQL安装教程
简介 原计划,今天这篇想要给小伙伴们讲解一下python操作mysql数据库,但是由于近期换了一台新的电脑,所以一看mysql数据库都没安装,所有才有了这篇文章.尽管网上不乏此类型的文章,但是刚好自己 ...
- VS Code断点调试PHP超详细萌新教程
AppServ安装 1. 下载 2. 安装,一路默认设置顺便设置sql密码即可.这里建议不要修改端口,后续教程默认80端口. 3.点我测试,有下图则恭喜你AppServ安装完成. Xdebug配置 1 ...
- 秒懂系列,超详细Java枚举教程!!!
所有知识体系文章,GitHub已收录,欢迎Star!再次感谢,愿你早日进入大厂! GitHub地址: https://github.com/Ziphtracks/JavaLearningmanual ...
随机推荐
- python应用_异常处理
我们把可能发生错误的语句放在try模块里,用except来处理异常. 参考学习链接: https://www.cnblogs.com/OliverQin/p/12222619.html 异常处理的完整 ...
- .NET平台系列24:从.NET Framework迁移到.NET Core/.NET5的技术指南
系列目录 [已更新最新开发文章,点击查看详细] 本文讲解了在将代码从 .NET Framework 移植到 .NET(旧称为 .NET Core)时应考虑的事项. 对于许多项目,从 .NET ...
- python中json.dump()与json.dumps()的区别
1.将python数据结构转换为json字符串(json.dumps()) >>> import json >>> data={'name':'pipi','age ...
- Samba 服务基础
配置SMB共享,跨平台的共享,Windows与Linux的共享 • Samba 软件项目 用途:为客户机提供共享使用的文件夹 协议:SMB(TCP 139).CIFS(TCP 445) • 所需软件包 ...
- 性能分析之用户数(线程数)/响应时间/TPS的关系
最近在写一些东西的时候,把一些内容整理了一下. 在考虑压力工具中的用户数(有些工具中称为线程数,本文后续都用"用户数"来说明).响应时间.TPS三者之间的关系时,想到之前也有人问起 ...
- 关于XXE漏洞
XXE漏洞 0x01.xxe是什么 介绍 XXE 之前,我先来说一下普通的 XML 注入,这个的利用面比较狭窄,如果有的话应该也是逻辑漏洞 1.1xml定义 XML用于标记电子文件使其具有结构性的标记 ...
- 个人使用uploadify插件遇到的一些问题
当uploadify上传插件遇到的好几个问题 现在开始自我反省,留下脚印希望能够帮助其他遇到同样问题的朋友. 我遇到的第一个是, 在firefox不能执行uploadify事件onUploadSucc ...
- Samba常见漏洞利用
Samba简介 Samba是linux和unix系统上实现smb协议的一个免费软件,由服务器及客户端程序构成,Samba是面向Linux和Unix环境的Windows互操作性套件.它适用于在可能包括L ...
- Linux指令手册 (一)
指令格式 指令主体 [选项] [操作对象] 一个完整的指令是由"指令主体"."选项"和"操作对象"组成的,其中指令主体只能有一个,选项有零个 ...
- MySQL不支持DELETE使用表别名?
最近做的需求经常和数据库在打交道, 因为系统页面上某些展示的字段并不是在前端写死的, 而是配置在数据库中, 这样的话便于维护和扩展. 于是遇到了一个MySQL中比较细节性的问题. 日常开发中不少程序员 ...