
简单快速安装Apache+PHP+MySql服务环境(一)
由于自己只是普通的coder,对于服务器的操作不是很熟悉,在网上找了很多关于PHP和apache服务器环境搭建的帖子,不过都不尽相同,尤其是编译安装更是看的云里雾里的,所以选择了一种比较简单的方式进行环境搭建和学习。亲测有效。
1. 使用虚拟机安装Linux系统,CentOS7.
2. 首先检查是否已经安装了apache
yum list installed | grep php 或者 rpm -qa |grep httpd
3. yum安装apache
yum -y install httpd
4. 启动apache
systemctl start httpd
ps -A|grep httpd //检查是否已经启动apache服务
主配置文件是/etc/httpd/conf/httpd.conf。
配置存储在的/etc/httpd/conf.d/目录。
看一下主配置文件httpd.conf里有用的配置项
#服务器根目录

ServerRoot "/etc/httpd"

#端口

#Listen 12.34.56.78:80

Listen 80

#域名+端口来标识服务器,没有域名用ip也可以

#ServerName www.example.com:80

#不许访问根目录

<Directory />

    AllowOverride none

    Require all denied

</Directory>

# 文档目录

DocumentRoot "/var/www/html"

# 对 /var/www目录访问限制

<Directory "/var/www">

    AllowOverride None

    # Allow open access:

    Require all granted

</Directory>

# 对/var/www/html目录访问限制

<Directory "/var/www/html">

   Options Indexes FollowSymLinks

   AllowOverride None

   Require all granted

</Directory>

# 默认编码

AddDefaultCharset UTF-8

#EnableMMAP off

EnableSendfile on

# include进来其它配置文件

IncludeOptional conf.d/*.conf
5. 使用yum方式安装php
yum install php
6. 修改apache配置文件(重要)
配置文件位置:/etc/httpd/conf/httpd.conf
- 在LoadModule后面添加:LoadModule php5_module modules/libphp5.so //不添加则访问.php文件将会变成下载
- 在DirectoryIndex后面添加:index.php
- 在AddType application/x-gzip .gz .tgz后面添加:AddType application/x-httpd-php .php //.php前面有一个空格
7. 重启apache并测试
systemctl restart httpd

8. 安装mysql,由于CentOS 7 版本将MySQL数据库软件从默认的程序列表中移除,用mariadb代替了,所以我们直接安装mariadb即可
yum install mariadb-server mariadb
安装后运行如下命令:
systemctl start mariadb # 启动 mariaDB
[root@localhost ~]# /usr/bin/mysql_secure_installation     //对数据库进行设置

NOTE: RUNNING ALL PARTS OF THIS SCRIPT IS RECOMMENDED FOR ALL MariaDB

      SERVERS IN PRODUCTION USE!  PLEASE READ EACH STEP CAREFULLY!

In order to log into MariaDB to secure it, we'll need the current

password for the root user.  If you've just installed MariaDB, and

you haven't set the root password yet, the password will be blank,

so you should just press enter here.

Enter current password for root (enter for none):    //给root管理员设定密码,直接回车

OK, successfully used password, moving on...

Setting the root password ensures that nobody can log into the MariaDB

root user without the proper authorisation.

Set root password? [Y/n] y   //是否设置,选择y

New password:    //输入新密码

Re-enter new password:    //再次输入新密码

Password updated successfully!

Reloading privilege tables..

 ... Success!

By default, a MariaDB installation has an anonymous user, allowing anyone

to log into MariaDB without having to have a user account created for

them.  This is intended only for testing, and to make the installation

go a bit smoother.  You should remove them before moving into a

production environment.

Remove anonymous users? [Y/n] n   //是否删除匿名用户,选择n

 ... skipping.

Normally, root should only be allowed to connect from 'localhost'.  This

ensures that someone cannot guess at the root password from the network.

Disallow root login remotely? [Y/n] n   //是否拒绝root用户远程登陆,选择n

 ... skipping.

By default, MariaDB comes with a database named 'test' that anyone can

access.  This is also intended only for testing, and should be removed

before moving into a production environment.

Remove test database and access to it? [Y/n] n   //是否删除测试数据库,选择n

 ... skipping.

Reloading the privilege tables will ensure that all changes made so far

will take effect immediately.

Reload privilege tables now? [Y/n] y   //是否加载权限列表,选择y

 ... Success!

Cleaning up...

All done!  If you've completed all of the above steps, your MariaDB

installation should now be secure.

Thanks for using MariaDB!

[root@localhost ~]#
mariadb数据库的相关命令是:
systemctl start mariadb #启动MariaDB
systemctl stop mariadb #停止MariaDB
systemctl restart mariadb #重启MariaDB
systemctl enable mariadb #设置开机启动
9. 设置mariadb的开机自启动
// 查看已经安装的软件的启动状态
# systemctl list-unit-files
// 设置开机自启动
# systemctl enabled mariadb
// 取消开机自启动
# systemctl disable maraidb
10. 默认安装的php中并没有mysql的相关模块,还需要安装相关组件
yum install php-mysql php-gd php-imap php-ldap php-odbc php-pear php-xml php-xmlrpc
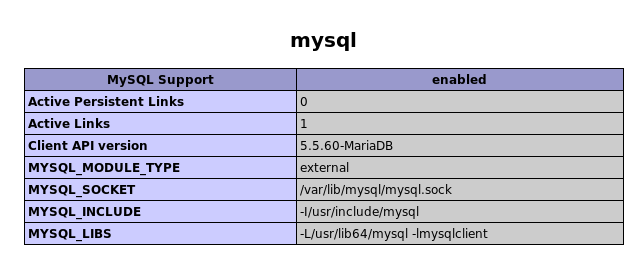
11. 重启apache服务
systemctl restart httpd
总结:由于水平有限,所有很多安装都是使用的默认配置。好在这种安装流程可以安装成功。其他方法以后再试。
简单快速安装Apache+PHP+MySql服务环境(一)的更多相关文章
- 简单快速安装Apache+PHP+MySql服务环境(四)—— 将php版本升级到7.2
书接上文,简单快速安装Apache+PHP+MySql服务环境(二)-- centos使用yum安装指定版本的php. 随着各种PHP框架的升级,对PHP的版本也有了更高的要求,所以笔者也尝试着更新升 ...
- 简单快速安装Apache+PHP+MySql服务环境(三)—— 下载安装phpmyadmin
为了方便在Linux上操作mysql数据库,打算安装一个phpmyadmin,不过在下载安装的过程中出现了一些坑,特此记录. 1. 在官网上下载phpmyadmin https://files.php ...
- 简单快速安装Apache+PHP+MySql服务环境(二)—— centos使用yum安装php5.6
使用默认方式yum install php安装的php版本为5.4,在使用某些PHP框架的时候可能会有问题,所以需要安装高版本的PHP. 通过yum list php*查看是否有自己需要安装的版本,如 ...
- 手动安装Apache+PHP+MYSQL及环境配置
先准备好软件: Apache官方下载地址:apache_2.0.55-win32-x86-no_ssl.msi,更多版本在这里: php官方下载地址:php-5.0.5-Win32.zip,更多镜像下 ...
- Windows手动安装Apache,MySql服务
绿色版的Apache,Mysql需要以服务方式运行.或者由于某种原因服务管理器里面没有服务项了,可以进行手工注册服务和启并服务. # Apache Apache进到安装目录的bin目录下,运行dos命 ...
- (总结)CentOS 6.x使用yum快速安装Apache+PHP+Tomcat(JSP)+MySQL
(总结)CentOS 6.x使用yum快速安装Apache+PHP+Tomcat(JSP)+MySQL PS:这个是懒人yum快速安装法,用于开发和测试环境很方便,用于没有特殊要求的生产环境也可以.特 ...
- 自定义安装Apache+php+mysql网站服务器环境
自定义安装Apache+php+mysql 这种方式是比较麻烦的安装方式,需要具有一定的对Apache了解的基础上才能安装,安装顺序就是先安装Apache软件,然后安装php,最后安装mysql.这里 ...
- Linux+Apache+PHP+MySQL服务器环境(CentOS篇)
1.前言 CentOS(Community ENTerprise Operating System)是Linux发行版之一,它是来自于Red Hat Enterprise Linux依照开放源代码规定 ...
- Apache+PHP+Mysql 集成环境 几个软件pk
WampServer 2.5 64位 - 工具软件 - 源码之家 2014年8月25日 - WampServer是Apache+PHP+Mysql 集成环境,拥有简单的图形和菜单安装和配置环境.支持2 ...
随机推荐
- ADO.NET的五大对象
ADO.NET是一种数据访问技术,使得应用程序可以连接到数据库存储,并以各种方式操作存储在其中的数据.该技术基于.NETFramework,与.NET Framework类库的其余部分高度集成. 其中 ...
- BIO/NIO/ANO笔记
一: netty服务器启动过程 serverBootstrap.bind(hostname, port)---> doBind(localAddress);--> 1.1: initAnd ...
- 从一条sql报错解决过程学习程序员查bug的思路
从oracle迁移数据到达梦后,发现数据库默认值都丢失了.于是我想从oracle数据库将默认值查出来,在达梦数据库加回去. 于是上网查了一下,看怎么获取oracle数据库字段默认值信息,找到了这个sq ...
- 【NX二次开发】Block UI对话框-代码生成部分
常规: 语言:生成的代码语言 生成附注:是否生成注释代码 生成特定与块的代码: 输入点: 回调:对话框通过回调函数调用,例如通过另一个对话框的按钮调用本对话框 菜单:对话框通过菜单调用 用户出口:对话 ...
- 云原生时代的Java
原文链接(作者:周志明):https://time.geekbang.org/column/article/321185 公开课链接:https://time.geekbang.org/opencou ...
- Lambda表达式和函数式接口
写在有道笔记中,链接地址.欢迎各位看官提出意见交流讨论 http://note.youdao.com/noteshare?id=147109f1bf7f3ae97c43d77891e6ebc8 Lam ...
- Jenkins 流水线远程部署 .NET Core/Framework 到 IIS
目录 Windows 安装 Git WebDeploy Windows 从节点 .NET Core 处理 IIS 处理项目 Jenkinsfile .NET Framework 安装环境 .NET F ...
- linux文件系统和日志分析
一.Linux文件系统 1.inode与block 1.概述: (1)文件数据包括元信息与实际信息 (2)文件存储在硬盘上,硬盘最小存储单位是"扇区",每个扇区存储512字节 (3 ...
- Netty 框架学习 —— 编解码器框架
编解码器 每个网络应用程序都必须定义如何解析在两个节点之间来回传输的原始字节,以及如何将其和目标应用程序的数据格式做相互转换.这种转换逻辑由编解码器处理,编解码器由编码器和解码器组成,它们每种都可以将 ...
- [翻译]Go与C#对比 第三篇:编译、运行时、类型系统、模块和其它的一切
Go vs C#, Part 3: Compiler, Runtime, Type System, Modules, and Everything Else | by Alex Yakunin | S ...