
python之数据库编程
python之数据库编程
sqlite
1.前期准备工作
导入模块:
import sqlite3
连接数据库
conn = sqlite3.connect("test.db") #test为数据库名称,若不存在此数据库,会自动创建
测试是否创建或连接数据库成功
print(conn) #打印结果为connection对象
pycharm端显示出数据库:
- 1.打开pycharm->右端database->点击+号
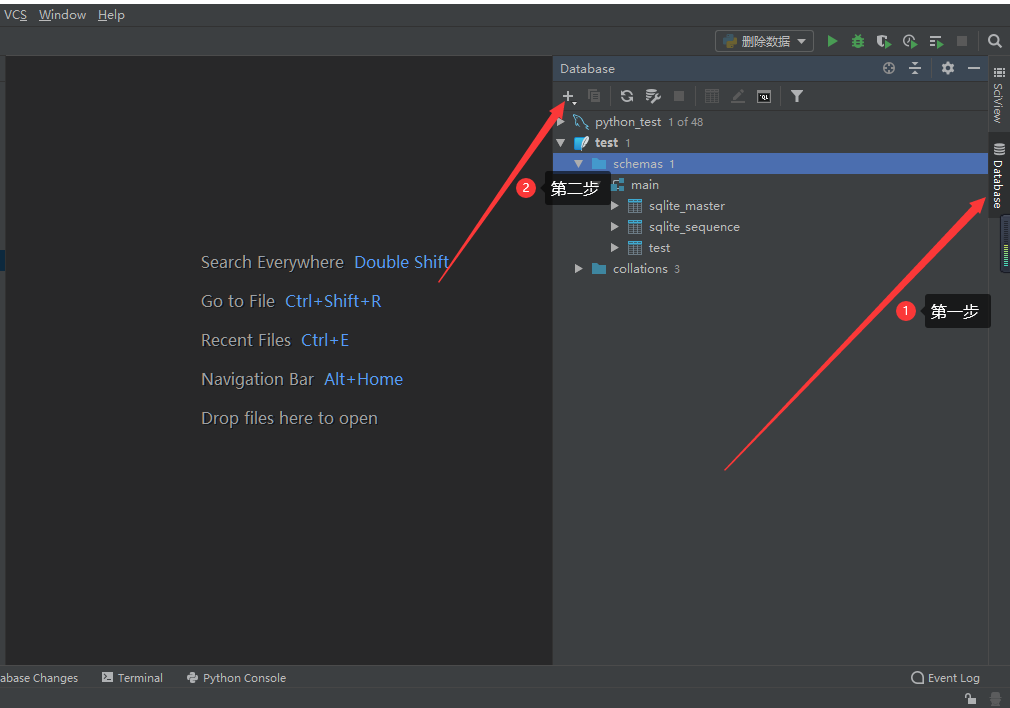
- 1.打开pycharm->右端database->点击+号
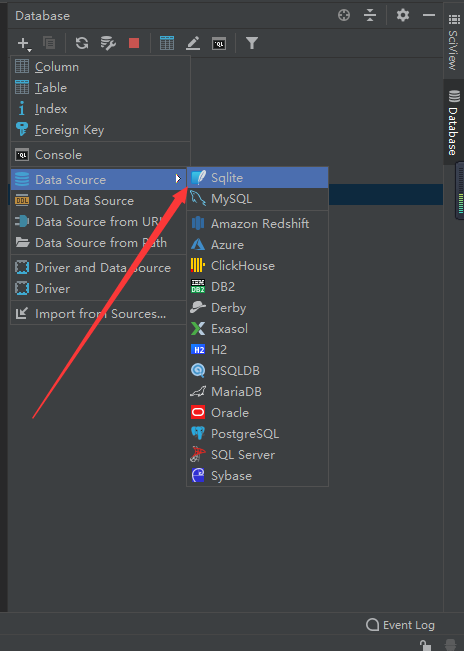
2.第二步:
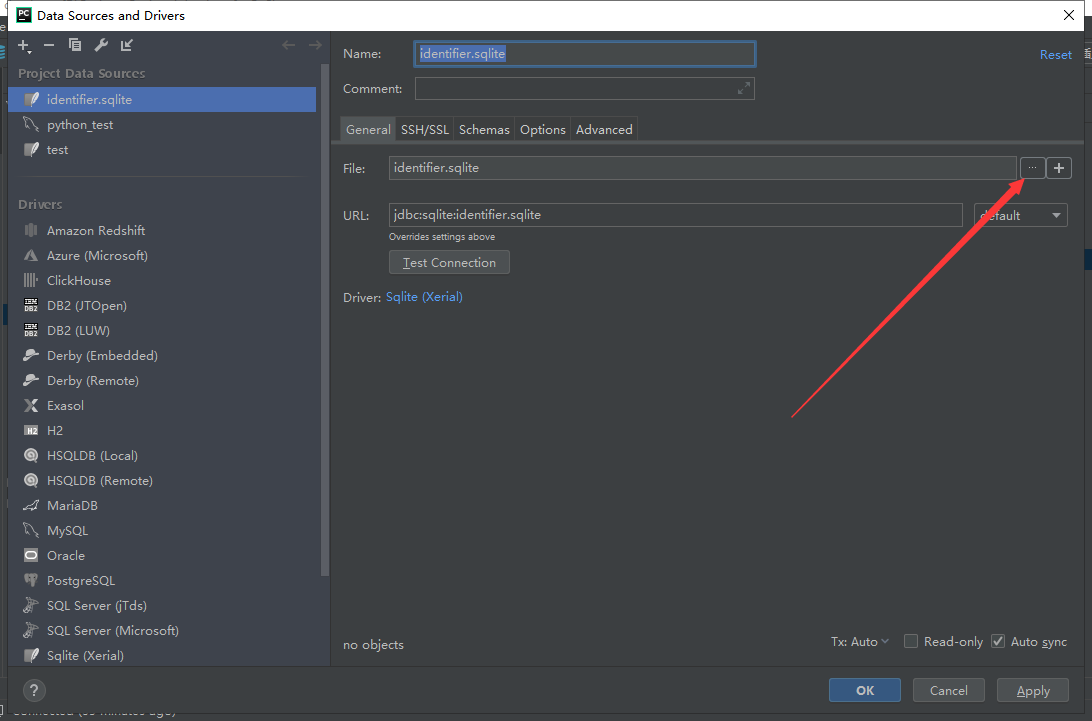
3.第三步
4.选择pycharm工作环境下新创建的数据库,比如我的在这里
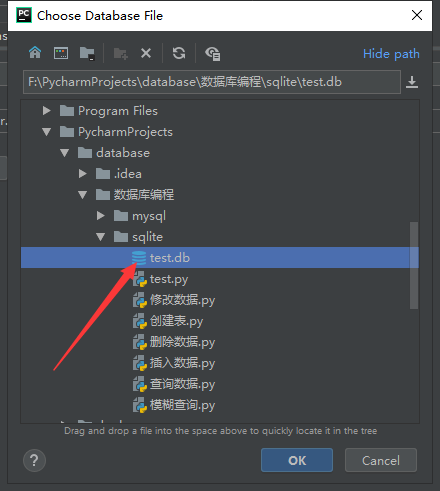
点击ok即可,注意:

若第三步出现这个,点击Download先进行下载。。。
2.创建数据库和表
import sqlite3

conn = sqlite3.connect("test.db")

#cur = conn.cursor()

sql = """

CREATE TABLE test(

id INTEGER PRIMARY KEY autoincrement,

name TEXT,

age INTEGER

)

"""

try:

    #cur.execute(sql)

    conn.execute(sql)

except Exception as e:

    print(e)

finally:

    #cur.close()

    conn.close()
注意:
可以看到,此处并没有使用游标,而是直接conn.execute(sql),值得说明的是,对sqlite来说(mysql却不是),增删改以及创建表都可以不用游标,但查询一定需要,往下看
3.插入数据
import sqlite3

conn = sqlite3.connect('test.db')

# cur = conn.cursor()

sql = """

insert into test(name, age) VALUES (%s,%s)

"""%("'王五'",22)

sql1 = """

insert into test(name, age) VALUES (?,?)

"""

try:

    print("sql:"+sql)

    print("sql1:" + sql1)

    #conn.execute(sql)

    #conn.execute(sql1, ('张三', 20))添加单条数据

    conn.executemany(sql1,[('李四',18),('王五',28),('赵六',38)])

    conn.commit()

    print("插入成功")

except Exception as e:

    print(e)

    print("插入失败")

    conn.rollback()

finally:

    conn.close()
显示结果:

插入数据中使用了两种方法,见sql和sql1,分别使用%s和?占位符
以下我就不一一展示显示结果了。。。
4.修改数据
import sqlite3

conn = sqlite3.connect('test.db')

# cur = conn.cursor()

sql = """

update test set name = ? , age = ? where id = ?

"""

sql1 = """

update test set name = %s , age = %s where id = %s

"""%("'曹操'", 24, 11)

try:

    #conn.execute(sql, ('曹操', 24, 4))

    conn.execute(sql1)

    print("成功")

    conn.commit()

except Exception as e:

    print(e)

    print("失败")

    conn.rollback()

finally:

    conn.close()
修改数据中使用了两种方法,见sql和sql1,分别使用%s和?占位符
5.删除数据
import sqlite3

conn = sqlite3.connect('test.db')

#cur = conn.cursor()

sql = """

delete from test where name = ?

"""

sql1 = """

delete from test where name = %s

"""%("'曹操'",)

try:

    conn.execute(sql1);

    #conn.execute(sql,('曹操',));

    #若执行conn.execute(sql,('曹操'));会报错Incorrect number of bindings supplied. The current statement uses 1, and there are 2 supplied.

    #使用('曹操',)或[曹操]

    conn.commit()

except Exception as e:

    conn.rollback()

    print(e)

finally:

    conn.close()
6.查询数据
import sqlite3

conn = sqlite3.connect('test.db')

cur = conn.cursor()

sql = """

select * from test

"""

try:

    cur.execute(sql);

    # print(cur.fetchall())#查询所有数据

    print(cur.fetchone())  # 查询第一条数据

    # print(cur.fetchmany(3))#查询几条数据,从开头开始

except Exception as e:

    print(e)

finally:

    cur.close()

    conn.close()
可以看到,查询数据必须要用游标,按条件进行查询可参照上面的占位符进行测试
7.模糊查询
import sqlite3

conn = sqlite3.connect('test.db')

cur = conn.cursor()

sql = "select * from test where name like '%%%s%%'"%"王"

#sql1 = "select * from test where name like ?"

try:

    print(sql)

    cur.execute(sql);

    #cur.execute(sql1, ("%王%",));

    print(cur.fetchall())  # 查询所有数据

    # print(cur.fetchone())  # 查询第一条数据

    # print(cur.fetchmany(3))#查询几条数据,从开头开始

except Exception as e:

    print(e)

finally:

    cur.close()

    conn.close()
模糊查询中使用了两种方法,见sql和sql1,分别使用%s和?占位符
注意:%s占位符模糊查询时,使用%%---%%进行转义
mysql
1.前期准备工作
导入模块:
import pymysql
连接数据库
conn = pymysql.connect(user='root',password='000000',host='localhost',

                       port=3306,database='python_test')

#mysql数据库不会自动创建,需要自己建立
测试是否连接数据库成功
print(conn) #打印结果为connection对象
pycharm端显示出数据库:
与sqlite操作一样,此时建立的是mysql
2.创建数据库和表
import pymysql

conn = pymysql.connect(user='root',password='000000',host='localhost',

                       port=3306,database='python_test')

cur = conn.cursor()

sql = """

create table student(

id integer primary key auto_increment,

sno char(20) not null,

name char(20),

score float

)

"""

try:

    cur.execute(sql)

    print("建表成功")

except Exception as e:

    print(e)

    print("建表失败")

finally:

    cur.close()

    conn.close()
注意:
可以看到,与sqlite不同,mysql的操作都需要游标参与
3.插入数据
import pymysql

conn = pymysql.connect(user='root', password='000000', host='localhost', port=3306, database='python_test')

cur = conn.cursor()

sql = """

insert into student(sno, name, score)

values

(%s,%s,%s)

"""

try:

    #cur.execute(sql, ('7777', 'ff', 90))  #插入一条

    cur.executemany(sql,[('3333','c',3),('4444','d',4)])  #插入多条

    conn.commit()

    print("插入成功")

except Exception as e:

    print(e)

    conn.rollback()

    print("插入失败")

finally:

    cur.close()

    conn.close()
显示结果:
mysql中使用%s做占位符
4.修改数据
import pymysql

conn = pymysql.connect(user='root', password='000000', host='localhost', port=3306, database='python_test')

cur = conn.cursor()

sql = """

update student set name = %s where id = %s

"""

try:

    cur.execute(sql,('王五',5))

    #cur.executemany(sql,[('3333','c',3),('4444','d',4)])

    conn.commit()

    print("修改成功")

except Exception as e:

    print(e)

    conn.rollback()

    print("修改失败")

finally:

    cur.close()

    conn.close()
5.删除数据
import pymysql

conn = pymysql.connect(user='root', password='000000', host='localhost', port=3306, database='python_test')

cur = conn.cursor()

sql = """

 delete from student where name = %s

"""

try:

    cur.execute(sql,'d')

    #cur.executemany(sql,[('3333','c',3),('4444','d',4)])

    conn.commit()

    print("删除成功")

except Exception as e:

    print(e)

    conn.rollback()

    print("删除失败")

finally:

    cur.close()

    conn.close()
6.查询数据
import pymysql

conn = pymysql.connect(user='root', password='000000', host='localhost', port=3306, database='python_test')

cur = conn.cursor()

sql = """

select * from student

"""

try:

    cur.execute(sql)

    #print(cur.fetchone())

    #print(cur.fetchmany(3))

    print(cur.fetchall())

except Exception as e:

    print(e)

finally:

    cur.close()

    conn.close()
7.模糊查询
import pymysql

conn = pymysql.connect(user='root', password='000000', host='localhost', port=3306, database='python_test')

cur = conn.cursor()

sql = """

select * from student where name like %s

"""

sql1 = "select * from student where name like '%%%s%%'"%'王'

try:

    print(sql1)

    cur.execute(sql1)

    #print(cur.fetchone())

    #print(cur.fetchmany(3))

    print(cur.fetchall())

except Exception as e:

    print(e)

finally:

    cur.close()

    conn.close()
python之数据库编程的更多相关文章
- 运用Python语言编写获取Linux基本系统信息(三):Python与数据库编程,把获取的信息存入数据库
运用Python语言编写获取Linux基本系统信息(三):Python与数据库编程 有关前两篇的链接: 运用Python语言编写获取Linux基本系统信息(一):获得Linux版本.内核.当前时间 运 ...
- python的数据库编程
数据库的基础知识 一.数据库的概念 数据库将大量数据按照一定的方式组织并存储起来,是相互关联的数据的集合.数据库中的数据不仅包括描述事物数据的本身,还包括相关数据之间的联系.数据库可以分为关系型数据库 ...
- Python学习系列(七)( 数据库编程)
Python学习系列(七)( 数据库编程) Python学习系列(六)(模块) 一,MySQL-Python插件 Python里操作MySQL数据库,需要Python下安装访 ...
- Python程序设计9——数据库编程
1 数据持久化 持久化是将内存中的对象存储在关系数据库中,当然也可以存储在磁盘文件.XML数据文件中.实现数据持久化至少需要实现以下3个接口 void Save(object o):把一个对象保存到外 ...
- python 闯关之路四(下)(并发编程与数据库编程) 并发编程重点
python 闯关之路四(下)(并发编程与数据库编程) 并发编程重点: 1 2 3 4 5 6 7 并发编程:线程.进程.队列.IO多路模型 操作系统工作原理介绍.线程.进程演化史.特点.区别 ...
- python 教程 第二十章、 数据库编程
第二十章. 数据库编程 环境设置 1).安装MySQL-python http://www.lfd.uci.edu/~gohlke/pythonlibs/ MySQL-python-1.2.3.win ...
- Python黑帽编程 2.0 第二章概述
Python黑帽编程 2.0 第二章概述 于 20世纪80年代末,Guido van Rossum发明了Python,初衷据说是为了打发圣诞节的无趣,1991年首次发布,是ABC语言的继承,同时也是一 ...
- Python金融应用编程(数据分析、定价与量化投资)
近年来,金融领域的量化分析越来越受到理论界与实务界的重视,量化分析的技术也取得了较大的进展,成为备受关注的一个热点领域.所谓金融量化,就是将金融分析理论与计算机编程技术相结合,更为有效的利用现代计算技 ...
- 使用Python管理数据库
使用Python管理数据库 这篇文章的主题是如何使用Python语言管理数据库,简化日常运维中频繁的.重复度高的任务,为DBA们腾出更多时间来完成更重要的工作.文章本身只提供一种思路,写的不是很全 ...
随机推荐
- JS 之循环 应用案例1
应用场景:将el-select下拉框的lab值,显示在下面的详情text框,见下图 用到了 el-select 传值,js循环判断options.code是否等于传进来的值,等于就break; tex ...
- U 跳转中加入变量参数的写法
href="{:U('Message/news?id='.$vo['messageid'].'')}" 就是在U方法里如果参数是变量就用 '.$i.'代替 {$i} <a h ...
- centos 服务
1,开机开启服务 # chkconfig vsftpd on
- OpenGL学习笔记(四)纹理
目录 要完成的纹理效果 纹理环绕方式 纹理过滤 多级渐远纹理 加载与创建纹理 stb_image库的使用方法 生成纹理对象 应用纹理 纹理单元 参考资料:OpenGL中文翻译 要完成的纹理效果 纹理是 ...
- Java面向对象03——类与对象的创建
类的创建与初始化对象 age: 以类的方式组织代码,以对象的组织(封装)数据 package oop.demon01.demon02; // 学生类(抽象模板) public class Stu ...
- C++ //多态 //静态多态:函数重载 和 运算符重载 属于静态多态 ,复用函数名 //动态多态:派生类和虚函数实现运行时多态
1 //多态 2 //静态多态:函数重载 和 运算符重载 属于静态多态 ,复用函数名 3 //动态多态:派生类和虚函数实现运行时多态 4 5 //静态多态和动态多态的区别 6 //静态多态的函数地址早 ...
- Unsatisfied dependency expressed through field 'rabbitTemplate'错误总结
1. 在springboot中整合RabbitMq的过程中,遇到如下错误:(截取部分) org.springframework.beans.factory.UnsatisfiedDependencyE ...
- k8s之数据存储-配置存储
ConfigMap configmap是一种比较特殊的存储卷,它的主要作用是用来存储配置信息的 创建configmap.yaml,内容如下 apiVersion: v1 kind: ConfigMap ...
- XSS之防御与绕过
很久之前的随笔讲过XSS的编码绕过的一些内容 本次侧重整理一下常见的防御思路,顺便补充一些针对性的绕过思路以及关于XSS个人想到的一些有趣的事情 开篇之前,先看一下XSS介绍(包括mXSS.uXSS. ...
- HTTP头参数详解及其中的危险
一.重要的头参数 user_agent 发出请求的用户信息 X-Forwarded-For 表示 HTTP 请求端真实 IP(格式:X-Forwarded-For: client, proxy1, p ...