Fiddler抓包一键生成代码
首先我们的需求场景是
用Fiddler抓到某个接口调用后,用代码来模拟调用,一般我们写代码会有3个步骤:
1设置http请求相关的参数:header,method,url,cookie等 2设置post的body(如果是post的话需要) 3拿到返回的body(一般我们需要拿到接口的返回体进行解析)
假如这3个步骤的代码全部都能一键生成那该多爽,我终于站在巨人的肩膀上搞定了!
搞定的效果如下图:
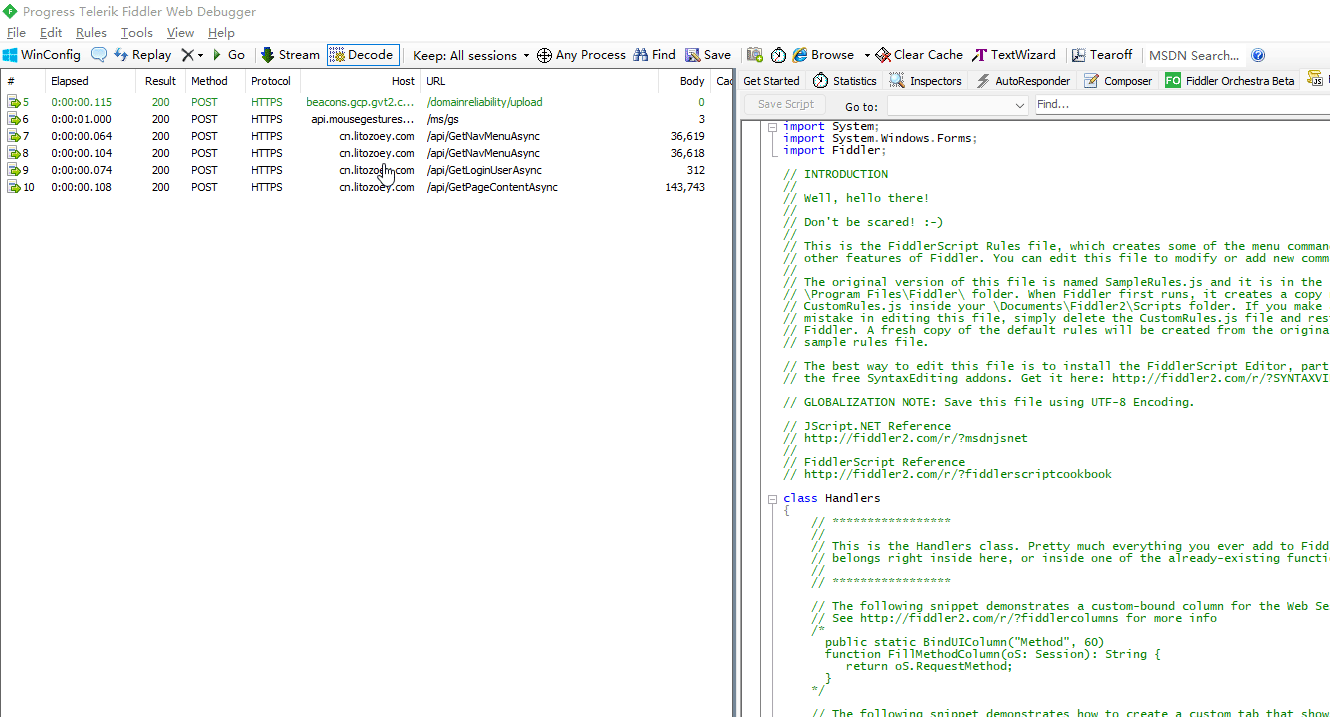
上面是对于csharp 采用自带的 HttpClient的代码生成演示,还可以针对java kotlin,python,nodejs等
本篇的主要功能都是在FiddlerScript里面完成,主要包含3块扩展
增加自定义右键菜单 增加控制开关 代码获取请求上下文并导出har 使用脚本完成process的封装并调用
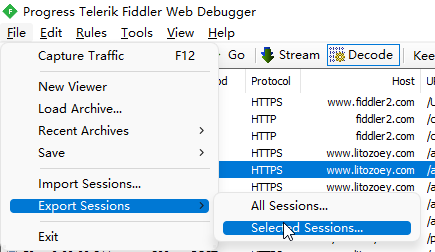
1. 增加右键菜单
点中某个Session然后点击右键菜单,选择生成指定语言的代码,这样使用起来最方便,如下图: 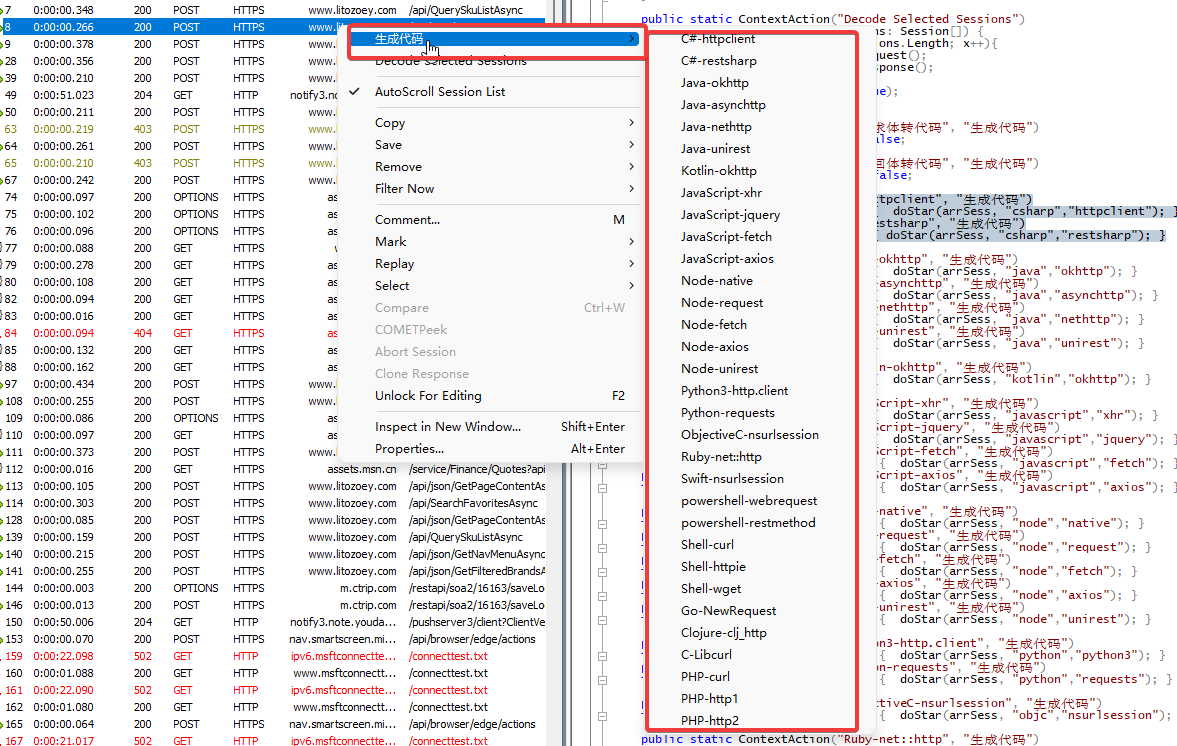
新增右键菜单的扩展方式是 【一个ContextAction+一个function】
例如:
 public static ContextAction("C#-httpclient", "生成代码")

 function do1(arrSess: Session[]) {  doStar(arrSess, "csharp","httpclient"); }
代表新增一个 一级菜单叫 生成代码,二级菜单叫 "C#-httpclient"
下面的function就是点击需要响应的方法实现,默认是Session数组,因为可以选择多个。
2. 控制开关
前面说有3个步骤,除了第一个步骤是核心的,其他2个步骤都是将json转为实体类定义,是辅助的。所以都设置开关可以人为控制要不要生成这2块的代码
如下图:
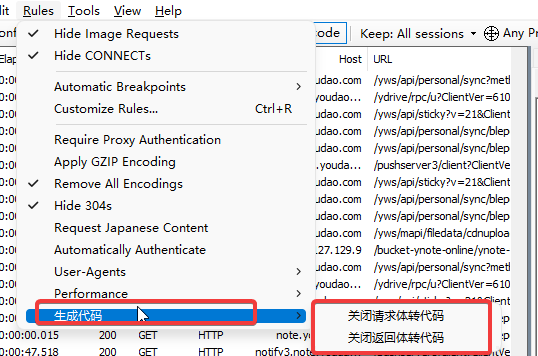
新增开关的方式是定义【一个RulesOption+一个对应接收的变量】
 public static RulesOption("关闭请求体转代码", "生成代码")

 var m_DisableReuqest: boolean = false;
代表新增一个 以及菜单叫生成代码,二级菜单叫 "关闭请求体转代码",类型是bool,因为下面对应接收的变量是布尔类型!
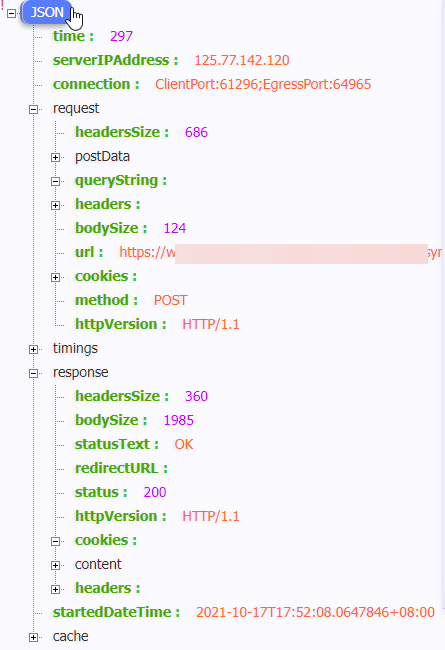
3. 通过选中Session拿到整个请求的上下文
上下文包括,请求的各种参数,比如url,header,method,request,response等
Fillder有一个api可以导出har文件,这个har格式是谷歌提出来的一个用来描述一个请求的标准定义
关于har格式的详细文档: http://groups.google.com/group/http-archive-specification/
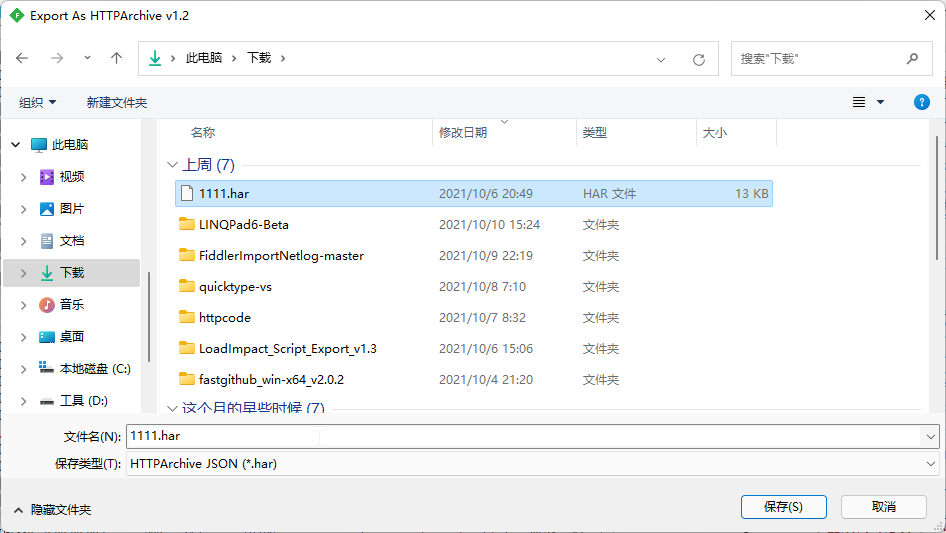
那如何在Fiddler里面将Session导出har呢

那用代码如何导出呢?
//这种方式为导出到变量 注意是Fiddler 4.6.2.0版本之后支持的

var oExportOptions = FiddlerObject.createDictionary();

oExportOptions.Add(“ExportToString”, “true”);

FiddlerApplication.DoExport("HTTPArchive v1.2", oSessions,oExportOptions, null);

//这个就是了

var sOutput: String = oExportOptions[“OutputAsString”];
//这种方式为导出到指定路径

var oExportOptions = FiddlerObject.createDictionary();

oExportOptions.Add("Filename", "对应的路径");

FiddlerApplication.DoExport("HTTPArchive v1.2", oSessions,oExportOptions, null);
这里我采用了第二种方式,先把选中的Session导出一个har文件,然后将这个har文件作为下一个process的入参,得到我想要结果!
下面隆重介绍根据har来生成请求代码的工具:httpsnippet
开源地址:https://github.com/Kong/httpsnippet
Kong的话有个很有有名的网关想必大家都听说过!
这里我已经把这个程序包装成在windows系统可以独立运行的exe了,可以在文章末尾获取下载链接。
这里我稍微改造了一下代码,把har文件的requestBody和responseBody也提取出来,为了是生成对应的POJO代码做入参.
将json生成实体类POJO这里用了另外一个工具:quicktype
开源地址:https://github.com/quicktype/quicktype
也包装成在windows系统可以独立运行的exe了。
好了,组装一起:
先通过代码生成har文件 然后用httpsnippet生成指定语言的代码,并导出har中的requestBody和responseBody 分别将requestBody和responseBody作为参数让quicktype生成实体类代码
整个的完整代码如下,按照如下步骤copy到fiddler的脚本编辑器中即可:
首先打开脚本编辑器:
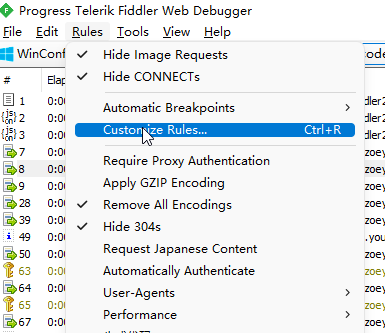
随便找到一个空白的地方,然后把下面的代码复制进去:
    public static RulesOption("关闭请求体转代码", "生成代码")

 var m_DisableReuqest: boolean = false;

 public static RulesOption("关闭返回体转代码", "生成代码")

 var m_DisableResponse: boolean = false;


 public static ContextAction("C#-httpclient", "生成代码")

 function do1(arrSess: Session[]) {  doStar(arrSess, "csharp","httpclient"); }

 public static ContextAction("C#-restsharp", "生成代码")

 function do2(arrSess: Session[]) { doStar(arrSess, "csharp","restsharp"); }

 public static ContextAction("Java-okhttp", "生成代码")

 function do3(arrSess: Session[]) {  doStar(arrSess, "java","okhttp"); }

 public static ContextAction("Java-asynchttp", "生成代码")

 function do4(arrSess: Session[]) {  doStar(arrSess, "java","asynchttp"); }

 public static ContextAction("Java-nethttp", "生成代码")

 function do5(arrSess: Session[]) {  doStar(arrSess, "java","nethttp"); }

 public static ContextAction("Java-unirest", "生成代码")

 function do6(arrSess: Session[]) {  doStar(arrSess, "java","unirest"); }

 public static ContextAction("Kotlin-okhttp", "生成代码")

 function do7(arrSess: Session[]) {  doStar(arrSess, "kotlin","okhttp"); }


 public static ContextAction("JavaScript-xhr", "生成代码")

 function do8(arrSess: Session[]) {  doStar(arrSess, "javascript","xhr"); }

 public static ContextAction("JavaScript-jquery", "生成代码")

 function do9(arrSess: Session[]) {  doStar(arrSess, "javascript","jquery"); }

 public static ContextAction("JavaScript-fetch", "生成代码")

 function do10(arrSess: Session[]) {  doStar(arrSess, "javascript","fetch"); }

 public static ContextAction("JavaScript-axios", "生成代码")

 function do11(arrSess: Session[]) {  doStar(arrSess, "javascript","axios"); }


 public static ContextAction("Node-native", "生成代码")

 function do12(arrSess: Session[]) {  doStar(arrSess, "node","native"); }

 public static ContextAction("Node-request", "生成代码")

 function do13(arrSess: Session[]) {  doStar(arrSess, "node","request"); }

 public static ContextAction("Node-fetch", "生成代码")

 function do14(arrSess: Session[]) {  doStar(arrSess, "node","fetch"); }

 public static ContextAction("Node-axios", "生成代码")

 function do15(arrSess: Session[]) {  doStar(arrSess, "node","axios"); }

 public static ContextAction("Node-unirest", "生成代码")

 function do16(arrSess: Session[]) {  doStar(arrSess, "node","unirest"); }


 public static ContextAction("Python3-http.client", "生成代码")

 function do17(arrSess: Session[]) {  doStar(arrSess, "python","python3"); }

 public static ContextAction("Python-requests", "生成代码")

 function do18(arrSess: Session[]) {  doStar(arrSess, "python","requests"); }


 public static ContextAction("ObjectiveC-nsurlsession", "生成代码")

 function do19(arrSess: Session[]) {  doStar(arrSess, "objc","nsurlsession"); }

 public static ContextAction("Ruby-net::http", "生成代码")

 function do20(arrSess: Session[]) {  doStar(arrSess, "ruby","native"); }

 public static ContextAction("Swift-nsurlsession", "生成代码")

 function do21(arrSess: Session[]) {  doStar(arrSess, "swift","nsurlsession"); }


 public static ContextAction("powershell-webrequest", "生成代码")

 function do22(arrSess: Session[]) {  doStar(arrSess, "powershell","webrequest"); }

 public static ContextAction("powershell-restmethod", "生成代码")

 function do23(arrSess: Session[]) {  doStar(arrSess, "powershell","restmethod"); }

 public static ContextAction("Shell-curl", "生成代码")

 function do24(arrSess: Session[]) {  doStar(arrSess, "shell","curl"); }

 public static ContextAction("Shell-httpie", "生成代码")

 function do25(arrSess: Session[]) {  doStar(arrSess, "shell","httpie"); }

 public static ContextAction("Shell-wget", "生成代码")

 function do26(arrSess: Session[]) {  doStar(arrSess, "shell","wget"); }


 public static ContextAction("Go-NewRequest", "生成代码")

 function do27(arrSess: Session[]) { doStar(arrSess, "go","native"); }


 public static ContextAction("Clojure-clj_http", "生成代码")

 function do28(arrSess: Session[]) { doStar(arrSess, "clojure","clj_http"); }

 public static ContextAction("C-Libcurl", "生成代码")

 function do29(arrSess: Session[]) { doStar(arrSess, "c","libcurl"); }


 public static ContextAction("PHP-curl", "生成代码")

 function do30(arrSess: Session[]) {  doStar(arrSess, "php","curl"); }

 public static ContextAction("PHP-http1", "生成代码")

 function do31(arrSess: Session[]) {  doStar(arrSess, "php","http1"); }

 public static ContextAction("PHP-http2", "生成代码")

 function do32(arrSess: Session[]) {  doStar(arrSess, "php","http2"); }


 public static function doStar(oSessions: Session[], target: String,client:String) {

     //注意看这里,请下载我给的这2个exe并替换成你电脑中正确的目录

  var httpsnippet = "E:\\workspace\\github\\test\\httpsnippet.exe";

  var quicktype = "E:\\workspace\\github\\test\\quicktype.exe";

  var oExportOptions = FiddlerObject.createDictionary();

  var tempPath2 = System.IO.Path.Combine(System.IO.Path.GetTempPath(), "fiddler.har");

  if(System.IO.File.Exists(tempPath2)){

   System.IO.File.Delete(tempPath2);

  }

  var tempPath = System.IO.Path.Combine(System.IO.Path.GetTempPath(), "fiddler.json");

  if(System.IO.File.Exists(tempPath)){

   System.IO.File.Delete(tempPath);

  }

  var tempRequestBodyPath = System.IO.Path.Combine(System.IO.Path.GetTempPath(), "fiddler_requestBody.json");

  if(System.IO.File.Exists(tempRequestBodyPath)){

   System.IO.File.Delete(tempRequestBodyPath);

  }

  var tempResponseBodyPath = System.IO.Path.Combine(System.IO.Path.GetTempPath(), "fiddler_responseBody.json");

  if(System.IO.File.Exists(tempResponseBodyPath)){

   System.IO.File.Delete(tempResponseBodyPath);

  }

  oExportOptions.Add("Filename", tempPath2);

  FiddlerApplication.DoExport("HTTPArchive v1.2", oSessions,oExportOptions, null);

  System.IO.File.Move(tempPath2, tempPath);

  if(!System.IO.File.Exists(tempPath)){

   MessageBox.Show("生成代码失败", "No action");

   return;

  }

  var rtPath = System.IO.Path.Combine(System.IO.Path.GetTempPath(), "fiddler_rt");

  if(System.IO.Directory.Exists(rtPath))System.IO.Directory.Delete(rtPath,true);

  if(!doProcess(httpsnippet, "\""+tempPath+"\" -t "+target+" -c "+client+" -o " + "\""+rtPath+"\"")){

   MessageBox.Show("生成代码错误", "No action");

   return;

  }

  var file = System.IO.Directory.GetFiles(rtPath);

  if(file.Length!=1){

   MessageBox.Show("生成代码错误", "No action");

   return;

  }

  var json = System.IO.File.ReadAllText(file[0]);

  System.IO.File.Delete(file[0]);

  var rtPath1 = System.IO.Path.Combine(System.IO.Path.GetTempPath(), "fiddler_request_body");

  if(System.IO.File.Exists(rtPath1))System.IO.File.Delete(rtPath1);

  if(!m_DisableReuqest && System.IO.File.Exists(tempRequestBodyPath)){


   json += getJsonCode(quicktype,tempRequestBodyPath,rtPath,rtPath1,target,"FiddlerRequest");

  }

  rtPath1 = System.IO.Path.Combine(System.IO.Path.GetTempPath(), "fiddler_response_body");

  if(System.IO.File.Exists(rtPath1))System.IO.File.Delete(rtPath1);

  if(!m_DisableResponse && System.IO.File.Exists(tempResponseBodyPath)){

   json += getJsonCode(quicktype,tempResponseBodyPath,rtPath,rtPath1,target, "FiddlerReponse");

  }


  Clipboard.SetText(json);

  MessageBox.Show("代码生成成功,已复制到剪贴板");

 }


 static function getJsonCode(file: String,tempRequestBodyPath:String,rtPath:String,rtPath1:String,target:String,type:String): String {

  var json = "";

  var tmp1 = "";

  if(target == 'csharp'){

   tmp1 = "--quiet --telemetry disable --features just-types --array-type list --no-check-required --namespace \"Fiddlers\" --lang \"" + target + "\" --top-level \""+type+"Model\" \"" + tempRequestBodyPath + "\"" +" -o " + "\""+rtPath1+"\"";

  }

  else if(target == 'kotlin'){

   tmp1 = "--quiet --telemetry disable --framework just-types --lang \"" + target + "\" --top-level \""+type+"Model\" \"" + tempRequestBodyPath + "\"" +" -o " + "\""+rtPath1+"\"";

  }

  else if(target == 'java'){

   tmp1 = "--quiet --telemetry disable --array-type list --just-types --package \"Fiddlers\" --lang \"" + target + "\" --top-level \""+type+"Model\" \"" + tempRequestBodyPath + "\"" +" -o " + "\""+rtPath+"\\test"+"\"";


  }

  else {

   tmp1 = "--telemetry disable --just-types  --lang \"" + target + "\" --top-level \""+type+"Models\" \"" + tempRequestBodyPath + "\"" +" -o " + "\""+rtPath1+"\"";

  }


  doProcess(file, tmp1)

  if(System.IO.File.Exists(rtPath1)){

   json += "\r\n//"+type+"-POJO\r\n" + System.IO.File.ReadAllText(rtPath1).Replace("package quicktype","");

  }


  if(target == 'java'){

   var javaFiles = System.IO.Directory.GetFiles(rtPath,"*.java");

   if(javaFiles.Length>0){

    json += "\r\n//"+type+"-POJO\r\n" ;

    for (var i:int = 0; i<javaFiles.Length; i++)

    {

     json += System.IO.File.ReadAllText(javaFiles[i]).Replace("package Fiddlers;","")

     System.IO.File.Delete(javaFiles[i]);

    }

   }

  }

  return json;

 }


 static function doProcess(file: String,paramsList:String): Boolean {

  var process = new System.Diagnostics.Process();

  process.StartInfo.FileName = file;

  process.StartInfo.Arguments = paramsList;

  process.StartInfo.CreateNoWindow = true;

  process.StartInfo.WindowStyle = System.Diagnostics.ProcessWindowStyle.Hidden;

  process.StartInfo.UseShellExecute = false;

  process.StartInfo.Verb = "runas";

  process.StartInfo.RedirectStandardError = true;

  process.StartInfo.RedirectStandardOutput = true;

  process.Start();

  process.WaitForExit();

  process.Dispose();

  return true;

 }
然后下载:httpsnippet和quicktype这2个可执行文件。获取下载地址的方法:关注文末公众号后发送文本 :Fiddler ,会告诉你百度网盘链接!
下载zip包后然后把这2个文件解压到你的电脑的某个目录。
在回到脚本中找到 doStar 方法中修改成正确的目录。
Enjoy!!!
关注公众号一起学习

Fiddler抓包一键生成代码的更多相关文章
- 关于fiddler抓包一键生成python脚本
本人贡献一篇关于抓包转换成脚本的文章 步骤一 打开fiddler,抓到包之后,保存成txt文件 步骤二 脚本里str_filename改成保存的文件名 步骤三 执行脚本一键转换 附上脚本,感谢关注~ ...
- Fiddler抓包调试前端脚本代码
0.写在前面的话 之前看了阮一峰老师关于互联网协议入门的博客,受益匪浅,接着再去体会了下HTTP协议,就想着看实际网络访问中的那些HTTP请求头和响应是什么样的.Chrome的调试工具的Network ...
- jmeter+Fiddler:通过Fiddler抓包生成jmeter脚本
Fiddler是目前最常用的抓包工具之一,它作为客户端和服务器端之间的代理,记录客户端和服务器之间的所有请求(http/https),可以针对特定的请求过滤,分析请求和响应的数据.设置断点.调试.修改 ...
- Python+Requests接口测试教程(1):Fiddler抓包工具
本书涵盖内容:fiddler.http协议.json.requests+unittest+报告.bs4.数据相关(mysql/oracle/logging)等内容.刚买须知:本书是针对零基础入门接口测 ...
- fiddler抓包详解
image.png 前言 fiddler是一个很好的抓包工具,默认是抓http请求的,对于pc上的https请求,会提示网页不安全,这时候需要在浏览器上安装证书. 一.网页不安全 1.用fiddler ...
- Fiddler抓包工具介绍
Fiddler官网 https://www.telerik.com/download/fiddler Fiddler原理 当你打开Fiddler工具的时候你会发现你浏览器的代理服务器被添加了127.0 ...
- Fiddler抓包实用非常详细,学会不要去做坏事~
为什么要先学fiddler?学习接口测试必学http协议,如果直接先讲协议,我估计小伙伴们更懵,为了更好的理解协议,先从抓包开始.结合抓包工具讲http协议更容易学一些. 抓firefox上https ...
- Fiddler抓包工具使用详解
一.Fiddler简介 Fiddler是最强大最好用的Web调试工具之一, 它能记录所有客户端和服务器的http和https请求.允许你监视.设置断点.甚至修改输入输出数据.Fiddler包含了一个强 ...
- Fiddler抓取https请求 & Fiddler抓包工具常用功能详解
Fiddler抓取https请求 & Fiddler抓包工具常用功能详解 先来看一个小故事: 小T在测试APP时,打开某个页面展示异常,于是就跑到客户端开发小A那里说:“你这个页面做的有问 ...
随机推荐
- 一、docker部署Jenkins
1.部署启动脚本: [root@node10 docker-data]# cat start.sh docker run -d \ --restart=unless-stopped \ -v /opt ...
- struts2的初步认识
Struts2是一个基于MVC设计模式的Web应用框架,它本质上相当于一个servlet,在MVC设计模式中,Struts2作为控制器(Controller)来建立模型与视图的数据交互. 一. Str ...
- Linux下SSH以及SSH秘钥
一.基于秘钥方式实现远程连接 第一步:创建密钥对(在管理端服务器上操作) 中间的输入项可以直接回车 ssh-keygen -t dsa 第二步:分发公钥(在管理端服务器执行) 这个步骤需要输入一个ye ...
- 20210713考试-2021noip13
这位巨佬的博客还是比我好多了 T1 工业题 考场: 暴力挺香的,不想正解了. 题解: $f(i,j)$ 只会得到 $f(i-1,j)$ 和 $f(i,j-1)$ 的贡献.每向右一步乘 $a$ ,向下一 ...
- Python - 如何将 list 列表作为数据结构使用
列表作为栈使用 栈的特点 先进后出,后进先出 如何模拟栈? 先在堆栈尾部添加元素,使用 append() 然后从堆栈顶部取出一个元素,使用 pop() # 模拟栈 stack = [1, 2, 3, ...
- GoLang设计模式06 - 对象池模式
这次介绍最后一个创建型模式--对象池模式.顾名思义,对象池模式就是预先初始化创建好多个对象,并将之保存在一个池子里.当需要的时候,客户端就可以从池子里申请一个对象使用,使用完以后再将之放回到池子里.池 ...
- JS020. Array map()函数查到需要的元素时跳出遍历循环,不再执行到数组边界
Array.prototype.map() map( ) 方法创建一个 新数组 *,其结果是该数组中的每个元素是调用一次提供的 函数后的返回值 *.[ MDN / RUNOOB ] * map 添加 ...
- 生成随机uuid
/** * 生成随机uuid */ export function uuid() { return 'xxxxxxxx-xxxx-4xxx-yxxx-xxxxxxxxxxxx'.repla ...
- Java环境搭建与HelloWprld—改变世界的第一步
1. JDK下载 访问oracle官网:http://www.oracle.com 在首页点击Downloads,进入oracle软件下载页. 在下载页面,点击Java. 选择Java (JDK) f ...
- webpack learn4-1配置css单独分离打包
1 先安装extract-text-webpack-plugin npm i extract-text-webpack-plugin 2 配置webpack.config.js