深入理解 Android ANR 触发原理以及信息收集过程
一、概述
作为 Android 开发者,相信大家都遇到过 ANR。那么为什么会出现 ANR 呢,ANR 之后系统都做了啥。文章将对这个问题详细解说。
ANR(Application Not responding),是指应用程序未响应,Android系统对于一些事件需要在一定的时间范围内完成,如果超过预定时间能未能得到有效响应或者响应时间过长,都会造成ANR。一般地,这时往往会弹出一个提示框,告知用户当前xxx未响应,用户可选择继续等待或者Force Close。
那么哪些场景会造成ANR呢?
Service Timeout:比如前台服务在20s内未执行完成;
BroadcastQueue Timeout:比如前台广播在10s内未执行完成
ContentProvider Timeout:内容提供者,在publish过超时10s;
InputDispatching Timeout: 输入事件分发超时5s,包括按键和触摸事件。
触发ANR的过程可分为三个步骤: 埋炸弹, 拆炸弹, 引爆炸弹。
埋炸弹可以理解为发送了一个延迟触发的消息(炸弹);
拆炸弹可以理解为将这个延迟消息(炸弹)取消了,也就不会触发了;
引爆炸弹可以理解为延迟时间已达,开始处理延迟消息(炸弹引爆了)。
二、Service
先附上一张 service 启动流程图:

Service Timeout是位于”ActivityManager”线程中的AMS.MainHandler收到SERVICE_TIMEOUT_MSG消息时触发。
对于Service有两类:
- 对于前台服务,则超时为SERVICE_TIMEOUT = 20s;
- 对于后台服务,则超时为SERVICE_BACKGROUND_TIMEOUT = 200s
由变量ProcessRecord.execServicesFg来决定是否前台启动。
2.1 埋炸弹
其中在Service进程attach到system_server进程的过程中会调用realStartServiceLocked()方法来埋下炸弹.
首先咱们先看 service 的启动中一个方法 realStartServiceLocked:
// ActiveServices.java

private final void realStartServiceLocked(ServiceRecord r, ProcessRecord app, boolean execInFg) throws RemoteException {

    ...

    //发送delay消息(SERVICE_TIMEOUT_MSG)

    bumpServiceExecutingLocked(r, execInFg, "create");

    try {

        ...

        //最终执行服务的onCreate()方法

        app.thread.scheduleCreateService(r, r.serviceInfo,

                mAm.compatibilityInfoForPackageLocked(r.serviceInfo.applicationInfo),

                app.repProcState);

    } catch (DeadObjectException e) {

        mAm.appDiedLocked(app);

        throw e;

    } finally {

        ...

    }

}

private final void bumpServiceExecutingLocked(ServiceRecord r, boolean fg, String why) {

    ...

    scheduleServiceTimeoutLocked(r.app);

}

void scheduleServiceTimeoutLocked(ProcessRecord proc) {

    if (proc.executingServices.size() == 0 || proc.thread == null) {

        return;

    }

    long now = SystemClock.uptimeMillis();

    Message msg = mAm.mHandler.obtainMessage(

            ActivityManagerService.SERVICE_TIMEOUT_MSG);

    msg.obj = proc;

    //当超时后仍没有remove该SERVICE_TIMEOUT_MSG消息,则执行service Timeout流程

    mAm.mHandler.sendMessageAtTime(msg,

        proc.execServicesFg ? (now+SERVICE_TIMEOUT) : (now+ SERVICE_BACKGROUND_TIMEOUT));

}
在 AS.realStartServiceLocked 启动 service 方法中,发送了了一个延时的关于超时的消息,这里又对 service 进行了前后台的区分:
    // How long we wait for a service to finish executing. 20s

    static final int SERVICE_TIMEOUT = 20*1000;

    // How long we wait for a service to finish executing. 200s

    static final int SERVICE_BACKGROUND_TIMEOUT = SERVICE_TIMEOUT * 10;
2.2 拆炸弹
AS.realStartServiceLocked() 调用的过程会埋下一颗炸弹, 超时没有启动完成则会爆炸. 那么什么时候会拆除这颗炸弹的引线呢? 经过Binder等层层调用进入目标进程的主线程handleCreateService()的过程.
// ActivityThread,这里多说一句, ApplicationThread 是其内部类

private void handleCreateService(CreateServiceData data) {

        ...

        java.lang.ClassLoader cl = packageInfo.getClassLoader();

        Service service = (Service) cl.loadClass(data.info.name).newInstance();

        ...

        try {

            //创建ContextImpl对象

            ContextImpl context = ContextImpl.createAppContext(this, packageInfo);

            context.setOuterContext(service);

            //创建Application对象

            Application app = packageInfo.makeApplication(false, mInstrumentation);

            service.attach(context, this, data.info.name, data.token, app,

                    ActivityManagerNative.getDefault());

            //调用服务onCreate()方法

            service.onCreate();

            //

            ActivityManagerNative.getDefault().serviceDoneExecuting(

                    data.token, SERVICE_DONE_EXECUTING_ANON, 0, 0);

        } catch (Exception e) {

            ...

        }

    }
在这个过程会创建目标服务对象,以及回调 onCreate() 方法, 紧接再次经过多次调用回到 system_server 来执行 serviceDoneExecuting 。
// ActiveServices

private void serviceDoneExecutingLocked(ServiceRecord r, boolean inDestroying, boolean finishing) {

    ...

    if (r.executeNesting <= 0) {

        if (r.app != null) {

            r.app.execServicesFg = false;

            r.app.executingServices.remove(r);

            if (r.app.executingServices.size() == 0) {

                //当前服务所在进程中没有正在执行的service

                mAm.mHandler.removeMessages(ActivityManagerService.SERVICE_TIMEOUT_MSG, r.app);

        ...

    }

    ...

}
// How long we wait for a service to finish executing.
static final int SERVICE_TIMEOUT = 20*1000;
该方法会在 service 启动完成后移除服务超时消息 SERVICE_TIMEOUT_MSG,时间是 20s。
2.3 引爆炸弹
前面介绍了埋炸弹和拆炸弹的过程, 如果在炸弹倒计时结束之前成功拆卸炸弹,那么就没有爆炸的机会, 但是世事难料. 总有些极端情况下无法即时拆除炸弹,导致炸弹爆炸, 其结果就是 App 发生 ANR. 接下来,带大家来看看炸弹爆炸的现场:
在 system_server 进程中有一个Handler线程,当倒计时结束便会向该 Handler 线程发送一条信息SERVICE_TIMEOUT_MSG,
  // ActivityManagerService.java ::MainHandler

 final class MainHandler extends Handler {

        public MainHandler(Looper looper) {

            super(looper, null, true);

        }

        @Override

        public void handleMessage(Message msg) {

            switch (msg.what) {

        ......case SERVICE_TIMEOUT_MSG: {

                mServices.serviceTimeout((ProcessRecord)msg.obj);

            } break;

     }

}
当延时时间到了之后,就会对消息进行处理,下面看下具体处理逻辑:
oid serviceTimeout(ProcessRecord proc) {

    String anrMessage = null;

    synchronized(mAm) {

        if (proc.executingServices.size() == 0 || proc.thread == null) {

            return;

        }

        final long now = SystemClock.uptimeMillis();

        final long maxTime =  now -

                (proc.execServicesFg ? SERVICE_TIMEOUT : SERVICE_BACKGROUND_TIMEOUT);

        ServiceRecord timeout = null;

        long nextTime = 0;

        for (int i=proc.executingServices.size()-1; i>=0; i--) {
       // 从进程里面获取正在运行的 service

            ServiceRecord sr = proc.executingServices.valueAt(i);

            if (sr.executingStart < maxTime) {

                timeout = sr;

                break;

            }

            if (sr.executingStart > nextTime) {

                nextTime = sr.executingStart;

            }

        }

        if (timeout != null && mAm.mLruProcesses.contains(proc)) {

            Slog.w(TAG, "Timeout executing service: " + timeout);

            StringWriter sw = new StringWriter();

            PrintWriter pw = new FastPrintWriter(sw, false, 1024);

            pw.println(timeout);

            timeout.dump(pw, " ");

            pw.close();

            mLastAnrDump = sw.toString();

            mAm.mHandler.removeCallbacks(mLastAnrDumpClearer);

            mAm.mHandler.postDelayed(mLastAnrDumpClearer, LAST_ANR_LIFETIME_DURATION_MSECS);

            anrMessage = "executing service " + timeout.shortName;

        }

    }

    if (anrMessage != null) {

        //当存在timeout的service,则执行appNotResponding

        mAm.appNotResponding(proc, null, null, false, anrMessage);

    }

}
其中anrMessage的内容为”executing service [发送超时serviceRecord信息]”;
2.4 前台与后台服务的区别
系统对前台服务启动的超时为20s,而后台服务超时为200s,那么系统是如何区别前台还是后台服务呢?来看看ActiveServices的核心逻辑:
ComponentName startServiceLocked(...) {

    final boolean callerFg;

    if (caller != null) {

        final ProcessRecord callerApp = mAm.getRecordForAppLocked(caller);

        callerFg = callerApp.setSchedGroup != ProcessList.SCHED_GROUP_BACKGROUND;

    } else {

        callerFg = true;

    }

    ...

    ComponentName cmp = startServiceInnerLocked(smap, service, r, callerFg, addToStarting);

    return cmp;

}
在startService过程根据发起方进程 callerApp 所属的进程调度组来决定被启动的服务是属于前台还是后台。当发起方进程不等于ProcessList.SCHED_GROUP_BACKGROUND (后台进程组) 则认为是前台服务,否则为后台服务,并标记在ServiceRecord的成员变量createdFromFg。
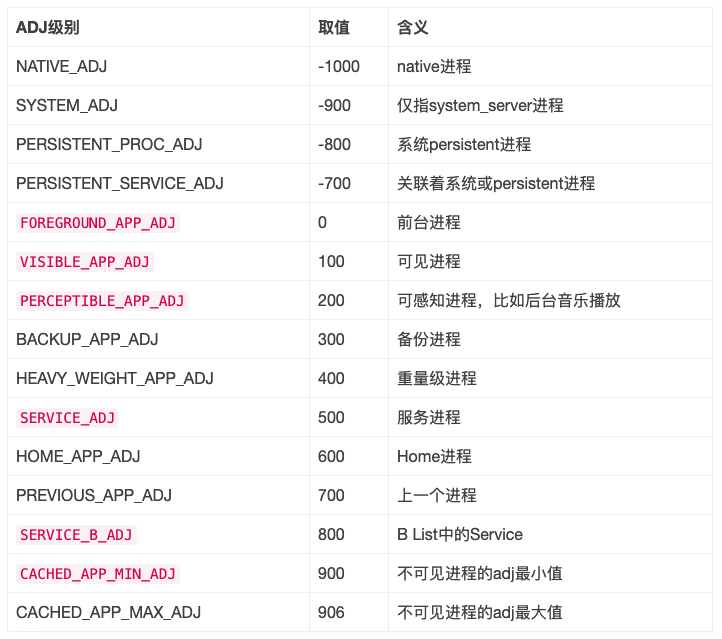
什么进程属于SCHED_GROUP_BACKGROUND调度组呢?进程调度组大体可分为TOP、前台、后台,进程优先级(Adj)和进程调度组(SCHED_GROUP)算法较为复杂,其对应关系可粗略理解为Adj等于0的进程属于Top进程组,Adj等于100或者200的进程属于前台进程组,Adj大于200的进程属于后台进程组。关于Adj的含义见下表,简单来说就是Adj>200的进程对用户来说基本是无感知,主要是做一些后台工作,故后台服务拥有更长的超时阈值,同时后台服务属于后台进程调度组,相比前台服务属于前台进程调度组,分配更少的CPU时间片。
前台服务准确来说,是指由处于前台进程调度组的进程发起的服务。这跟常说的fg-service服务有所不同,fg-service是指挂有前台通知的服务。
需要注意的问题,如果日志中出现 Reason: executing service com.example.baidu/.AnrService 也不一定是因为服务本身耗时导致,比如启动服务后,执行了耗时的操作,启动服务时onCreate函数或者 onStartCommand函数不能执行,超时后,仍然会造成anr
三、BroadcastReceiver
BroadcastReceiver Timeout 是位于”ActivityManager”线程中的BroadcastQueue.BroadcastHandler收到BROADCAST_TIMEOUT_MSG消息时触发。
对于广播队列有两个: foreground 队列和 background 队列:
- 对于前台广播,则超时为 BROADCAST_FG_TIMEOUT = 10s;
- 对于后台广播,则超时为 BROADCAST_BG_TIMEOUT = 60s
3.1 埋炸弹
先看发送广播的逻辑:
// ActivityManagerService.java]

public final int broadcastIntent(IApplicationThread caller,

            Intent intent, String resolvedType, IIntentReceiver resultTo,

            int resultCode, String resultData, Bundle resultExtras,

            String[] requiredPermissions, int appOp, Bundle bOptions,

            boolean serialized, boolean sticky, int userId) {

        enforceNotIsolatedCaller("broadcastIntent");

        synchronized(this) {
       // 验证广播的有效性

            intent = verifyBroadcastLocked(intent);

       // 获取发送广播的进程信息

            final ProcessRecord callerApp = getRecordForAppLocked(caller);

            final int callingPid = Binder.getCallingPid();

            final int callingUid = Binder.getCallingUid();

            final long origId = Binder.clearCallingIdentity();

            try {

                return broadcastIntentLocked(callerApp,

                        callerApp != null ? callerApp.info.packageName : null,

                        intent, resolvedType, resultTo, resultCode, resultData, resultExtras,

                        requiredPermissions, appOp, bOptions, serialized, sticky,

                        callingPid, callingUid, callingUid, callingPid, userId);

            } finally {

                Binder.restoreCallingIdentity(origId);

            }

        }

    }
broadcastIntent()方法有两个布尔参数 serialized 和 sticky 来共同决定是普通广播,有序广播,还是 Sticky 广播,参数如下:
| 类型 | serialized | sticky |
|---|---|---|
| sendBroadcast | false | false |
| sendOrderedBroadcast | true | false |
| sendStickyBroadcast | false | true |
说完发送广播,接下去就要讲讲讲收广播的操作了。
首先广播发出去之后,肯定会存在一个队列里面来进行处理。
// ActivityManagerService

  public ActivityManagerService(Context systemContext, ActivityTaskManagerService atm) {

    // ...... 创建了三个队列来保存不同的广播类型

        mFgBroadcastQueue = new BroadcastQueue(this, mHandler,

                "foreground", foreConstants, false);

        mBgBroadcastQueue = new BroadcastQueue(this, mHandler,

                "background", backConstants, true);

        mOffloadBroadcastQueue = new BroadcastQueue(this, mHandler,

                "offload", offloadConstants, true);

        mBroadcastQueues[0] = mFgBroadcastQueue;

        mBroadcastQueues[1] = mBgBroadcastQueue;

        mBroadcastQueues[2] = mOffloadBroadcastQueue;

}
在 ams 的构造函数里面,可以发现这里对广播进行了分类,分别有前台广播,后台广播,Offload 广播,并用一个新的数组将这三个队列放在一起。这里的 handler 是 MainHandler,也就是主线程的。传入是为了获取其 looper 。
    BroadcastQueue(ActivityManagerService service, Handler handler,

            String name, BroadcastConstants constants, boolean allowDelayBehindServices) {

        mService = service;
     // 广播的 handler 主要是获取到 ams 中 handler looper 来创建的

        mHandler = new BroadcastHandler(handler.getLooper());

        mQueueName = name;

        mDelayBehindServices = allowDelayBehindServices;

        mConstants = constants;

        mDispatcher = new BroadcastDispatcher(this, mConstants, mHandler, mService);

    }
下面就说下处理广播的逻辑:
    private final class BroadcastHandler extends Handler {

        public BroadcastHandler(Looper looper) {

            super(looper, null, true);

        }

        @Override

        public void handleMessage(Message msg) {

            switch (msg.what) {

                case BROADCAST_INTENT_MSG: {

                    if (DEBUG_BROADCAST) Slog.v(

                            TAG_BROADCAST, "Received BROADCAST_INTENT_MSG ["

                            + mQueueName + "]");
            // 开始处理广播

                    processNextBroadcast(true);

                } break;

                case BROADCAST_TIMEOUT_MSG: {

                    synchronized (mService) {

                        broadcastTimeoutLocked(true);

                    }

                } break;

            }

        }

    }
可以发现这里调用的是 processNextBroadcast 方法来处理广播。
final void processNextBroadcast(boolean fromMsg) {

    synchronized(mService) {

        //part1: 处理并行广播

        while (mParallelBroadcasts.size() > 0) {

            r = mParallelBroadcasts.remove(0);

            r.dispatchTime = SystemClock.uptimeMillis();

            r.dispatchClockTime = System.currentTimeMillis();

            final int N = r.receivers.size();

            for (int i=0; i<N; i++) {

                Object target = r.receivers.get(i);

                //分发广播给已注册的receiver

                deliverToRegisteredReceiverLocked(r, (BroadcastFilter)target, false);

            }

            addBroadcastToHistoryLocked(r);//将广播添加历史统计

        }

        //part2: 处理当前有序广播

        do {

            if (mOrderedBroadcasts.size() == 0) {

                mService.scheduleAppGcsLocked(); //没有更多的广播等待处理

                if (looped) {

                    mService.updateOomAdjLocked();

                }

                return;

            }

            r = mOrderedBroadcasts.get(0); //获取串行广播的第一个广播

            boolean forceReceive = false;

            int numReceivers = (r.receivers != null) ? r.receivers.size() : 0;

            if (mService.mProcessesReady && r.dispatchTime > 0) {

                long now = SystemClock.uptimeMillis();

                if ((numReceivers > 0) && (now > r.dispatchTime + (2*mTimeoutPeriod*numReceivers))) {

                    broadcastTimeoutLocked(false); //当广播处理时间超时,则强制结束这条广播

                }

            }

            ...

            if (r.receivers == null || r.nextReceiver >= numReceivers

                    || r.resultAbort || forceReceive) {

                if (r.resultTo != null) {

                    //处理广播消息消息,调用到onReceive()

                    performReceiveLocked(r.callerApp, r.resultTo,

                        new Intent(r.intent), r.resultCode,

                        r.resultData, r.resultExtras, false, false, r.userId);

                }

                cancelBroadcastTimeoutLocked(); //取消BROADCAST_TIMEOUT_MSG消息

                addBroadcastToHistoryLocked(r);

                mOrderedBroadcasts.remove(0);

                continue;

            }

        } while (r == null);

        //part3: 获取下一个receiver

        r.receiverTime = SystemClock.uptimeMillis();

        if (recIdx == 0) {

            r.dispatchTime = r.receiverTime;

            r.dispatchClockTime = System.currentTimeMillis();

        }

        if (!mPendingBroadcastTimeoutMessage) {

            long timeoutTime = r.receiverTime + mTimeoutPeriod;

            setBroadcastTimeoutLocked(timeoutTime); //设置广播超时延时消息

        }

        //part4: 处理下条有序广播

        ProcessRecord app = mService.getProcessRecordLocked(targetProcess,

                info.activityInfo.applicationInfo.uid, false);

        if (app != null && app.thread != null) {

            app.addPackage(info.activityInfo.packageName,

                    info.activityInfo.applicationInfo.versionCode, mService.mProcessStats);

            processCurBroadcastLocked(r, app); //[处理串行广播]

            return;

            ...

        }

        //该receiver所对应的进程尚未启动,则创建该进程

        if ((r.curApp=mService.startProcessLocked(targetProcess,

                info.activityInfo.applicationInfo, true,

                r.intent.getFlags() | Intent.FLAG_FROM_BACKGROUND,

                "broadcast", r.curComponent,

                (r.intent.getFlags()&Intent.FLAG_RECEIVER_BOOT_UPGRADE) != 0, false, false))

                        == null) {

            ...

            return;

        }

    }

}
对于广播超时处理时机:
首先在part3的过程中setBroadcastTimeoutLocked(timeoutTime) 设置超时广播消息;
然后在part2根据广播处理情况来处理:
当广播接收者等待时间过长,则调用 broadcastTimeoutLocked(false);也就是引爆炸弹
当执行完广播,则调用 cancelBroadcastTimeoutLocked; 也就是拆除炸弹
// BroadcastQueue

final void setBroadcastTimeoutLocked(long timeoutTime) {

    if (! mPendingBroadcastTimeoutMessage) {

        Message msg = mHandler.obtainMessage(BROADCAST_TIMEOUT_MSG, this);

        mHandler.sendMessageAtTime(msg, timeoutTime);

        mPendingBroadcastTimeoutMessage = true;

    }

}
设置定时广播 BROADCAST_TIMEOUT_MSG,即当前往后推 mTimeoutPeriod 时间广播还没处理完毕,则进入广播超时流程。
    // BroadcastConstants.java


   private static final long DEFAULT_TIMEOUT = 10_000;

    // Timeout period for this broadcast queue

    public long TIMEOUT = DEFAULT_TIMEOUT;

    // Unspecified fields retain their current value rather than revert to default 超时时间还是可以设置的

    TIMEOUT = mParser.getLong(KEY_TIMEOUT, TIMEOUT);
来看下具体时间的设置,超时设置的是 10 s。
3.2 拆炸弹
broadcast跟service超时机制大抵相同:
// 取消超时

final void cancelBroadcastTimeoutLocked() {

        if (mPendingBroadcastTimeoutMessage) {

            // 移除消息

            mHandler.removeMessages(BROADCAST_TIMEOUT_MSG, this);

            mPendingBroadcastTimeoutMessage = false;

        }

    }
移除广播超时消息 BROADCAST_TIMEOUT_MSG,这样就把诈弹拆除了。
3.3 引爆炸弹
下面看下引爆炸弹的逻辑,前面我们已经介绍了 BroadcastQueue 中的 handler 的实现了,下面直接看下超时的处理逻辑:
//fromMsg = true

final void broadcastTimeoutLocked(boolean fromMsg) {

    if (fromMsg) {

        mPendingBroadcastTimeoutMessage = false;

    }

    if (mOrderedBroadcasts.size() == 0) {

        return;

    }

    long now = SystemClock.uptimeMillis();

    BroadcastRecord r = mOrderedBroadcasts.get(0);

    if (fromMsg) {

        if (mService.mDidDexOpt) {

            mService.mDidDexOpt = false;

            long timeoutTime = SystemClock.uptimeMillis() + mTimeoutPeriod;

            setBroadcastTimeoutLocked(timeoutTime);

            return;

        }

        if (!mService.mProcessesReady) {

            return; //当系统还没有准备就绪时,广播处理流程中不存在广播超时

        }

        long timeoutTime = r.receiverTime + mTimeoutPeriod;

        if (timeoutTime > now) {

            //如果当前正在执行的receiver没有超时,则重新设置广播超时

            setBroadcastTimeoutLocked(timeoutTime);

            return;

        }

    }

    BroadcastRecord br = mOrderedBroadcasts.get(0);

    if (br.state == BroadcastRecord.WAITING_SERVICES) {

        //广播已经处理完成,但需要等待已启动service执行完成。当等待足够时间,则处理下一条广播。

        br.curComponent = null;

        br.state = BroadcastRecord.IDLE;

        processNextBroadcast(false);

        return;

    }

    r.receiverTime = now;

    //当前BroadcastRecord的anr次数执行加1操作

    r.anrCount++;

    if (r.nextReceiver <= 0) {

        return;

    }

    ...

    Object curReceiver = r.receivers.get(r.nextReceiver-1);

    //查询App进程

    if (curReceiver instanceof BroadcastFilter) {

        BroadcastFilter bf = (BroadcastFilter)curReceiver;

        if (bf.receiverList.pid != 0

                && bf.receiverList.pid != ActivityManagerService.MY_PID) {

            synchronized (mService.mPidsSelfLocked) {

                app = mService.mPidsSelfLocked.get(

                        bf.receiverList.pid);

            }

        }

    } else {

        app = r.curApp;

    }

    if (app != null) {

        anrMessage = "Broadcast of " + r.intent.toString();

    }

    if (mPendingBroadcast == r) {

        mPendingBroadcast = null;

    }

    //继续移动到下一个广播接收者

    finishReceiverLocked(r, r.resultCode, r.resultData,

            r.resultExtras, r.resultAbort, false);

    scheduleBroadcastsLocked();

    if (anrMessage != null) {

        // 发送 anr 消息,带上了 anr 进程信息和 anr 消息

        mHandler.post(new AppNotResponding(app, anrMessage));

    }

}
mOrderedBroadcasts已处理完成,则不会anr;
正在执行dexopt,则不会anr;
系统还没有进入ready状态(mProcessesReady=false),则不会anr;
如果当前正在执行的receiver没有超时,则重新设置广播超时,不会anr;
来看下 AppNotResponding 实现:
    private final class AppNotResponding implements Runnable {

        private final ProcessRecord mApp;

        private final String mAnnotation;

        public AppNotResponding(ProcessRecord app, String annotation) {

            mApp = app;

            mAnnotation = annotation;

        }

        @Override

        public void run() {

            mApp.appNotResponding(null, null, null, null, false, mAnnotation);

        }

    }
最终会让 ProcessRecord 来处理 anr,并且其内部持有 ActivityManagerService 实例。
3.4 前台与后台广播超时
前台广播超时为10s,后台广播超时为60s,那么如何区分前台和后台广播呢?来看看AMS的核心逻辑:
BroadcastQueue broadcastQueueForIntent(Intent intent) {

    final boolean isFg = (intent.getFlags() & Intent.FLAG_RECEIVER_FOREGROUND) != 0;

    return (isFg) ? mFgBroadcastQueue : mBgBroadcastQueue;

}

mFgBroadcastQueue = new BroadcastQueue(this, mHandler,

        "foreground", BROADCAST_FG_TIMEOUT, false);

mBgBroadcastQueue = new BroadcastQueue(this, mHandler,

        "background", BROADCAST_BG_TIMEOUT, true);
根据发送广播sendBroadcast(Intent intent)中的intent的flags是否包含 FLAG_RECEIVER_FOREGROUND 来决定把该广播是放入前台广播队列或者后台广播队列,前台广播队列的超时为10s,后台广播队列的超时为60s,默认情况下广播是放入后台广播队列,除非指明加上 FLAG_RECEIVER_FOREGROUND 标识。
后台广播比前台广播拥有更长的超时阈值,同时在广播分发过程遇到后台service的启动(mDelayBehindServices)会延迟分发广播,等待service的完成,因为等待service而导致的广播ANR会被忽略掉;后台广播属于后台进程调度组,而前台广播属于前台进程调度组。简而言之,后台广播更不容易发生ANR,同时执行的速度也会更慢。
另外,只有串行处理的广播才有超时机制,因为接收者是串行处理的,前一个receiver处理慢,会影响后一个receiver;并行广播通过一个循环一次性向所有的receiver分发广播事件,所以不存在彼此影响的问题,则没有广播超时。
前台广播准确来说,是指位于前台广播队列的广播。
四 ContentProvider
ContentProvider Timeout是位于”ActivityManager”线程中的AMS.MainHandler收到CONTENT_PROVIDER_PUBLISH_TIMEOUT_MSG消息时触发。
ContentProvider 超时为CONTENT_PROVIDER_PUBLISH_TIMEOUT = 10s. 这个跟前面的Service和BroadcastQueue完全不同, 由 Provider 进程启动过程相关.
4.1 埋炸弹
埋炸弹的过程其实是在进程创建的过程,进程创建后会调用attachApplicationLocked() 进入system_server进程。
// ActivityManagerService

private final boolean attachApplicationLocked(IApplicationThread thread, int pid) {

    ProcessRecord app;

    if (pid != MY_PID && pid >= 0) {

        synchronized (mPidsSelfLocked) {

            app = mPidsSelfLocked.get(pid); // 根据pid获取ProcessRecord

        }

    }

    ...

    //系统处于ready状态或者该app为FLAG_PERSISTENT进程则为true

    boolean normalMode = mProcessesReady || isAllowedWhileBooting(app.info);

    List<ProviderInfo> providers = normalMode ? generateApplicationProvidersLocked(app) : null;

    //app进程存在正在启动中的provider,则超时10s后发送CONTENT_PROVIDER_PUBLISH_TIMEOUT_MSG消息

    if (providers != null && checkAppInLaunchingProvidersLocked(app)) {

        Message msg = mHandler.obtainMessage(CONTENT_PROVIDER_PUBLISH_TIMEOUT_MSG);

        msg.obj = app;

        mHandler.sendMessageDelayed(msg, CONTENT_PROVIDER_PUBLISH_TIMEOUT);

    }

    thread.bindApplication(...);

    ...

}
// 10s
static final int CONTENT_PROVIDER_PUBLISH_TIMEOUT = 10*1000;
10s 之后引爆该炸弹.
4.2 拆炸弹
当 provider 成功 publish 之后,便会拆除该炸弹.
public final void publishContentProviders(IApplicationThread caller, List<ContentProviderHolder> providers) {

   ...

   synchronized (this) {

       final ProcessRecord r = getRecordForAppLocked(caller);

       final int N = providers.size();

       for (int i = 0; i < N; i++) {

           ContentProviderHolder src = providers.get(i);

           ...

           ContentProviderRecord dst = r.pubProviders.get(src.info.name);

           if (dst != null) {

               ComponentName comp = new ComponentName(dst.info.packageName, dst.info.name);

               mProviderMap.putProviderByClass(comp, dst); //将该provider添加到mProviderMap

               String names[] = dst.info.authority.split(";");

               for (int j = 0; j < names.length; j++) {

                   mProviderMap.putProviderByName(names[j], dst);

               }

               int launchingCount = mLaunchingProviders.size();

               int j;

               boolean wasInLaunchingProviders = false;

               for (j = 0; j < launchingCount; j++) {

                   if (mLaunchingProviders.get(j) == dst) {

                       //将该provider移除mLaunchingProviders队列

                       mLaunchingProviders.remove(j);

                       wasInLaunchingProviders = true;

                       j--;

                       launchingCount--;

                   }

               }

               //成功pubish则移除该消息

               if (wasInLaunchingProviders) {

                   mHandler.removeMessages(CONTENT_PROVIDER_PUBLISH_TIMEOUT_MSG, r);

               }

               synchronized (dst) {

                   dst.provider = src.provider;

                   dst.proc = r;

                   //唤醒客户端的wait等待方法

                   dst.notifyAll();

               }

               ...

           }

       }

   }

}
4.3 引爆炸弹
在system_server进程中有一个Handler线程, 名叫”ActivityManager”.当倒计时结束便会向该Handler线程发送 一条信息CONTENT_PROVIDER_PUBLISH_TIMEOUT_MSG. MainHandler 是 AMS 的内部类。
final class MainHandler extends Handler {

    public void handleMessage(Message msg) {

        switch (msg.what) {

            case CONTENT_PROVIDER_PUBLISH_TIMEOUT_MSG: {

                ...

                ProcessRecord app = (ProcessRecord)msg.obj;

                synchronized (ActivityManagerService.this) {

                    //【见小节4.3.2】

                    processContentProviderPublishTimedOutLocked(app);

                }

            } break;

            ...

        }

        ...

    }

}

private final void processContentProviderPublishTimedOutLocked(ProcessRecord app) {

    //[见4.3.3]

    cleanupAppInLaunchingProvidersLocked(app, true);

    //[见小节4.3.4]

    removeProcessLocked(app, false, true, "timeout publishing content providers");

}

boolean cleanupAppInLaunchingProvidersLocked(ProcessRecord app, boolean alwaysBad) {

    boolean restart = false;

    for (int i = mLaunchingProviders.size() - 1; i >= 0; i--) {

        ContentProviderRecord cpr = mLaunchingProviders.get(i);

        if (cpr.launchingApp == app) {

            if (!alwaysBad && !app.bad && cpr.hasConnectionOrHandle()) {

                restart = true;

            } else {

                //移除死亡的provider

                removeDyingProviderLocked(app, cpr, true);

            }

        }

    }

    return restart;

}
removeDyingProviderLocked()的功能跟进程的存活息息相关:详见ContentProvider引用计数 []小节4.5]
对于stable类型的provider(即conn.stableCount > 0),则会杀掉所有跟该provider建立stable连接的非persistent进程.
对于unstable类的provider(即conn.unstableCount > 0),并不会导致client进程被级联所杀.
五、input超时机制
input的超时检测机制跟service、broadcast、provider截然不同,为了更好的理解input过程先来介绍两个重要线程的相关工作:
InputReader线程负责通过EventHub(监听目录/dev/input)读取输入事件,一旦监听到输入事件则放入到InputDispatcher的mInBoundQueue队列,并通知其处理该事件;
InputDispatcher线程负责将接收到的输入事件分发给目标应用窗口,分发过程使用到3个事件队列:
mInBoundQueue用于记录InputReader发送过来的输入事件;
outBoundQueue用于记录即将分发给目标应用窗口的输入事件;
waitQueue用于记录已分发给目标应用,且应用尚未处理完成的输入事件;
input的超时机制并非时间到了一定就会爆炸,而是处理后续上报事件的过程才会去检测是否该爆炸,所以更像是扫雷的过程,具体如下图所示。
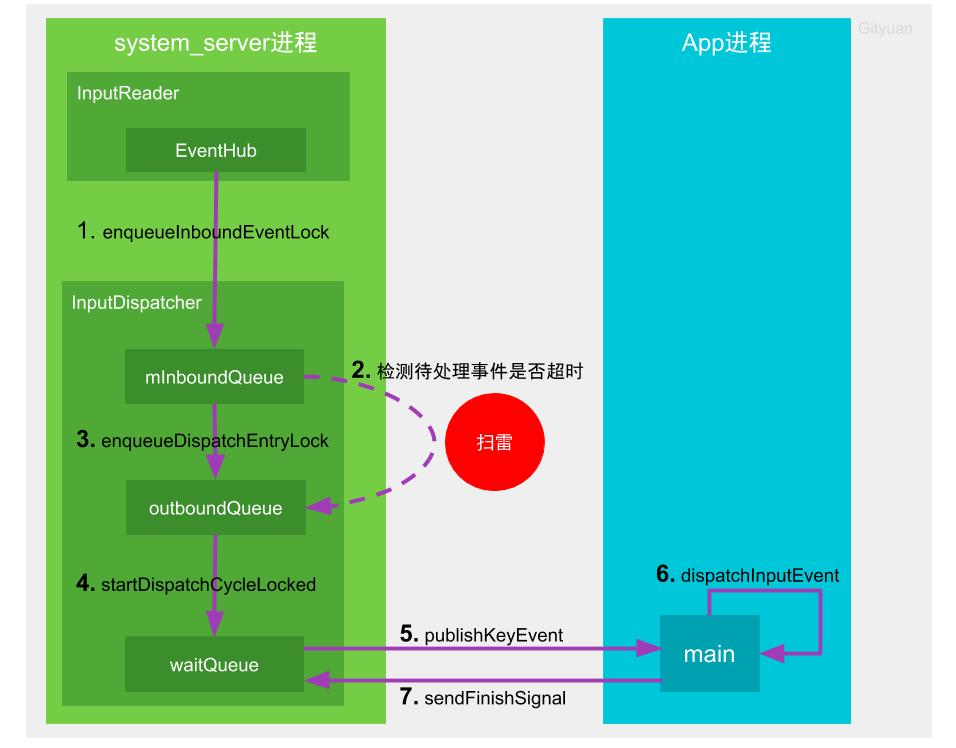
InputReader线程通过EventHub监听底层上报的输入事件,一旦收到输入事件则将其放至mInBoundQueue队列,并唤醒InputDispatcher线程
InputDispatcher开始分发输入事件,设置埋雷的起点时间。先检测是否有正在处理的事件(mPendingEvent),如果没有则取出mInBoundQueue队头的事件,并将其赋值给mPendingEvent,且重置ANR的timeout;否则不会从mInBoundQueue中取出事件,也不会重置timeout。然后检查窗口是否就绪(checkWindowReadyForMoreInputLocked),满足以下任一情况,则会进入扫雷状态(检测前一个正在处理的事件是否超时),终止本轮事件分发,否则继续执行步骤3。当应用窗口准备就绪,则将mPendingEvent转移到outBoundQueue队列
对于按键类型的输入事件,则outboundQueue或者waitQueue不为空,
对于非按键的输入事件,则waitQueue不为空,且等待队头时间超时500ms
当outBoundQueue不为空,且应用管道对端连接状态正常,则将数据从outboundQueue中取出事件,放入waitQueue队列
InputDispatcher通过socket告知目标应用所在进程可以准备开始干活
App在初始化时默认已创建跟中控系统双向通信的socketpair,此时App的包工头(main线程)收到输入事件后,会层层转发到目标窗口来处理
包工头完成工作后,会通过socket向中控系统汇报工作完成,则中控系统会将该事件从waitQueue队列中移除。
input超时机制为什么是扫雷,而非定时爆炸呢?是由于对于input来说即便某次事件执行时间超过timeout时长,只要用户后续在没有再生成输入事件,则不会触发ANR。 这里的扫雷是指当前输入系统中正在处理着某个耗时事件的前提下,后续的每一次input事件都会检测前一个正在处理的事件是否超时(进入扫雷状态),检测当前的时间距离上次输入事件分发时间点是否超过timeout时长。如果前一个输入事件,则会重置ANR的timeout,从而不会爆炸。
到这里,关于 service ,广播,provider 的 anr 原因都讲清楚了。下面就看看是如何对 anr 信息进行收集的。
六、appNotResponding处理流程
不管是啥 anr ,最终都会调用到 ProcessRecord 的 appNotResponding 方法,下面来看看这个方法里面具体都做了啥:
// ProcessRecord.java

void appNotResponding(String activityShortComponentName, ApplicationInfo aInfo,

            String parentShortComponentName, WindowProcessController parentProcess,

            boolean aboveSystem, String annotation) {

        ArrayList<Integer> firstPids = new ArrayList<>(5);

        SparseArray<Boolean> lastPids = new SparseArray<>(20);

        mWindowProcessController.appEarlyNotResponding(annotation, () -> kill("anr", true));

     // anr 时间,实际上发生 anr 的时候,此时收集的运行堆栈有可能并不是引起 anr 的堆栈

        long anrTime = SystemClock.uptimeMillis();

        if (isMonitorCpuUsage()) {

            mService.updateCpuStatsNow();

        }

        synchronized (mService) {

            // PowerManager.reboot() can block for a long time, so ignore ANRs while shutting down.  关机时发生 anr 会被忽略,因为可能会引起长时间阻塞

            if (mService.mAtmInternal.isShuttingDown()) {

                Slog.i(TAG, "During shutdown skipping ANR: " + this + " " + annotation);

                return;

            } else if (isNotResponding()) {

                Slog.i(TAG, "Skipping duplicate ANR: " + this + " " + annotation);

                return;

            } else if (isCrashing()) {

                Slog.i(TAG, "Crashing app skipping ANR: " + this + " " + annotation);

                return;

            } else if (killedByAm) {

                Slog.i(TAG, "App already killed by AM skipping ANR: " + this + " " + annotation);

                return;

            } else if (killed) {

                Slog.i(TAG, "Skipping died app ANR: " + this + " " + annotation);

                return;

            }

            // In case we come through here for the same app before completing

            // this one, mark as anring now so we will bail out.  这样可以避免重复进入

            setNotResponding(true);

            // Log the ANR to the event log.  记录 anr 到 eventlog

            EventLog.writeEvent(EventLogTags.AM_ANR, userId, pid, processName, info.flags,

                    annotation);

            // Dump thread traces as quickly as we can, starting with "interesting" processes.  将当前进程添加到 firstPids 中

            firstPids.add(pid);

            // Don't dump other PIDs if it's a background ANR

            if (!isSilentAnr()) {

                int parentPid = pid;

                if (parentProcess != null && parentProcess.getPid() > 0) {

                    parentPid = parentProcess.getPid();

                }

                if (parentPid != pid) firstPids.add(parentPid);

          // 将system_server进程添加到firstPids

                if (MY_PID != pid && MY_PID != parentPid) firstPids.add(MY_PID);

                for (int i = getLruProcessList().size() - 1; i >= 0; i--) {

                    ProcessRecord r = getLruProcessList().get(i);

                    if (r != null && r.thread != null) {

                        int myPid = r.pid;

                        if (myPid > 0 && myPid != pid && myPid != parentPid && myPid != MY_PID) {

                            if (r.isPersistent()) {

                                firstPids.add(myPid); // 将persistent进程添加到firstPids

                                if (DEBUG_ANR) Slog.i(TAG, "Adding persistent proc: " + r);

                            } else if (r.treatLikeActivity) {

                                firstPids.add(myPid);  // 使用了 BIND_TREAT_LIKE_ACTIVITY

                                if (DEBUG_ANR) Slog.i(TAG, "Adding likely IME: " + r);

                            } else {

                                lastPids.put(myPid, Boolean.TRUE);  // 其他进程添加到lastPids

                                if (DEBUG_ANR) Slog.i(TAG, "Adding ANR proc: " + r);

                            }

                        }

                    }

                }

            }

        }

        // Log the ANR to the main log.  记录 anr 到 mainlog

        StringBuilder info = new StringBuilder();

        info.setLength(0);

        info.append("ANR in ").append(processName);

        if (activityShortComponentName != null) {

            info.append(" (").append(activityShortComponentName).append(")");

        }

        info.append("\n");

        info.append("PID: ").append(pid).append("\n");

        if (annotation != null) {

            info.append("Reason: ").append(annotation).append("\n");

        }

        if (parentShortComponentName != null

                && parentShortComponentName.equals(activityShortComponentName)) {

            info.append("Parent: ").append(parentShortComponentName).append("\n");

        }

     // 创建 cpu tracker 对象

        ProcessCpuTracker processCpuTracker = new ProcessCpuTracker(true);

        // don't dump native PIDs for background ANRs unless it is the process of interest

        String[] nativeProcs = null;

        if (isSilentAnr()) {

            for (int i = 0; i < NATIVE_STACKS_OF_INTEREST.length; i++) {

                if (NATIVE_STACKS_OF_INTEREST[i].equals(processName)) {

                    nativeProcs = new String[] { processName };

                    break;

                }

            }

        } else {

            nativeProcs = NATIVE_STACKS_OF_INTEREST;

        }

     // 获取 native 进程

        int[] pids = nativeProcs == null ? null : Process.getPidsForCommands(nativeProcs);

        ArrayList<Integer> nativePids = null;

        if (pids != null) {

            nativePids = new ArrayList<>(pids.length);

            for (int i : pids) {

                nativePids.add(i);

            }

        }

        // For background ANRs, don't pass the ProcessCpuTracker to

        // avoid spending 1/2 second collecting stats to rank lastPids.  收集堆栈信息

        File tracesFile = ActivityManagerService.dumpStackTraces(firstPids,

                (isSilentAnr()) ? null : processCpuTracker, (isSilentAnr()) ? null : lastPids,

                nativePids);

        String cpuInfo = null;
     // 添加 cpu 信息

        if (isMonitorCpuUsage()) {

            mService.updateCpuStatsNow();

            synchronized (mService.mProcessCpuTracker) {

                cpuInfo = mService.mProcessCpuTracker.printCurrentState(anrTime);

            }

            info.append(processCpuTracker.printCurrentLoad());

            info.append(cpuInfo);

        }

        info.append(processCpuTracker.printCurrentState(anrTime));

        Slog.e(TAG, info.toString());

        if (tracesFile == null) {

            // There is no trace file, so dump (only) the alleged culprit's threads to the log

            Process.sendSignal(pid, Process.SIGNAL_QUIT);

        }

        StatsLog.write(StatsLog.ANR_OCCURRED, uid, processName,

                activityShortComponentName == null ? "unknown": activityShortComponentName,

                annotation,

                (this.info != null) ? (this.info.isInstantApp()

                        ? StatsLog.ANROCCURRED__IS_INSTANT_APP__TRUE

                        : StatsLog.ANROCCURRED__IS_INSTANT_APP__FALSE)

                        : StatsLog.ANROCCURRED__IS_INSTANT_APP__UNAVAILABLE,

                isInterestingToUserLocked()

                        ? StatsLog.ANROCCURRED__FOREGROUND_STATE__FOREGROUND

                        : StatsLog.ANROCCURRED__FOREGROUND_STATE__BACKGROUND,

                getProcessClassEnum(),

                (this.info != null) ? this.info.packageName : "");

        final ProcessRecord parentPr = parentProcess != null

                ? (ProcessRecord) parentProcess.mOwner : null;
    // 将traces文件 和 CPU使用率信息保存到dropbox,即data/system/dropbox目录

        mService.addErrorToDropBox("anr", this, processName, activityShortComponentName,

                parentShortComponentName, parentPr, annotation, cpuInfo, tracesFile, null);

        if (mWindowProcessController.appNotResponding(info.toString(), () -> kill("anr", true),

                () -> {

                    synchronized (mService) {

                        mService.mServices.scheduleServiceTimeoutLocked(this);

                    }

                })) {

            return;

        }

        synchronized (mService) {

            // mBatteryStatsService can be null if the AMS is constructed with injector only. This

            // will only happen in tests.

            if (mService.mBatteryStatsService != null) {

                mService.mBatteryStatsService.noteProcessAnr(processName, uid);

            }

       // 杀死后台 anr 的进程

            if (isSilentAnr() && !isDebugging()) {


                kill("bg anr", true);

                return;

            }

            // Set the app's notResponding state, and look up the errorReportReceiver

            makeAppNotRespondingLocked(activityShortComponentName,

                    annotation != null ? "ANR " + annotation : "ANR", info.toString());

            // mUiHandler can be null if the AMS is constructed with injector only. This will only

            // happen in tests.

            if (mService.mUiHandler != null) {

                // Bring up the infamous App Not Responding dialog

                Message msg = Message.obtain();

                msg.what = ActivityManagerService.SHOW_NOT_RESPONDING_UI_MSG;

                msg.obj = new AppNotRespondingDialog.Data(this, aInfo, aboveSystem);

         // 发送 anr 弹窗信息

                mService.mUiHandler.sendMessage(msg);

            }

        }

    }
/**
 * Unless configured otherwise, swallow ANRs in background processes & kill the process.
 * Non-private access is for tests only.  如果是后台 ANR 会被吞噬,不会提示 anr,
 */
@VisibleForTesting
boolean isSilentAnr() {
    return !getShowBackground() && !isInterestingForBackgroundTraces();
}
当发生ANR时, 会按顺序依次执行:
输出ANR Reason信息到EventLog. 也就是说ANR触发的时间点最接近的就是EventLog中输出的am_anr信息;
收集并输出重要进程列表中的各个线程的traces信息,该方法较耗时; 【见小节2】
输出当前各个进程的CPU使用情况以及CPU负载情况;
将traces文件和 CPU使用情况信息保存到dropbox,即data/system/dropbox目录
根据进程类型,来决定直接后台杀掉,还是弹框告知用户.
ANR输出重要进程的traces信息,这些进程包含:
firstPids队列:第一个是ANR进程,第二个是system_server,剩余是所有persistent进程;
Native队列:是指/system/bin/目录的mediaserver,sdcard 以及surfaceflinger进程;
lastPids队列: 是指mLruProcesses中的不属于firstPids的所有进程。
下面看下收集各进程堆栈信息逻辑:
// AMS

   /**

     * If a stack trace dump file is configured, dump process stack traces.

     * @param firstPids of dalvik VM processes to dump stack traces for first

     * @param lastPids of dalvik VM processes to dump stack traces for last

     * @param nativePids optional list of native pids to dump stack crawls

     */

    public static File dumpStackTraces(ArrayList<Integer> firstPids,

            ProcessCpuTracker processCpuTracker, SparseArray<Boolean> lastPids,

            ArrayList<Integer> nativePids) {

        ArrayList<Integer> extraPids = null;

        Slog.i(TAG, "dumpStackTraces pids=" + lastPids + " nativepids=" + nativePids);

        // Measure CPU usage as soon as we're called in order to get a realistic sampling

        // of the top users at the time of the request.

        if (processCpuTracker != null) {

            processCpuTracker.init();

            try {

                Thread.sleep(200); // 等待 200ms

            } catch (InterruptedException ignored) {

            }

       // 测量CPU使用情况

            processCpuTracker.update();

            // We'll take the stack crawls of just the top apps using CPU. 收集 5 个最高使用 cpu 的 进程

            final int N = processCpuTracker.countWorkingStats();

            extraPids = new ArrayList<>();

            for (int i = 0; i < N && extraPids.size() < 5; i++) {

                ProcessCpuTracker.Stats stats = processCpuTracker.getWorkingStats(i);

                if (lastPids.indexOfKey(stats.pid) >= 0) {

                    if (DEBUG_ANR) Slog.d(TAG, "Collecting stacks for extra pid " + stats.pid);

                    extraPids.add(stats.pid);

                } else {

                    Slog.i(TAG, "Skipping next CPU consuming process, not a java proc: "

                            + stats.pid);

                }

            }

        }

        final File tracesDir = new File(ANR_TRACE_DIR);

        // Each set of ANR traces is written to a separate file and dumpstate will process

        // all such files and add them to a captured bug report if they're recent enough.  每一个 anr 都保存在单独的文件中的

        maybePruneOldTraces(tracesDir);

        // NOTE: We should consider creating the file in native code atomically once we've

        // gotten rid of the old scheme of dumping and lot of the code that deals with paths

        // can be removed.  创建 anr 文件

        File tracesFile = createAnrDumpFile(tracesDir);

        if (tracesFile == null) {

            return null;

        }

     // 收集 anr 堆栈

        dumpStackTraces(tracesFile.getAbsolutePath(), firstPids, nativePids, extraPids);

        return tracesFile;

    }

   // 创建 anr 文件

    private static synchronized File createAnrDumpFile(File tracesDir) {

        if (sAnrFileDateFormat == null) {

            sAnrFileDateFormat = new SimpleDateFormat("yyyy-MM-dd-HH-mm-ss-SSS");

        }

        final String formattedDate = sAnrFileDateFormat.format(new Date());
     // anr 文件名是 anr_加上时间

        final File anrFile = new File(tracesDir, "anr_" + formattedDate);

     ...return anrFile;

    }


   // 收集堆栈逻辑

    public static void dumpStackTraces(String tracesFile, ArrayList<Integer> firstPids,

            ArrayList<Integer> nativePids, ArrayList<Integer> extraPids) {

        Slog.i(TAG, "Dumping to " + tracesFile);

        // We don't need any sort of inotify based monitoring when we're dumping traces via

        // tombstoned. Data is piped to an "intercept" FD installed in tombstoned so we're in full

        // control of all writes to the file in question.


        // We must complete all stack dumps within 20 seconds. 在 20s 里面完成堆栈收集工作,未完成也会直接退出

        long remainingTime = 20 * 1000;

        // First collect all of the stacks of the most important pids.  收集最重要的几个进程的信息

        if (firstPids != null) {

            int num = firstPids.size();

            for (int i = 0; i < num; i++) {

                Slog.i(TAG, "Collecting stacks for pid " + firstPids.get(i));

                final long timeTaken = dumpJavaTracesTombstoned(firstPids.get(i), tracesFile, remainingTime);

                remainingTime -= timeTaken;

                if (remainingTime <= 0) {

                    Slog.e(TAG, "Aborting stack trace dump (current firstPid=" + firstPids.get(i) +

                           "); deadline exceeded.");

                    return;

                }

            }

        }

        // Next collect the stacks of the native pids  收集 native 堆栈

        if (nativePids != null) {

            for (int pid : nativePids) {

                Slog.i(TAG, "Collecting stacks for native pid " + pid);

                final long nativeDumpTimeoutMs = Math.min(NATIVE_DUMP_TIMEOUT_MS, remainingTime);

                final long start = SystemClock.elapsedRealtime();

                Debug.dumpNativeBacktraceToFileTimeout(

                        pid, tracesFile, (int) (nativeDumpTimeoutMs / 1000));

                final long timeTaken = SystemClock.elapsedRealtime() - start;

                remainingTime -= timeTaken;
          ... 超时则停止收集


            }

        }

        // Lastly, dump stacks for all extra PIDs from the CPU tracker. 最后是前面最高的 5 个

        if (extraPids != null) {

            for (int pid : extraPids) {

                Slog.i(TAG, "Collecting stacks for extra pid " + pid);

                final long timeTaken = dumpJavaTracesTombstoned(pid, tracesFile, remainingTime);

                remainingTime -= timeTaken;

             ...

            }

        }

        Slog.i(TAG, "Done dumping");

    }
该方法的主要功能,依次输出:
- 收集firstPids进程的stacks;
第一个是发生ANR进程;
第二个是system_server;
mLruProcesses中所有的persistent进程;
收集Native进程的stacks;(dumpNativeBacktraceToFile)
依次是mediaserver,sdcard,surfaceflinger进程;
收集lastPids进程的stacks;;
依次输出CPU使用率top 5的进程;
七、总结
当出现ANR时,都是调用到AMS.appNotResponding()方法,当然这里介绍的 provider 例外.
Timeout时长
对于前台服务,则超时为SERVICE_TIMEOUT = 20s;
对于后台服务,则超时为SERVICE_BACKGROUND_TIMEOUT = 200s
对于前台广播,则超时为BROADCAST_FG_TIMEOUT = 10s;
对于后台广播,则超时为BROADCAST_BG_TIMEOUT = 60s;
ContentProvider超时为CONTENT_PROVIDER_PUBLISH_TIMEOUT = 10s;
超时检测
Service超时检测机制:
- 超过一定时间没有执行完相应操作来触发移除延时消息,则会触发anr;
BroadcastReceiver超时检测机制:
有序广播的总执行时间超过 2* receiver个数 * timeout时长,则会触发anr;
有序广播的某一个receiver执行过程超过 timeout时长,则会触发anr;
另外:
对于Service, Broadcast, Input发生ANR之后,最终都会调用AMS.appNotResponding;
对于provider,在其进程启动时publish过程可能会出现ANR, 则会直接杀进程以及清理相应信息,而不会弹出ANR的对话框. appNotRespondingViaProvider()过程会走appNotResponding(), 这个就不介绍了,很少使用,由用户自定义超时时间.
最后,真诚感谢 gityuan 的博客。
参考文章
http://gityuan.com/2016/12/02/app-not-response/
http://gityuan.com/2016/07/02/android-anr/
http://gityuan.com/2017/01/01/input-anr/
http://gityuan.com/2019/04/06/android-anr/
深入理解 Android ANR 触发原理以及信息收集过程的更多相关文章
- 理解Android ANR的触发原理(转)
一.概述 ANR(Application Not responding),是指应用程序未响应,Android系统对于一些事件需要在一定的时间范围内完成,如果超过预定时间能未能得到有效响应或者响应时间过 ...
- ANR触发原理(what triggers ANR?)
Ref: http://developer.android.com/training/articles/perf-anr.html http://stackoverflow.com/questions ...
- Android ANR从原理到日志分析,记下来就够了
站在巨人的肩膀上可以看的更远 做一个优秀的搬运工 Android 彻底理解安卓应用无响应机制 Android ANR日志分析全面解析 优秀的文章不可独享,要扩散,要做好笔记,哈 <沁园春长沙&g ...
- 深入理解Android内存管理原理(六)
一般来说,程序使用内存的方式遵循先向操作系统申请一块内存,使用内存,使用完毕之后释放内存归还给操作系统.然而在传统的C/C++等要求显式释放内存的编程语言中,记得在合适的时候释放内存是一个很有难度的工 ...
- ANR触发原理
ANR(Application Not responding),是指应用程序未响应,Android系统对于一些事件需要在一定的时间范围内完成,如果超过预定时间能未能得到有效响应或者响应时间过长,都会造 ...
- 深入理解 Android 消息机制原理
欢迎大家前往腾讯云社区,获取更多腾讯海量技术实践干货哦~ 作者:汪毅雄 导语: 本文讲述的是Android的消息机制原理,从Java到Native代码进行了梳理,并结合其中使用到的Epoll模型予以介 ...
- 【转载】理解Android中垃圾回收日志信息
本文转自:http://droidyue.com/blog/2014/11/08/understanding-garbage-collection-output-messages-in-android ...
- 《深入理解Android:Telephon原理剖析与最佳实践》学习笔记(系统框架)
Android智能手机的系统结构: 智能手机的硬件基本结构大多采用双处理器架构:主处理器和从处理器,主处理器主要运行开放式操作系统以及操作系统之上的应用,负责整个系统的控制,称之为AP,从处理 ...
- 记一次nmap扫描信息收集过程
1.首先扫描网段内存活主机 nmap -sP 192.168.1.1-254 2.获取到存活主机后,开始进行端口扫描 nmap -p1-1000 192.168.1.66 可得到端口状态: filte ...
随机推荐
- MSSQL·备份数据库中的单表
阅文时长 | 0.11分钟 字数统计 | 237.6字符 主要内容 | 1.引言&背景 2.声明与参考资料 『MSSQL·备份数据库中的单表』 编写人 | SCscHero 编写时间 | 20 ...
- 基础知识:DFRduino UNO R3最全资料详解
一.概述篇:1. 什么是DFRduino UNO R3?DFRduino UNO R3是一块基与开放原始代码的Simple i/o平台,並且具有使用类似java,C语言的开发环境.让您可以快速使用Ar ...
- 1Spring注入小结
Spring注入小结 (在Application.xml中) Spring学习笔记 周芋杉2021/5/14 1.基本注入类型注入 注入前的准备 <bean id="#配置文件的唯一标 ...
- [bug] vscode output 输出乱码
参考 https://blog.csdn.net/qq_34192032/article/details/105077173 https://blog.csdn.net/a19990412/artic ...
- 解决latex数学公式渲染不正确及行内公式中文渲染乱码问题
问题 之前数学OCR渲染数学公式用的 katex 来渲染,前端解决方案,我们的进行公式编写的时候是需要输入中文的,如: Fe_{2}O_{3} + 3 C O \stackrel{高温}{=} 2 F ...
- Spring Cloud Alibaba(13)---Sleuth概述
Sleuth概述 前言 在微服务架构中,众多的微服务之间互相调用,如何清晰地记录服务的调用链路是一个需要解决的问题.同时,由于各种原因,跨进程的服务调用失败时,运维人员希望能够通过 查看日志和查看服务 ...
- Go基础结构与类型02---使用iota定义常量组
package main import "fmt" /*const ( USA = 0 China = 1 Russia = 2 Britain = 3 France = 4 )* ...
- TensorFlow创建DeepDream网络
TensorFlow创建DeepDream网络 Google 于 2014 年在 ImageNet 大型视觉识别竞赛(ILSVRC)训练了一个神经网络,并于 2015 年 7 月开放源代码. 该网络学 ...
- CodeGen用户定义的扩展令牌
CodeGen用户定义的扩展令牌 用户定义的扩展令牌是一种特殊的令牌,开发人员可以确定令牌的名称以及在代码生成过程中遇到令牌时要插入的值. CodeGen支持多种机制,允许通过以下方式实现用户定义的令 ...
- 嵌入式Linux的OTA更新,基础知识和实现
嵌入式Linux的OTA更新,第1部分-基础知识和实现 OTA updates for Embedded Linux, Fundamentals and implementation 更新的需要 一 ...