
Spring Boot 整合Mybatis非starter时,mapper一直无法注入解决
本来呢,直接使用mybatis-spring-boot-starter还是挺好的,但是我们系统比较复杂,有多个数据源,其中一个平台自己的数据源,另外一些是动态配置出来的,两者完全没有关系。所以直接使用mybatis-spring-boot-starter就很麻烦了,会报下列错误:
Caused by: org.springframework.beans.factory.NoUniqueBeanDefinitionException: No qualifying bean of type 'javax.sql.DataSource' available: expected single matching bean but found 2: dataSource,branchta

    at org.springframework.beans.factory.support.DefaultListableBeanFactory.resolveNamedBean(DefaultListableBeanFactory.java:1041)

    at org.springframework.beans.factory.support.DefaultListableBeanFactory.getBean(DefaultListableBeanFactory.java:345)

    at org.springframework.beans.factory.support.DefaultListableBeanFactory.getBean(DefaultListableBeanFactory.java:340)

    at org.springframework.context.support.AbstractApplicationContext.getBean(AbstractApplicationContext.java:1090)

    at org.springframework.boot.autoconfigure.jdbc.DataSourceInitializer.init(DataSourceInitializer.java:77)

    at sun.reflect.NativeMethodAccessorImpl.invoke0(Native Method)


具体是init()中基于类型获取dataSource的原因:

    @PostConstruct

    public void init() {

        if (!this.properties.isInitialize()) {

            logger.debug("Initialization disabled (not running DDL scripts)");

            return;

        }

        if (this.applicationContext.getBeanNamesForType(DataSource.class, false,

                false).length > 0) {

            this.dataSource = this.applicationContext.getBean(DataSource.class);

        }

        if (this.dataSource == null) {

            logger.debug("No DataSource found so not initializing");

            return;

        }

        runSchemaScripts();

    }
就只能蜕回去使用mybatis-spring了。启动的时候发现死活注入不进去,报下列错误:
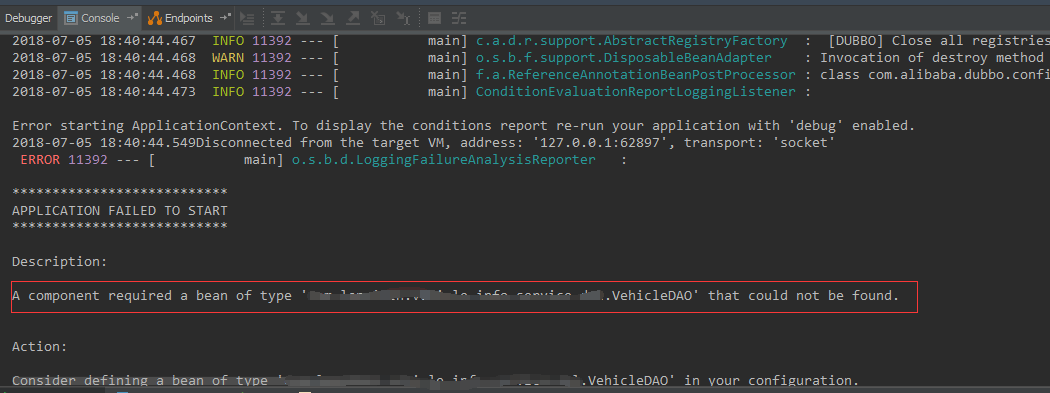
参考了http://www.cnblogs.com/insaneXs/p/9270071.html和https://blog.csdn.net/qq_21853607/article/details/72802080,经验证并非他们所述的问题。我debug的时候,发现mapper对象是有的,而不是第一个所述的没有创建代理,最后debug的时候发现好像是druiddatasouce bean创建的时候出错了,但是没有堆栈信息。完整的配置如下:
application-bean.xml:
<?xml version="1.0" encoding="UTF-8"?>

<beans xmlns="http://www.springframework.org/schema/beans" xmlns:xsi="http://www.w3.org/2001/XMLSchema-instance"

       xmlns:tx="http://www.springframework.org/schema/tx"

       xmlns:util="http://www.springframework.org/schema/util"

       xmlns:p="http://www.springframework.org/schema/p"

       xmlns:context="http://www.springframework.org/schema/context"

       xsi:schemaLocation="http://www.springframework.org/schema/beans http://www.springframework.org/schema/beans/spring-beans-4.3.xsd

        http://www.springframework.org/schema/tx http://www.springframework.org/schema/tx/spring-tx-4.3.xsd

        http://www.springframework.org/schema/util

        http://www.springframework.org/schema/util/spring-util-4.3.xsd

        http://www.springframework.org/schema/context

        http://www.springframework.org/schema/context/spring-context-4.3.xsd">

    <context:property-placeholder location="classpath*:jrescloud.properties" ignore-unresolvable="true" order="1"/>

    <bean name="dataSource" class="com.alibaba.druid.pool.DruidDataSource" init-method="init" destroy-method="close">

        <property name="driverClassName" value="${spring.datasource.driver-class-name}"/>

        <property name="url" value="${spring.datasource.url}"/>

        <property name="username" value="${spring.datasource.username}"/>

        <property name="password" value="${spring.datasource.password}"/>

        <!-- 配置初始化大小、最小、最大 -->

        <!-- <property name="initialSize" value="1"/>

        <property name="minIdle" value="100000"/>

        <property name="maxActive" value="10"/> -->

        <!-- 配置获取连接等待超时的时间 -->

        <!-- <property name="maxWait" value="${jdbc.maxWait}"/>

        打开PSCache,并且指定每个连接上PSCache的大小

        <property name="poolPreparedStatements" value="${jdbc.pps}"/>

        <property name="maxPoolPreparedStatementPerConnectionSize" value="${jdbc.mpps}"/>

        配置间隔多久才进行一次检测,检测需要关闭的空闲连接,单位是毫秒

        <property name="timeBetweenEvictionRunsMillis" value="${jdbc.timeBetweenEvictionRunsMillis}"/>

        配置一个连接在池中最小生存的时间,单位是毫秒

        <property name="minEvictableIdleTimeMillis" value="${jdbc.minEvictableIdleTimeMillis}"/>

        <property name="removeAbandoned" value="${jdbc.removeAbandoned}"/>

        <property name="removeAbandonedTimeout" value="${jdbc.removeAbandonedTimeout}"/>

        <property name="logAbandoned" value="${jdbc.logAbandoned}"/>

        配置监控统计拦截的filters

        <property name="filters" value="${jdbc.filters}"/> -->

    </bean>

    <bean id="transactionManager" class="org.springframework.jdbc.datasource.DataSourceTransactionManager">

        <property name="dataSource" ref="dataSource" />

    </bean>

    <!-- 使用annotation 自动注册bean, 并保证@Required、@Autowired的属性被注入 -->

    <tx:annotation-driven transaction-manager="transactionManager"/>

    <bean id="sqlSessionFactory" class="org.mybatis.spring.SqlSessionFactoryBean">

        <property name="configLocation" value="${mybatis.configLocation}"/>

        <property name="dataSource" ref="dataSource"/>

        <property name="mapperLocations">

            <list>

                <value>${mybatis.mapperLocations}</value>

            </list>

        </property>

    </bean>

</beans>
package com.XX.XXX.XXXX.config;

import org.mybatis.spring.mapper.MapperScannerConfigurer;

import org.springframework.context.annotation.Bean;

import org.springframework.context.annotation.Configuration;

@Configuration

public class MybatisConfig {

    @Bean

    public MapperScannerConfigurer mapperScannerConfigurer() {

        MapperScannerConfigurer mapperScannerConfigurer = new MapperScannerConfigurer();

        mapperScannerConfigurer.setSqlSessionFactoryBeanName("sqlSessionFactory");

        mapperScannerConfigurer.setBasePackage("com.XX.XXX.XXXX.*.mapper");

        return mapperScannerConfigurer;

    }

}
package com.XX.XXX.XXXX.config;

import org.springframework.context.annotation.Bean;

import org.springframework.context.annotation.Configuration;

import org.springframework.context.annotation.ImportResource;

@Configuration

@ImportResource(locations={"classpath:application-bean.xml"})

public class AppConfig {

    @Bean

    public DynamicDataSourceRegister dynamicDataSourceRegister() {

        return new DynamicDataSourceRegister();

    }

    @Bean

    public DynamicDataSourceConfig getDynamicDataSourceConfig() {

        return new DynamicDataSourceConfig();

    }

}
Spring Boot 整合Mybatis非starter时,mapper一直无法注入解决的更多相关文章
- Spring Boot整合MyBatis(非注解版)
Spring Boot整合MyBatis(非注解版),开发时采用的时IDEA,JDK1.8 直接上图: 文件夹不存在,创建一个新的路径文件夹 创建完成目录结构如下: 本人第一步习惯先把需要的包结构创建 ...
- Spring Boot 整合mybatis时遇到的mapper接口不能注入的问题
现实情况是这样的,因为在练习spring boot整合mybatis,所以自己新建了个项目做测试,可是在idea里面mapper接口注入报错,后来百度查询了下,把idea的注入等级设置为了warnin ...
- Spring Boot整合Mybatis报错InstantiationException: tk.mybatis.mapper.provider.base.BaseSelectProvider
Spring Boot整合Mybatis时一直报错 后来发现原来主配置类上的MapperScan导错了包 由于我使用了通用Mapper,所以应该导入通用mapper这个包
- spring boot 整合 mybatis 以及原理
同上一篇文章一样,spring boot 整合 mybatis过程中没有看见SqlSessionFactory,sqlsession(sqlsessionTemplate),就连在spring框架整合 ...
- Spring Boot整合Mybatis完成级联一对多CRUD操作
在关系型数据库中,随处可见表之间的连接,对级联的表进行增删改查也是程序员必备的基础技能.关于Spring Boot整合Mybatis在之前已经详细写过,不熟悉的可以回顾Spring Boot整合Myb ...
- Spring Boot系列(三):Spring Boot整合Mybatis源码解析
一.Mybatis回顾 1.MyBatis介绍 Mybatis是一个半ORM框架,它使用简单的 XML 或注解用于配置和原始映射,将接口和Java的POJOs(普通的Java 对象)映射成数据库中的记 ...
- 太妙了!Spring boot 整合 Mybatis Druid,还能配置监控?
Spring boot 整合 Mybatis Druid并配置监控 添加依赖 <!--druid--> <dependency> <groupId>com.alib ...
- Spring Boot整合Mybatis并完成CRUD操作
MyBatis 是一款优秀的持久层框架,被各大互联网公司使用,本文使用Spring Boot整合Mybatis,并完成CRUD操作. 为什么要使用Mybatis?我们需要掌握Mybatis吗? 说的官 ...
- Spring Boot 整合 Mybatis 实现 Druid 多数据源详解
摘要: 原创出处:www.bysocket.com 泥瓦匠BYSocket 希望转载,保留摘要,谢谢! “清醒时做事,糊涂时跑步,大怒时睡觉,独处时思考” 本文提纲一.多数据源的应用场景二.运行 sp ...
随机推荐
- 监督学习之knn算法
1.1 KNN(K-Nearest Neighbor)工作原理: 存在一个样本数据集合,也称为训练样本集,并且样本集中每个数据都存在标签,即我们知道样本集中每一数据与所属分类对应的关系.输入没有标签 ...
- 基于Jenkins的持续交付方案
简介 Jenkins是开源的自动化编译.测试.部署的Web应用程序一个持续性交付应用 Jenkins的优势 1.Jenkins在国内的开发者中认可度较高,很多创业公司的自建持续交付系统的选择大部分都是 ...
- 转 EasyUi日期控件datebox设置,只显示年月,也只能选择年月
1.引入Jquery和easyui,注低版本的Jquery和easy不能使用,这里使用的Jquery是1.8.2easyui是1.6.1.1.easyui下载地址:http://www.jeasyui ...
- iOS 设计模式-NSNotificationCenter 通知中心
通知介绍 每一个应用程序都有一个通知中心(NSNotificationCenter)实例,专门负责协助不同对象之间的消息通信 任何一个对象都可以向通知中心发布通知(NSNotification),描述 ...
- ida快捷键
跳转相关: ctrl+1 快速查看 ctrl+L 查看所有数据和函数 Ctrl+P跳转到某函数(ChooseFunction()) Ctrl+S跳转到指定节 s=segment Ctrl+x查找引用 ...
- 项目遇到的css样式
1. 这种怎么写?用radio,我这里用的时element的radio <div class="menu"> <span>我的粉丝({{totalNumbe ...
- IDEA2017及DataGrip2017注册码
访问http://idea.lanyus.com/,网页中有相关说明,最简单的方式是将“0.0.0.0 account.jetbrains.com”添加到hosts文件中,然后点击页面底部的“获得注册 ...
- mysql----------阿里云RDS导入导出
1.这是阿里云rds如何将导出的物理备份文件,导入到自建库里面: https://help.aliyun.com/knowledge_detail/5973700.html?spm=5176.7766 ...
- MyBatis基础入门《十八》动态SQL(if-where)
MyBatis基础入门<十八>动态SQL(if-where) 描述: 代码是在<MyBatis基础入门<十七>动态SQL>基础上进行改造的,不再贴所有代码,仅贴改动 ...
- CoreWebApi集成Exceptionless
参考博客 https://www.cnblogs.com/akaxb/p/7207827.html 一. Exceptionlessr的安装部署 依乐祝,<ASP.NET Core免费开源分布式 ...