CentOS7安装ffmpeg
首先在官网http://ffmpeg.org/download.html下载ffmpeg-4.2.1.tar.bz2
以下为安装步骤:
1、使用工具将源码包上传至Linux主机

2、解压源码包
进入该文件夹下:cd /usr/ffmpeg/(这里我是安装到usr目录下新建的ffmpeg文件夹中)
解压该源码包:tar -jxvf ffmpeg-4.2.1.tar.bz2
[bhsoft@localhost ~]$ cd /usr/ffmpeg/
[bhsoft@localhost ffmpeg]$ tar -jxvf ffmpeg-4.2.1.tar.bz2

3、进入到解压完成的ffmpeg-4.2.1目录下安装yasm(如已安装跳过此步骤)
安装yasm命令:yum install yasm
[bhsoft@localhost ffmpeg]$ cd ffmpeg-4.2.1/
[bhsoft@localhost ffmpeg-4.2.1]$ yuminstallyasm

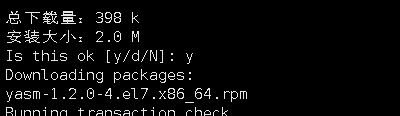
中间遇到Is this ok 选择y,如图
4、
Normal
0
7.8 磅
0
2
false
false
false
EN-US
ZH-CN
X-NONE
/* Style Definitions */
table.MsoNormalTable
{mso-style-name:普通表格;
mso-tstyle-rowband-size:0;
mso-tstyle-colband-size:0;
mso-style-noshow:yes;
mso-style-priority:99;
mso-style-parent:"";
mso-padding-alt:0cm 5.4pt 0cm 5.4pt;
mso-para-margin:0cm;
mso-para-margin-bottom:.0001pt;
mso-pagination:widow-orphan;
font-size:10.0pt;
font-family:"Times New Roman",serif;}
安装yasm完毕后执行命令
[bhsoft@localhost ffmpeg-4.2.1]$ ./configure --enable-shared --prefix=/usr/ffmpeg
5、执行make命令(这一步时间比较长,请耐心等待)
Normal
0
7.8 磅
0
2
false
false
false
EN-US
ZH-CN
X-NONE
/* Style Definitions */
table.MsoNormalTable
{mso-style-name:普通表格;
mso-tstyle-rowband-size:0;
mso-tstyle-colband-size:0;
mso-style-noshow:yes;
mso-style-priority:99;
mso-style-parent:"";
mso-padding-alt:0cm 5.4pt 0cm 5.4pt;
mso-para-margin:0cm;
mso-para-margin-bottom:.0001pt;
mso-pagination:widow-orphan;
font-size:10.0pt;
font-family:"Times New Roman",serif;}
[bhsoft@localhost ffmpeg-4.2.1]$ make
6、
Normal
0
7.8 磅
0
2
false
false
false
EN-US
ZH-CN
X-NONE
/* Style Definitions */
table.MsoNormalTable
{mso-style-name:普通表格;
mso-tstyle-rowband-size:0;
mso-tstyle-colband-size:0;
mso-style-noshow:yes;
mso-style-priority:99;
mso-style-parent:"";
mso-padding-alt:0cm 5.4pt 0cm 5.4pt;
mso-para-margin:0cm;
mso-para-margin-bottom:.0001pt;
mso-pagination:widow-orphan;
font-size:10.0pt;
font-family:"Times New Roman",serif;}
执行make install(安装)命令
[bhsoft@localhost ffmpeg-4.2.1]$ make install
7、
Normal
0
7.8 磅
0
2
false
false
false
EN-US
ZH-CN
X-NONE
/* Style Definitions */
table.MsoNormalTable
{mso-style-name:普通表格;
mso-tstyle-rowband-size:0;
mso-tstyle-colband-size:0;
mso-style-noshow:yes;
mso-style-priority:99;
mso-style-parent:"";
mso-padding-alt:0cm 5.4pt 0cm 5.4pt;
mso-para-margin:0cm;
mso-para-margin-bottom:.0001pt;
mso-pagination:widow-orphan;
font-size:10.0pt;
font-family:"Times New Roman",serif;}
修改文件/etc/ld.so.conf
使用 vim /etc/ld.so.conf命令打开文件
[bhsoft@localhost ffmpeg-4.2.1]$ vim /etc/ld.so.conf
在文件后面添加 /usr/ffmpeg/lib/
然后执行ldconfig命令使其生效
[bhsoft@localhost ffmpeg-4.2.1]$ldconfig
8、
Normal
0
7.8 磅
0
2
false
false
false
EN-US
ZH-CN
X-NONE
/* Style Definitions */
table.MsoNormalTable
{mso-style-name:普通表格;
mso-tstyle-rowband-size:0;
mso-tstyle-colband-size:0;
mso-style-noshow:yes;
mso-style-priority:99;
mso-style-parent:"";
mso-padding-alt:0cm 5.4pt 0cm 5.4pt;
mso-para-margin:0cm;
mso-para-margin-bottom:.0001pt;
mso-pagination:widow-orphan;
font-size:10.0pt;
font-family:"Times New Roman",serif;}
配置环境变量
[bhsoft@localhost ffmpeg-4.2.1]$ vim /etc/profil
使用 vim /etc/profile命令打开profile文件,在文件末添加环境变量:
#set ffmpeg environment

PATH=$PATH:/usr/ffmpeg/bin

export PATH
随后执行 source /etc/profile使配置生效
[bhsoft@localhost ffmpeg-4.2.1]$ source /etc/profile
9、查看是否配置成功
Normal
0
7.8 磅
0
2
false
false
false
EN-US
ZH-CN
X-NONE
/* Style Definitions */
table.MsoNormalTable
{mso-style-name:普通表格;
mso-tstyle-rowband-size:0;
mso-tstyle-colband-size:0;
mso-style-noshow:yes;
mso-style-priority:99;
mso-style-parent:"";
mso-padding-alt:0cm 5.4pt 0cm 5.4pt;
mso-para-margin:0cm;
mso-para-margin-bottom:.0001pt;
mso-pagination:widow-orphan;
font-size:10.0pt;
font-family:"Times New Roman",serif;}
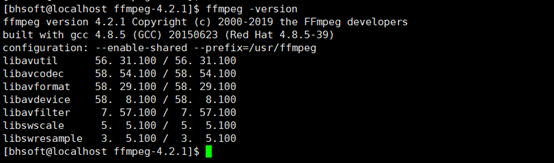
用命令ffmpeg -version查看,出现下图信息即安装成功
  Normal

  0

  7.8 磅

  0

  2

  false

  false

  false

  EN-US

  ZH-CN

  X-NONE


 /* Style Definitions */

 table.MsoNormalTable

	{mso-style-name:普通表格;

	mso-tstyle-rowband-size:0;

	mso-tstyle-colband-size:0;

	mso-style-noshow:yes;

	mso-style-priority:99;

	mso-style-parent:"";

	mso-padding-alt:0cm 5.4pt 0cm 5.4pt;

	mso-para-margin:0cm;

	mso-para-margin-bottom:.0001pt;

	mso-pagination:widow-orphan;

	font-size:10.0pt;

	font-family:"Times New Roman",serif;}
Normal
0
7.8 磅
0
2
false
false
false
EN-US
ZH-CN
X-NONE
/* Style Definitions */
table.MsoNormalTable
{mso-style-name:普通表格;
mso-tstyle-rowband-size:0;
mso-tstyle-colband-size:0;
mso-style-noshow:yes;
mso-style-priority:99;
mso-style-parent:"";
mso-padding-alt:0cm 5.4pt 0cm 5.4pt;
mso-para-margin:0cm;
mso-para-margin-bottom:.0001pt;
mso-pagination:widow-orphan;
font-size:10.0pt;
font-family:"Times New Roman",serif;}
CentOS7安装ffmpeg的更多相关文章
- centos7 安装 ffmpeg
升级系统 yum install epel-release -yyum update -y 安装Nux Dextop Yum源 由于centos 没有官方软件包,我们可以使用第三方YUM源(Nux D ...
- CentOS7 安装ffmpeg
安装EPEL Release,因为安装需要使用其他的repo源,所以需要EPEL支持:yum install -y epel-release#如果出现缺少Code提示,可以: sudo rpm --i ...
- 在CentOS7 安装ffmpeg
参考自:https://linuxize.com/post/how-to-install-ffmpeg-on-centos-7/ 首先切换至root用户 yum install epel-releas ...
- CentOs7.5安装FFmpeg
一.FFmpeg简介 FFmpeg是一个自由软件,可以运行音频和视频多种格式的录影.转换.流功能,包含了libavcodec ─这是一个用于多个项目中音频和视频的解码器库,以及libavformat— ...
- centos7上安装ffmpeg
FFmpeg介绍 FFmpeg是一个开源免费跨平台的视频和音频流方案,属于自由软件,采用LGPL或GPL许可证(依据你选择的组件).它提供了录制.转换以及流化音视频的完整解决方案.它包含了非常先进的音 ...
- centos7 yum安装ffmpeg,以及ffmpeg的简单用法
yum install ffmpeg: 安装EPEL Release,因为安装需要使用其他的repo源,所以需要EPEL支持: yum install -y epel-release #如果出现缺少C ...
- docker下centos7编译安装ffmpeg
1.安装基础命令 docker下精简版centos没有make等命令,先安装: yum -y install gcc automake autoconf libtool make yum instal ...
- cent7安装ffmpeg
FFmpeg是一个领先的多媒体框架工具集,几乎能够对任何格式的音视频文件进行解码,编码,转码,复用,解复用,流式传输,过滤和播放. 不管这些音视频文件所采用的格式是由某些标准委员会,社区还是公司设计的 ...
- # centos7下FFmpeg环境部署记录
# centos7下FFmpeg环境部署记录 随着视频在网站上的应用越来越多,越来越多的网站服务器需要支持视频转码,视频压缩,FFmpeg是目前最好用的网站服务器后台转码程序,应用最多.FFmpeg是 ...
随机推荐
- SimpleXML使用详解
SimpleXML使用详解 介绍 SimpleXML提供了一种简单,直观的方法来处理XML.它只有一个单一类型的类,三个函数和六个方法. 使用SimpleXML SimpleXMLElement 类是 ...
- Process用法与进程详解
僵尸与孤儿进程 僵尸进程:父进程的子进程结束的时候父进程没有wait()情况下子进程会变成僵尸进程 孤儿进程(无害) 一个父进程退出,而它的一个或多个子进程还在运行,那么那些子进程将成为孤儿进程.孤儿 ...
- shell脚本编程基础--文本比较
1.概述 允许测试Linux文件系统上文件的目录和状态. 2.详解 2.1 检查目录 -d测试会检查指定的目录是否存在于系统中.当我们打算将文件写入目录或是准备切换到该目录时,先进行测试是比较好的做法 ...
- js5——页面转换
<!DOCTYPE html><html lang="en"><head> <meta charset="UTF-8" ...
- Python如何爬取实时变化的WebSocket数据【华为云技术分享】
一.前言 作为一名爬虫工程师,在工作中常常会遇到爬取实时数据的需求,比如体育赛事实时数据.股市实时数据或币圈实时变化的数据.如下图: Web 领域中,用于实现数据'实时'更新的手段有轮询和 WebSo ...
- 挑战10个最难的Java面试题(附答案)【上】【华为云技术分享】
版权声明:本文为博主原创文章,遵循 CC 4.0 BY-SA 版权协议,转载请附上原文出处链接和本声明.本文链接:https://blog.csdn.net/devcloud/article/deta ...
- LeetCode刷题--无重复字符的最长子串(中等)
题目描述: 给定一个字符串,请你找出其中不含有重复字符的 最长子串 的长度. 示例 1: 输入: "abcabcbb" 输出: 3 解释: 因为无重复字符的最长子串是 " ...
- “智慧海绵城市”(SSC)监测评价体系整体解决方案
一.方案简介 无论是内涝防治.黑臭水体治理,还是海绵城市规划设计及建设.评估,乃至未来智慧城市的建设,都需要有全面.致密.大量的城市水文监测数据和先进模拟仿真技术作基础支撑,唯有如此,决策才有据可依, ...
- js-Date()对象,get/setFullYear(),getDay()编程练习
啥也不说!看代码 主要注意:getday()方法中原理!!! <!DOCTYPE html> <html lang="en"> <head> & ...
- SpringCache自定义过期时间及自动刷新
背景前提 阅读说明(十分重要) 对于Cache和SpringCache原理不太清楚的朋友,可以看我之前写的文章:Springboot中的缓存Cache和CacheManager原理介绍 能关注Spri ...