springboot+security整合(3)自定义鉴权
说明 springboot 版本 2.0.3
源码地址:点击跳转
系列
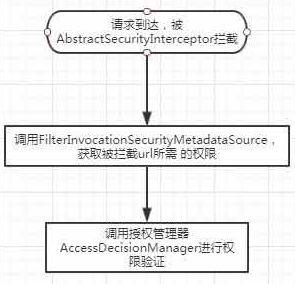
这篇讲解如何自定义鉴权过程,实现根据数据库查询出的 url 和 method 是否匹配当前请求的 url 和 method 来决定有没有权限。security 鉴权过程如下:
一、 重写 metadataSource 类
- 编写 MyGranteAuthority 类,让权限包含 url 和 method 两个部分。
public class MyGrantedAuthority implements GrantedAuthority {

    private String method;

    private String url;

    public MyGrantedAuthority(String method, String url) {

        this.method = method;

        this.url = url;

    }

    @Override

    public String getAuthority() {

        return url;

    }

    public String getMethod() {

        return method;

    }

    public String getUrl() {

        return url;

    }

    @Override

    public boolean equals(Object obj) {

        if(this==obj) return true;

        if(obj==null||getClass()!= obj.getClass()) return false;

        MyGrantedAuthority grantedAuthority = (MyGrantedAuthority)obj;

        if(this.method.equals(grantedAuthority.getMethod())&&this.url.equals(grantedAuthority.getUrl()))

            return true;

        return false;

    }

}
- 编写 MyConfigAttribute 类,实现 ConfigAttribute 接口,代码如下:
public class MyConfigAttribute implements ConfigAttribute {

    private HttpServletRequest httpServletRequest;

    private MyGrantedAuthority myGrantedAuthority;

    public MyConfigAttribute(HttpServletRequest httpServletRequest) {

        this.httpServletRequest = httpServletRequest;

    }

    public MyConfigAttribute(HttpServletRequest httpServletRequest, MyGrantedAuthority myGrantedAuthority) {

        this.httpServletRequest = httpServletRequest;

        this.myGrantedAuthority = myGrantedAuthority;

    }

    public HttpServletRequest getHttpServletRequest() {

        return httpServletRequest;

    }

    @Override

    public String getAttribute() {

        return myGrantedAuthority.getUrl();

    }

    public MyGrantedAuthority getMyGrantedAuthority() {

        return myGrantedAuthority;

    }

}
- 编写 MySecurityMetadataSource 类,获取当前 url 所需要的权限
@Component

public class MySecurityMetadataSource implements FilterInvocationSecurityMetadataSource {

    private Logger log = LoggerFactory.getLogger(this.getClass());

    @Autowired

    private JurisdictionMapper jurisdictionMapper;

    private List<Jurisdiction> jurisdictions;

    private void loadResource() {

        this.jurisdictions = jurisdictionMapper.selectAllPermission();

    }

    @Override

    public Collection<ConfigAttribute> getAttributes(Object object) throws IllegalArgumentException {

        if (jurisdictions == null) this.loadResource();

        HttpServletRequest request = ((FilterInvocation) object).getRequest();

        Set<ConfigAttribute> allConfigAttribute = new HashSet<>();

        AntPathRequestMatcher matcher;

        for (Jurisdiction jurisdiction : jurisdictions) {

            //使用AntPathRequestMatcher比较可让url支持ant风格,例如/user/*/a

            //*匹配一个或多个字符,**匹配任意字符或目录

            matcher = new AntPathRequestMatcher(jurisdiction.getUrl(), jurisdiction.getMethod());

            if (matcher.matches(request)) {

                ConfigAttribute configAttribute = new MyConfigAttribute(request,new MyGrantedAuthority(jurisdiction.getMethod(),jurisdiction.getUrl()));

                allConfigAttribute.add(configAttribute);

                //这里是获取到一个权限就返回,根据校验规则也可获取多个然后返回

                return allConfigAttribute;

            }

        }

        //未匹配到,说明无需权限验证

        return null;

    }

    @Override

    public Collection<ConfigAttribute> getAllConfigAttributes() {

        return null;

    }

    @Override

    public boolean supports(Class<?> clazz) {

        return FilterInvocation.class.isAssignableFrom(clazz);

    }

}
二、 编写 MyAccessDecisionManager 类
实现 AccessDecisionManager 接口以实现权限判断,直接 return 说明验证通过,如不通过需要抛出对应错误,代码如下:
@Component

public class MyAccessDecisionManager implements AccessDecisionManager{

    private Logger log = LoggerFactory.getLogger(this.getClass());

	@Override

	public void decide(Authentication authentication, Object object, Collection<ConfigAttribute> configAttributes)

			throws AccessDeniedException, InsufficientAuthenticationException {

	    //无需验证放行

	    if(configAttributes==null || configAttributes.size()==0)

	        return;

	    if(!authentication.isAuthenticated()){

	        throw new InsufficientAuthenticationException("未登录");

        }

        Collection<? extends GrantedAuthority> authorities = authentication.getAuthorities();

        for(ConfigAttribute attribute : configAttributes){

            MyConfigAttribute urlConfigAttribute = (MyConfigAttribute)attribute;

            for(GrantedAuthority authority: authorities){

                MyGrantedAuthority myGrantedAuthority = (MyGrantedAuthority)authority;

                if(urlConfigAttribute.getMyGrantedAuthority().equals(myGrantedAuthority))

                    return;

            }

        }

        throw new AccessDeniedException("无权限");

	}

	@Override

	public boolean supports(ConfigAttribute attribute) {

		return true;

	}

	@Override

	public boolean supports(Class<?> clazz) {

		return true;

	}

}
三、 编写 MyFilterSecurityInterceptor 类
该类继承 AbstractSecurityInterceptor 类,实现 Filter 接口,代码如下:
@Component

public class MyFilterSecurityInterceptor extends AbstractSecurityInterceptor implements Filter {

    //注入上面编写的两个类

    @Autowired

    private MySecurityMetadataSource mySecurityMetadataSource;

    @Autowired

    public void setMyAccessDecisionManager(MyAccessDecisionManager myAccessDecisionManager) {

        super.setAccessDecisionManager(myAccessDecisionManager);

    }

    @Override

    public void init(FilterConfig arg0) throws ServletException {

    }

    @Override

    public void doFilter(ServletRequest request, ServletResponse response, FilterChain chain) throws IOException, ServletException {

        FilterInvocation fi = new FilterInvocation(request, response, chain);

        invoke(fi);

    }

    public void invoke(FilterInvocation fi) throws IOException, ServletException {

        //这里进行权限验证

        InterceptorStatusToken token = super.beforeInvocation(fi);

        try {

            fi.getChain().doFilter(fi.getRequest(), fi.getResponse());

        } finally {

            super.afterInvocation(token, null);

        }

    }

    @Override

    public void destroy() {

    }

    @Override

    public Class<?> getSecureObjectClass() {

        return FilterInvocation.class;

    }

    @Override

    public SecurityMetadataSource obtainSecurityMetadataSource() {

        return this.mySecurityMetadataSource;

    }

}
四、 加入到 security 的过滤器链中
.addFilterBefore(urlFilterSecurityInterceptor,FilterSecurityInterceptor.class)
完成
本篇原创发布于:https://www.tapme.top/blog/detail/2018-08-22-10-38
springboot+security整合(3)自定义鉴权的更多相关文章
- springboot+security整合(2)自定义校验
说明 springboot 版本 2.0.3源码地址:点击跳转 系列 springboot+security 整合(1) springboot+security 整合(2) springboot+se ...
- SpringBoot整合SpringSecurityOauth2实现鉴权-动态权限
写在前面 思考:为什么需要鉴权呢? 系统开发好上线后,API接口会暴露在互联网上会存在一定的安全风险,例如:爬虫.恶意访问等.因此,我们需要对非开放API接口进行用户鉴权,鉴权通过之后再允许调用. 准 ...
- springboot+security整合(1)
说明 springboot 版本 2.0.3源码地址:点击跳转 系列 springboot+security 整合(1) springboot+security 整合(2) springboot+se ...
- Shiro(4)默认鉴权与自定义鉴权
=========默认鉴权======== 过滤链中定义: <!-- 过滤链定义 --> <property name="filterChainDefinitions&qu ...
- Spring Cloud注册中心Eureka设置访问权限并自定义鉴权页面
原文:https://blog.csdn.net/a823007573/article/details/88971496 使用Spring Security实现鉴权 1. 导入Spring Secur ...
- 使用SpringSecurity Oauth2.0实现自定义鉴权中心
Oauth2.0是什么不在赘述,本文主要介绍如何使用SpringSecurity Oauth2.0实现自定义的用户校验 1.鉴权中心服务 首先,列举一下我们需要用到的依赖,本文采用的是数据库保存用户信 ...
- 「快学springboot」集成Spring Security实现鉴权功能
Spring Security介绍 Spring Security是Spring全家桶中的处理身份和权限问题的一员.Spring Security可以根据使用者的需要定制相关的角色身份和身份所具有的权 ...
- Spring Security 接口认证鉴权入门实践指南
目录 前言 SpringBoot 示例 SpringBoot pom.xml SpringBoot application.yml SpringBoot IndexController SpringB ...
- springboot oauth 鉴权之——授权码authorization_code鉴权
近期一直在研究鉴权方面的各种案例,这几天有空,写一波总结及经验. 第一步:什么是 OAuth鉴权 OAuth2是工业标准的授权协议.OAuth2取代了在2006创建的原始OAuthTM协议所做的工作. ...
随机推荐
- golang模拟编程tcp模拟http(转载)
package main import ( "fmt" "net" "strconv" ) //用来转化int为string type In ...
- 【大数据】安装关系型数据库MySQL安装大数据处理框架Hadoop
作业来源于:https://edu.cnblogs.com/campus/gzcc/GZCC-16SE2/homework/3161 1. 简述Hadoop平台的起源.发展历史与应用现状. 列举发展过 ...
- HDFS练习
利用Shell命令与HDFS进行交互 以”./bin/dfs dfs”开头的Shell命令方式 1.目录操作 在HDFS中为hadoop用户创建一个用户目录(hadoop用户) 在用户目录下创建一个i ...
- js十大排序算法收藏
十大经典算法排序总结对比 转载自五分钟学算法&https://www.cnblogs.com/AlbertP/p/10847627.html 一张图概括: 主流排序算法概览 名词解释: n: ...
- [转]Windows内存堆内容整理总结
在系统安全研究中,堆,是一个极其重要的内存区域以及研究的热点.堆,区别于栈区.全局数据区以及代码区,它的主要作用是允许程序在运行时动态地申请某个大小的内存空间.本文将从宏观到微观,简单梳理总结一下Wi ...
- Linux 中 cp 命令(文件复制)
cp命令用来将一个或多个源文件或者目录复制到指定的目的文件或目录.它可以将单个源文件复制成一个指定文件名的具体的文件或一个已经存在的目录下.cp命令还支持同时复制多个文件,当一次复制多个文件时,目标文 ...
- Layui 点击查询分页,页码不刷新解决方法
Layui 点击查询分页,页码不刷新解决方法 function queryDataGrid() { layui.table.reload(tableName, { where: { //设定异步数据接 ...
- 使用bert进行情感分类
2018年google推出了bert模型,这个模型的性能要远超于以前所使用的模型,总的来说就是很牛.但是训练bert模型是异常昂贵的,对于一般人来说并不需要自己单独训练bert,只需要加载预训练模型, ...
- 泡泡一分钟:BLVD: Building A Large-scale 5D Semantics Benchmark for Autonomous Driving
BLVD: Building A Large-scale 5D Semantics Benchmark for Autonomous Driving BLVD:构建自主驾驶的大规模5D语义基准 Jia ...
- 泡泡一分钟:GEN-SLAM - Generative Modeling for Monocular Simultaneous Localization and Mapping
张宁 GEN-SLAM - Generative Modeling for Monocular Simultaneous Localization and Mapping GEN-SLAM - 单 ...