Swift3.0 UICollectionView 删除,拖动
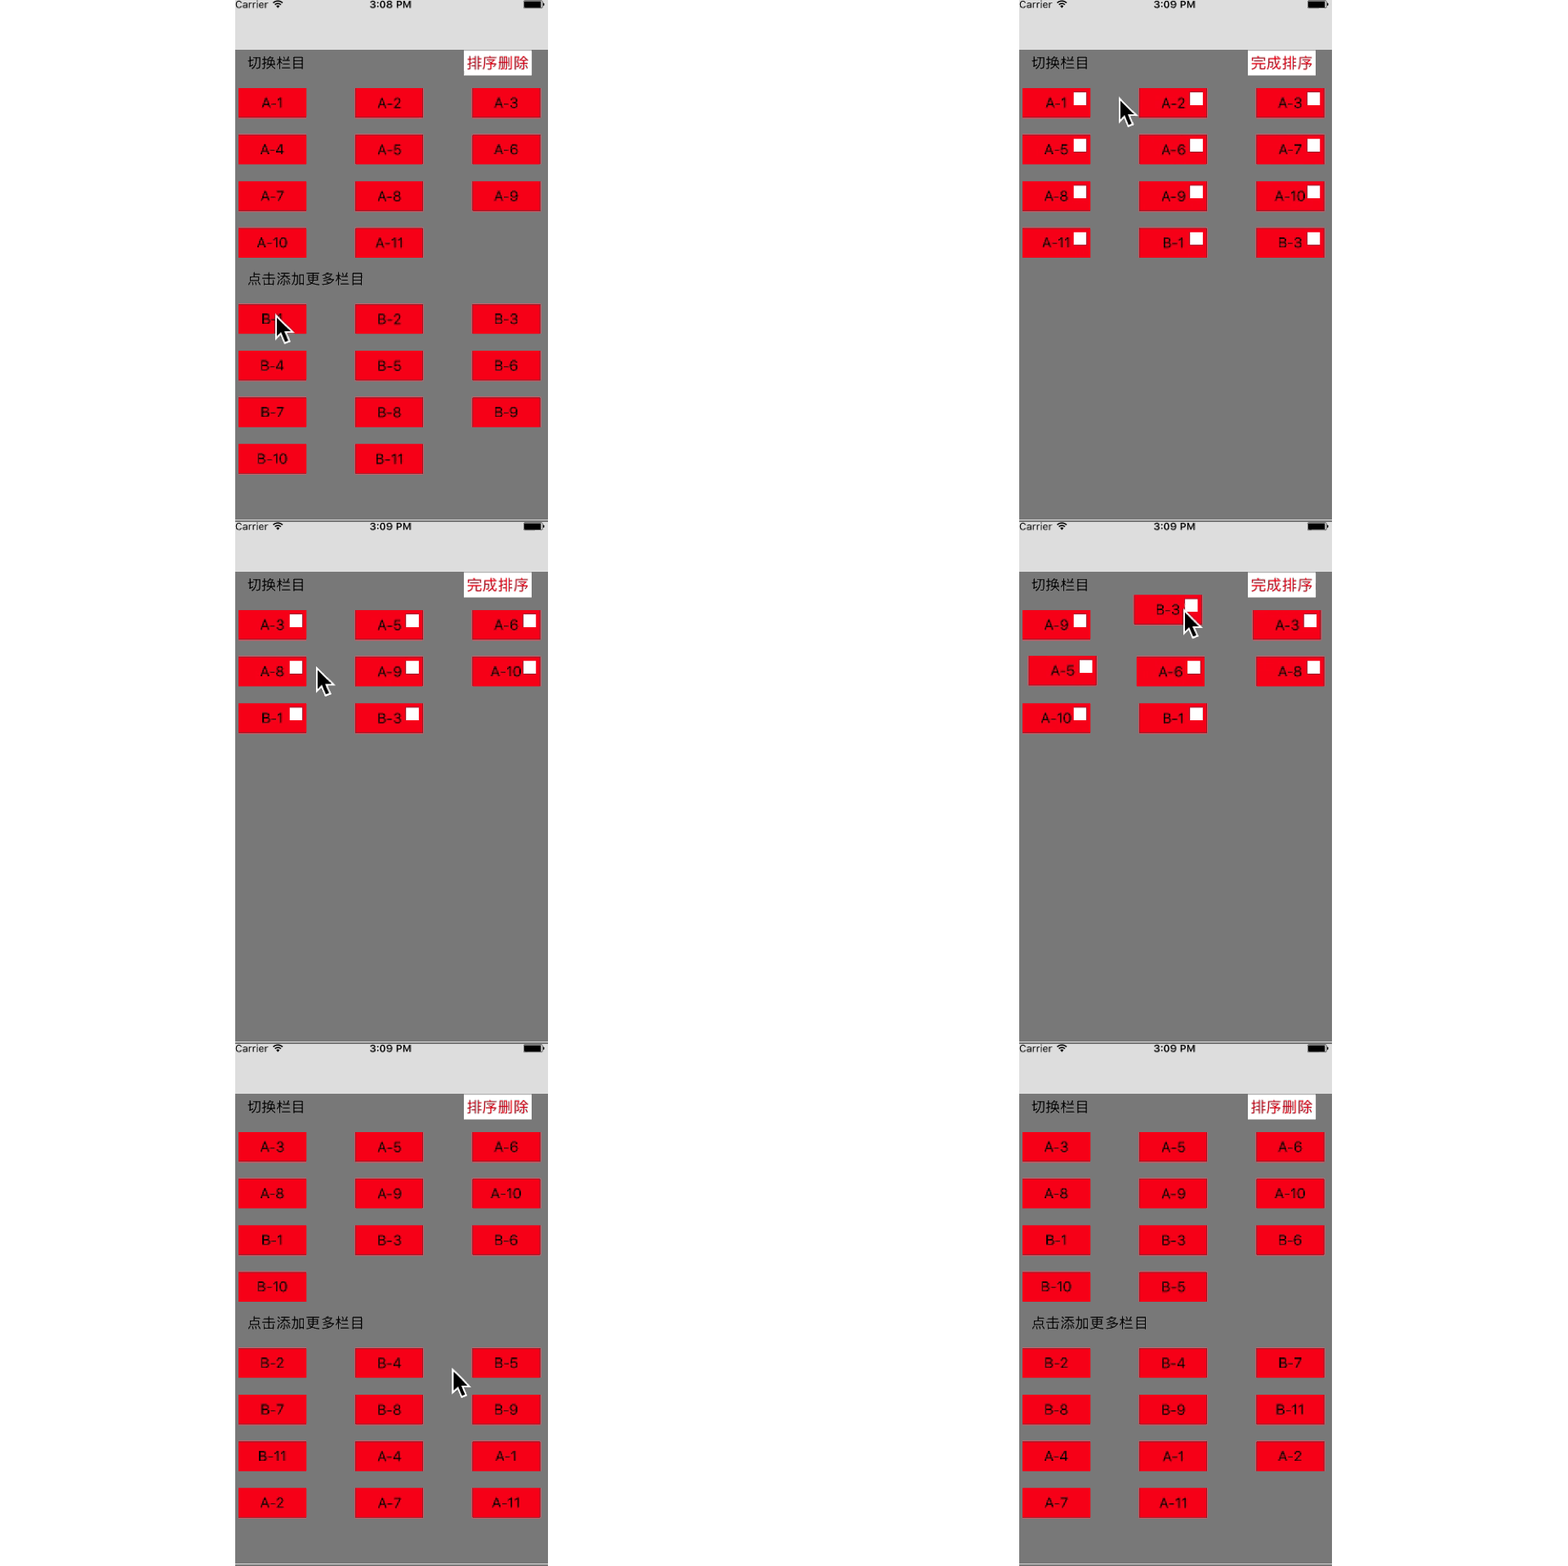
UICollectionView实现了一下常见的新闻分类. 附有效果图
近期一直在深入学习swift,实现了CollectionView item的头东与删除,用的都是系统的一些函数方法,看起来比较直观.

第一步:
class HotViewController: UIViewController,UICollectionViewDelegate,UICollectionViewDataSource,UICollectionViewDelegateFlowLayout {

    //声明两个存放字符串的数组

    var nowClassName = [String]()

    var surplusClassName = [String]()

    //是否排序

    var isRank = Bool()

    var collectionView : UICollectionView?

    override func viewDidLoad() {

        super.viewDidLoad()

        self.view.backgroundColor = ColorViewBG

        let layout = UICollectionViewFlowLayout()

        layout.itemSize = CGSize(width:,height:)

        //列间距,行间距,偏移

        layout.minimumInteritemSpacing =

        layout.minimumLineSpacing =

        layout.sectionInset = UIEdgeInsetsMake(, , , )

        collectionView = UICollectionView.init(frame: self.view.bounds, collectionViewLayout: layout)

        collectionView?.delegate = self

        collectionView?.dataSource = self;

        //注册一个cell

        collectionView!.register(HotCell.self, forCellWithReuseIdentifier:"HotCell")

        //注册区头

        collectionView?.register(UICollectionReusableView.self, forSupplementaryViewOfKind:UICollectionElementKindSectionHeader, withReuseIdentifier: "headView")

        collectionView?.backgroundColor = ColorViewBG

        self.view.addSubview(collectionView!)

        let gesture = UILongPressGestureRecognizer(target: self, action: #selector(viewCustom(_ :)))

        collectionView?.addGestureRecognizer(gesture)

        saveData()

    }
func viewCustom(_ longPress:UILongPressGestureRecognizer){

        let point:CGPoint = longPress.location(in: longPress.view)

        let indexPath = self.collectionView?.indexPathForItem(at: point)

        switch longPress.state {

        case .began:

            self.collectionView?.beginInteractiveMovementForItem(at: indexPath!)

            break

        case .changed:

            self.collectionView?.updateInteractiveMovementTargetPosition(point)

            break

        case .ended:

            self.collectionView?.endInteractiveMovement()

            break

        default:

            self.collectionView?.cancelInteractiveMovement()

            break

        }

    }
 //添加数据

    private func saveData() {

        nowClassName += ["A-1","A-2","A-3","A-4","A-5","A-6","A-7","A-8","A-9","A-10","A-11"]

        surplusClassName += ["B-1","B-2","B-3","B-4","B-5","B-6","B-7","B-8","B-9","B-10","B-11"]

    }
// MARK: 代理

    //每个区的item个数

    func collectionView(_ collectionView: UICollectionView, numberOfItemsInSection section: Int) -> Int {

        if section ==  {

            return nowClassName.count

        }else {

            if !isRank {

                return surplusClassName.count

            }else{

                 return

            }

        }

    }

    //分区个数

    func numberOfSections(in collectionView: UICollectionView) -> Int {

        if !isRank {

            return

        }

        return

    }

    //自定义cell

    func collectionView(_ collectionView: UICollectionView, cellForItemAt indexPath: IndexPath) -> UICollectionViewCell {

        let cell = collectionView.dequeueReusableCell(withReuseIdentifier: "HotCell", for: indexPath) as! HotCell

        cell.backgroundColor = UIColor.red

        if indexPath.section ==  {

            cell.label.text = nowClassName[indexPath.item]

            cell.button.addTarget(self, action: #selector(removeItem(_ :)), for: .touchUpInside)

            cell.button.tag = indexPath.row

            cell.button.isHidden = !isRank

        }else{

            cell.label.text = surplusClassName[indexPath.item]

            cell.button.isHidden = true

        }

        return cell

    }

    func removeItem(_ button:UIButton){

        //执行在这里的时候,显示的是有个分区,否则崩溃,报不明错误!,研究过的可以告诉一下,不胜感激!!!

        self.collectionView?.performBatchUpdates({

            //数据变更

            let item = self.nowClassName[button.tag]

            self.nowClassName.remove(at: button.tag)

            self.surplusClassName.append(item)

            let indexPath = IndexPath.init(item: button.tag, section: )

            print(indexPath)

            let arr:[IndexPath] = [indexPath]

            self.collectionView?.deleteItems(at: arr)

        }, completion: { (completion) in

            self.collectionView?.reloadData()

        })

    }

    //是否可以移动

    func collectionView(_ collectionView: UICollectionView, canMoveItemAt indexPath: IndexPath) -> Bool {

        if isRank {

            return true

        }

        return false

    }

    func collectionView(_ collectionView: UICollectionView, didSelectItemAt indexPath: IndexPath) {

        //获取当前 item

        //collectionView.cellForItem(at: indexPath)

        //获取所有的item

        //collectionView.indexPathsForVisibleItems

        if !isRank && indexPath.section == {

            //先把数据更新好,因为移动后界面会自动刷新,否则会崩溃

            nowClassName.append(surplusClassName[indexPath.item])

            surplusClassName.remove(at: indexPath.item)

            let indexPath1 = NSIndexPath.init(item: nowClassName.count-, section: )

            let indexPath2 = NSIndexPath.init(item: indexPath.item, section: )

            //从当前位置移动到新的位置

            collectionView.moveItem(at: indexPath2 as IndexPath, to: indexPath1 as IndexPath)

        }

    }

    //设置拖动(手势拖动触发)

    func collectionView(_ collectionView: UICollectionView, moveItemAt sourceIndexPath: IndexPath, to destinationIndexPath: IndexPath) {

//        if sourceIndexPath.section == 0 && destinationIndexPath.section == 0 {

//            collectionView.exchangeSubview(at: sourceIndexPath.item, withSubviewAt: destinationIndexPath.item)

//        }

    }

    //区头设置

    func collectionView(_ collectionView: UICollectionView, viewForSupplementaryElementOfKind kind: String, at indexPath: IndexPath) -> UICollectionReusableView {

//

        //区头

        var headerView : UICollectionReusableView?

        if kind == UICollectionElementKindSectionHeader{

            headerView = collectionView.dequeueReusableSupplementaryView(ofKind: kind, withReuseIdentifier: "headView", for: indexPath)

            //防止重用,这样很暴力

            for view in (headerView?.subviews)!{

                view.removeFromSuperview()

            }

            let label = UILabel.init(frame: CGRect(x:,y:,width:,height:))

            if indexPath.section ==  {

                label.text = "切换栏目"

                let button = UIButton.init(type: .custom)

                button.frame = CGRect(x:collectionView.frame.size.width - ,y:,width:,height:)

                button.titleLabel?.textColor = UIColor.cyan

                button.backgroundColor = UIColor.white

                let str = isRank ? "完成排序" : "排序删除"

                button.setTitle(str, for: .normal)

                button.setTitleColor(UIColor.red, for: .normal)

                headerView?.addSubview(button)

                button.addTarget(self, action: #selector(click(_ :)), for: .touchUpInside)

            }else if indexPath.section == {

                label.text = "点击添加更多栏目"

            }

            headerView?.addSubview(label)

        }

        return headerView!

    }

    func click(_ btn:UIButton){

        let str = isRank ? "完成排序" : "排序删除"

        btn.setTitle(str, for: .normal)

        isRank = !isRank

        print(isRank)

        self.collectionView?.reloadData()

    }

    //设置HeaderView的宽高

    //MARK: UICollectionViewDelegateFlowLayout

    func collectionView(_ collectionView: UICollectionView, layout collectionViewLayout: UICollectionViewLayout, referenceSizeForHeaderInSection section: Int) -> CGSize {

        return CGSize(width:collectionView.frame.size.width,height:)

    }
HotCell 类的实现
class HotCell: UICollectionViewCell {

    var label = UILabel()

    var button = UIButton()

    override init(frame: CGRect) {

        super.init(frame: frame)

        label = UILabel.init(frame: self.bounds)

        label.textAlignment = .center

        self.addSubview(label)

        button = UIButton.init(type: .custom)

        button.backgroundColor = UIColor.white

        button.frame = CGRect(x:frame.size.width - ,y:,width:,height:)

        self.addSubview(button)

    }

    required init?(coder aDecoder: NSCoder) {

        fatalError("init(coder:) has not been implemented")

    }

}
Swift3.0 UICollectionView 删除,拖动的更多相关文章
- Swift3.0 UICollectionView简单使用
感觉swift各版本语法改动太大,储备着吧
- Swift3.0语言教程删除字符与处理字符编码
Swift3.0语言教程删除字符与处理字符编码 Swift3.0语言教程删除字符 Swift3.0语言教程删除字符与处理字符编码,在字符串中,如果开发者有不需要使用的字符,就可以将这些字符删除.在NS ...
- UICollectionView在Swift3.0中的用法
UICollectionView在Swift3.0中的用法 UICollectionView的初始化跟OC中是相似的,创建 GameView 集成自 UICollectionView .注意不同于UI ...
- iOS开发之资讯类App常用分类控件的封装与实现(CollectionView+Swift3.0+)
今天博客中,我们就来实现一下一些常用资讯类App中常用的分类选择的控件的封装.本篇博客中没有使用到什么新的技术点,如果非得说用到了什么新的技术点的话,那么勉强的说,用到了一些iOS9以后UIColle ...
- Swift3.0服务端开发(一) 完整示例概述及Perfect环境搭建与配置(服务端+iOS端)
本篇博客算是一个开头,接下来会持续更新使用Swift3.0开发服务端相关的博客.当然,我们使用目前使用Swift开发服务端较为成熟的框架Perfect来实现.Perfect框架是加拿大一个创业团队开发 ...
- Swift3.0语言教程使用路径字符串
Swift3.0语言教程使用路径字符串 Swift3.0语言教程使用路径字符串,路径其实是字符串的一种,我们称为路径字符串.本小节将讲解如何使用路径字符串. 1.组合路径 开发者可以将数组快速的组合成 ...
- Swift3.0语言教程替换子字符串
Swift3.0语言教程替换子字符串 Swift3.0语言教程替换子字符串,替换子字符串其实就是将字符串中的子字符串删除,然后再进行添加.为了让这一繁琐的过程变的简单,NSString提供了替换子字符 ...
- swift3.0 coredata 的使用
//swift3.0在语法上有很大的改变,以简单的增删改查为例,如下: //User类如下: import Foundation import CoreData extension User { @n ...
- Swift3.0相对于2.3语法的一些变化
前言 : Swift3.0的Swift的第3个主要版本,目标是安全,快速和有表现力,也是第一个有开源社区参与开发的Swift版本.由于语法和API改动比较多,Xcode 8.0 Beta提供了migr ...
随机推荐
- BUPT复试专题—找最小数(2010)
https://www.nowcoder.com/practice/ba91786c4759403992896d859e87a6cd?tpId=67&tqId=29645&rp=0&a ...
- Android开发的环境搭建及HelloWorld的实现
安装JDK和配置Java开发环境 http://www.oracle.com/technetwork/java/javase/downloads/java-se-jdk-7-download-4321 ...
- Effective C++ 条款四 确定对象被使用前已被初始化
1.对于某些array不保证其内容被初始化,而vector(来自STL)却有此保证. 2.永远在使用对象前初始化.对于无任何成员的内置类型,必须手工完成. int x = 0; c ...
- IO多路复用:select、poll、epoll示例
一.IO多路复用 所谓IO多路复用,就是通过一种机制,一个进程可以监视多个描述符,一旦某个描述符就绪(一般是读就绪或者写就绪),能够通知程序进行相应的读写操作. Linux支持IO多路复用的系统调用有 ...
- MySQL中insert ignore into, on duplicate key update,replace into,insert … select … where not exist的一些用法总结
在MySQL中进行条件插入数据时,可能会用到以下语句,现小结一下.我们先建一个简单的表来作为测试: CREATE TABLE `books` ( `id` ) NOT NULL AUTO_INCREM ...
- oracle user locke
1:管理员登录 sqlplus sys/pwd as sysdba sql->alter user jd account unlock; commit; SQL> password new ...
- C++结构体中使用函数与类中使用函数小结
#include <iostream>#include <string.h>using namespace std;struct stud//学生信息结构体{ char ...
- 0mq
- mongo 原理 Replica Set Oplog
[客户的写请求全部发送至主节点] Primary. The primary receives all write operations. Secondaries. Secondaries replic ...
- UIView局部点击
今天上班遇到一种情况,需要局部响应点击事件,比如在一个UIImageView中设置一个小圆圈图片,要求点击圆圈里面不响应点击,点击小圆圈外面的部分响应点击.可以通过重写hitTest:withEven ...
