
Apache基于域名、端口、IP的虚拟主机配置(Centos 6.5)
虚拟主机:部署多个站点,每个站点,希望用不同的域名和站点目录,或者是不同的端口,不同的ip,需要虚拟主机功能。一句话,一个http服务要配置多个站点,就需要虚拟主机。
虚拟主机分类:基于域名、基于端口、基于ip;所谓的基于**,就是靠**来区分不同的站点,支持各种混合,N多个虚拟主机。
基于域名的虚拟主机配置如下:
创建环境:
| 站点目录 | 域名 |
| /var/html/blog | blog.bqh123.com |
| /var/html/bbs | bbs.bqh123.com |
[root@bqh- extra]# mkdir /var/html/{blog,bbs} -p

[root@bqh- extra]# touch /var/html/{blog,bbs}/index.html

[root@bqh- extra]# tree /var/html/

/var/html/

├── bbs

│   └── index.html

└── blog

    └── index.html

 directories,  files

[root@bqh- extra]# for name in blog bbs;do echo "http://$name.bqh123.com" >/var/html/$name/index.html;done

[root@bqh- extra]# for name in blog bbs;do  cat /var/html/$name/index.html;done

http://blog.bqh123.com

http://bbs.bqh123.com
配置虚拟主机配置文件:httpd-vhosts.conf
[root@bqh- extra]# vim httpd-vhosts.conf

   #

   # Virtual Hosts

   #

   # If you want to maintain multiple domains/hostnames on your

   # machine you can setup VirtualHost containers for them. Most configurations

   # use only name-based virtual hosts so the server doesn't need to worry about

   # IP addresses. This is indicated by the asterisks in the directives below.

   #

   # Please see the documentation at

  # <URL:http://httpd.apache.org/docs/2.2/vhosts/>

  # for further details before you try to setup virtual hosts.

  #

  # You may use the command line option '-S' to verify your virtual host

  # configuration.

  #

  # Use name-based virtual hosting.

  #

  NameVirtualHost *:

  #

  # VirtualHost example:

  # Almost any Apache directive may go into a VirtualHost container.

  # The first VirtualHost section is used for all requests that do not

  # match a ServerName or ServerAlias in any <VirtualHost> block.

  #

  <VirtualHost *:>

      ServerAdmin @qq.com

      DocumentRoot "/var/html/blog"

      ServerName blog.bqh123.com

      ServerAlias bg.bqh123.com

      ErrorLog "logs/blog-error_log"

      CustomLog "logs/blog-access_log" common

  </VirtualHost>

  <VirtualHost *:>

      ServerAdmin @qq.com

      DocumentRoot "/var/html/bbs"

      ServerName bbs.bqh123.com

      ServerAlias bs.bqh123.com

      ErrorLog "logs/bbs-error_log"

      CustomLog "logs/bbs-access_log" common

  /VirtualHost>
在主配置文件(httpd.conf)里激活生效:
- Include conf/extra/httpd-vhosts.conf
- Include conf/extra/httpd-mpm.conf
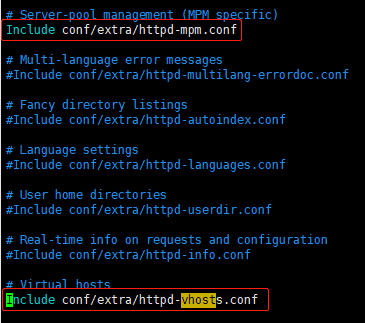
检测配置文件语法错误并刷新配置:
[root@bqh- extra]# ../../bin/apachectl -t

httpd: apr_sockaddr_info_get() failed for bqh-

httpd: Could not reliably determine the server's fully qualified domain name, using 127.0.0.1 for ServerName

Syntax OK

[root@bqh- extra]# ../../bin/apachectl graceful

httpd: apr_sockaddr_info_get() failed for bqh-

httpd: Could not reliably determine the server's fully qualified domain name, using 127.0.0.1 for ServerName
配置一下hosts解析:
[root@bqh- extra]# cat /etc/hosts

127.0.0.1   localhost localhost.localdomain localhost4 localhost4.localdomain4

::         localhost localhost.localdomain localhost6 localhost6.localdomain6

192.168.0.119 blog.bqh123.com bbs.bqh123.com
windows系统,在“C:\Windows\System32\drivers\etc”下的hosts中配置一下域名解析:
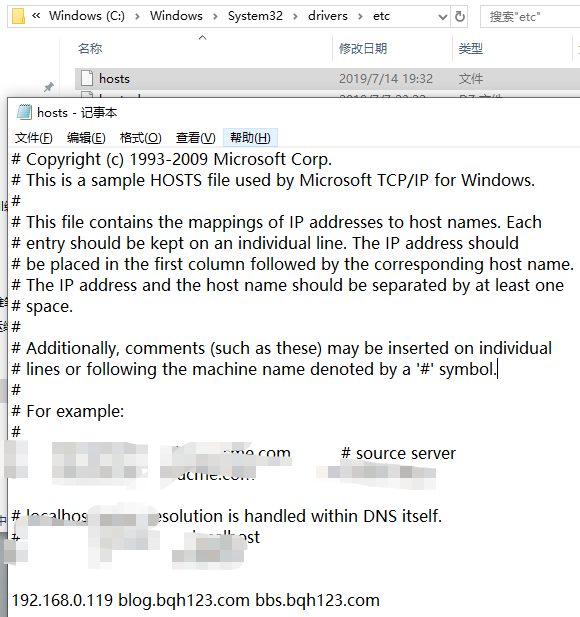
----------------------------------------------------------------------------------
用cur或客户端浏览器测试一下:


解决方法:
在主配置文件(httpd.conf)追加一下内容:
  <Directory "/var/html">

      Options  FollowSymLinks

      AllowOverride None

      Order allow,deny

      Allow from all

  </Directory>
检测配置文件语法错误,刷新配置,从新启动:
[root@bqh- conf]# vim httpd.conf

[root@bqh- conf]# ../bin/apachectl -t

httpd: apr_sockaddr_info_get() failed for bqh-

httpd: Could not reliably determine the server's fully qualified domain name, using 127.0.0.1 for ServerName

Syntax OK

[root@bqh- conf]# ../bin/apachectl graceful

httpd: apr_sockaddr_info_get() failed for bqh-

httpd: Could not reliably determine the server's fully qualified domain name, using 127.0.0.1 for ServerName
用cur或客户端浏览器测试一下:

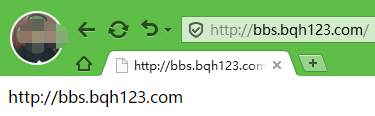

---------------------------------------------------------------------------------
ok,Apache基于域名的虚拟主机配置及测试完成。
~~~~~~~~~~~~~~~~~~~~~~~~~~~~~~~~~~~~~~~~~~~~~~~~~~~~~
基于端口的虚拟主机配置如下:
①在主配置文件httpd.conf里配置监听新增端口:
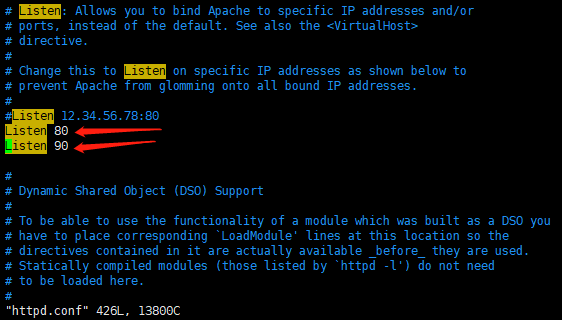
②在虚拟机配置文件httpd-vhosts.conf修改如下:

③检测配置文件语法错误,刷新配置,从新启动:
[root@bqh- conf]# ../bin/apachectl -t

httpd: apr_sockaddr_info_get() failed for bqh-

httpd: Could not reliably determine the server's fully qualified domain name, using 127.0.0.1 for ServerName

Syntax OK

[root@bqh- conf]# ../bin/apachectl graceful

httpd: apr_sockaddr_info_get() failed for bqh-

httpd: Could not reliably determine the server's fully qualified domain name, using 127.0.0.1 for ServerName

[root@bqh- conf]# netstat -lntup|egrep "80|90"

tcp               :::                       :::*                        LISTEN      /httpd

tcp               :::                       :::*                        LISTEN      /httpd
④用cur或客户端浏览器测试一下:



注:如果不加端口访问,默认以ip的形式解析访问。
ok,Apache基于端口的虚拟主机配置及测试完成。
~~~~~~~~~~~~~~~~~~~~~~~~~~~~~~~~~~~~~~~~~~~~~~~~~~~~~
基于IP的虚拟主机配置如下:
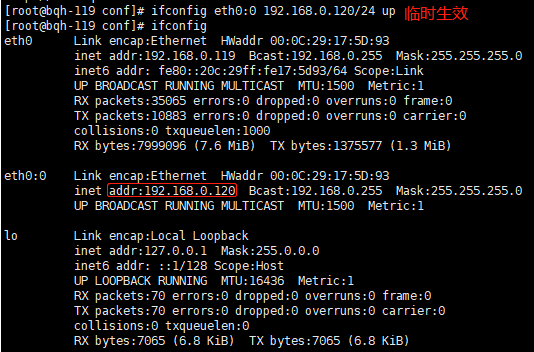
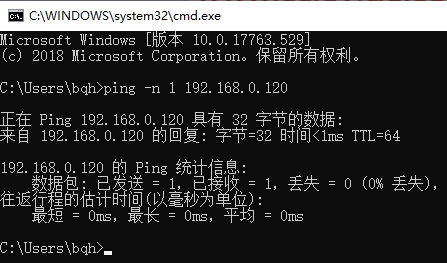
①添加别名IP
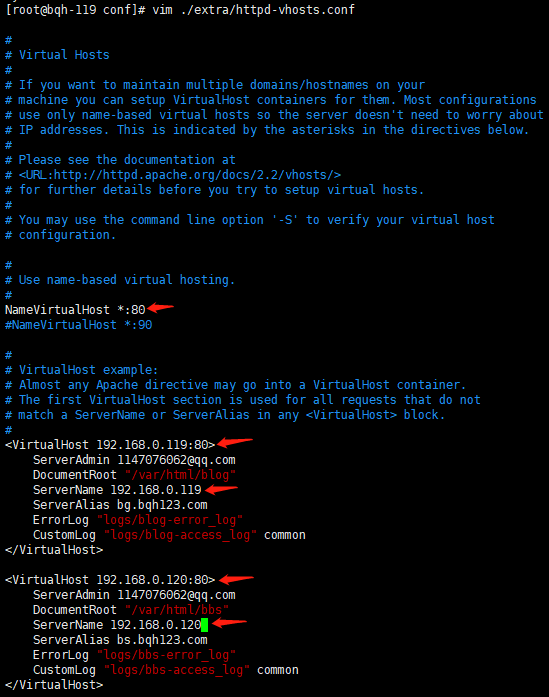
②在虚拟机配置文件httpd-vhosts.conf修改如下:
③检测配置文件语法错误,刷新配置,从新启动:

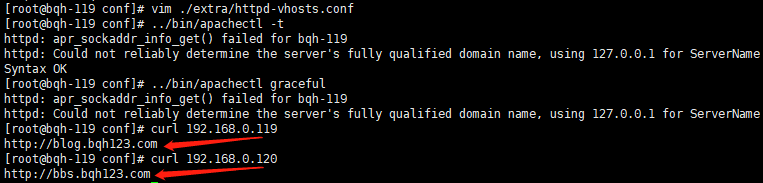
④用cur或客户端浏览器测试一下:
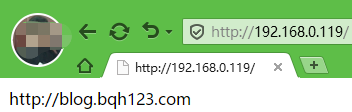
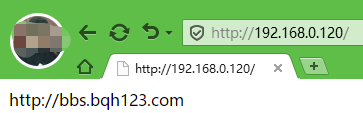
ok,Apache基于IP的虚拟主机配置及测试完成
Apache基于域名、端口、IP的虚拟主机配置(Centos 6.5)的更多相关文章
- CentOS 7运维管理笔记(6)----Apache 基于 IP 的虚拟主机配置
Apache 配置虚拟主机支持3种方式:基于IP的虚拟主机配置,基于端口的虚拟主机配置,基于域名的虚拟主机配置.本篇随笔记录自己基于IP的虚拟主机配置. 如果同一台服务器有多个IP,可以使用基于IP的 ...
- Nginx总结(二)基于ip的虚拟主机配置
前面讲了如何安装配置Nginx,大家可以去这里看看nginx系列文章:https://www.cnblogs.com/zhangweizhong/category/1529997.html 今天要说的 ...
- 源码编译安装LAMP环境及配置基于域名访问的多虚拟主机
实验环境及软件版本: CentOS版本: 6.6(2.6.32.-504.el6.x86_64) apache版本: apache2.2.27 mysql版本: Mysql-5.6.23 php版本 ...
- 源码编译安装LNMP环境及配置基于域名访问的多虚拟主机
实验环境及软件版本: CentOS版本: 6.6(2.6.32.-504.el6.x86_64) nginx版本: nginx-1.6.2 mysql版本: Mysql-5.6.23 php版本: ...
- mac 下 xampp 多域名 多站点 多虚拟主机 配置
前言:最近用mac工作了,需要搭建个调试前段程序的站点,选了xampp,需求是能同时运行多个站点,多个域名,目录自定义,网上找了好多资料,都感觉有些不符合心意,且复制文确实很多,甚至有些没实践过的在乱 ...
- 基于ip的虚拟主机配置——在一台服务器上绑定多个 IP 地址
进入/etc/sysconfig/network-scripts,修改ifcfg-ens33文件 输入 ip addr 查看ip 引用:https://blog.csdn.net/u013887008 ...
- 【 APACHE 】 Apache2.4.x版本虚拟主机配置
今天准备使用apache搭建一个目录浏览的服务,折腾了一下. apache2.4.x以后的版本: Require all granted 代替了apache2.4.x以前版本: Order Allow ...
- lamp centos虚拟主机配置
1.基于不同端口的虚拟主机配置 [root@lamp~]# vi /etc/httpd/conf/httpd.conf Listen 80 #设置监听不同的虚拟主机需要使用的端口 Liste ...
- Nginx配置基于多域名、端口、IP的虚拟主机
原文:https://www.cnblogs.com/ssgeek/p/9220922.html ------------------------------- Nginx配置基于多域名.端口.IP的 ...
随机推荐
- Centos7 手动编译 RabbitMQ ,并安装php amqp
RabbitMQ是一个在AMQP基础上完成的,可复用的企业消息系统,底层基于Erlang语言. 一:centos7安装RabbitMQ 这玩意儿安装很扯淡,官方推荐rpm安装,rpm安装本身是最简单的 ...
- 转 linux下ClamAV使用
linux下ClamAV使用 第一步:Clamav下载http://www.clamav.net/downloads#yuminstall wget –y第二步:创建clamav用户和组groupad ...
- Game and Application Protocol
This privacy policy details the information collected by the team ("we" or "our" ...
- 123457123456#0#-----com.ppGame.huaHua65--前拼后广--儿童填色-pp
com.ppGame.huaHua65--前拼后广--儿童填色-pp
- [ kvm ] 学习笔记 3:KVM 基础功能详解
1. 构建 KVM 环境 KVM 从诞生开始就需要硬件虚拟化的支持,KVM 必需的硬件虚拟化扩展分别是:Intel 的虚拟化技术(Intel VT)和 AMD 的 AMD-V 技术.首先处理器(CPU ...
- Centos 更改MySQL5.7数据库目录位置
原文地址:https://blog.csdn.net/zyw_java/article/details/78512285 Centos7.3 安装Mysql5.7并修改初始密码 基于 CentOS M ...
- 【神经网络与深度学习】【计算机视觉】RCNN- 将CNN引入目标检测的开山之作
转自:https://zhuanlan.zhihu.com/p/23006190?refer=xiaoleimlnote 前面一直在写传统机器学习.从本篇开始写一写 深度学习的内容. 可能需要一定的神 ...
- 按键板的原理与实现 扩展GPIO
在系统可用的GPIO口数量有限的情况下实现按键板的另一个选择就是:扩展GPIO口.扩展GPIO的方法有很多,市场上已经有很多种类的GPIO口扩展器件,但是从成本上考虑,但它们总是显得昂贵.对于按键板的 ...
- python format函数/print 函数详细讲解(4)
在python开发过程中,print函数和format函数使用场景特别多,下面分别详细讲解两个函数的用法. 一.print函数 print翻译为中文指打印,在python中能直接输出到控制台,我们可以 ...
- 烽火传递【单调队列优化dp】
题目大意: 1.给出长度为n的数组,要求每m个连续的元素之间必须选一个值作为代价,求该数组的最小代价. 题解思路: 1.显然是线性dp,dp[i]表示选择第 i 个元素时的最小总代价.很明显状态转移方 ...